

Change border color, width, and style in Outlook table

In this article you’ll see how to apply conditional formatting to table’s borders in Outlook. I’ll show you how to change their color, width and style. Then I’ll teach you how to make several modifications at a time and color your Outlook table in many different ways.
First off, I’d like to make a small headnote for this blog newcomers. As today we’ll talk about conditional formatting in templates, I’ll show you how to set them up correctly using our Shared Email Templates add-in for Outlook. This tool can help you paste pre-saved perfectly formatted templates to your emails and shrink your correspondence routine to a matter of a few clicks.
If you’ve already read my Conditional formatting in Outlook tables tutorial, you know how to change the cells’ content and background color. However, that’s not everything you can do to brighten your Outlook table. Today I’ll show you the ways to conditionally color your table’s borders and modify their width and style.
Moreover, a small bonus is awaiting you in the last chapter where I’ll show you how to apply several modifications at the same time and make your table as colorful and bright as the fireworks on the 4th of July ;)
Change the color of cells borders
To show you how the borders’ painting works, I’ll use the same samples from the last week's tutorial. The case is the following: I paste a template and choose the discount rate to fill in the table. Depending on my choice, the cell’s borders will be colored in the particular color.
The table I’ll be coloring today would be the one below:
| Sample header 1 | Sample header 2 | Sample header 3 |
| ~%WhatToEnter[ {dataset:'Dataset with discounts', column:'Discount', title:'Select discount'} ] discount |
As conditional formatting is handled in templates’ HTML, let’s open this table’s HTML code first:
- Open the template of interest and hit Edit:

- Find the View HTML icon () on the template’s toolbar:
- See the original HTML that will be modified multiple times:


If you wonder about the colors and their connection with discount rates, I’ll give you a hint :) Dataset! Have no idea what it is? Then take a small pause and read my Fillable Outlook templates tutorial first.
Here is the original dataset I’ll use at the beginning and improve a little in a few chapters:
| Discount | Color code |
| 10% | #00B0F0 |
| 15% | #00B050 |
| 20% | #FFC000 |
| 25% | #4630A0 |
When I need to retrieve the necessary color code from this table, I’ll use the following macro:
~%WhatToEnter[{dataset:'Dataset with discounts',column:'Color code'}]As we have all the basics covered, let’s start changing colors :)
Update the border color of one cell
To color the borders of a single cell in a table, let’s first find its line in the template’s HTML and have a closer look at its components:
- “style=” represents the set of basic parameters of a cell.
- “width: 32%; border: 1px solid #aeabab” are the cell’s and border’s width, color and style.
- “~%WhatToEnter[] discount” is the cell’s content.
This code line means that I’ll see a cell with 1px grey borders of a solid style. If I replace any of those parameters, it may corrupt the appearance of the table in my template, i.e. the borders will be invisible (although everything will look perfectly after pasting).
I’d love to have a standard table in a template and have it modified when pasting. So, I add one new attribute with the parameters that’ll replace the original ones when pasting:
Let’s examine the HTML line above:
- “ is the first attribute. Those are the cell’s original characteristics.
- “data-set-style=” is a special parameter that will help me replace the attribute above with the necessary set of properties during pasting.
- “border:1px solid; border-color:” is the part of the second attribute where we’ll take a pause. See, the beginning is identical to the original, the same border width and style. However, when it comes to the color (the parameter that I want to change), I replace it with border-color: and paste the WhatToEnter macro. Hence, depending on the dropdown choice, the macro will be replaced with the color code and the border will be repainted.
- “~%WhatToEnter[] discount” is still the cell’s content that doesn’t require any changes.
Therefore, the full HTML with the future-colored cell will look like this:
| Sample header 1 | Sample header 2 | Sample header 3 |
| ~%WhatToEnter[{dataset:'Dataset with discounts',column:'Discount',title:'Select discount'}] discount |
When you paste this template, the border of the updated cell will be colored in the chosen color right away:

Paint borders of entire row
Now let’s paint the borders on the whole row of our sample table and see how it works. The logic is absolutely the same as in the paragraph above except that you’ll need to update all the cells of the second row. Once the same modifications I covered above are applied to the whole row, it gets painted in a wink when pasting the template.

If you’d like to have a look at the ready HTML with the second row coloring, here it goes:
| Sample header 1 | Sample header 2 | Sample header 3 |
| ~%WhatToEnter[{dataset:'Dataset with discounts',column:'Discount',title:'Select discount'}] discount |
Change border width
Now let’s try updating not only border color but also its width. Take one more look at the HTML attribute that replaces the original one when pasting:
data-set->~%WhatToEnter[{dataset:'Dataset with discounts',column:'Discount',title:'Select discount'}] discountSee the 1px parameter? This is the width of the borders to be colored. You may manually change it to, say, 2 and the table borders will become wider once you paste it.
However, I’ll do it another way. I’ll update my dataset and add a new column with borders width. In this case, once I choose a present rate to paste, both color and width will be updated.
| Discount | Color code | Border width |
| 10% | #00B0F0 | 2 |
| 15% | #00B050 | 2.5 |
| 20% | #FFC000 | 3 |
| 25% | #4630A0 | 3.5 |
Now let’s modify the second attribute of each line and replace 1px with the following piece of text:
border-width:~%WhatToEnter[{dataset:'Dataset with discounts',column:'Border width'}]Then I repeat it for all the three cells of the second row and get the following HTML in the result:
| Sample header 1 | Sample header 2 | Sample header 3 |
| ~%WhatToEnter[{dataset:'Dataset with discounts',column:'Discount',title:'Select discount'}] discount |
Once this template is saved and pasted, the widen blue borders will appear in an email:

Modify borders style in a table
In this chapter I’d like to draw your attention to another parameter – style. This one will handle the borders appearance. Before I show you how to apply it correctly, I’ll need to get back to my dataset and modify it in accordance with my current case.
| Discount | Border style |
| 10% | Dashed |
| 15% | Double |
| 20% | Dotted |
| 25% | Ridge |
I’ve associated each discount rate with a border style and saved this dataset for the future. The macro to retrieve the style for my HTML would be the one below:
~%WhatToEnter[{dataset:"Dataset with discounts",column:"Border style"}]Now I’ll need to update the second row’s attributes by replacing solid (the default style I’ve been using all along) with the macro above to get the following piece of code:
data-set-width: 100%; border-collapse: collapse; border-style: solid; border-color: #aeabab;" border="1px">
If you copy this HTML and paste to your templates, the result won’t keep you waiting:

Set up conditional formatting to change highlighting, text color, and borders width at the same time
We’ve reached the most interesting part as I’m about to show you how to apply multiple modifications at a time. First off, I’ll update the dataset I’ll be retrieving the data from. Since I decided to change the cells’ highlighting, text color and borders width, all those parameters need to be specified. Hence, my new dataset would look like that:
| Discount | Color code | Background code | Border width |
| 10% | #00B0F0 | #DEEBF6 | 2 |
| 15% | #00B050 | #E2EFD9 | 2.5 |
| 20% | #FFC000 | #FFF2CC | 3 |
| 25% | #4630A0 | #FBE5D5 | 3.5 |
So, if I choose 10%, the necessary text will be painted in blue (#00B0F0), the background of the chosen cells will be shaded in a light blue tone (#DEEBF6) and their borders will be widened twice.
But how this dataset can be connected to an Outlook table so that it gets formatted? I’ve been preparing you for this task in 2 articles :) Here goes the HTML that will handle all the necessary modifications:
| span data-set->Sample header 1 | Sample header 2 | span data-set->Sample header 3 |
| data-set->~%WhatToEnter[{dataset:'Dataset with discounts',column:'Discount',title:'Select discount'}] discount | data-set-> | data-set-> |
Now let’s have a look at all the modifications applied:
- Sample header 1 - this piece will paint the header text in color from the “Color code” column. In case you feel like you need to refresh your memory on the text painting, refer to the Change the font color of text in table chapter of my previous tutorial.
- data-set-color: purple;"> data-set-lazy" decoding="async" title="Several modifications applied to a table and its content in one click." src="https://cdn.ablebits.com/_img-blog/table-borders/multiple-formatting.png" alt="Several modifications applied to a table and its content in one click." width="640" height="566" />
There is a small note I’d like to make before closing this topic. While I was testing borders coloring in tables I faced quite ambiguous behavior of borders in both online and desktop versions of Outlook. Being a little bit confused, I reached our developers for clarification. They found out that different Outlook clients render tables in different ways and the reason for such behavior is a bug in Outlook.
Our team reported this issue to Microsoft team, feel free to check out their response in this GitHub conversation :)
Final note
I really hope I managed to convince you that a table in Outlook is not just black borders with plain text. There is plenty of room for improvement and creativity :)
When you decide to take a few painting experiments of your own, just install Shared Email Templates from Microsoft AppSource and enjoy!
If there are any questions left of you need some help with conditional formatting in Outlook tables, just leave a few words in the Comments section and we’ll figure it out ;)
The above is the detailed content of Change border color, width, and style in Outlook table. For more information, please follow other related articles on the PHP Chinese website!

Hot AI Tools

Undresser.AI Undress
AI-powered app for creating realistic nude photos

AI Clothes Remover
Online AI tool for removing clothes from photos.

Undress AI Tool
Undress images for free

Clothoff.io
AI clothes remover

Video Face Swap
Swap faces in any video effortlessly with our completely free AI face swap tool!

Hot Article
Hot Tools

Notepad++7.3.1
Easy-to-use and free code editor

SublimeText3 Chinese version
Chinese version, very easy to use

Zend Studio 13.0.1
Powerful PHP integrated development environment

Dreamweaver CS6
Visual web development tools

SublimeText3 Mac version
God-level code editing software (SublimeText3)
Hot Topics


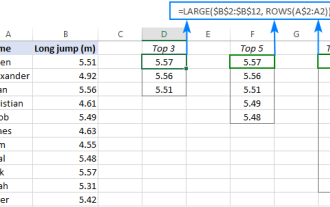 Excel formula to find top 3, 5, 10 values in column or row
Apr 01, 2025 am 05:09 AM
Excel formula to find top 3, 5, 10 values in column or row
Apr 01, 2025 am 05:09 AM
This tutorial demonstrates how to efficiently locate the top N values within a dataset and retrieve associated data using Excel formulas. Whether you need the highest, lowest, or those meeting specific criteria, this guide provides solutions. Findi
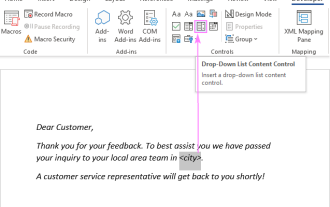 Add a dropdown list to Outlook email template
Apr 01, 2025 am 05:13 AM
Add a dropdown list to Outlook email template
Apr 01, 2025 am 05:13 AM
This tutorial shows you how to add dropdown lists to your Outlook email templates, including multiple selections and database population. While Outlook doesn't directly support dropdowns, this guide provides creative workarounds. Email templates sav
 How to use Flash Fill in Excel with examples
Apr 05, 2025 am 09:15 AM
How to use Flash Fill in Excel with examples
Apr 05, 2025 am 09:15 AM
This tutorial provides a comprehensive guide to Excel's Flash Fill feature, a powerful tool for automating data entry tasks. It covers various aspects, from its definition and location to advanced usage and troubleshooting. Understanding Excel's Fla
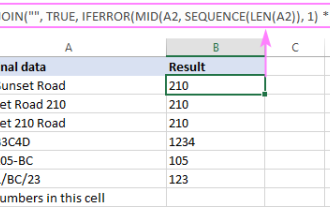
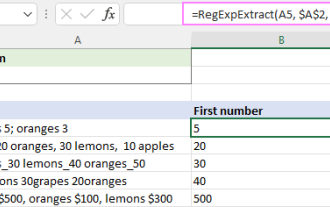 Regex to extract strings in Excel (one or all matches)
Mar 28, 2025 pm 12:19 PM
Regex to extract strings in Excel (one or all matches)
Mar 28, 2025 pm 12:19 PM
In this tutorial, you'll learn how to use regular expressions in Excel to find and extract substrings matching a given pattern. Microsoft Excel provides a number of functions to extract text from cells. Those functions can cope with most
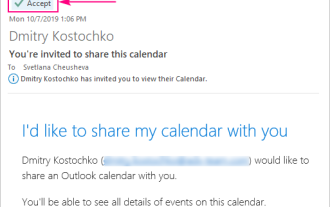 How to add calendar to Outlook: shared, Internet calendar, iCal file
Apr 03, 2025 am 09:06 AM
How to add calendar to Outlook: shared, Internet calendar, iCal file
Apr 03, 2025 am 09:06 AM
This article explains how to access and utilize shared calendars within the Outlook desktop application, including importing iCalendar files. Previously, we covered sharing your Outlook calendar. Now, let's explore how to view calendars shared with
 MEDIAN formula in Excel - practical examples
Apr 11, 2025 pm 12:08 PM
MEDIAN formula in Excel - practical examples
Apr 11, 2025 pm 12:08 PM
This tutorial explains how to calculate the median of numerical data in Excel using the MEDIAN function. The median, a key measure of central tendency, identifies the middle value in a dataset, offering a more robust representation of central tenden
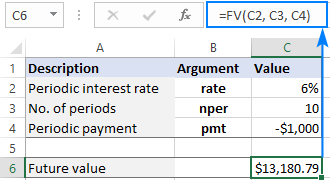 FV function in Excel to calculate future value
Apr 01, 2025 am 04:57 AM
FV function in Excel to calculate future value
Apr 01, 2025 am 04:57 AM
This tutorial explains how to use Excel's FV function to determine the future value of investments, encompassing both regular payments and lump-sum deposits. Effective financial planning hinges on understanding investment growth, and this guide prov
 How to remove / split text and numbers in Excel cell
Apr 01, 2025 am 05:07 AM
How to remove / split text and numbers in Excel cell
Apr 01, 2025 am 05:07 AM
This tutorial demonstrates several methods for separating text and numbers within Excel cells, utilizing both built-in functions and custom VBA functions. You'll learn how to extract numbers while removing text, isolate text while discarding numbers
