

How to watermark photos on Mac to protect your intellectual property


Want to protect your photos or designs from unauthorized use? Adding a watermark is the way to go. Let’s explore the best watermarking tools, along with their pros and cons.
What is a watermark?
Traditionally, a watermark is an image or text added to paper either for decoration or to identify the document as legitimate. With the advent of digital images, however, it’s taken on a new meaning. It’s a mark made on a photograph, translucent enough that it doesn’t obscure or detract from the image but is visible to the naked eye, used as a means of identifying the original owner.
Once you put a watermark on your image with, say, your name, logo, or website URL, it’s very difficult for anyone to remove it without changing the image. Adding a watermark is a very effective way of stopping unscrupulous social media users from claiming credit for your image.Which brings us to the main question of today’s post — how do you watermark photos?
How to watermark images on Mac in a few ways
If you want to know how to watermark images on Mac, you probably want to know a few ways to do it, so that you've got options. Luckily, there are a number of ways to add watermarks, some easy, others not so easy. Let's look through them.
| Tool | Best features | Best for | Price |
| Preview (Mac built-in) | Basic watermarking using text and drawings | Occasional watermarking, free users | Free |
| PhotoBulk | Batch watermarking, auto-scaling, text & image watermarks | Users needing quick, professional batch watermarking | Free trial, then $9.99/month, along with 250 other apps (on Setapp) |
| Photoshop | Advanced watermarking with full customization, actions for batch processing | Professionals using Photoshop regularly | Paid Adobe subscription ($22.99/month) |
| Photos App (iOS) | Simple watermarking with text or signature | Mobile users needing quick watermarking | Free |

Get a watermark app for macOS
Access PhotoBulk, a top-notch watermark app to protect your photos. Plus, get tons of other goodies for your devices on Setapp.
Try free Security-testedAdd a text watermark to your photos on macOS using Preview
- Difficulty: Easy
- Best features: Basic text and drawing watermarks
- Key idea: No extra software needed
- Cons: Lacks batch processing
- Best for: Occasional watermarking, free users
- Price: Free
If you only need to add watermarks occasionally and in a non-professional way, the free built-in Preview tool is your best option. The process is a bit roundabout, though, so let’s walk through it.
- Open the image with Preview and click the Markup button at the top right of the image (it looks like the tip of a pen) to open the editing menu.
- Select Sketch button in the editing menu (third from the left).
- Select your desired color by clicking the Fill Color button in the editing menu (third from the right).
- Click the curvy line (third from the left).
- Draw your watermark (you can just sign your name).
- Save your watermarked image (note that changes are saved on top of your existing file, so make sure to make the edits in a copied file, not the original).

Another way of watermarking (sort-of) your image in Preview is adding text to your image with the Text tool.
If you are wondering how to add a logo to a photo on Mac, here's your option with Preview:
- Open the file with your logo in Preview.
- Select the logo by right-clicking the image and pressing Copy Subject.
- Paste it onto your image (Command V) in Preview.

Watermark photos in batches with PhotoBulk app
- Difficulty: Easy
- Best features: Batch watermarking, batch editing
- Key idea: Automates watermarking for large batches of images
- Cons: Doesn’t have advanced editing features
- Best for: Users needing quick, easy, and professional batch watermarking
- Price: Free 7-day trial, then $9.99/month, together with 250 apps on Setapp
If you need to watermark multiple images, PhotoBulkis the best app I can recommend.
- Download and launch PhotoBulk.
- Drag the photos you want to watermark onto PhotoBulk’s main window. You’ll see thumbnails appear along the bottom.

- Check the box next to Watermark at the top of the sidebar.
- Choose whether you want a text, image, or date stamp for your watermark.
- If you chose text, you can now type or paste the text in the box and format it. If you chose an image, click Browse to navigate to the image you want to use and select it.
- Drag the box with the watermark into position and resize it.
- Press Start, choose a folder to save the watermarked images, and click Save.


That’s it! No scripts or Actions necessary. PhotoBulk will watermark each image in turn. You can add multiple watermarks to images, too. Once you’ve created and placed the first one, go back to step 4 and this time, press the plus icon at the top of the Watermark box and choose the type you want.
One of the best things about using Photobulk to batch watermark photos is that you don’t have a problem with scaling and positioning the watermark in relation to the size and shape of the photo. PhotoBulk handles all of that automatically.
You can also use PhotoBulk toresize, convert, optimize, and rename images in batches.
Batch watermark photos in Photoshop
- Difficulty: Hard
- Best features: Custom watermarking, batch automation via Actions
- Key idea: Best for professional designers
- Cons: A steep learning curve
- Best for: Professionals using Photoshop regularly
- Price: $22.99/month
If you're using Photoshop on a daily basis, you may like its watermarking feature. The best way to add a copyright watermark to an image in Photoshop is:
- Create your watermark by opening up a document in Photoshop and typing the text or adding the logo you want to use for the watermark.
- Adjust the size and remember to reduce the opacity so you can see the image through it. Save the image and close it.
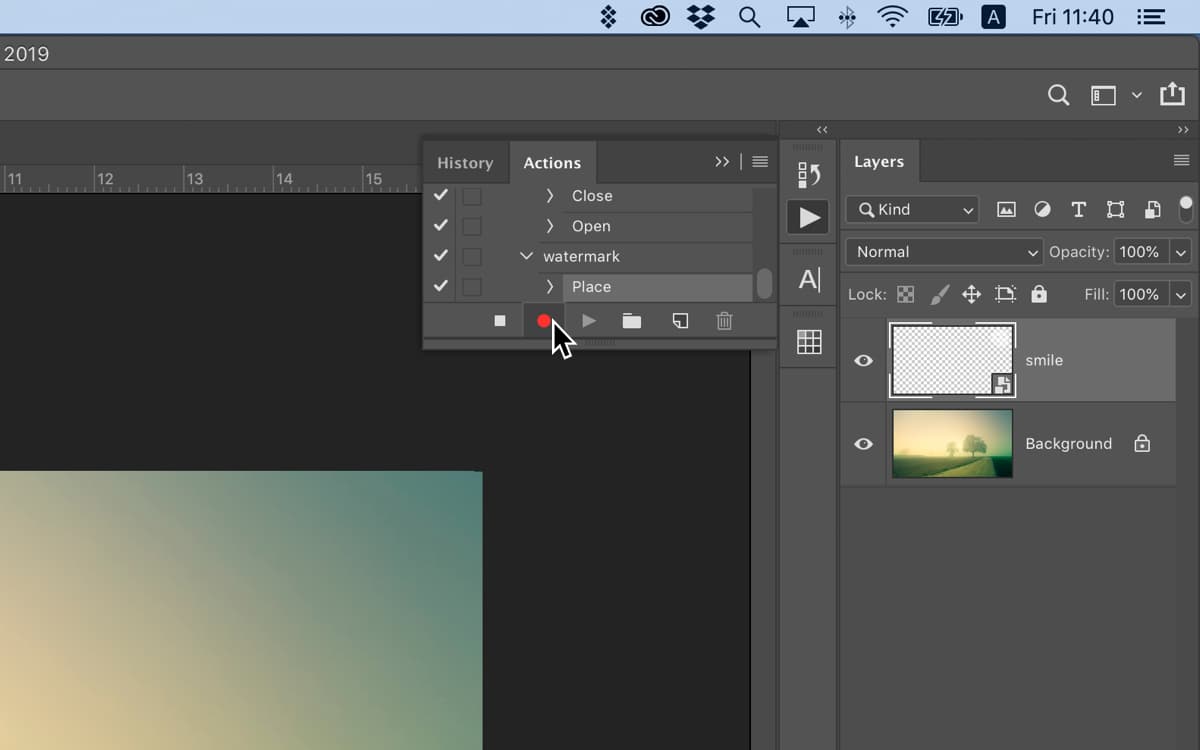
- Open the first image you want to put watermark on. Go to the Window menu, select Actions, and click the New Action button at the bottom of the panel — it’s an icon of a document with a corner folded down.
- Give the Action a name that makes it obvious what it’s for — Watermark will do — and press Return. Photoshop will now start recording every step you take.
- Go to the File menu, choose Place, navigate to the file containing your watermark, and click Place at the bottom of the window. Resize your watermark and put it in the position you want. When you’re done, hit Return. Press the Stop button at the bottom of the Actions palette to stop recording.
- Close the image without saving it.
- Go to the File menu and choose Script, then Image Processor.
- Click Select Folder and navigate to the folder where your images are saved and click Open. Then, just below, do the same again, but this time navigate to the folder where you want to save the watermarked images.
- At the bottom of the window, click Run Action, and in the right-hand menu, select the Action you created earlier.
- Click Run at the top of the window. Photoshop will now open all the images in the folder, one at a time, and watermark them then save them in the folder you specified.


Does that seem complicated? Well, consider this. The steps above work perfectly if all the images in your folder are the same size and shape. If they’re not, you have to add several steps to the process to make sure the watermark is displayed correctly in every image.
As you can see, watermarking multiple images can be difficult or it can be easy. Creating a Photoshop Action will get the job done, but it’s by no means straightforward if you have images of different shapes and sizes.
How to add a watermark on iOS
- Difficulty: Easy
- Best features: Quick watermarking with text or signature, adjustable opacity
- Key idea: Simple, free
- Cons: Not suitable for professional use
- Best for: Mobile users needing quick watermarking
- Price: Free
On iOS, you can add a watermark and adjust opacity in the Photos app.
Here’s how to put a watermark on a photo on your phone:
- Open your image in Photos and tap Edit (three lines at the bottom).
- Next, tap the Markup icon (pencil) in the top right corner of your screen.
- Find the button at the bottom right of your screen and tap it.
- Select Add Text and type in your watermark text there. Alternatively, you can select Add Signature.
- Then, tap the text and tap the "Aa" icon that appears.
- Tap the color wheel to adjust the color of your watermark and move the toggle to adjust Opacity.
Close the color editing menu, adjust your text’s location on the image, and tap Done when you are finished.
Note that just like in Preview on your Mac, Photos app saves the edits on top of your existing file, so you have to edit a copy in order to keep your unedited and unwatermarked original.
Read also:
- Add Text to Photo
- Black and White Images
- Best Password Managers for Mac
- Remove Background From Image
Add a watermark for free
As you can see, both free built-in and advanced third-party apps offer watermarking options. The best tool depends on your needs:
- For occasional watermarking — the built-in Preview app.
- For easy yet professional bulk watermarking — PhotoBulk.
- For professional watermarking, especially if you use advanced photo editing tools — Photoshop.
You can try PhotoBulk for free on Setappfor 7 days, along with 250 other Mac, iPhone, and web apps. After the trial, the subscription is $9.99 per month for the entire collection.
The above is the detailed content of How to watermark photos on Mac to protect your intellectual property. For more information, please follow other related articles on the PHP Chinese website!

Hot AI Tools

Undresser.AI Undress
AI-powered app for creating realistic nude photos

AI Clothes Remover
Online AI tool for removing clothes from photos.

Undress AI Tool
Undress images for free

Clothoff.io
AI clothes remover

AI Hentai Generator
Generate AI Hentai for free.

Hot Article
Hot Tools

Notepad++7.3.1
Easy-to-use and free code editor

SublimeText3 Chinese version
Chinese version, very easy to use

Zend Studio 13.0.1
Powerful PHP integrated development environment

Dreamweaver CS6
Visual web development tools

SublimeText3 Mac version
God-level code editing software (SublimeText3)
Hot Topics
 1378
1378
 52
52


 Floating screen recording: how to capture a specific app window on a Mac
Mar 28, 2025 am 09:16 AM
Floating screen recording: how to capture a specific app window on a Mac
Mar 28, 2025 am 09:16 AM
Mac Screen Recording: Easily capture windows, areas and drop-down menus The screenshot tool (Command Shift 5) that comes with Mac systems can record full screen or selected areas, but cannot record specific application windows separately. At this time, more powerful tools are needed to complete the task. This article will introduce several ways to help you record your Mac windows as easily as a professional. Record the application window separately Record a single window to avoid cluttered desktop backgrounds and create more professional and prominent images and videos. Here are some excellent screen recording applications: Function comparison Gifox CleanShot X Dropshare Record a specific window ✓ ✓ ✓
 Change the unchangeable PDFs with Nitro PDF Pro
Mar 22, 2025 am 11:14 AM
Change the unchangeable PDFs with Nitro PDF Pro
Mar 22, 2025 am 11:14 AM
You can’t avoid working with PDFs. But what you can avoid is having problems with them. Intractable as they seem, PDFs are actually pretty easy to deal with – not without help, of course. When it comes to making changes in your docs,Nitro PDF Pr
 Top 9 AI writing assistants for Mac, iOS, and the web
Mar 23, 2025 am 10:44 AM
Top 9 AI writing assistants for Mac, iOS, and the web
Mar 23, 2025 am 10:44 AM
The market for AI-powered writing assistants is expected to grow rapidly, reaching approximately $6.5 billion by 2030. Since AI writing assistants are here to stay, it's important to learn about the best tools in the industry. In this article, w

 The full list of all macOS versions until 2025
Mar 23, 2025 am 10:08 AM
The full list of all macOS versions until 2025
Mar 23, 2025 am 10:08 AM
macOS version history macOS 15 Sequoia, September 16, 2024macOS 14 Sonoma,September 26, 2023 macOS 13 Ventura,October 25, 2022
 How to refresh on a Mac - Setapp
Mar 18, 2025 am 11:47 AM
How to refresh on a Mac - Setapp
Mar 18, 2025 am 11:47 AM
This guide shows you how to refresh various aspects of your Mac, from web pages to the desktop and Messages. Let's dive in! Refreshing Web Pages on Your Mac For a quick refresh, the easiest method is using the keyboard shortcut Command R. This wor
 How to convert a PDF to grayscale
Mar 22, 2025 am 10:20 AM
How to convert a PDF to grayscale
Mar 22, 2025 am 10:20 AM
Converting color PDFs to grayscale or black and white can effectively reduce file size, save printing costs, or facilitate previewing. This article will introduce the use of two methods of using Mac's own tools and third-party applications to achieve PDF color conversion. Grayscale images contain a variety of shades of gray from white to black, while true black and white images have only two colors: pure black and pure white. Therefore, for printed documents containing content other than simple text, grayscale is usually the preferred color format. Save PDFs to black and white instead of grayscale, the file size will decrease significantly, but the appearance of all objects except text will change. Therefore, converting PDFs from color to grayscale is usually a safer choice. Method 1: Use Nitro PDF Pro Nitro PD
