

How to connect bluetooth headphones to Mac?

From the dawn of time to just about a few years ago, all of us sported a pair of wired headphones and were convinced that this is simply how it will be done forever. After all, they are the easiest technology around: just plug them in, put them on, and go. But with proliferation of Bluetooth headphone options and disappearance of headphone jacks from nearly all the latest smartphones, wired headphones seem to progress on the path of disappearance more and more each day.
Thankfully, wireless devices are great. They are lightweight. They are versatile. They can be easily connected to your iPhone, your Mac, or your car. Charge them overnight just the same way as your phone and they last all day too.
Sadly, without proper configuration, connecting Bluetooth headphones to Mac might get a bit tricky, with frequent disconnections and music interruptions. Here, we’ll help you find out how to pair AirPods and other sound devices with Mac properly and control them masterfully at the same time.
Why Bluetooth headphones won't connect to Mac
There are a few common problems we need to explore:
- Bluetooth headphones won't connect to Mac right out of the box — some configuring is needed
- Pairing Bluetooth headphones with Mac is different from pairing them with iPhone or your car’s audio system
- Special settings that answer questions like how to connect two Bluetooth headphones to one Mac and how to use multiple audio outputs
Throughout the article, AirPods would be used as an example, but any other model of Bluetooth headphones can be connected in a similar fashion.
Effortless headphones pairing
Connect Bluetooth devices to your Mac in one click. Setapp has easy tools for that.
Try freeHow to pair wireless headphones to Mac
Connecting Bluetooth headphones to Mac for the first time is done by following a few easy steps:
- On your Mac, click on the Apple menu and launch System Preferences
- Navigate to the Bluetooth menu and Turn Bluetooth On. You should now see all available Bluetooth devices around you.
- Make sure your headphones are charged and currently in discoverable mode. Click Connect to establish a new connection
- Your Bluetooth headphones should now appear in the list. Click Connect to establish a new connection.
- If you’re trying to reconnect your existing device, right-click on it and choose Connect
After you’ve managed to successfully connect Bluetooth headphones to Mac for the first time, they should stay connected or reconnect automatically when you leave the Bluetooth range (around 33 feet or 10 meters) and come back.
You can also calibrate headphones to your liking through the Sound menu in System Preferences. For example, in the Output tab you can choose to “Show volume in menu bar” and set a stereo balance between right and left.

Oftentimes things don’t go as planned, so let’s work through some widespread issues regarding Bluetooth headphones.
How to connect AirPods to Mac
We’ll start with the easiest method: install AirBuddy and pair AirPods with Mac using a handy pairing screen (similar to the one you get on iOS). All it takes is bringing your AirPods close to your Mac and opening the lid. Then, you’ll see a screen like this:

From there, it’s pretty straightforward. Hit the “Click to connect” button and that’s it. The beauty of AirBuddy is that you don’t have to dive into any settings to pair your device.
If you don’t have AirBuddy, you can rely on Apple’s native connection flow.
Here’s how you connect new AirPods to Mac:
- Open System Preferences on your Mac and select Bluetooth.
- Ensure Bluetooth is turned on.
- On AirPods, press and hold the round button (it’s at the bottom center of the case) until the white light starts blinking.
- Your Bluetooth headphones should now appear in the list.
In case you’ve already paired AirPods with your iPhone that’s tied to the same iCloud account and Apple ID, your earbuds will be automatically recognized by Mac.

If you want an easy tool for pairing multiple headphones simultaneously, install ToothFairy. You can set up custom icons for different headphones so they’re easy to recognize. To connect, simply click on the icon. You can read more about how to use the app below.

How to fix Bluetooth headphone issues
Sometimes going through the setup steps doesn’t result in your headphones connecting successfully, or connecting and then abruptly disconnecting. This is profoundly annoying but can be solved by either resetting the headphones or purging preference settings on your Mac. Here's how to fix all known issues:
Restart your Bluetooth headphones
In case you can’t connect your Bluetooth headphones not only to your Mac but also any other device you own (iPhone or car audio), it might be a glitch in its settings, so a simple reset should remedy the situation.
For reset instructions, check your device’s manual. Here’s how to reset AirPods:
- Put the earpieces into the case and keep the lid open
- Press and hold the setup button until the light switches from amber to white (around 10 seconds)
Now all settings on your earphones should be reset and you should be able to connect them again using the standard workflow above. If the problem persists, it could be something to do with the preferences on your Mac.
Reset sounds preferences on Mac
First, make sure that your Mac is running macOS Sierra or newer (macOS High Sierra or Mojave). If not, upgrade to the latest version by going to System Preferences > Software Update or using the App Store if you’re upgrading from a few versions back.
Next, if nothing was of any benefit so far, try resetting your Mac’s sound preferences. To do that:
- From the menu bar select Go > Go to Folder… and type ~/Library/Preferences
- In the long list of preference files, find and delete the following: com.apple.preferences.plist and com.apple.soundpref.plist

Deleting preferences out of the library forces your Mac to recreate them brand new, thus avoiding any bugs or improper algorithms that could have interfered with your Bluetooth headphones setup. If that didn’t work, you can also try relaunching the audio process:
- Launch Activity Monitor from the Applications folder
- In the CPU tab, find the process called coreaudiod
- Quit the process and close Activity Monitor

The above would force not only the preferences for your audio to reset but also the audio process for your whole Mac to relaunch.
No audio from a paired and connected Bluetooth headset
Occasionally, when you succeeded in connecting Bluetooth headphones to Mac, you might hear no sound going through. There are a few things you can do to solve this.
Ensure that your headphones are the selected audio output for your Mac:
- Go System Preferences > Sound
- In the Output tab, find your headphones in the list and double-click to make them active
If that didn’t change anything:
- Reset your headphones as per the directions above
- Go System Preferences > Bluetooth
- Right-click on your headphones, choose Remove, and confirm
Now you need to connect Bluetooth headphones to Mac all over again, and the problem should disappear.
Can’t connect two Bluetooth headphones Mac recognizes
The beauty of Mac’s Bluetooth menu is that it lets you add any number of Bluetooth-enabled devices, from keyboards to headphones. Sometimes, however, it might malfunction and not allow you to add two wireless headphones at the same time.
To fix this issue, essentially repeat the steps from the previous section:
- Reset each pair of headphones
- Remove them from Mac’s Bluetooth menu
- Reconnect your headphones once more
If, however, you’re looking for how to use multiple audio outputs, such as headphones, at the same time — here some magic tricks are required.
How to use multiple audio outputs simultaneously
Most Mac users believe that they can only play their audio output through one device at a time, be it internal speakers, Bluetooth headphones, or some other amplifier. But in reality it’s possible to play audio on multiple devices at the same time through a handy built-in utility called Audio MIDI Setup. Here’s what you need to do:
- Launch Audio MIDI Setup through Applications
- Click the plus icon at the bottom left and choose Create Multi-Output Device
- In the new option that appears, check all the Bluetooth devices you need to play simultaneously
- Navigate to the Sound menu in System Preferences and choose the Multi-Output Device in the Output tab. Now all sounds will play through both devices at the same time.

Playing audio through multiple devices is a nifty trick for when you need more sound power for your party or when trying to create a true surround sound for a movie screening.
Use master Bluetooth software for all needs
Most of the time, audio on Mac is not an issue. What’s frustrating is the way current settings are sprinkled all over macOS. Lots of fixes described here might seem confusing and unintuitive at first sight. You might wish there was an app that would make it easy to control all your audio needs from a single place.
And there is not just one such app, but two!
As we’ve mentioned, we love AirBuddy, an app that brings the ease of headphones pairing from iOS to macOS. As long as you’re logged in your iCloud account, you don’t have to do any manual pairing, just bring your headphones close to Mac and click “Connect.”

Another useful helper is ToothFairy — the most simple Bluetooth device assistant for setting up multiple headphones connections.
To set up a new device in ToothFairy, all you need to do is:
- Open the app
- Click the plus icon
- Locate your device in the list and click Connect
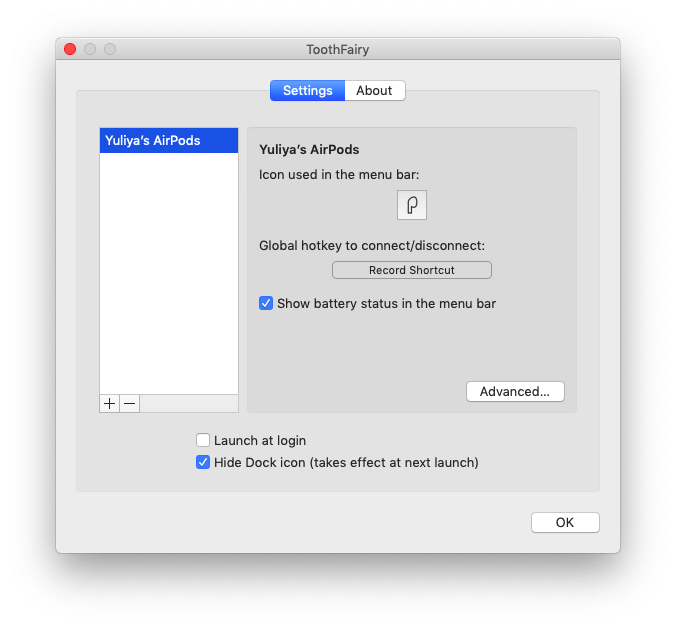
Similarly, it’s just as easy to assign custom icons to all your frequently used devices and get them displayed in the menu bar, so you instantly know which devices are connected, what’s their battery life, and can quickly turn them on and off with one click.
Additionally, ToothFairy offers a unique option of improving the sound quality of your Bluetooth headphones by funneling the sound through a higher level audio codec.

In the end, it seems like wireless headphones are here to stay. So finding a master program to control them with ease is going to save your hours of time in the long run. Use the tips above to configure your headphones, easily connect AirPods to MacBook, and take advantage of AirBuddy and ToothFairy for best results.
How to disconnect Bluetooth headphones from a Mac
To disconnect your headphones from your Mac, you only need to perform two steps.
- Click the Bluetooth icon in your Menu bar.
- Find your headphones on the list of the connected Bluetooth devices and click the blue icon next to the name to disconnect:

You can also disconnect via System Preferences. This method can be your go-to if you don’t want to have the Bluetooth icon in your Menu bar.
Just like when you connect wireless headphones to MacBook, you have to go to the Apple menu > System Preferences… > Bluetooth and find your headphones on the list of the connected Bluetooth devices there, then two-finger click on the item you want to disconnect and select Disconnect in the drop-down menu.
Alternatively, you can turn off Bluetooth with the toggle, which will automatically disconnect all of your connected Bluetooth devices.
How to connect your Bluetooth headphones via Control Center (Big Sur and later)
Control Center was introduced with macOS Big Sur, so you might not realize that you can actually connect your Bluetooth devices there.
Here’s how to connect earbuds or headphones to MacBook if you are running macOS Big Sur or fresher.
- Click the Control Center icon at the right side of your Menu bar (it looks like two toggle bars — one off, and the other on).
- Turn on Bluetooth by clicking the respective icon on the left of the word Bluetooth and wait for it to turn blue to signify that Bluetooth is on.
- Next, click on the word Bluetooth to open the Bluetooth menu and find your headphones on the list (your Bluetooth headphones need to be on and in the discoverable mode for this to work). Click on them to connect.
Best of all, AirBuddy and ToothFairy are available for a free trial through Setapp, a platform of over 200 useful utilities and apps for people who love finding the best shortcuts for using their Macs. Now enjoy the sound!
The above is the detailed content of How to connect bluetooth headphones to Mac?. For more information, please follow other related articles on the PHP Chinese website!

Hot AI Tools

Undresser.AI Undress
AI-powered app for creating realistic nude photos

AI Clothes Remover
Online AI tool for removing clothes from photos.

Undress AI Tool
Undress images for free

Clothoff.io
AI clothes remover

AI Hentai Generator
Generate AI Hentai for free.

Hot Article
Hot Tools

Notepad++7.3.1
Easy-to-use and free code editor

SublimeText3 Chinese version
Chinese version, very easy to use

Zend Studio 13.0.1
Powerful PHP integrated development environment

Dreamweaver CS6
Visual web development tools

SublimeText3 Mac version
God-level code editing software (SublimeText3)
Hot Topics
 1378
1378
 52
52


 Floating screen recording: how to capture a specific app window on a Mac
Mar 28, 2025 am 09:16 AM
Floating screen recording: how to capture a specific app window on a Mac
Mar 28, 2025 am 09:16 AM
Mac Screen Recording: Easily capture windows, areas and drop-down menus The screenshot tool (Command Shift 5) that comes with Mac systems can record full screen or selected areas, but cannot record specific application windows separately. At this time, more powerful tools are needed to complete the task. This article will introduce several ways to help you record your Mac windows as easily as a professional. Record the application window separately Record a single window to avoid cluttered desktop backgrounds and create more professional and prominent images and videos. Here are some excellent screen recording applications: Function comparison Gifox CleanShot X Dropshare Record a specific window ✓ ✓ ✓
 Change the unchangeable PDFs with Nitro PDF Pro
Mar 22, 2025 am 11:14 AM
Change the unchangeable PDFs with Nitro PDF Pro
Mar 22, 2025 am 11:14 AM
You can’t avoid working with PDFs. But what you can avoid is having problems with them. Intractable as they seem, PDFs are actually pretty easy to deal with – not without help, of course. When it comes to making changes in your docs,Nitro PDF Pr
 Top 9 AI writing assistants for Mac, iOS, and the web
Mar 23, 2025 am 10:44 AM
Top 9 AI writing assistants for Mac, iOS, and the web
Mar 23, 2025 am 10:44 AM
The market for AI-powered writing assistants is expected to grow rapidly, reaching approximately $6.5 billion by 2030. Since AI writing assistants are here to stay, it's important to learn about the best tools in the industry. In this article, w

 The full list of all macOS versions until 2025
Mar 23, 2025 am 10:08 AM
The full list of all macOS versions until 2025
Mar 23, 2025 am 10:08 AM
macOS version history macOS 15 Sequoia, September 16, 2024macOS 14 Sonoma,September 26, 2023 macOS 13 Ventura,October 25, 2022
 How to refresh on a Mac - Setapp
Mar 18, 2025 am 11:47 AM
How to refresh on a Mac - Setapp
Mar 18, 2025 am 11:47 AM
This guide shows you how to refresh various aspects of your Mac, from web pages to the desktop and Messages. Let's dive in! Refreshing Web Pages on Your Mac For a quick refresh, the easiest method is using the keyboard shortcut Command R. This wor
 How to convert a PDF to grayscale
Mar 22, 2025 am 10:20 AM
How to convert a PDF to grayscale
Mar 22, 2025 am 10:20 AM
Converting color PDFs to grayscale or black and white can effectively reduce file size, save printing costs, or facilitate previewing. This article will introduce the use of two methods of using Mac's own tools and third-party applications to achieve PDF color conversion. Grayscale images contain a variety of shades of gray from white to black, while true black and white images have only two colors: pure black and pure white. Therefore, for printed documents containing content other than simple text, grayscale is usually the preferred color format. Save PDFs to black and white instead of grayscale, the file size will decrease significantly, but the appearance of all objects except text will change. Therefore, converting PDFs from color to grayscale is usually a safer choice. Method 1: Use Nitro PDF Pro Nitro PD
