

How to add, copy and delete multiple checkboxes in Excel

This tutorial shows you how to efficiently add, modify, and delete multiple checkboxes in Excel. Last week, we explored using checkboxes for checklists, conditional formatting, interactive reports, and dynamic charts. This week, we'll focus on the technical aspects.
- Form Control vs. ActiveX Checkboxes
- Adding Checkboxes
- Adding Multiple Checkboxes (Copying)
- Changing Checkbox Names and Captions
- Selecting Checkboxes
- Deleting Checkboxes
- Formatting Checkboxes and Fixing Position
Form Control vs. ActiveX Checkboxes
Excel offers two checkbox types: Form Controls and ActiveX Controls.

Form Controls are simpler and generally preferred. ActiveX Controls offer more formatting but can be less stable and require enabling in the Trust Center. ActiveX is Windows-only and accessible via VBA.
Adding a Checkbox
- Go to the Developer tab, click Insert, and choose Check Box under Form Controls.
- Click in the desired cell; the checkbox appears nearby.
- Drag the checkbox to its final position.
- Edit the caption text as needed.

(Note: If the Developer tab is missing, right-click the ribbon, select Customize the Ribbon, and check the Developer box.)
Adding Multiple Checkboxes
Add one checkbox, then copy it using these methods:
-
Ctrl D: The quickest way to copy and paste. This creates duplicates.

-
Ctrl C, Paste: Copy and paste to a specific location.
-
Fill Handle: Drag the fill handle (bottom-right corner of the cell) to copy to adjacent cells.


(Note: Copied checkboxes share the same caption but have unique internal names. Linked cells remain the same.)
Changing Checkbox Names and Captions
The caption is the visible text (e.g., "Check Box 1"). Right-click, select Edit Text, and type the new caption.

The checkbox name appears in the Name box when selected. Type the new name directly into the Name box.

(Note: Changing the caption doesn't change the checkbox name.)

Selecting Checkboxes
Select a single checkbox by right-clicking it or clicking while holding Ctrl. Select multiple checkboxes by Ctrl-clicking or using the Selection Pane (Home > Find & Select > Selection Pane).

(Note: The Selection Pane shows checkbox names, not captions.)
Deleting Checkboxes
Delete individual checkboxes with the Delete key. Delete multiple checkboxes by selecting them and pressing Delete. To delete all checkboxes, use Go To Special (Home > Find & Select > Go To Special), select Objects, and press Delete.

(Caution: This deletes all objects on the sheet.)
Formatting Checkboxes
Form Controls have limited formatting. Right-click, choose Format Control, and adjust the fill and line colors.

For more options, use ActiveX Controls. You can also adjust size and protection on the Format Control dialog. The Properties tab lets you control positioning; select "Don't move or size with cells" to fix the checkbox's position. Ensure "Print object" is checked for printing.

The Control tab sets the initial state (checked, unchecked, mixed). You can also add 3-D shading and link to a cell using the Cell link box.

This covers adding, modifying, and deleting checkboxes in Excel. Refer to previous tutorials for practical examples.
The above is the detailed content of How to add, copy and delete multiple checkboxes in Excel. For more information, please follow other related articles on the PHP Chinese website!

Hot AI Tools

Undresser.AI Undress
AI-powered app for creating realistic nude photos

AI Clothes Remover
Online AI tool for removing clothes from photos.

Undress AI Tool
Undress images for free

Clothoff.io
AI clothes remover

Video Face Swap
Swap faces in any video effortlessly with our completely free AI face swap tool!

Hot Article
Hot Tools

Notepad++7.3.1
Easy-to-use and free code editor

SublimeText3 Chinese version
Chinese version, very easy to use

Zend Studio 13.0.1
Powerful PHP integrated development environment

Dreamweaver CS6
Visual web development tools

SublimeText3 Mac version
God-level code editing software (SublimeText3)
Hot Topics


 How to Create a Timeline Filter in Excel
Apr 03, 2025 am 03:51 AM
How to Create a Timeline Filter in Excel
Apr 03, 2025 am 03:51 AM
In Excel, using the timeline filter can display data by time period more efficiently, which is more convenient than using the filter button. The Timeline is a dynamic filtering option that allows you to quickly display data for a single date, month, quarter, or year. Step 1: Convert data to pivot table First, convert the original Excel data into a pivot table. Select any cell in the data table (formatted or not) and click PivotTable on the Insert tab of the ribbon. Related: How to Create Pivot Tables in Microsoft Excel Don't be intimidated by the pivot table! We will teach you basic skills that you can master in minutes. Related Articles In the dialog box, make sure the entire data range is selected (
 You Need to Know What the Hash Sign Does in Excel Formulas
Apr 08, 2025 am 12:55 AM
You Need to Know What the Hash Sign Does in Excel Formulas
Apr 08, 2025 am 12:55 AM
Excel Overflow Range Operator (#) enables formulas to be automatically adjusted to accommodate changes in overflow range size. This feature is only available for Microsoft 365 Excel for Windows or Mac. Common functions such as UNIQUE, COUNTIF, and SORTBY can be used in conjunction with overflow range operators to generate dynamic sortable lists. The pound sign (#) in the Excel formula is also called the overflow range operator, which instructs the program to consider all results in the overflow range. Therefore, even if the overflow range increases or decreases, the formula containing # will automatically reflect this change. How to list and sort unique values in Microsoft Excel
 If You Don't Rename Tables in Excel, Today's the Day to Start
Apr 15, 2025 am 12:58 AM
If You Don't Rename Tables in Excel, Today's the Day to Start
Apr 15, 2025 am 12:58 AM
Quick link Why should tables be named in Excel How to name a table in Excel Excel table naming rules and techniques By default, tables in Excel are named Table1, Table2, Table3, and so on. However, you don't have to stick to these tags. In fact, it would be better if you don't! In this quick guide, I will explain why you should always rename tables in Excel and show you how to do this. Why should tables be named in Excel While it may take some time to develop the habit of naming tables in Excel (if you don't usually do this), the following reasons illustrate today
 How to Format a Spilled Array in Excel
Apr 10, 2025 pm 12:01 PM
How to Format a Spilled Array in Excel
Apr 10, 2025 pm 12:01 PM
Use formula conditional formatting to handle overflow arrays in Excel Direct formatting of overflow arrays in Excel can cause problems, especially when the data shape or size changes. Formula-based conditional formatting rules allow automatic formatting to be adjusted when data parameters change. Adding a dollar sign ($) before a column reference applies a rule to all rows in the data. In Excel, you can apply direct formatting to the values or background of a cell to make the spreadsheet easier to read. However, when an Excel formula returns a set of values (called overflow arrays), applying direct formatting will cause problems if the size or shape of the data changes. Suppose you have this spreadsheet with overflow results from the PIVOTBY formula,

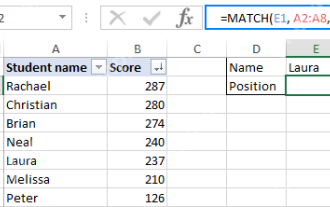 Excel MATCH function with formula examples
Apr 15, 2025 am 11:21 AM
Excel MATCH function with formula examples
Apr 15, 2025 am 11:21 AM
This tutorial explains how to use MATCH function in Excel with formula examples. It also shows how to improve your lookup formulas by a making dynamic formula with VLOOKUP and MATCH. In Microsoft Excel, there are many different lookup/ref
 How to Use Excel's AGGREGATE Function to Refine Calculations
Apr 12, 2025 am 12:54 AM
How to Use Excel's AGGREGATE Function to Refine Calculations
Apr 12, 2025 am 12:54 AM
Quick Links The AGGREGATE Syntax
 How to change Excel table styles and remove table formatting
Apr 19, 2025 am 11:45 AM
How to change Excel table styles and remove table formatting
Apr 19, 2025 am 11:45 AM
This tutorial shows you how to quickly apply, modify, and remove Excel table styles while preserving all table functionalities. Want to make your Excel tables look exactly how you want? Read on! After creating an Excel table, the first step is usual
