Knockoutjs Quick Start (Classic)_Basic Knowledge
Knockoutjs is an MVVM framework implemented in JavaScript. It mainly has the following functions:
1. Declarative bindings
2. Observables and dependency tracking
3. Templating
It has a significant effect on separating the front-end business logic and views and simplifying the data binding process. Without further ado, let’s just look at the example. I won’t talk about how to download it. If you use VS to develop, you can use Nuget to get it done with one click.
1. Basic binding and dependency tracking
First you need to define a ViewModel:
Then there is a View used to display this ViewModel:
< input data-bind="value: lastName"/>
From this view you can see the meaning of declarative binding, you only need to use it on the label The data-bind attribute can bind the value of the data to the corresponding place. With View and ViewModel, code is needed to associate the two:
ko.applyBindings(new ViewModel());
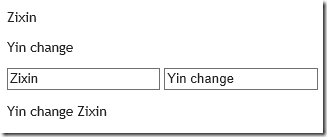
Put them together. Note that the applyBinding code must be executed after the page is fully loaded. The page displays:

Let’s look at observables next. This function is not innate. You must set the View Model to observable. The method is as follows:
function ViewModel() {
this.firstName = ko.observable("Zixin");
this.lastName = ko.observable(" Yin");
}
Nothing else needs to be changed. At this time, if you change the value in the input box, when the focus leaves, you can find that the value in p also changes. :

Let’s look at dependency tracking, that is, if a value depends on multiple values, and any one of the values changes, it will automatically change. This is achieved through the computed method, the code is as follows:
function ViewModel() {
this.firstName = ko.observable("Zixin" );
this.lastName = ko.observable("Yin");
this.fullName = ko.computed(function () { return this.lastName() " " this.firstName(); },this );
}
Note that getting the value of an observable is a function call. In this way, when the first or last name changes, the fullName will automatically change accordingly.

You can also change the value of the observable through code, and the page will refresh automatically:
function ViewModel() {
//………
this.capitalizeLastName = function () {
this.lastName(this.lastName().toUpperCase());
}
}
Add a button on the page:
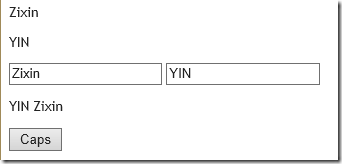
After clicking the button, the capitalizeLastName method of the viewmodel will be launched. The way to change the value of an observable is to use the new value as a parameter of the function call. After clicking:

Join us with the following order ViewModel and use observableArray to track changes in the array.
var products=[{name: "Thinkpad X1", price:9000},
{name:"Hp ProBook",price:5555},
{name:"Mouse",price:45} ];
function Order() {
var self = this;
self.items = ko.observableArray([
//This data should load from server
new Item(products[0], 1),
new Item(products [1],2)]);
self.price = ko.computed(function () {
var p=0;
for (var i = 0; i < self.items() .length; i ) {
var item = self.items()[i];
p = item.product.price * item.amount();
}
return p;
}, self);
}
The Item in Order should actually be obtained from the server. The Item is defined as follows:
function Item(product, amount) {
var self = this;
this.product = product;
this.amount = ko.observable(amount);
this.subTotal = ko.computed(function () {
return self.amount() * self.product.price;
}, self );
}
After the ViewModel is ready, you can implement the View. This time you need to use foreach binding, as follows:
< table>
Order Price:
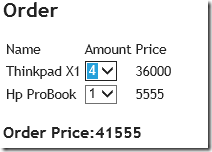
It would be nice to have a basic order page like this, where you can select the quantity and the price will automatically update:

Next, add the function of adding and deleting products to the order. First add the following method to the Order:
function Order() {
//……
self.remove = function (item) {
self.items.remove(item);
}
self.addMouse = function () {
self.items.push(new Item(products[2],1));
}
}
Add a column delete button to the table:
Again Add a button to add products at the bottom of the table:
< ;button data-bind="click: addMouse">Add a Mouse
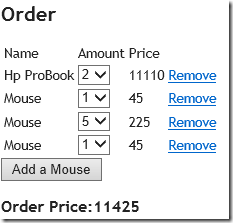
At this time, the function of observableArray is reflected. When you click the delete button or the button at the bottom, the page nodes will change accordingly, without the need to manually update the DOM nodes, which greatly simplifies the front-end JS.


Hot AI Tools

Undresser.AI Undress
AI-powered app for creating realistic nude photos

AI Clothes Remover
Online AI tool for removing clothes from photos.

Undress AI Tool
Undress images for free

Clothoff.io
AI clothes remover

AI Hentai Generator
Generate AI Hentai for free.

Hot Article

Hot Tools

Notepad++7.3.1
Easy-to-use and free code editor

SublimeText3 Chinese version
Chinese version, very easy to use

Zend Studio 13.0.1
Powerful PHP integrated development environment

Dreamweaver CS6
Visual web development tools

SublimeText3 Mac version
God-level code editing software (SublimeText3)

Hot Topics
 1378
1378
 52
52
 How do I create and publish my own JavaScript libraries?
Mar 18, 2025 pm 03:12 PM
Article discusses creating, publishing, and maintaining JavaScript libraries, focusing on planning, development, testing, documentation, and promotion strategies.
 How do I optimize JavaScript code for performance in the browser?
Mar 18, 2025 pm 03:14 PM
The article discusses strategies for optimizing JavaScript performance in browsers, focusing on reducing execution time and minimizing impact on page load speed.
 What should I do if I encounter garbled code printing for front-end thermal paper receipts?
Apr 04, 2025 pm 02:42 PM
Frequently Asked Questions and Solutions for Front-end Thermal Paper Ticket Printing In Front-end Development, Ticket Printing is a common requirement. However, many developers are implementing...
 How do I debug JavaScript code effectively using browser developer tools?
Mar 18, 2025 pm 03:16 PM
The article discusses effective JavaScript debugging using browser developer tools, focusing on setting breakpoints, using the console, and analyzing performance.
 Who gets paid more Python or JavaScript?
Apr 04, 2025 am 12:09 AM
There is no absolute salary for Python and JavaScript developers, depending on skills and industry needs. 1. Python may be paid more in data science and machine learning. 2. JavaScript has great demand in front-end and full-stack development, and its salary is also considerable. 3. Influencing factors include experience, geographical location, company size and specific skills.
 How do I use source maps to debug minified JavaScript code?
Mar 18, 2025 pm 03:17 PM
The article explains how to use source maps to debug minified JavaScript by mapping it back to the original code. It discusses enabling source maps, setting breakpoints, and using tools like Chrome DevTools and Webpack.
 Getting Started With Chart.js: Pie, Doughnut, and Bubble Charts
Mar 15, 2025 am 09:19 AM
This tutorial will explain how to create pie, ring, and bubble charts using Chart.js. Previously, we have learned four chart types of Chart.js: line chart and bar chart (tutorial 2), as well as radar chart and polar region chart (tutorial 3). Create pie and ring charts Pie charts and ring charts are ideal for showing the proportions of a whole that is divided into different parts. For example, a pie chart can be used to show the percentage of male lions, female lions and young lions in a safari, or the percentage of votes that different candidates receive in the election. Pie charts are only suitable for comparing single parameters or datasets. It should be noted that the pie chart cannot draw entities with zero value because the angle of the fan in the pie chart depends on the numerical size of the data point. This means any entity with zero proportion
 The difference in console.log output result: Why are the two calls different?
Apr 04, 2025 pm 05:12 PM
In-depth discussion of the root causes of the difference in console.log output. This article will analyze the differences in the output results of console.log function in a piece of code and explain the reasons behind it. �...


