 Web Front-end
 JS Tutorial
 How to use the JS component Bootstrap ContextMenu right-click menu_javascript skills
How to use the JS component Bootstrap ContextMenu right-click menu_javascript skills
Today I will summarize the application of a small component of bootstrap. Okay, without further ado, let’s get to the point.
1. Introduction to ContextMenu
One requirement: Table row ordering, support for multi-selection ordering, and non-consecutive multi-selection. What does it mean? Let’s first take a look at the renderings that need to be achieved:
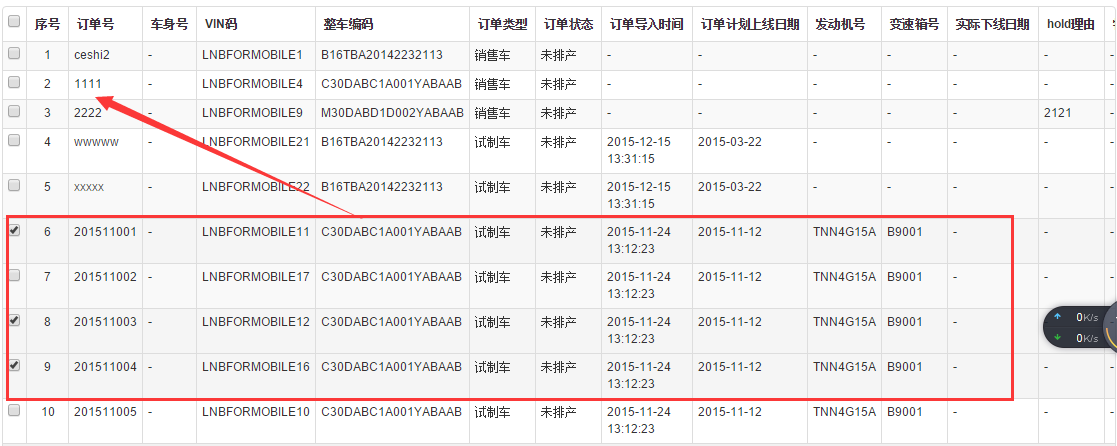
The requirement is: the selected rows 6, 8, and 9 need to be moved to between rows 2 and 3. Business aside, from a purely technical perspective, in order to achieve the above effect with the least amount of operations, the blogger thought of the right-click function. If you can right-click the mouse on the 2nd or 3rd line, you can select the selected item through the right-click menu function. Isn't this the simplest way to move the rows to the corresponding positions? Let's do it, so we looked for the component and searched for "bootstrap right-click menu". Finally, we found our ContextMenu component. After careful study, I felt that the effect was okay, so I shared it here for the reference of gardeners who need to use it.
ContextMenu open source address: https://github.com/sydcanem/bootstrap-contextmenu
ContextMenu using Demo: http://sydcanem.com/bootstrap-contextmenu/
2. ContextMenu effect
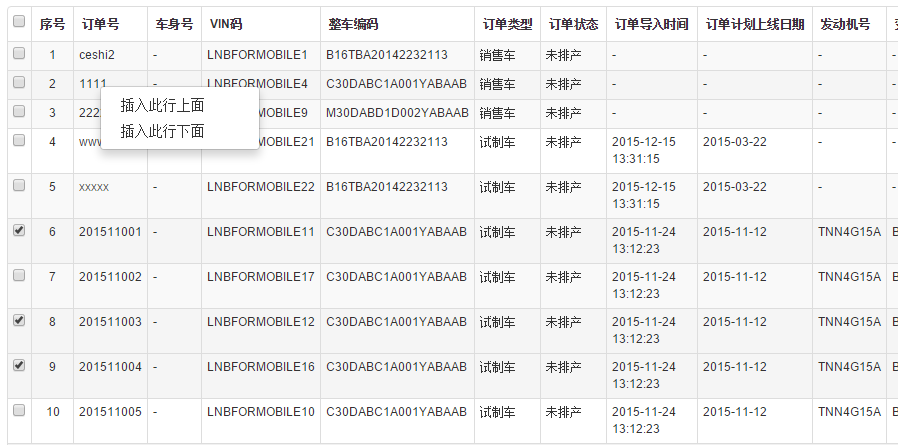
Initial right-click effect
Apply to projects
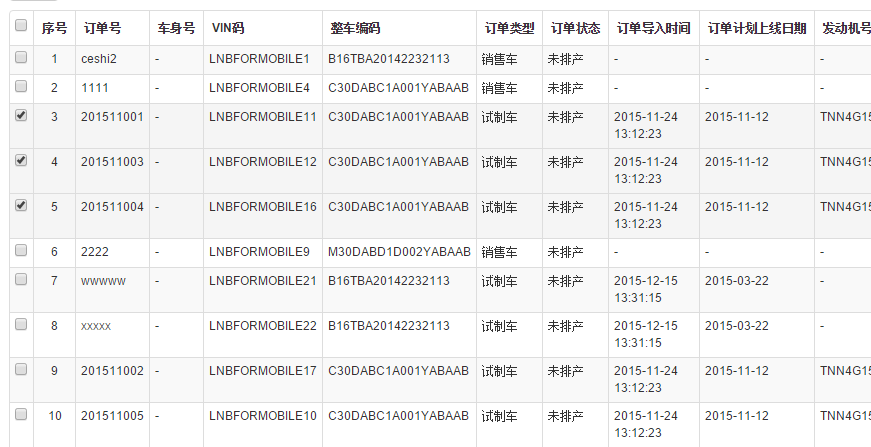
After executing the menu function
3. ContextMenu code example
In fact, it’s such a simple thing, let’s see how to use it.
1. Quote the corresponding documents. The key ones are bootstrap-contextmenu.js and prettify.js
<script src="/Scripts/jquery-1.9.1.min.js"></script>
<script src="/Content/bootstrap/js/bootstrap.min.js"></script>
<script src="/Content/boostrap-contextmenu/bootstrap-contextmenu.js"></script>
<script src="http://cdnjs.cloudflare.com/ajax/libs/prettify/r224/prettify.js"></script>
2. HTML preparation
  <div id="context-menu">
    <ul class="dropdown-menu" role="menu">
      <li><a tabindex="-1" href="#" operator="top">插入此行上面</a></li>
      <li><a tabindex="-1" href="#" operator="bottom">插入此行下面</a></li>
    </ul>
  </div>
3. JS initialization
The code is not difficult, just some table row operation logic. Things that need explanation:
(1) After performing remove and insert on a table row, the right-click menu function needs to be reinitialized, otherwise, it will no longer work after right-clicking once.
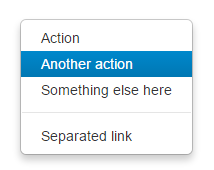
(2) If there are many menu function items, you need to use dividing lines to group them. Just add
and it will be done.
<div id="context-menu2">
     <ul class="dropdown-menu" role="menu">
       <li><a tabindex="-1">Action</a></li>
       <li><a tabindex="-1">Another action</a></li>
       <li><a tabindex="-1">Something else here</a></li>
       <li class="divider"></li>
       <li><a tabindex="-1">Separated link</a></li>
     </ul>
    </div>
(3) If you want to move the mouse to the menu to display a blue background, you need to reference another css file.
The effect is as follows:
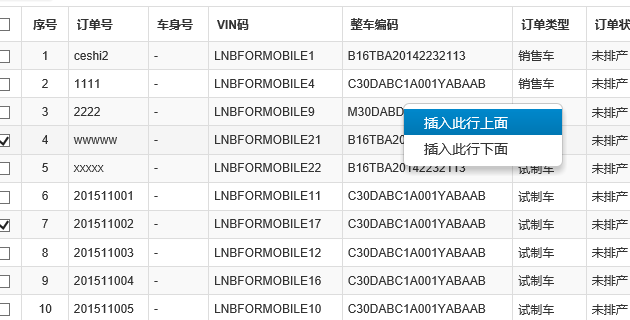
The above are some simple usages of bootstrap-ContextMenu component. It may not be perfect, but it can solve the general right-click menu needs very well.

Hot AI Tools

Undresser.AI Undress
AI-powered app for creating realistic nude photos

AI Clothes Remover
Online AI tool for removing clothes from photos.

Undress AI Tool
Undress images for free

Clothoff.io
AI clothes remover

Video Face Swap
Swap faces in any video effortlessly with our completely free AI face swap tool!

Hot Article

Hot Tools

Notepad++7.3.1
Easy-to-use and free code editor

SublimeText3 Chinese version
Chinese version, very easy to use

Zend Studio 13.0.1
Powerful PHP integrated development environment

Dreamweaver CS6
Visual web development tools

SublimeText3 Mac version
God-level code editing software (SublimeText3)

Hot Topics
 1389
1389
 52
52
 How to get the bootstrap search bar
Apr 07, 2025 pm 03:33 PM
How to use Bootstrap to get the value of the search bar: Determines the ID or name of the search bar. Use JavaScript to get DOM elements. Gets the value of the element. Perform the required actions.
 How to use bootstrap in vue
Apr 07, 2025 pm 11:33 PM
Using Bootstrap in Vue.js is divided into five steps: Install Bootstrap. Import Bootstrap in main.js. Use the Bootstrap component directly in the template. Optional: Custom style. Optional: Use plug-ins.
 How to do vertical centering of bootstrap
Apr 07, 2025 pm 03:21 PM
Use Bootstrap to implement vertical centering: flexbox method: Use the d-flex, justify-content-center, and align-items-center classes to place elements in the flexbox container. align-items-center class method: For browsers that do not support flexbox, use the align-items-center class, provided that the parent element has a defined height.
 How to write split lines on bootstrap
Apr 07, 2025 pm 03:12 PM
There are two ways to create a Bootstrap split line: using the tag, which creates a horizontal split line. Use the CSS border property to create custom style split lines.
 How to use bootstrap button
Apr 07, 2025 pm 03:09 PM
How to use the Bootstrap button? Introduce Bootstrap CSS to create button elements and add Bootstrap button class to add button text
 How to resize bootstrap
Apr 07, 2025 pm 03:18 PM
To adjust the size of elements in Bootstrap, you can use the dimension class, which includes: adjusting width: .col-, .w-, .mw-adjust height: .h-, .min-h-, .max-h-
 How to set up the framework for bootstrap
Apr 07, 2025 pm 03:27 PM
To set up the Bootstrap framework, you need to follow these steps: 1. Reference the Bootstrap file via CDN; 2. Download and host the file on your own server; 3. Include the Bootstrap file in HTML; 4. Compile Sass/Less as needed; 5. Import a custom file (optional). Once setup is complete, you can use Bootstrap's grid systems, components, and styles to create responsive websites and applications.
 How to insert pictures on bootstrap
Apr 07, 2025 pm 03:30 PM
There are several ways to insert images in Bootstrap: insert images directly, using the HTML img tag. With the Bootstrap image component, you can provide responsive images and more styles. Set the image size, use the img-fluid class to make the image adaptable. Set the border, using the img-bordered class. Set the rounded corners and use the img-rounded class. Set the shadow, use the shadow class. Resize and position the image, using CSS style. Using the background image, use the background-image CSS property.


