

PHP extension to mongodb (first acquaintance)_javascript skills

Under the coercion of the blogger, I would like to share a little with you. I hereby declare that the blogger is very simple and honest. This is just a coercion, and there is absolutely no inducement.
Since there is less Chinese information related to mongodb, I will continue to share it with you if I have the opportunity. I hope this little sharing can bring something to everyone. Let’s get back to the point, please read on.
Why do you say "we met each other for the first time"? Because the data storage format of mongodb is a kind of data storage format. MongoDB's document structure is BJSON format (full name of BJSON: BinaryJSON), and the BJSON format itself supports saving data in binary format. , so the binary format data of the file can be saved directly into the MongoDB document structure.
MongoDB is composed of three levels: database, collection, and document object. Correspondence between
and relational database:
Relational database MongoDB database
Database database
table collection
Row document
can be used in MongoDB When creating an index, there is a default hidden field _id in the collection.
Installation and use
Install mongodb under windows and simply use mongodb command
1. Download and unzip the file
Go to the official website to download the appropriate version http:/ /www.mongodb.org/downloads
For example: http://fastdl.mongodb.org/win32/mongodb-win32-i386-2.2.1.zip
Unzip and place it under the corresponding drive letter, for example : D:mongodb
2. Installation
1. Add the bin directory to the environment variable D:mongodbbin
2. Create a data folder under D:mongodb to store data. You also need to create a db folder under the data file. Without the db folder, mongodb cannot start normally
3. Simple method to start mongodb:
Enter the bin directory
C:Documents and Settingsme>D:
D:>cd mongodb/bin
D: mongodbbin>mongod –dbpath D:/mongodb/data
D:mongodbbin>mongod –dbpath D:/mongodb/data
The following content is displayed:
Sun Jan 16 14:56:03 MongoDB starting: pid=860 port=27017 dbpath=D:/mongodb/d
ata 32-bit
** NOTE: when using MongoDB 32 bit, you are limited to about 2 gigabytes of data
** see http://blog.mongodb.org/post/137788967/32-bit-limitations
Sun Jan 16 14:56:03 db version v2.2.1, pdfile version 4.5
Sun Jan 16 14:56:03 git version: 0eb017e9b2828155a67c5612183337b89e12e291
Sun Jan 16 14:56:03 sys info: windows (5, 1, 2600, 2, 'Service Pack 3 ′) BOOST_LI
B_VERSION=1_35
Sun Jan 16 14:56:03 [initandlisten] waiting for connections on port 27017
Sun Jan 16 14:56:03 [websvr] web admin interface listening on port 28017
Note: You must first create the data folder and execute it in the bin directory. The default connection port of the mongoDB server is 27017
2. Add it to the registry to start as a Windows service. Like mysql, the service will be automatically started when Windows is started. Go to the bin directory and execute
D:mongodbbin>mongod --logpath D:mongodbloglog1.log --logappend
-- dbpath D:mongodbdata --directoryperdb --serviceName mongodb –install
After completion, output the following content (anti-virus software such as 360 will block it and need to be allowed to pass)
all output going to: D:mongodblogslog1 .log
Creating service mongodb
Service creation successful.
Service can be started from the command line via 'net start “mongodb″'.
D:mongodbbin>
Among them: loglog1.log log is output in append mode, –serviceName mongodb is the service name
Start MongoDB: net start mongodb
Stop MongoDB: net stop mongodb
Note: Restart after adding to the registry The computer can see that it has been started in the service item, but the service is still not started. When restarting the service, it is found that it is blocked by 360 Security Guards and needs to be confirmed again before it can be started.
3. A simple command to use mongodb. Go to the bin command and execute mongo.exe to enter the management interface. The default is to enter the test account.
D:mongodbbin>mongo.exe
MongoDB shell version: 2.2.1
connecting to: test
> show dbs;
admin
local
> help;View command prompt

3. Next, the same operation as for all databases requires adding a user’s defense permission
But the user created at this time does not have the permission to view the collection. What to do! In fact, it's easy to handle. I've already had a headache for everyone, so students who can persist in seeing this with their heart won't have any more headaches.
Execute the following command in the mongo.exe management interface you just entered
>use admin
>db.auth("sa","sa")
>use web
>show collections
This time It's clear now.
4. MongoDB can create a database using use as follows: use web; This will create a database
Switch to the web database. If it does not exist, it will automatically be inserted after the data is inserted. Create one, and you can see a new web folder in the data directory
> use web;
switched to db web
> db.my.save({a:10}); Save a message to collection my if it does not exist collection will automatically create a
> db.my.find(); retrieve all records
{ “_id” : ObjectId(“4d32c9204e6100000000691e”), “a” : 10 }
> show collections;
my
system.indexes
>exit;Exit
The installation and user permission settings of Mongodb have ended.
The following introduces several graphics management tools
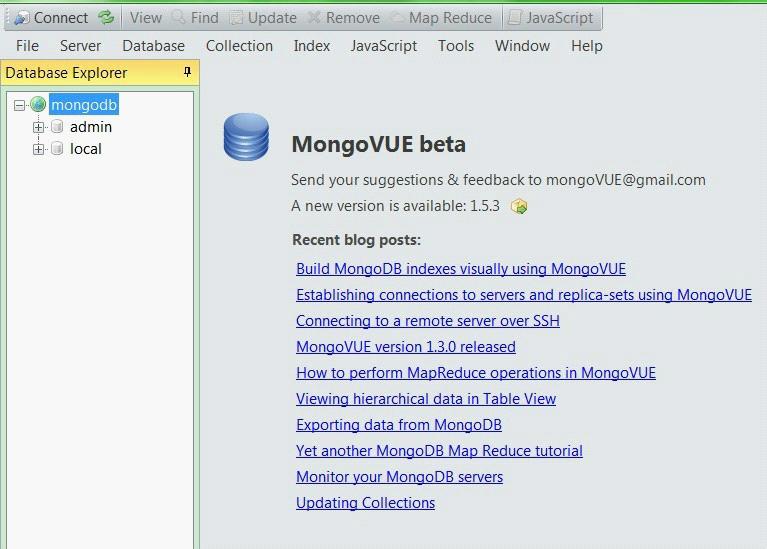
1. Use the graphics management tool "MongoVUE 0.9.7.2"
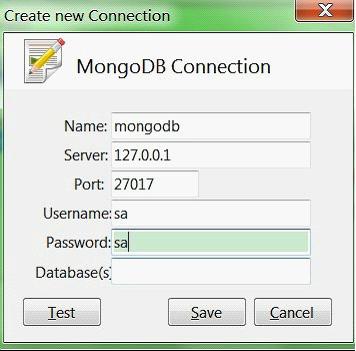
You can see it after entering
2. A more recommended management software is "rockmongo"
It needs the support of PHP operating environment. I prefer it because PHP programmers have a ready-made environment and don't need to use it in vain, haha .
(1). Download a rockmongo, unzip it and put it in the web directory. Download address: http://rockmongo.com/downloads
If you don’t have a PHP operating environment but want to use rockmongo, you can Integrate package download in the download address.
(2). Download a php_mongo.dll that supports mongodb. Download address: https://github.com/mongodb/mongo-php-driver/downloads
(3). Add it to php.ini This line of code extension=php_mongo.dll Then restart apache and check php_info
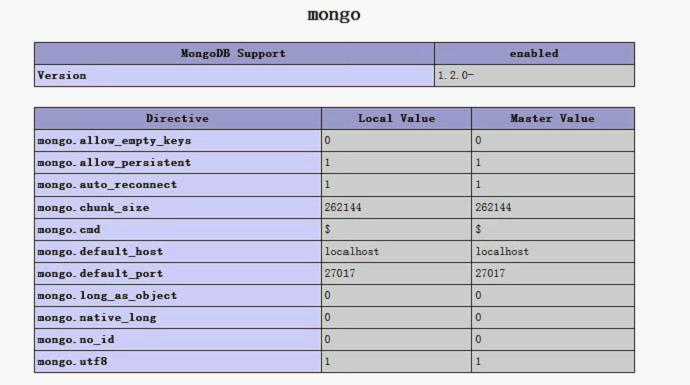
means the installation has been successful
(4). Enter the address of rockmongo in the browser, a login box will appear, and you can log in. The default user is: admin Password: admin
There are many other tools, you can explore slowly.

Hot AI Tools

Undresser.AI Undress
AI-powered app for creating realistic nude photos

AI Clothes Remover
Online AI tool for removing clothes from photos.

Undress AI Tool
Undress images for free

Clothoff.io
AI clothes remover

Video Face Swap
Swap faces in any video effortlessly with our completely free AI face swap tool!

Hot Article
Hot Tools

Notepad++7.3.1
Easy-to-use and free code editor

SublimeText3 Chinese version
Chinese version, very easy to use

Zend Studio 13.0.1
Powerful PHP integrated development environment

Dreamweaver CS6
Visual web development tools

SublimeText3 Mac version
God-level code editing software (SublimeText3)
Hot Topics
 1386
1386
 52
52

 How to connect navicat to mongodb
Apr 24, 2024 am 11:27 AM
How to connect navicat to mongodb
Apr 24, 2024 am 11:27 AM
To connect to MongoDB using Navicat, you need to: Install Navicat Create a MongoDB connection: a. Enter the connection name, host address and port b. Enter the authentication information (if required) Add an SSL certificate (if required) Verify the connection Save the connection
 What is the use of net4.0
May 10, 2024 am 01:09 AM
What is the use of net4.0
May 10, 2024 am 01:09 AM
.NET 4.0 is used to create a variety of applications and it provides application developers with rich features including: object-oriented programming, flexibility, powerful architecture, cloud computing integration, performance optimization, extensive libraries, security, Scalability, data access, and mobile development support.
 Integration of Java functions and databases in serverless architecture
Apr 28, 2024 am 08:57 AM
Integration of Java functions and databases in serverless architecture
Apr 28, 2024 am 08:57 AM
In a serverless architecture, Java functions can be integrated with the database to access and manipulate data in the database. Key steps include: creating Java functions, configuring environment variables, deploying functions, and testing functions. By following these steps, developers can build complex applications that seamlessly access data stored in databases.
 How to configure MongoDB automatic expansion on Debian
Apr 02, 2025 am 07:36 AM
How to configure MongoDB automatic expansion on Debian
Apr 02, 2025 am 07:36 AM
This article introduces how to configure MongoDB on Debian system to achieve automatic expansion. The main steps include setting up the MongoDB replica set and disk space monitoring. 1. MongoDB installation First, make sure that MongoDB is installed on the Debian system. Install using the following command: sudoaptupdatesudoaptinstall-ymongodb-org 2. Configuring MongoDB replica set MongoDB replica set ensures high availability and data redundancy, which is the basis for achieving automatic capacity expansion. Start MongoDB service: sudosystemctlstartmongodsudosys
 How to ensure high availability of MongoDB on Debian
Apr 02, 2025 am 07:21 AM
How to ensure high availability of MongoDB on Debian
Apr 02, 2025 am 07:21 AM
This article describes how to build a highly available MongoDB database on a Debian system. We will explore multiple ways to ensure data security and services continue to operate. Key strategy: ReplicaSet: ReplicaSet: Use replicasets to achieve data redundancy and automatic failover. When a master node fails, the replica set will automatically elect a new master node to ensure the continuous availability of the service. Data backup and recovery: Regularly use the mongodump command to backup the database and formulate effective recovery strategies to deal with the risk of data loss. Monitoring and Alarms: Deploy monitoring tools (such as Prometheus, Grafana) to monitor the running status of MongoDB in real time, and
 Navicat's method to view MongoDB database password
Apr 08, 2025 pm 09:39 PM
Navicat's method to view MongoDB database password
Apr 08, 2025 pm 09:39 PM
It is impossible to view MongoDB password directly through Navicat because it is stored as hash values. How to retrieve lost passwords: 1. Reset passwords; 2. Check configuration files (may contain hash values); 3. Check codes (may hardcode passwords).
 Major update of Pi Coin: Pi Bank is coming!
Mar 03, 2025 pm 06:18 PM
Major update of Pi Coin: Pi Bank is coming!
Mar 03, 2025 pm 06:18 PM
PiNetwork is about to launch PiBank, a revolutionary mobile banking platform! PiNetwork today released a major update on Elmahrosa (Face) PIMISRBank, referred to as PiBank, which perfectly integrates traditional banking services with PiNetwork cryptocurrency functions to realize the atomic exchange of fiat currencies and cryptocurrencies (supports the swap between fiat currencies such as the US dollar, euro, and Indonesian rupiah with cryptocurrencies such as PiCoin, USDT, and USDC). What is the charm of PiBank? Let's find out! PiBank's main functions: One-stop management of bank accounts and cryptocurrency assets. Support real-time transactions and adopt biospecies
 How to open table connection in navicat
Apr 24, 2024 am 09:39 AM
How to open table connection in navicat
Apr 24, 2024 am 09:39 AM
Steps to access table connections through Navicat: 1. Connect to the database; 2. Browse to the required database; 3. Right-click the table and select "Edit Table"; 4. View the table data.
