About jQuery UI usage experience and skills_jquery
1 jQuery UI
2 works for me
2.1 Tabs
2.2 Accordion
2.2.1 Using basic Accordion
2.2.2 Opening multiple tabs
2.2.3 Accordion embedding Set
3 Apply theme to the plug-in——Theme Roller
3.1 Change color scheme
3.2 Change icon
4 Related links
jQuery UI

jQuery UI is a set of interface tools developed based on jQuery. It includes almost all the plug-ins and animation special effects that you can think of and use on the web page, making it easier for a coder who has no sense of art and only knows how to code. It takes very little effort to create a stunning interface. It allows you to ‘take it’ and use it when making interfaces. Another point is that it is free and open source, and users can customize or even redesign it according to their needs.
2 works for me
Let’s take a look at how to use jQuery UI in the project using the Tabs and Accordion plug-ins. Detailed usage documentation and demonstrations of other plug-ins can be learned here, but they are only in English.
2.1Tabs
Plug-ins in the form of Tabs are widely used in web pages and desktop applications. They can be used as menus or as tabs for a small part of the content
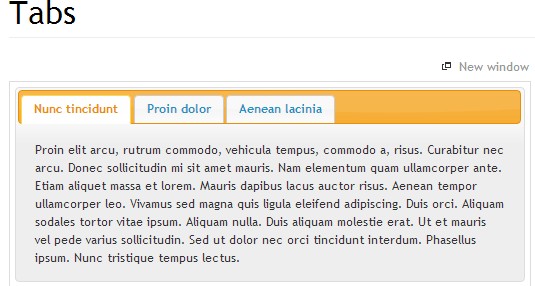
In order to render Tabs on the page Plug-in, we need to define a Div, select it in the <script> script code, and apply the tabs method to it. <br><div class="codetitle"> <span><a style="CURSOR: pointer" data="3334" class="copybut" id="copybut3334" onclick="doCopy('code3334')"><u>Copy code</u></a></span> The code is as follows:</div> <div class="codebody" id="code3334"> <br><div id="tabs"> <br></div> <br><script type="text/javascript"> <br>$(document).ready(function () { <br>$("#tabs").tabs(); <br>}) <br></script>
You will not see anything when you run the program now, because we have not defined the tabs to be displayed in the main Div, we have just defined them. A place to put tabs. Now define an unordered list in the tabs Div. The list items determine the number of tabs to be displayed and the tab names to be displayed.
Three list items are defined here, named Tabs1, Tabs2, and Tabs3. The three Divs below the list correspond to the three labels defined above, which are used to present the text to be displayed in each label. The page part is basically completed. Run the program:
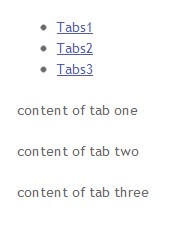
Picture 2
It is worth noting that the effect in Figure 0 does not appear at this step, and the tabs style is not applied. There can only be one reason, and that is the style sheet. Later, a Google search revealed that the corresponding style sheet was not included in the page. This is not mentioned in the official demo, and no corresponding attention is given. I think the demo here should not omit an important line of code. Not everyone who uses jQuery UI for the first time can quickly find the problem. . For every newbie, before reaching this step, you need to Google to find out why the effect is not coming out. Once you find the problem, it's easy to fix it. Add a reference to the jQuery UI stylesheet in the page.
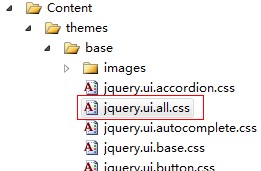
Picture 3
The final complete code is probably like this.
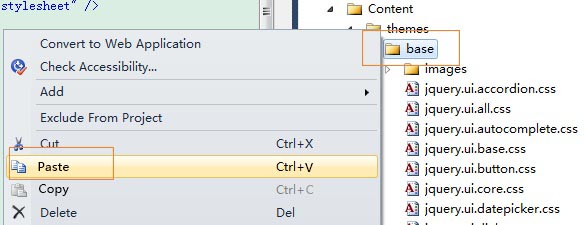
Since the project is generated using the MVC template, the jQuery UI CSS style sheet has been placed in the Content/themes/base folder. If not, you need to download it separately and put it into the project, and add it to the page Quote correctly.
Now refresh the page again and the effect will appear.
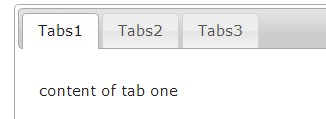
Picture 4
Since it is controlled by a style sheet, it means that we can customize it at will, change colors, etc. This will be introduced in the application style later.
There is something to be said about the Accordion control. Because for a thing, if it is not flexible enough and difficult to expand, it will bring great inconvenience to users.
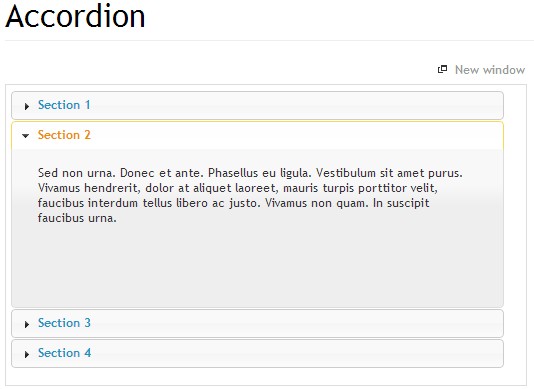
Picture 5
Let’s first look at how to apply the Accordion plug-in. We'll put it on our Tabs1 page. Like Tabs, it is very simple to apply. You only need to define the corresponding Div. After that, all the work you need to do in the script is just one sentence of code. Have you experienced the convenience brought by jQuery UI?
Delete the
tag and content in the previous tabs-1 Div and replace it with the following code.
The surrounding Div with the id of accordion is the container. Select it in the script code and apply the accordion method to it.
After that, each tag inside will be parsed into a clickable title, and the tag will be followed by
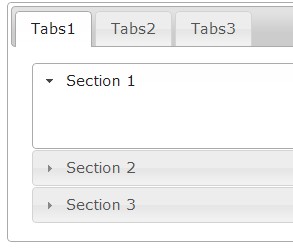
Picture 6
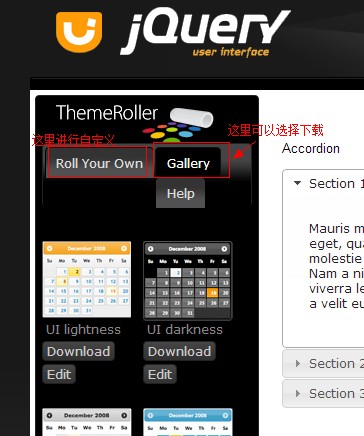
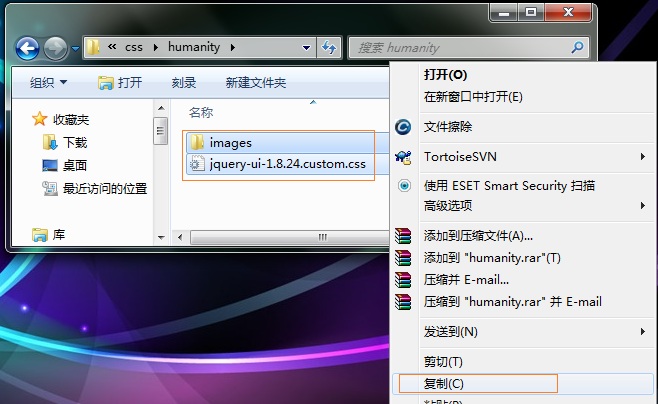
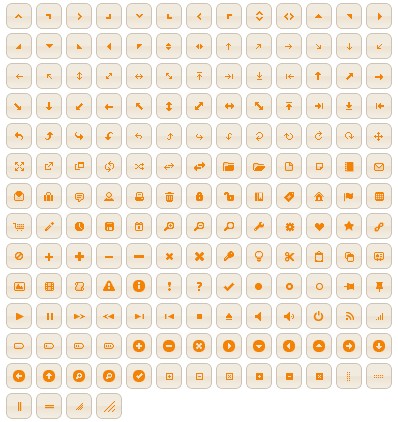
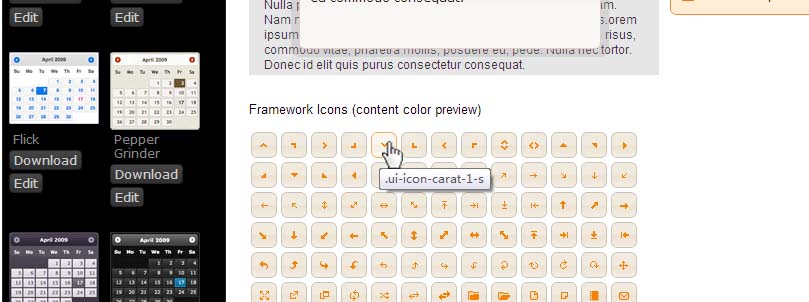
There are two points that need to be noted. The first is style. Every jQuery UI actually uses the style sheet mentioned above. If it has not been referenced into the page before, the Accordion effect here will not appear. Second, the format here needs to strictly follow the form of an tag followed by a Picture 7 Isn’t it a bit cheating? So if I need to layout in the section, I have to put two Div or more. Then you must install these contents into a div and then put them in section1, so that there will be no mistakes. To show that there are indeed two Divs, add a border to each Div. content of section 1.1 content of section 1.2 content of section 2 content of section 3 Picture 8 2.2.2 Implement opening multiple tabs The biggest flaw and most annoying feature of jQuery UI Accordion is that only one tab can be opened at the same time. For example, if Section1 is clicked, other Sections must be closed. What if I want to have several tabs open at the same time, and I don't want the open tabs to be closed because I click on another tab. Unfortunately, this plug-in does not provide the corresponding Option. What's even more awesome is that it is clearly stated in the official Demo that if you insist on keeping multiple tabs open at the same time, then you should not use our Accordion. Use whatever you like. Anyway, we just want to make it. It only supports one tab being opened. Picture 9 Well, I am not powerful enough to rewrite this Accordion plug-in, so I Google "expander" "multi open accordion" and the like. Indeed, there are still many friends who have such needs, and some excellent people have given them. There are some solutions, but they are all a bit complicated. Finally, I suddenly realized that it would be enough to define each section as an accordion. An action can only open one section at the same time. If I want each section to be opened and closed at will without affecting other sections, then just replace each section with an accordion, and only define one section in the accordion. It sounds a bit confusing. Modify the previous code below, define three divs with IDs of accordion1, accordion2, and accordion3 and put the corresponding content: Picture 10 Another problem is the nesting of accordions. I also encountered some trouble when trying to implement this function at first. For example, now we want to put another accordion in section 1. Let’s name it subaccordion. What needs to be noted is that this subaccordion must be placed in the Div “content of section1”. Any other form of placement The correct effect will not appear even if it is played. If you think that adding an tag and a Figure 11 What is a little imperfect is the scroll bar appearing in Section1. Next, we set the height attribute and make the sub-accortion inside it be in a collapsed state at first. Modify the script code as follows: Figure 12 From here you can already see that you can set whether any label is in a collapsed or open state at first. Of course, you can also disable an accommodation, so that clicking on the title will not cause the folding and opening action. 3 Apply a theme to the plug-in——Theme Roller 3.1Change the color Now, we can easily use jQuery UI to create the interface. But just imagine, if so many people are using it, will it make the entire Internet the same? As soon as users open the browser, they will see the same thing wherever they go, and it will be a bit confusing. And we also need to make some adjustments when using these plug-ins to match the theme, tone, etc. of our own website. jQuery UI supports user-defined styles, and you can even change the implementation code for more advanced customization, if you have the ability. You can modify the corresponding css file to achieve the purpose of modifying the style, but this is not as good as going to the official website's theme website to download the theme you need, and you can also edit the theme you want online. . After entering the theme roller, select the theme style you like and download it. Picture 13 After unzipping, go to the css folder, copy the jquery-ui-1.8.24.custom.css file and images folder to the appropriate location in the project, and then need to correctly reference it on the page to apply the style . No matter what theme you use, the image names used in the theme are the same, just the colors are different. Since this example is a project generated using an MVC template, the pictures that already exist in the imges folder in the project and the downloaded pictures may have partially the same name. When copying, you will be asked whether to replace, and click OK. Figure 14 Figure 15 At this time, change the previously written style sheet reference to a reference to the customer style sheet Then refresh the page, the effect is as follows: Figure 16 It should be noted that it is best not to change the relative position of jquery-ui-1.8.24.custom.css and the images folder, that is, put them together, because the css file will call the images folder. For pictures, if you change their relative positions, you need to change all the call paths to the pictures in css to make the theme work properly. Not only the colors, the jQuery UI theme also presets a lot of icons for us to choose from. We can see a lot of rich icons on the web page. The colors of these icons correspond to the theme you downloaded and are included in the imges folder. Figure 17 The problem is how to specify the exact one we want among so many icons. For example, now I want to change the triangle icon on the left side of the Accordion title into a linear pointed shape. The following is just a little tip provided by me. Point the mouse to the icon you want, and the tooltip text will appear. This text corresponds to the icon. Figure 18 Now that we have the name, we can go to the script code to make modifications. Picture 19 Here is a basic introduction to the use of jQuery UI. Of course, jQuery UI not only includes the two plug-ins of tabs and accordion. The use of other plug-ins and effects is also similar. Detailed usage and setting methods can be found in the official documentation and demo. Postscript: Because jQuery is already so popular, if it is combined with jQuery UI, the burden on programmers will be reduced to a greater extent. While enjoying these conveniences, we have to silently thank our colleagues who have contributed to jQuery and UI. At the same time, we can also do our part to enrich and expand jQuery's plug-ins and UI libraries. Example source code download:http://xiazai.jb51.net/201210/yuanma/jQueryUIExample_jb51.rar AI-powered app for creating realistic nude photos Online AI tool for removing clothes from photos. Undress images for free AI clothes remover Generate AI Hentai for free. Easy-to-use and free code editor Chinese version, very easy to use Powerful PHP integrated development environment Visual web development tools God-level code editing software (SublimeText3) In Elden's Ring, the UI page of this game will be automatically hidden after a period of time. Many players do not know how the UI is always displayed. Players can select the gauge display configuration in the display and sound configuration. Click to turn it on. Why does the Elden Ring UI keep displaying? 1. First, after we enter the main menu, click [System Configuration]. 2. In the [Display and Sound Configuration] interface, select the meter display configuration. 3. Click Enable to complete. Detailed explanation of jQuery reference method: Quick start guide jQuery is a popular JavaScript library that is widely used in website development. It simplifies JavaScript programming and provides developers with rich functions and features. This article will introduce jQuery's reference method in detail and provide specific code examples to help readers get started quickly. Introducing jQuery First, we need to introduce the jQuery library into the HTML file. It can be introduced through a CDN link or downloaded How to use PUT request method in jQuery? In jQuery, the method of sending a PUT request is similar to sending other types of requests, but you need to pay attention to some details and parameter settings. PUT requests are typically used to update resources, such as updating data in a database or updating files on the server. The following is a specific code example using the PUT request method in jQuery. First, make sure you include the jQuery library file, then you can send a PUT request via: $.ajax({u How to remove the height attribute of an element with jQuery? In front-end development, we often encounter the need to manipulate the height attributes of elements. Sometimes, we may need to dynamically change the height of an element, and sometimes we need to remove the height attribute of an element. This article will introduce how to use jQuery to remove the height attribute of an element and provide specific code examples. Before using jQuery to operate the height attribute, we first need to understand the height attribute in CSS. The height attribute is used to set the height of an element Title: jQuery Tips: Quickly modify the text of all a tags on the page In web development, we often need to modify and operate elements on the page. When using jQuery, sometimes you need to modify the text content of all a tags in the page at once, which can save time and energy. The following will introduce how to use jQuery to quickly modify the text of all a tags on the page, and give specific code examples. First, we need to introduce the jQuery library file and ensure that the following code is introduced into the page: < Title: Use jQuery to modify the text content of all a tags. jQuery is a popular JavaScript library that is widely used to handle DOM operations. In web development, we often encounter the need to modify the text content of the link tag (a tag) on the page. This article will explain how to use jQuery to achieve this goal, and provide specific code examples. First, we need to introduce the jQuery library into the page. Add the following code in the HTML file: How to tell if a jQuery element has a specific attribute? When using jQuery to operate DOM elements, you often encounter situations where you need to determine whether an element has a specific attribute. In this case, we can easily implement this function with the help of the methods provided by jQuery. The following will introduce two commonly used methods to determine whether a jQuery element has specific attributes, and attach specific code examples. Method 1: Use the attr() method and typeof operator // to determine whether the element has a specific attribute jQuery is a popular JavaScript library that is widely used to handle DOM manipulation and event handling in web pages. In jQuery, the eq() method is used to select elements at a specified index position. The specific usage and application scenarios are as follows. In jQuery, the eq() method selects the element at a specified index position. Index positions start counting from 0, i.e. the index of the first element is 0, the index of the second element is 1, and so on. The syntax of the eq() method is as follows: $("s
You originally thought that these two divs would be wrapped in the first section, but in fact the real effect would be a bit outrageous:
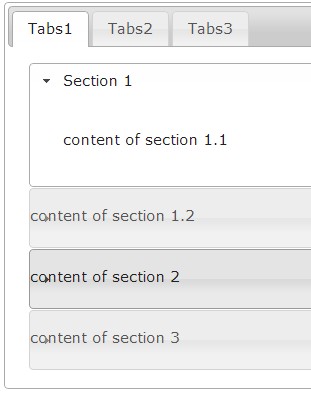
Section 1
Section 2
Section 3


Then modify the script code:
Run the program and find that three sections are opened at the same time and cannot be closed! This is obviously not the result we want. The reason is very simple. If the above-mentioned accordion plug-in has and only one section is opened, and we only define one section in each accordion, then this section should undoubtedly be open, because there is only one section. , after closing it, no other section can be opened, so we can't close it even if we want to.
But fortunately, we can make this only section foldable and open by setting the accordion's collapsible to true. Just modify the script as follows:
Run the program again, Okay, everything is as we thought.
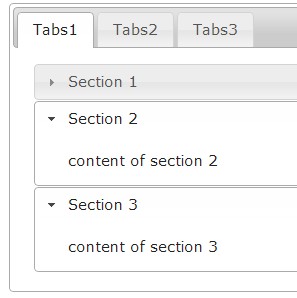
Section 1
.....
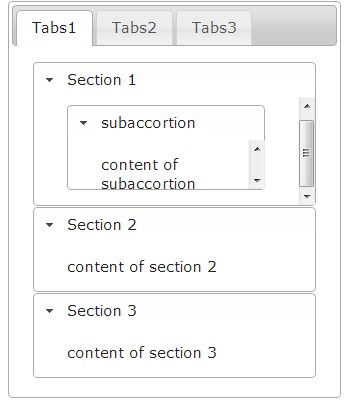
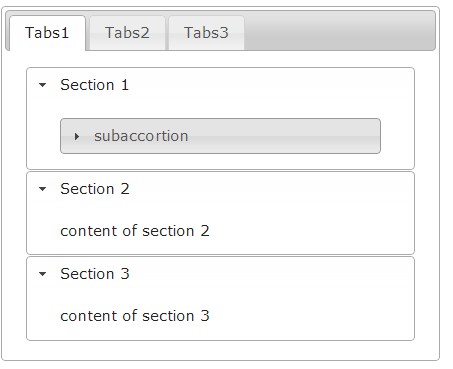
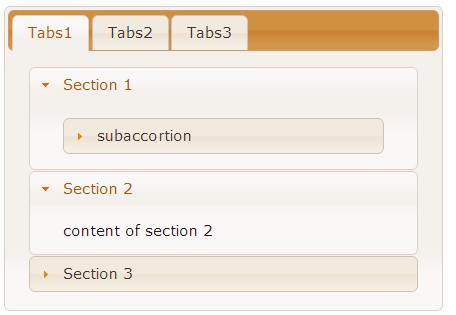
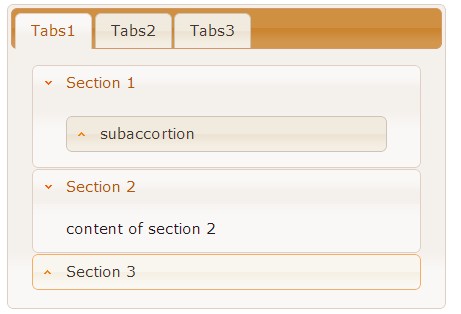
Finally let’s see the effect, perfect.
Related links
jQuery UI official website
http://jqueryui.com/
theme roller
http://jqueryui.com/themeroller/
jQuery Learning: Zhang Ziqiu's "Learning jQuery from Scratch" series :
http://www.jb51.net/article/24908.htm
Hot AI Tools

Undresser.AI Undress

AI Clothes Remover

Undress AI Tool

Clothoff.io

AI Hentai Generator

Hot Article

Hot Tools

Notepad++7.3.1

SublimeText3 Chinese version

Zend Studio 13.0.1

Dreamweaver CS6

SublimeText3 Mac version

Hot Topics
 1384
1384
 52
52
 Why does the Elden Ring UI keep showing up?
Mar 11, 2024 pm 04:31 PM
 Detailed explanation of jQuery reference methods: Quick start guide
Feb 27, 2024 pm 06:45 PM
 How to use PUT request method in jQuery?
Feb 28, 2024 pm 03:12 PM
 How to remove the height attribute of an element with jQuery?
Feb 28, 2024 am 08:39 AM
 jQuery Tips: Quickly modify the text of all a tags on the page
Feb 28, 2024 pm 09:06 PM
 Use jQuery to modify the text content of all a tags
Feb 28, 2024 pm 05:42 PM
 How to tell if a jQuery element has a specific attribute?
Feb 29, 2024 am 09:03 AM
 Understand the role and application scenarios of eq in jQuery
Feb 28, 2024 pm 01:15 PM


