

Fine Uploader文件上传组件应用介绍

最近在处理后台数据时需要实现文件上传.考虑到对浏览器适配上采用Fine Uploader. Fine Uploader 采用ajax方式实现对文件上传.同时在浏览器中直接支持文件拖拽[对浏览器版本有要求类似IE版本必须是9或是更高的IE10].在不同浏览器中提供统一用户体验.该组件基本覆盖目前所有主流浏览器.同时没有任何第三方组件依赖.相当Clear.在服务器端已经覆盖支持了ASP.NET/ColdFusion/Java/Node.js/Perl/PHP/Python. 对上传细节类似限制文件大小,文件类型,文件上传的数量等通过统一接口以暴露选项方式操作.
看到Github 上Fine Uploader 按照官方的说法. Fine Uploader前身是Ajax Upload. 新版本Fine Uploader主要添加一些新特性.从1.0版本发布的Realse Note来看.二者最大的区别在于.Fine Uploder不在基于Jquery组件.而某些细节处理也更加统一严格.类似返回值全部统一为Json格式.对后台服务器操作和前端Dom对象一些操作Code全部集中Js Script脚本文件中.这样集成使Fine Uploader组件使用非常简单.只需要添加一个CSS+JavaScript文件即可实现文件上传.大大简化用户引用和操作组件难度.
Fine Uploader特点如下:
Fine Uploader Features:
A:支持文件上传进度显示.
B:文件拖拽浏览器上传方式
C:Ajax页面无刷新.
D:多文件上传.
F:跨浏览器.
E:跨后台服务器端语言.
在Git Hub上Fine Uploader上下载打包源码,在Php Designer 8中打开其源码可以看到其源码结构如下:
在根目录中可以看到Client客户端调用需要使用文件.Server目录则是对应不同语言Perl/Php/Asp.net[VB]等版本实现.test目录则有包含一个完整本地Sample Demo.可供参考.
如何快速构建一个简单Demo? 其实官方在Basic-Demo-Page上已经给出一个简单的演示.这里基于Bootstrap方式构建.
首先新建一个Html空白页面.命名FineUploderDemo.html.添加如下CSS引用如下:
复制代码 代码如下:
这两个文件时必须引用的.fineuploader.css则是对应下载Fine Uploder源码Client目录下.fineuploder.css 提供JS脚本中所需的CSS样式,主要包括按钮的样式、进度显示的样式以及上传结果的样式.添加JavaScript文件引用如下:
复制代码 代码如下:
其中uploder.js和uploder.basic.js则是前端的所有上传功能都在该脚本中实现.必须引用.
同时添加client目录下processing和loading两张进度显示所需要的动态图片.该图片都在fineuploder.css文件调用.
在body添加如下Code:
复制代码 代码如下:
<script> <BR>function createUploader() { <BR>var uploader = new qq.FineUploader({ <BR>element: document.getElementById('bootstrapped-fine-uploader'), <BR>request: { <BR>endpoint: 'server/handlerfunction' <BR>}, <BR>text: { <BR>uploadButton: '<i class="icon-upload icon-white"> Click me now and upload a product image' <BR>}, <BR>template: <BR>'<div class="qq-uploader span12">' + <BR>'<div class="code" style="position:relative; padding:0px; margin:0px;"><pre class='brush:php;toolbar:false;'><span>{dragZoneText}</span></pre><div class="contentsignin">Copy after login</div></div>' + <BR>'<div class="qq-upload-button btn btn-success" style="width: auto;">{uploadButtonText}' + <BR>'<span class="qq-drop-processing"><span>{dropProcessingText}'+ <BR>'<span class="qq-drop-processing-spinner">' + <BR>'<ul class="qq-upload-list" style="margin-top: 10px; text-align: center;">' + <BR>'', <BR>classes: { <BR>success: 'alert alert-success', <BR>fail: 'alert alert-error' <BR>}, <BR>debug: true <BR>}); <BR>} <br><br>window.onload = createUploader; <BR></script>
这是基于Bootstrap实现对Fine Uploader最简单的前端调用.前端一般需要做两件事A:添加Css+Js文件引用.B:在Js中实例化qq.FineUploder对象.运行效果如下:
查看JS构建qq.Fineuploader对象创建过程.首先指定Fine Uploader插件的Dom元素.通过Dom获取操作.request则是对应服务器端实现文件路径.在这建议不要自己构建服务器端处理.而是直接采用官方提供的实现文件修改即可.template则是对应上传文件添加内容模版也可以自己修改.debug是一个布尔值.用来控制是否使用浏览器的控制台打印Fine Uploader的调试信息,默认为false.
qq.FineUploader对象还有如下控制参数:
validation:该参数一般用来在执行上传文件操作前.在客户端做一些验证.验证操作包含文件格式.文件大小.等添加格式如下:
复制代码 代码如下:
validation:
{
allowedExtensions: ['jpeg', 'jpg', 'gif', 'png'],
sizeLimit: 204800 // 200 kB = 200 * 1024 bytes
}
allowedExtensions控制上传文件的后缀格式数组.
sizeLimit上传文件大小的上限,单位为byte的数值.浏览器不一定支持本设置.也可以在服务器端里设置.
minSizeLimit:上传文件大小的下限,单位为byte的数值.同上有些浏览器存在适配问题.建议统一在服务端设置.
另外针对qq.FineUploder对象在执行上传操作整个过程.定义了五个客户端可控做额外操作的事件.可以再callback参数下设置定义:
callbacks:
{
onSubmit: function(id, fileName) {
$messages.append('
},
onUpload: function(id, fileName) {
$('#file-' + id).addClass('alert-info')
.html('
 ' +
' + 'Initializing ' +
'“' + fileName + '”');
}
}
onSubmit事件:文件开始提交.调用参数格式如下:onSubmit:function(id,fileName){}.
onUpload事件: 文件开始上传.调用参数格式如下:onUpload: function(id, fileName) {}.
onProgress事件: 文件正在上传.调用参数格式如下:onProgress:function(id,fileName,loaded,total){}.
onComplete事件: 文件上传成功. 调用参数格式如下:onComplete:function(id,fileName,responseJSON){}.
onCancel事件: 取消文件上传.调用参数格式如下:onCancel:function(id,fileName){}.
如上五个事件基本覆盖整个上传文件操作中所有过程.完全以开放的形式可以再客户端操作.关于调用如上事件参数说明如下:
Id:表示第几个开始上传的文件.Fine Uploder定义是默认从0开始计数.
fileName:上传文件的文件名.
loaded:表示已经上传到服务器端数据的大小[byte].
total: 需要上传文件的大小.
responseJSON: 用来在上传操作完成后返回的Json格式的数据.通过Jquery反序列化出来对象.其中包含一个IsSuccess属性用来判断此次上传是否成功.
如果你想在上传过程向服务器端传递数据.可以通过如下参数控制:
params:用来向服务器端传递数据.注意params采用key-value的数组存储.采用Post方式发送给服务器端.一般传递参数格式如下:
复制代码 代码如下:
params:
{
argument1: "value1",
argument2: "value2"
},
ok.这时基本关于Fine Uploader客户端初始化和控制操作选项基本完成.当我们需要上传操作时.如果IsAuto=false时可以通过已经定义qq.FineUploader对象的uploadStoreFiles()方式手工触发上传操作:
复制代码 代码如下:
$('#triggerUpload').click(function() {
uploader2.uploadStoredFiles();
});
如果我们此时点击上传会发现.则提示上传失败. 因为还没有对上传服务器端做任何处理:
复制代码 代码如下:
request:
{
endpoint: 'server/handlerfunction'
},
这时我们需要在EndPoint指定处理文件上传的Php文件[这里是phpdemo].关于服务器端如果你没有已经成熟处理模块.还是推荐你使用官方Server目录上.这里我采用php环境则选中时php.php文件.对应客户端修改如下:
复制代码 代码如下:
request:
{
endpoint: 'controller/php.php'
}
打开php.php发现在文件头部说明该文件使用同时在文件定义三个类用来分别处理XMLHttpRequest、FormPost、BasicPost方式文件服务器端处理.在文件顶部注释中:
/****************************************
Example of how to use this uploader class...
You can uncomment the following lines (minus the require) to use
hese as your defaults.
// list of valid extensions, ex. array("jpeg", "xml", "bmp")
$allowedExtensions = array();
// max file size in bytes
$sizeLimit = 10 * 1024 * 1024;
//the input name set in the javascript
$inputName = 'qqfile'
require('valums-file-uploader/server/php.php');
$uploader = new qqFileUploader($allowedExtensions, $sizeLimit, $inputName);
// Call handleUpload() with the name of the folder, relative to PHP's getcwd()
$result = $uploader->handleUpload('uploads/');
// to pass data through iframe you will need to encode all html tags
header("Content-Type: text/plain");
echo htmlspecialchars(json_encode($result), ENT_NOQUOTES);
/******************************************/
已经详细说明如下Class调用方式.添加如下Php代码即可简单完成服务器端处理:
复制代码 代码如下:
$allowedExtensions = array("jpeg", "jpg", "bmp", "png");
$sizeLimit = 10 * 1024 * 1024;
$uploader = new qqFileUploader($allowedExtensions, $sizeLimit);
$result = $uploader->handleUpload('uploads/'); //folder for uploaded files
echo htmlspecialchars(json_encode($result), ENT_NOQUOTES);
allowExtensions则定义了允许上传文件的格式.
sizeLimit上限定义为10M.注意首先采用Phpinfo();方法输出当前php环境配置.一般默认情况默认上传文件最大大小为2M.如果你需要上传更大则修改php.ini文件配置参数 这里不再赘述.
uploder则是初始化qq.Fileuploder对象.并加载配置.
fineuploder调用处理上传函数.并传递服务器端存储上传文件存储路径.
echo想服务器端输出上传结果.必须.不然客户端接受不到指定responseJason参数用来判断上传后状态.
在进一步看看服务器端如何处理上传的找到handleUpload函数定义.
复制代码 代码如下:
/**
* Handle the uploaded file
* @param string $uploadDirectory
* @param string $replaceOldFile=true
* @returns array('success'=>true) or array('error'=>'error message')
*/
function handleUpload($uploadDirectory, $replaceOldFile = FALSE){
if (!is_writable($uploadDirectory)){
return array('error' => "Server error. Upload directory isn't writable.");
}
if (!$this->file){
return array('error' => 'No files were uploaded.');
}
$size = $this->file->getSize();
if ($size == 0) {
return array('error' => 'File is empty');
}
if ($size > $this->sizeLimit) {
return array('error' => 'File is too large');
}
$pathinfo = pathinfo($this->file->getName());
$filename = $pathinfo['filename'];
//$filename = md5(uniqid());
$ext = @$pathinfo['extension'];// hide notices if extension is empty
if($this->allowedExtensions && !in_array(strtolower($ext), $this->allowedExtensions)){
$these = implode(', ', $this->allowedExtensions);
return array('error' => 'File has an invalid extension, it should be one of '. $these . '.');
}
$ext = ($ext == '') ? $ext : '.' . $ext;
if(!$replaceOldFile){
/// don't overwrite previous files that were uploaded
while (file_exists($uploadDirectory . DIRECTORY_SEPARATOR . $filename . $ext)) {
$filename .= rand(10, 99);
}
}
$this->uploadName = $filename . $ext;
if ($this->file->save($uploadDirectory . DIRECTORY_SEPARATOR . $filename . $ext)){
return array('success'=>true);
} else {
return array('error'=> 'Could not save uploaded file.' .
'The upload was cancelled, or server error encountered');
}
}
在调用这个处理函数时.需要注意的是.传递的URL存储路径需要时绝对的.所以需要对传入路劲做一下格式化处理:
$uploadDirectory = $_SERVER['DOCUMENT_ROOT']."DS".$uploadDirectory;
对于is_writeable文件是否可写的判断.我个人认为还不够详细.is_writeable主要判断文件或目录是否存在.并可写才会返回true. 所以个人建议在is_writable前添加一个文件是否存在.这样更易于在客户端判断服务器端文件出错具体的情况:
复制代码 代码如下:
if (!file_exists($uploadDirectory)) {
return array('error' => "Server error. Upload directory dones't exist.");
}
在保存文件操作前.可以看到.处理函数分别做了四次判断.分别判断了 上传文件的数量、文件上传的大小、文件上传大小是否超过上限、另外在上传过程.如果我们多次想服务器端上传同一个文件.发现Fine Uploder处理方式是.并非是重写.而是从10-99随机一个数字重写命名该文件.并保存到目录下.当保存文件成功后.则想服务器端返回一个Json数据其中包含IsSuccess来指定此次上传操作是否操作成功. IsSuccess参数作为客户端判断此时操作唯一参数.
在上传操作过程发信很多出现“increase post_max_size and upload_max_filesize to 10M”错误,其实针对这个问题.主要是上传文件配置超过php环境默认的2M.需要在php.ini文件中把post_max_size和upload_max_filesize两项的值改到10M以上,然后重启Apache即可.或是参考Php官网针对配置说明 修改php.ini配置文件.
至此整个Fine Uploader配置流程已经全部完成.点击选择文件时.会如下效果:
提示上传成功.当然更多的请参考官方给出演示demo.如上从Fine Uploader源码角度分析其实现原理.

Hot AI Tools

Undresser.AI Undress
AI-powered app for creating realistic nude photos

AI Clothes Remover
Online AI tool for removing clothes from photos.

Undress AI Tool
Undress images for free

Clothoff.io
AI clothes remover

AI Hentai Generator
Generate AI Hentai for free.

Hot Article
Hot Tools

Notepad++7.3.1
Easy-to-use and free code editor

SublimeText3 Chinese version
Chinese version, very easy to use

Zend Studio 13.0.1
Powerful PHP integrated development environment

Dreamweaver CS6
Visual web development tools

SublimeText3 Mac version
God-level code editing software (SublimeText3)
Hot Topics


 Open source! Beyond ZoeDepth! DepthFM: Fast and accurate monocular depth estimation!
Apr 03, 2024 pm 12:04 PM
Open source! Beyond ZoeDepth! DepthFM: Fast and accurate monocular depth estimation!
Apr 03, 2024 pm 12:04 PM
0.What does this article do? We propose DepthFM: a versatile and fast state-of-the-art generative monocular depth estimation model. In addition to traditional depth estimation tasks, DepthFM also demonstrates state-of-the-art capabilities in downstream tasks such as depth inpainting. DepthFM is efficient and can synthesize depth maps within a few inference steps. Let’s read about this work together ~ 1. Paper information title: DepthFM: FastMonocularDepthEstimationwithFlowMatching Author: MingGui, JohannesS.Fischer, UlrichPrestel, PingchuanMa, Dmytr
 The operation process of WIN10 service host occupying too much CPU
Mar 27, 2024 pm 02:41 PM
The operation process of WIN10 service host occupying too much CPU
Mar 27, 2024 pm 02:41 PM
1. First, we right-click the blank space of the taskbar and select the [Task Manager] option, or right-click the start logo, and then select the [Task Manager] option. 2. In the opened Task Manager interface, we click the [Services] tab on the far right. 3. In the opened [Service] tab, click the [Open Service] option below. 4. In the [Services] window that opens, right-click the [InternetConnectionSharing(ICS)] service, and then select the [Properties] option. 5. In the properties window that opens, change [Open with] to [Disabled], click [Apply] and then click [OK]. 6. Click the start logo, then click the shutdown button, select [Restart], and complete the computer restart.
 Google is ecstatic: JAX performance surpasses Pytorch and TensorFlow! It may become the fastest choice for GPU inference training
Apr 01, 2024 pm 07:46 PM
Google is ecstatic: JAX performance surpasses Pytorch and TensorFlow! It may become the fastest choice for GPU inference training
Apr 01, 2024 pm 07:46 PM
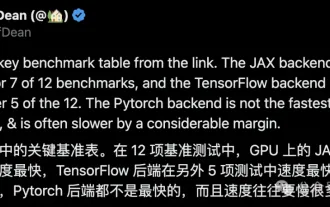
The performance of JAX, promoted by Google, has surpassed that of Pytorch and TensorFlow in recent benchmark tests, ranking first in 7 indicators. And the test was not done on the TPU with the best JAX performance. Although among developers, Pytorch is still more popular than Tensorflow. But in the future, perhaps more large models will be trained and run based on the JAX platform. Models Recently, the Keras team benchmarked three backends (TensorFlow, JAX, PyTorch) with the native PyTorch implementation and Keras2 with TensorFlow. First, they select a set of mainstream
 The vitality of super intelligence awakens! But with the arrival of self-updating AI, mothers no longer have to worry about data bottlenecks
Apr 29, 2024 pm 06:55 PM
The vitality of super intelligence awakens! But with the arrival of self-updating AI, mothers no longer have to worry about data bottlenecks
Apr 29, 2024 pm 06:55 PM
I cry to death. The world is madly building big models. The data on the Internet is not enough. It is not enough at all. The training model looks like "The Hunger Games", and AI researchers around the world are worrying about how to feed these data voracious eaters. This problem is particularly prominent in multi-modal tasks. At a time when nothing could be done, a start-up team from the Department of Renmin University of China used its own new model to become the first in China to make "model-generated data feed itself" a reality. Moreover, it is a two-pronged approach on the understanding side and the generation side. Both sides can generate high-quality, multi-modal new data and provide data feedback to the model itself. What is a model? Awaker 1.0, a large multi-modal model that just appeared on the Zhongguancun Forum. Who is the team? Sophon engine. Founded by Gao Yizhao, a doctoral student at Renmin University’s Hillhouse School of Artificial Intelligence.
 Slow Cellular Data Internet Speeds on iPhone: Fixes
May 03, 2024 pm 09:01 PM
Slow Cellular Data Internet Speeds on iPhone: Fixes
May 03, 2024 pm 09:01 PM
Facing lag, slow mobile data connection on iPhone? Typically, the strength of cellular internet on your phone depends on several factors such as region, cellular network type, roaming type, etc. There are some things you can do to get a faster, more reliable cellular Internet connection. Fix 1 – Force Restart iPhone Sometimes, force restarting your device just resets a lot of things, including the cellular connection. Step 1 – Just press the volume up key once and release. Next, press the Volume Down key and release it again. Step 2 – The next part of the process is to hold the button on the right side. Let the iPhone finish restarting. Enable cellular data and check network speed. Check again Fix 2 – Change data mode While 5G offers better network speeds, it works better when the signal is weaker
 How to Undo Delete from Home Screen in iPhone
Apr 17, 2024 pm 07:37 PM
How to Undo Delete from Home Screen in iPhone
Apr 17, 2024 pm 07:37 PM
Deleted something important from your home screen and trying to get it back? You can put app icons back on the screen in a variety of ways. We have discussed all the methods you can follow and put the app icon back on the home screen. How to Undo Remove from Home Screen in iPhone As we mentioned before, there are several ways to restore this change on iPhone. Method 1 – Replace App Icon in App Library You can place an app icon on your home screen directly from the App Library. Step 1 – Swipe sideways to find all apps in the app library. Step 2 – Find the app icon you deleted earlier. Step 3 – Simply drag the app icon from the main library to the correct location on the home screen. This is the application diagram
 The U.S. Air Force showcases its first AI fighter jet with high profile! The minister personally conducted the test drive without interfering during the whole process, and 100,000 lines of code were tested for 21 times.
May 07, 2024 pm 05:00 PM
The U.S. Air Force showcases its first AI fighter jet with high profile! The minister personally conducted the test drive without interfering during the whole process, and 100,000 lines of code were tested for 21 times.
May 07, 2024 pm 05:00 PM
Recently, the military circle has been overwhelmed by the news: US military fighter jets can now complete fully automatic air combat using AI. Yes, just recently, the US military’s AI fighter jet was made public for the first time and the mystery was unveiled. The full name of this fighter is the Variable Stability Simulator Test Aircraft (VISTA). It was personally flown by the Secretary of the US Air Force to simulate a one-on-one air battle. On May 2, U.S. Air Force Secretary Frank Kendall took off in an X-62AVISTA at Edwards Air Force Base. Note that during the one-hour flight, all flight actions were completed autonomously by AI! Kendall said - "For the past few decades, we have been thinking about the unlimited potential of autonomous air-to-air combat, but it has always seemed out of reach." However now,
 Alibaba 7B multi-modal document understanding large model wins new SOTA
Apr 02, 2024 am 11:31 AM
Alibaba 7B multi-modal document understanding large model wins new SOTA
Apr 02, 2024 am 11:31 AM
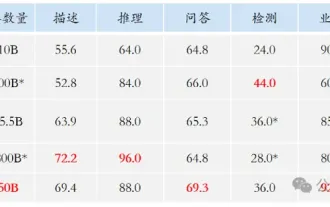
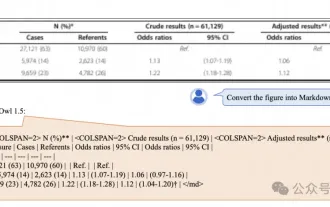
New SOTA for multimodal document understanding capabilities! Alibaba's mPLUG team released the latest open source work mPLUG-DocOwl1.5, which proposed a series of solutions to address the four major challenges of high-resolution image text recognition, general document structure understanding, instruction following, and introduction of external knowledge. Without further ado, let’s look at the effects first. One-click recognition and conversion of charts with complex structures into Markdown format: Charts of different styles are available: More detailed text recognition and positioning can also be easily handled: Detailed explanations of document understanding can also be given: You know, "Document Understanding" is currently An important scenario for the implementation of large language models. There are many products on the market to assist document reading. Some of them mainly use OCR systems for text recognition and cooperate with LLM for text processing.
