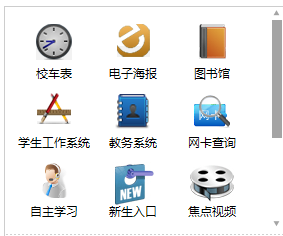
A few days ago, our student online homepage was revamped and we wanted to make a toolbar. Due to space limitations, many of the tools originally planned had to be arranged in a small area. The specific effects are as follows:

Of course, this effect can also be achieved using the controls that come with HTML. However, if you customize it, you can set the style of the slider yourself, for example, set it to red, blue, etc., and you can also make the button shape yourself.
The effect that needs to be achieved is that a maximum of 9 of these tools can be displayed in the visible area at a time (assuming here that the total number of tool items is more than 9, if it is less than 9, it is likely to be expanded to 9 in the future), click the upper and lower buttons You can move the tool area up or down in the visible area.
But after doing this, the operation staff gave me some advice: If the toolbar can slide up and down by moving the slider, the user experience will be better. However, it is simple to say, but it is a bit troublesome to do.
Let’s start from the beginning. My idea is as follows:
- The entire area is divided into two, one is the tool area (class="toolBox"), and the other is the slide bar area (class="slideBar").
- The tool area (class="toolBox") is set to relative positioning. There is a large strip inside (class="innerToolBox") to store all the tools. There are three tools in a row. The excess part is not visible (this is very important) ), and is absolutely positioned relative to the external tool area (class="toolBox"). At the beginning, top=0, so that each slide only needs to change its top value.
- The slide bar area on the right (class="slideBar") has three things: up button (class="upBtn"), down button (class="downBtn"), and slide bar box (class="barBox") . The slider box (class="barBox") is just a "box" to store the slider, with a slider inside (class="innerBar"). Similar to the toolbar, the slide bar (class="innerBar") is absolutely positioned relative to the slide bar box (class="barBox"). You only need to change the top value of the slide bar (class="innerBar") to achieve sliding. And it slides synchronously with the toolbar on the left. So is the height of the slider fixed? Of course not. Its height is determined by the number of rows of the tool on the left. This needs to be implemented by js (this will be mentioned later).
The html code is as follows:
css代码如下:
/***Big box***/
#smallTools
{
background:url(../images10/smallBarBg.gif) repeat-x left bottom;
position:relative;
height:227px;
overflow:hidden;
}
/***Layout of left and right sides***/
#smallTools .toolBox /***Tool box area on the left***/
{
height:207px;
margin-top:10px;
float:left;
width:237px;
margin-left:10px;
overflow:hidden;
position:relative;
}
#smallTools .slideBar /***Slider area on the right***/
{
height:227px;
float:right;
width:11px;
}
/***Specific style of the elements in the left frame***/
.innerToolBox
{
position:absolute;
left:0px;
top:0px;
}
#smallTools ul
{
height:69px;
}
#smallTools ul li
{
float:left;
width:79px;
height:69px;
text-align:center;
}
#smallTools ul li a
{
display:block;
width:79px;
height:22px;
padding-top:47px;
color:#000;
}
/***The following is to set the background for each tool item***/
#smallTools ul li.tool1
{
background:url(../images/tool1.gif) no-repeat center 7px
}
#smallTools ul li.tool2
{
background:url(../images/tool2.gif) no-repeat center 7px
}
#smallTools ul li.tool3
{
background:url(../images/tool3.gif) no-repeat center 7px
}
#smallTools ul li.tool4
{
background:url(../images/tool4.gif) no-repeat center 7px
}
#smallTools ul li.tool5
{
background:url(../images/tool5.gif) no-repeat center 7px
}
#smallTools ul li.tool6
{
background:url(../images/tool6.gif) no-repeat center 7px
}
#smallTools ul li.tool7
{
background:url(../images/tool7.gif) no-repeat center 7px
}
#smallTools ul li.tool8
{
background:url(../images/tool8.gif) no-repeat center 7px
}
#smallTools ul li.tool9
{
background:url(../images/tool9.gif) no-repeat center 7px
}
/***Specific style of the right slider***/
.slideBar .upBtn /***Slide button up***/
{
display:block;
line-height:0px;
width:9px;
height:7px;
background:url(../images/up_btn.png) no-repeat left top;
margin-top:2px;
padding:0px;
}
.slideBar .upBtn:hover
{
border:1px solid #000000;
}
.slideBar .downBtn /***Swipe down button***/
{
display:block;
line-height:0px;
width:9px;
height:7px;
background:url(../images/down_btn.png) no-repeat left top;
margin:0px;
padding:0px;
}
.slideBar .downBtn:hover
{
border:1px solid #000000;
}
#smallTools .barBox
{
height:196px;
margin:4px 0px;
width:11px;
position:relative;
}
.innerBar
{
position:absolute;
width:10px;
background:#a4a4a4;
cursor:s-resize;
top:0px;
}
接下来就是给它添加脚本代码了。为了方便,在这里用的是jQuery库。
我决定为它建立一个对象,大致成员变量如下:
$( function()
{
/***객체 메소드, 일부 멤버 변수 할당
변수: elem: 위아래로 이동할 도구 모음 영역 이름(요소 이름, ID, 클래스의 조합)
perHight: 이동할 각 그리드의 길이 a time
slideN: 도구 모음에 있는 도구 행 수
showN: 표시되는 도구 행 수(여기서는 3)
speed: 한 번 이동하는 데 걸리는 밀리초 수
index: 가시 영역의 첫 번째 행
barElem 인덱스: 슬라이더 이름(요소 이름, ID 및 클래스의 조합)
***/
function toolBar(elem,perHeight,slideN,showN,speed,index,barElem)
{ …}
toolBar.prototype=
{
/***슬라이더 막대 높이 설정
높이 계산 공식: 슬라이더 막대에 설정할 수 있는 최대 높이 *표시되는 도구 행 수/도구 모음에 있는 도구의 총 행 수
***/
initBar:function()
{…},
/***툴바 슬라이딩 기능, to는 슬라이딩할 인덱스로, 상하 버튼을 클릭하거나 슬라이드바를 움직일 때 이 기능이 실행됩니다** */
slide:function(to)
{… },
/***슬라이드 바 슬라이딩 기능, to는 슬라이딩할 인덱스로, 이 기능은 위, 아래 버튼을 클릭할 때 실행되며 슬라이드 기능과 동기적으로 구현됩니다***/
barSlide:function(to)
{… **이 함수는 위쪽 및 아래쪽 버튼에 대한 클릭 이벤트를 추가합니다
upelem: 위쪽 버튼 이름(요소 이름, ID 및 클래스 조합)
downelem: 아래쪽 버튼 이름(요소 이름 조합) 이름, 아이디, 클래스)
***/
clickTab:function(upelem,downelem)
{…},
/***슬라이드 바를 드래그하는 기능은 드래그 후 도구 상자도 그에 따라 이동합니다.
elem : 이동해야 할 요소의 이름(요소명, id, 클래스의 조합)
handle : 해당 요소를 이동하기 위해 드래그해야 하는 핸들 요소의 이름(요소의 조합) 요소 이름, ID 및 클래스)
uplev: 드래그된 요소의 가장 높은 지점(여기서는 0)
downlev: 드래그된 요소의 가장 낮은 지점(여기서는 196)
***/
drag:function(elem,handle,uplev ,downlev )
{…}
}
/***객체의 인스턴스화 및 관련 함수 호출은 다음과 같습니다***/
})
전체 js 코드는 다음과 같습니다.
코드 복사 코드는 다음과 같습니다.
$(function()
{
function toolBar(elem,perHeight,slideN,showN,speed,index,barElem)
{
this.elem=$(elem);
this.perHeight=perHeight;
this.slideN=slideN;
this.showN=showN;
this.speed=speed;
this.index=index;
this.barElem=barElem;
}
toolBar.prototype=
{
initBar:function()
{
var tl=$(this.barElem).parent().height();
$(this.barElem).css({'height':tl*this.showN/this.slideN});
},
slide:function(to)
{
this.elem.animate({'top':-(to*this.perHeight)},this.speed)
},
barSlide:function(to)
{
var tl=$(this.barElem).parent().height();
$(this.barElem).animate({'top':tl*to/this.slideN},this.speed)
},
clickTab:function(upelem,downelem)
{
var _this=this;
$(upelem).bind('click',function()
{
if(_this.index>0)
{
_this.index--;
_this.slide(_this.index);
_this.barSlide(_this.index);
}
return false;
});
$(downelem).bind('click',function()
{
if(_this.index<_this.slideN-_this.showN)
{
_this.index ;
_this.slide(_this.index);
_this.barSlide(_this.index);
}
return false;
});
},
drag:function(elem,handle,uplev,downlev)
{
var _this=this;
var tl=$(this.barElem).parent().height();
var C=$(elem);
var dy, moveout;
var T = $(handle);
T.bind("selectstart", function()
{
return false;
});
T.mousedown(function(e)
{
//dx = e.clientX - parseInt(C.css("left"));
e=e?e:window.event;
dy = e.clientY - parseInt(C.css("top"));
C.mousemove(move).mouseout(out).css('opacity', 0.8);
T.mouseup(up);
});
function move(e)
{
e=e?e:window.event;
moveout = false;
if((e.clientY - dy)>=uplev&&(e.clientY - dy)<=(downlev-C.height()))
C.css({"top": e.clientY - dy});
}
function out(e)
{
e=e?e:window.event;
moveout = true;
setTimeout(function(){checkout(e);}, 100);
}
function up(e)
{
e=e?e:window.event;
var adaptTop;
var presTop=parseInt(C.css("top"));
C.unbind("mousemove", move).unbind("mouseout", out).css('opacity', 1);
T.unbind("mouseup", up);
//alert(parseInt(_this.slideN));
if(((presTop/(tl/_this.slideN))-parseInt(presTop/(tl/_this.slideN)))>=0.5)
{
_this.index=parseInt(presTop/(tl/_this.slideN)) 1;
}
else
{
_this.index=parseInt(presTop/(tl/_this.slideN));
}
adaptTop=_this.index*(tl/_this.slideN);
_this.slide(_this.index);
C.css({"top":adaptTop});
}
function checkout(e)
{
e=e?e:window.event;
moveout && up(e);
}
}
}
var slength=$("#smallTools .innerToolBox ul").length;
var stBox=new toolBar("#smallTools .innerToolBox",69,slength,3,700,0,"#smallTools .innerBar");
stBox.initBar();
stBox.clickTab("#smallTools .upBtn","#smallTools .downBtn");
stBox.drag("#smallTools .innerBar","#smallTools .innerBar",0,196);
})
水平有限,如有错误,敬请批评指正。


 Introduction to screenshot shortcut keys in win10
 How to open rar file
 Advantages of downloading the official website of Yiou Exchange App
 How to fix the computer default gateway is unavailable
 How to type double quotes in latex
 tim mobile online
 Introduction to the difference between javascript and java
 MySQL restore database


![[Web front-end] Node.js quick start](https://img.php.cn/upload/course/000/000/067/662b5d34ba7c0227.png)


