

小弟我所经历的大文件数据导出(后台执行,自动生成)

我所经历的大文件数据导出(后台执行,自动生成)
一、前言
记录一下以前做的后台excel格式导出统计信息的功能,也是最近同事问到了相关东西,一时之间竟忘了具体的细节,因此记录一下;
大家知道,excel导出数据的功能,后台几乎是必须功能,一般都是点击后,生成文件然后自动下载,
如果是数据量小的话,一下子便可请求完成,从而下载到本地;
但是,如果数据量特别大的时候,页面就必须一直在等待,直到写入excel成功,
这样便影响了后台使用者无法操作其他页面,为此,对excel导出做了以下功能优化:
- excel导出分成两部分内容:生成excel文件和下载excel文件
- excel的文件生成在程序后台执行,前端不必等待,可进行其他后台操作
- 增加下载文件页面,显示excel文件生成的进度,完成后,方可下载生成的excel文件
- 文件生成后,点击下载方可下载相应的文件
二、生成excel文件
生成excel文件的方法有很多,暂不一一记录,只是记录本次的方法;
这里用到了table的html格式,以及相应的excel的声明
(隐约记得其他的方法用office07打开的时候好像是乱码,后面尝试用csv格式文件,可还是乱码,所以用了table的形式)
文件的开头:


<span style="font-family: 'Microsoft YaHei';"><span style="color: #008080;"> 1</span>     <span style="color: #800080;">$struserdata</span> = Eof</span><span style="color: #008080;"> 2</span>          3         xmlns:x="urn:schemas-microsoft-com:office:excel"<span style="color: #008080;"> 4</span>         xmlns="http://www.w3.org/TR/REC-html40"><span style="color: #008080;"> 5</span>     <span style="color: #008080;"> 6</span>         span style="color: #0000ff;">PUBLIC "-//W3C//DTD XHTML 1.0 Transitional//EN" "http://www.w3.org/TR/xhtml1/DTD/xhtml1-transitional.dtd"><span style="color: #008080;"> 7</span>         <span style="color: #008080;"> 8</span>         <span style="color: #008080;"> 9</span>             <meta http-equiv="Content-type" content="text/html;charset=utf-8"><span style="color: #008080;">10</span>         <style id="Classeur1_16681_Styles"><span style="color: #008080;">11         </style><span style="color: #008080;">12</span>         <span style="color: #008080;">13</span>         <span style="color: #008080;">14</span>         <div id="Classeur1_16681" align="center" x:publishsource="Excel">
<span style="color: #008080;">15</span>     <span style="color: #008080;">16</span>         <table x:str border="1" cellpadding="0" cellspacing="0" width="100%" style="border-collapse: collapse">
<span style="color: #008080;">17</span> Eof;<span class="cnblogs_code_collapse" style="font-family: 'Microsoft YaHei';">View Code</span><p><span style="font-family: 'Microsoft YaHei';">    文件的结尾:</span></p>
<div class="cnblogs_code" onclick="cnblogs_code_show('6e7814c6-7ec0-4037-94c2-b0b68682b66d')">
<span style="font-family: 'Microsoft YaHei';"><img class="code_img_closed lazy" src="/static/imghw/default1.png" data-src="/img/2015/08/11/12404618.gif" id="code_img_closed_6e7814c6-7ec0-4037-94c2-b0b68682b66d" alt=""><img class="code_img_opened lazy" src="/static/imghw/default1.png" data-src="/img/2015/08/11/12404619.gif" id="code_img_opened_6e7814c6-7ec0-4037-94c2-b0b68682b66d" style="max-width:90%" onclick="cnblogs_code_hide('6e7814c6-7ec0-4037-94c2-b0b68682b66d',event)" alt=""></span><div id="cnblogs_code_open_6e7814c6-7ec0-4037-94c2-b0b68682b66d" class="cnblogs_code_hide"><pre class="brush:php;toolbar:false"><span style="font-family: 'Microsoft YaHei';"><span style="color: #008080;">1</span> <span style="color: #800080;">$struserdata</span> = Eof</span><span style="color: #008080;">2</span> 当然,文件中间就是一些tr td 标签了。
三、让程序在后台执行
场景:
用户点击 生成excel后,跳转到下载页面,程序在后台执行,用户可不必等待生成完成,可执行其他操作;
下载页面可看到文件生成的进度以及是否可下载状态
思路:
点击 生成excel,显示下载页面 ---> show_download方法
生成excel ---> create_excel 方法
show_download方法中调用 create_excel方法,而show_download 方法中,自己用了一下命令行执行程序的方式,
利用php命令行的方式,把参数传递给 create_excel方法
<span style="font-family: 'Microsoft YaHei';"><span style="color: #008080;">1</span> <span style="color: #008000;">//</span><span style="color: #008000;"> $cmd = "/usr/bin/php /home/xxx/xxx.php " . $strjoin . " >/dev/null & ";</span><span style="color: #008080;">2</span> <span style="color: #008000;"> // $a=exec($cmd, $out, $returndata);</span><span style="color: #008080;">3</span> <span style="color: #008080;">4</span> <span style="color: #008080;">5</span> <span style="color: #800080;">$command</span> = "/usr/bin/php ".STATISTIC_EXPORT_SCRIPT_DIR."xxx.php " . "'" .<span style="color: #800080;">$strjoin</span> ."'". " " . <span style="color: #800080;">$uid</span> . " ". <span style="color: #800080;">$action</span> ." & "<span style="color: #000000;">;</span><span style="color: #008080;">6</span> <span style="color: #800080;">$process</span> = <span style="color: #008080;">proc_open</span>(<span style="color: #800080;">$command</span>, <span style="color: #0000ff;">array</span>(),<span style="color: #800080;">$pipes</span><span style="color: #000000;">); </span><span style="color: #008080;">7</span> <span style="color: #800080;">$var</span> = <span style="color: #008080;">proc_get_status</span>(<span style="color: #800080;">$process</span><span style="color: #000000;">); </span><span style="color: #008080;">8</span> <span style="color: #008080;">proc_close</span>(<span style="color: #800080;">$process</span><span style="color: #000000;">);</span><span style="color: #008080;">9</span> <span style="color: #800080;">$pid</span> = <span style="color: #008080;">intval</span>(<span style="color: #800080;">$var</span>['pid'])+1;</span>
而在create_excel方法中:
需填写以下代码:
<span style="font-family: 'Microsoft YaHei';"><span style="color: #008080;">1</span> <span style="color: #008080;">set_time_limit</span>(0); <span style="color: #008000;">//</span><span style="color: #008000;">取消脚本运行时间的超时上限</span><span style="color: #008080;">2</span> <span style="color: #008080;">3</span> <span style="color: #008080;">ignore_user_abort</span>(<span style="color: #0000ff;">TRUE</span>); <span style="color: #008000;">//</span><span style="color: #008000;">后台运行,不受用户关闭浏览器的影响</span></span>
调用相关的api得到数据:
<span style="font-family: 'Microsoft YaHei';"><span style="color: #008080;">1</span> <span style="color: #800080;">$statistic</span> = <span style="color: #008080;">call_user_func</span>(<span style="color: #0000ff;">array</span>('shellscript','get_result'),<span style="color: #800080;">$url</span>,<span style="color: #800080;">$params</span><span style="color: #000000;">);</span><span style="color: #008080;">2</span> <span style="color: #0000ff;">if</span>(!<span style="color: #008080;">is_object</span>(<span style="color: #800080;">$statistic</span>) || !<span style="color: #0000ff;">isset</span>(<span style="color: #800080;">$statistic</span>->data-><span style="color: #000000;">items)){</span><span style="color: #008080;">3</span> <span style="color: #008080;">usleep</span>(400000);<span style="color: #008000;">//</span><span style="color: #008000;">停止400毫秒</span><span style="color: #008080;">4</span> <span style="color: #800080;">$statistic</span> = <span style="color: #008080;">call_user_func</span>(<span style="color: #0000ff;">array</span>('shellscript','get_result'),<span style="color: #800080;">$url</span>,<span style="color: #800080;">$params</span><span style="color: #000000;">);</span><span style="color: #008080;">5</span> }</span>四、显示文件生成进度
但是怎么显示相应的文件生成进度呢,怎么知道文件到底生成好了没有呢?
这里,我用到的方法是,在写入数据文件的时候data.xsl,每个数据文件都生成一个对应的文件进度文件,暂且称为flag_data.xsl;
思路:
- 第一次请求api的时候,根据返回的total总数,以及pagesize,确定要请求的次数count;
- 这样便可知道要请求api的次数(分页请求api),在写入数据文件的同时,同时写入进度文件flag_data.xsl;
数据格式大约是(以逗号分割)
1,5
2,5
...- 然后显示文件进度的时候,读取进度文件,这样变可知道数据文件大体的进度
- 前端js处理时,几秒读取一次相应的方法(如果都100%进度,可停止请求方法),从而实现动态查看文件的生成进度
查看文件的进度方法:
<span style="font-family: 'Microsoft YaHei';"><span style="color: #008080;"> 1</span> <span style="color: #0000ff;">public</span> <span style="color: #0000ff;">function</span><span style="color: #000000;"> execscript_process(){</span><span style="color: #008080;"> 2</span> <span style="color: #800080;">$this</span>->load->library('smarty'<span style="color: #000000;">);</span><span style="color: #008080;"> 3</span> <span style="color: #800080;">$file_arr_str</span> = <span style="color: #0000ff;">array</span><span style="color: #000000;">();</span><span style="color: #008080;"> 4</span> <span style="color: #800080;">$file_arr_process</span> = <span style="color: #0000ff;">array</span><span style="color: #000000;">();</span><span style="color: #008080;"> 5</span> <span style="color: #800080;">$file_arr_name</span> = <span style="color: #0000ff;">array</span><span style="color: #000000;">();</span><span style="color: #008080;"> 6</span> <span style="color: #800080;">$file_arr</span> = <span style="color: #0000ff;">array</span><span style="color: #000000;">();</span><span style="color: #008080;"> 7</span> <span style="color: #800080;">$refresh_flag</span> = 'yes'<span style="color: #000000;">;</span><span style="color: #008080;"> 8</span> <span style="color: #800080;">$uid</span> = <span style="color: #800080;">$_REQUEST</span>['uid'<span style="color: #000000;">];</span><span style="color: #008080;"> 9</span> <span style="color: #800080;">$url_dir</span> = STATISTIC_EXPORT_FILE_DIR.<span style="color: #800080;">$uid</span> .'/';<span style="color: #008000;">//</span><span style="color: #008000;">@todo</span><span style="color: #008080;">10</span> <span style="color: #0000ff;">if</span>(!<span style="color: #008080;">is_dir</span>(<span style="color: #800080;">$url_dir</span><span style="color: #000000;">)){</span><span style="color: #008080;">11</span> @<span style="color: #008080;">mkdir</span>(<span style="color: #800080;">$url_dir</span>,0777<span style="color: #000000;">);</span><span style="color: #008080;">12</span> <span style="color: #000000;"> }</span><span style="color: #008080;">13</span> <span style="color: #800080;">$files</span> = <span style="color: #008080;">scandir</span>(<span style="color: #800080;">$url_dir</span><span style="color: #000000;">);</span><span style="color: #008080;">14</span> <span style="color: #008080;">15</span> <span style="color: #0000ff;">if</span>(!<span style="color: #0000ff;">empty</span>(<span style="color: #800080;">$files</span><span style="color: #000000;">)){</span><span style="color: #008080;">16</span> <span style="color: #0000ff;">foreach</span> (<span style="color: #800080;">$files</span> <span style="color: #0000ff;">as</span> <span style="color: #800080;">$key</span> => <span style="color: #800080;">$value</span><span style="color: #000000;">) {</span><span style="color: #008080;">17</span> <span style="color: #0000ff;">if</span>(<span style="color: #800080;">$value</span>!='.' && <span style="color: #800080;">$value</span>!='..'<span style="color: #000000;">){</span><span style="color: #008080;">18</span> <span style="color: #0000ff;">if</span>(<span style="color: #008080;">substr</span>(<span style="color: #800080;">$value</span>, 0 , 5)=="flag_"<span style="color: #000000;">){</span><span style="color: #008080;">19</span> <span style="color: #800080;">$file_size</span> = <span style="color: #008080;">filesize</span>(<span style="color: #800080;">$url_dir</span> . <span style="color: #800080;">$value</span><span style="color: #000000;">);</span><span style="color: #008080;">20</span> <span style="color: #0000ff;">if</span>(!<span style="color: #0000ff;">empty</span>(<span style="color: #800080;">$file_size</span><span style="color: #000000;">)){</span><span style="color: #008080;">21</span> <span style="color: #800080;">$fhandle</span> = <span style="color: #008080;">fopen</span>(<span style="color: #800080;">$url_dir</span> . <span style="color: #800080;">$value</span>, 'rb+'<span style="color: #000000;">);</span><span style="color: #008080;">22</span> <span style="color: #008080;">fseek</span>(<span style="color: #800080;">$fhandle</span>, -1,<span style="color: #000000;"> SEEK_END);</span><span style="color: #008080;">23</span> <span style="color: #800080;">$fstr</span> = ''<span style="color: #000000;">;</span><span style="color: #008080;">24</span> <span style="color: #0000ff;">while</span>((<span style="color: #800080;">$c</span> = <span style="color: #008080;">fgetc</span>(<span style="color: #800080;">$fhandle</span>)) !== <span style="color: #0000ff;">false</span><span style="color: #000000;">) {</span><span style="color: #008080;">25</span> <span style="color: #0000ff;">if</span>(<span style="color: #800080;">$c</span> == "\n" && <span style="color: #800080;">$fstr</span>) <span style="color: #0000ff;">break</span><span style="color: #000000;">;</span><span style="color: #008080;">26</span> <span style="color: #800080;">$fstr</span> = <span style="color: #800080;">$c</span> . <span style="color: #800080;">$fstr</span><span style="color: #000000;">;</span><span style="color: #008080;">27</span> <span style="color: #008080;">fseek</span>(<span style="color: #800080;">$fhandle</span>, -2,<span style="color: #000000;"> SEEK_CUR);</span><span style="color: #008080;">28</span> <span style="color: #000000;"> }</span><span style="color: #008080;">29</span> <span style="color: #008080;">fclose</span>(<span style="color: #800080;">$fhandle</span><span style="color: #000000;">);</span><span style="color: #008080;">30</span> <span style="color: #800080;">$fstr</span> = <span style="color: #008080;">trim</span>(<span style="color: #800080;">$fstr</span><span style="color: #000000;">);</span><span style="color: #008080;">31</span> <span style="color: #800080;">$fstr_arr_str</span> = <span style="color: #008080;">explode</span>(',', <span style="color: #800080;">$fstr</span><span style="color: #000000;">);</span><span style="color: #008080;">32</span> <span style="color: #800080;">$file_arr_process</span>[] = 100 * <span style="color: #008080;">number_format</span>(<span style="color: #800080;">$fstr_arr_str</span>[0]/<span style="color: #800080;">$fstr_arr_str</span>[1],2).'%'<span style="color: #000000;">;</span><span style="color: #008080;">33</span> <span style="color: #800080;">$file_arr_name</span>[] = <span style="color: #008080;">substr</span>(<span style="color: #800080;">$value</span>,5<span style="color: #000000;">);</span><span style="color: #008080;">34</span> <span style="color: #000000;"> }</span><span style="color: #008080;">35</span> <span style="color: #000000;"> }</span><span style="color: #008080;">36</span> <span style="color: #000000;"> }</span><span style="color: #008080;">37</span> <span style="color: #000000;"> }</span><span style="color: #008080;">38</span> <span style="color: #008080;">39</span> <span style="color: #0000ff;">foreach</span> (<span style="color: #800080;">$file_arr_process</span> <span style="color: #0000ff;">as</span> <span style="color: #800080;">$key</span> => <span style="color: #800080;">$value</span><span style="color: #000000;">) {</span><span style="color: #008080;">40</span> <span style="color: #0000ff;">if</span>(<span style="color: #800080;">$value</span> != '100%'<span style="color: #000000;">){</span><span style="color: #008080;">41</span> <span style="color: #800080;">$refresh_flag</span> = 'no'<span style="color: #000000;">;</span><span style="color: #008080;">42</span> <span style="color: #0000ff;">break</span><span style="color: #000000;">;</span><span style="color: #008080;">43</span> <span style="color: #000000;"> }</span><span style="color: #008080;">44</span> <span style="color: #000000;"> }</span><span style="color: #008080;">45</span> <span style="color: #000000;"> }</span><span style="color: #008080;">46</span> <span style="color: #008080;">47</span> <span style="color: #800080;">$file_arr</span> = <span style="color: #0000ff;">array</span><span style="color: #000000;">(</span><span style="color: #008080;">48</span> 'process' => <span style="color: #800080;">$file_arr_process</span>,<span style="color: #008080;">49</span> 'name' => <span style="color: #800080;">$file_arr_name</span>,<span style="color: #008080;">50</span> 'refresh_flag' => <span style="color: #800080;">$refresh_flag</span><span style="color: #008080;">51</span> <span style="color: #000000;"> );</span><span style="color: #008080;">52</span> <span style="color: #800080;">$file_arr_json</span> = json_encode(<span style="color: #800080;">$file_arr</span><span style="color: #000000;">);</span><span style="color: #008080;">53</span> <span style="color: #0000ff;">echo</span> <span style="color: #800080;">$file_arr_json</span><span style="color: #000000;">;</span><span style="color: #008080;">54</span> }</span>五、下载文件
文件的下载就好说了,既然已经都生成成功,下载的方法如下:
<span style="font-family: 'Microsoft YaHei';"><span style="color: #008080;"> 1</span> <span style="color: #0000ff;">public</span> <span style="color: #0000ff;">function</span><span style="color: #000000;"> execscript_download(){</span><span style="color: #008080;"> 2</span> <span style="color: #800080;">$filename</span> = <span style="color: #800080;">$_REQUEST</span>['filename'<span style="color: #000000;">];</span><span style="color: #008080;"> 3</span> <span style="color: #800080;">$uid</span> = <span style="color: #800080;">$_REQUEST</span>['uid'<span style="color: #000000;">];</span><span style="color: #008080;"> 4</span> <span style="color: #800080;">$file_dir</span> = STATISTIC_EXPORT_FILE_DIR.<span style="color: #800080;">$uid</span>.'/'.<span style="color: #800080;">$filename</span><span style="color: #000000;">;</span><span style="color: #008080;"> 5</span> <span style="color: #0000ff;">if</span> (!<span style="color: #008080;">file_exists</span>(<span style="color: #800080;">$file_dir</span><span style="color: #000000;">)){</span><span style="color: #008080;"> 6</span> <span style="color: #008080;">header</span>("Content-type: text/html; charset=utf-8"<span style="color: #000000;">);</span><span style="color: #008080;"> 7</span> <span style="color: #0000ff;">echo</span> "File not found!"<span style="color: #000000;">;</span><span style="color: #008080;"> 8</span> <span style="color: #0000ff;">exit</span><span style="color: #000000;">; </span><span style="color: #008080;"> 9</span> } <span style="color: #0000ff;">else</span><span style="color: #000000;"> {</span><span style="color: #008080;">10</span> <span style="color: #008080;">ini_set</span>("memory_limit","500M"<span style="color: #000000;">); </span><span style="color: #008080;">11</span> <span style="color: #008080;">header</span>('Content-Description: File Transfer'<span style="color: #000000;">);</span><span style="color: #008080;">12</span> <span style="color: #008080;">header</span>('Content-Type: application/octet-stream'<span style="color: #000000;">);</span><span style="color: #008080;">13</span> <span style="color: #008080;">header</span>('Content-Disposition: attachment; filename='.<span style="color: #008080;">basename</span>(<span style="color: #800080;">$file_dir</span><span style="color: #000000;">));</span><span style="color: #008080;">14</span> <span style="color: #008080;">header</span>('Content-Transfer-Encoding: binary'<span style="color: #000000;">);</span><span style="color: #008080;">15</span> <span style="color: #008080;">header</span>('Expires: ' . <span style="color: #008080;">gmdate</span>('D, d M Y H:i:s') . ' GMT'<span style="color: #000000;">);</span><span style="color: #008080;">16</span> <span style="color: #008080;">header</span>('Cache-Control: must-revalidate,post-check=0, pre-check=0'<span style="color: #000000;">);</span><span style="color: #008080;">17</span> <span style="color: #008080;">header</span>('Pragma: public'<span style="color: #000000;">);</span><span style="color: #008080;">18</span> <span style="color: #008080;">header</span>('Content-Length: ' . <span style="color: #008080;">filesize</span>(<span style="color: #800080;">$file_dir</span><span style="color: #000000;">));</span><span style="color: #008080;">19</span> <span style="color: #008080;">readfile</span>(<span style="color: #800080;">$file_dir</span><span style="color: #000000;">);</span><span style="color: #008080;">20</span> <span style="color: #000000;"> }</span><span style="color: #008080;">21</span> <span style="color: #008080;">22</span> }</span>六、上线后出现的问题
本地本来已经测试完毕,可上线后,却出现了奇怪的问题;
现象描述:
当在后台点击生成文件,跳转到下载页的时候,因为下载页是显示文件进度的页面,
竟然出现有时候有刚刚点击的文件进度,有时候没有,就感觉没有生成相应的文件一样;解决方法:
因为数据文件和进度文件都是生成在程序的某个文件夹file中,所以读取的时候都是读取的文件夹下的文件,从而判断显示进度;
后面才知道,由于后台程序有两台服务器,导致读取以及下载的时候找不到相应的文件夹,两个服务器相应的文件夹弄个共享目录就可以了
七、相应的后续优化
由于下载的文件多了,导致文件夹下的文件越来越多,而原来生成的文件是没有价值的,所以加了个定期删除文件的功能,只保留近七天的文件
当然可以用crontab,只不过我比较懒,是在点击生成文件的时候,判断了一下文件夹中的过期文件,从而删除
<span style="font-family: 'Microsoft YaHei';"><span style="color: #008080;"> 1</span> <span style="color: #0000ff;">public</span> <span style="color: #0000ff;">function</span><span style="color: #000000;"> execscript_process_show(){</span><span style="color: #008080;"> 2</span> <span style="color: #800080;">$this</span>->load->library('smarty'<span style="color: #000000;">);</span><span style="color: #008080;"> 3</span> <span style="color: #800080;">$uid</span> = <span style="color: #800080;">$_REQUEST</span>['uid'<span style="color: #000000;">];</span><span style="color: #008080;"> 4</span> <span style="color: #800080;">$url_dir</span> = STATISTIC_EXPORT_FILE_DIR.<span style="color: #800080;">$uid</span> .'/';<span style="color: #008000;">//</span><span style="color: #008000;">@todo</span><span style="color: #008080;"> 5</span> <span style="color: #0000ff;">if</span>(!<span style="color: #008080;">is_dir</span>(<span style="color: #800080;">$url_dir</span><span style="color: #000000;">)){</span><span style="color: #008080;"> 6</span> @<span style="color: #008080;">mkdir</span>(<span style="color: #800080;">$url_dir</span>,0777<span style="color: #000000;">);</span><span style="color: #008080;"> 7</span> <span style="color: #000000;"> } </span><span style="color: #008080;"> 8</span> <span style="color: #800080;">$files</span> = <span style="color: #008080;">scandir</span>(<span style="color: #800080;">$url_dir</span><span style="color: #000000;">);</span><span style="color: #008080;"> 9</span> <span style="color: #0000ff;">if</span>(!<span style="color: #0000ff;">empty</span>(<span style="color: #800080;">$files</span><span style="color: #000000;">)){</span><span style="color: #008080;">10</span> <span style="color: #0000ff;">foreach</span> (<span style="color: #800080;">$files</span> <span style="color: #0000ff;">as</span> <span style="color: #800080;">$key</span> => <span style="color: #800080;">$value</span><span style="color: #000000;">) {</span><span style="color: #008080;">11</span> <span style="color: #0000ff;">if</span>(<span style="color: #800080;">$value</span>!='.' && <span style="color: #800080;">$value</span>!='..'<span style="color: #000000;">){</span><span style="color: #008080;">12</span> <span style="color: #0000ff;">foreach</span> (<span style="color: #800080;">$files</span> <span style="color: #0000ff;">as</span> <span style="color: #800080;">$key</span> => <span style="color: #800080;">$value</span><span style="color: #000000;">) {</span><span style="color: #008080;">13</span> <span style="color: #0000ff;">if</span>(<span style="color: #800080;">$value</span>!='.' && <span style="color: #800080;">$value</span>!='..'<span style="color: #000000;">){</span><span style="color: #008080;">14</span> <span style="color: #0000ff;">if</span>(<span style="color: #008080;">substr</span>(<span style="color: #800080;">$value</span>, 0 , 5)!="flag_"<span style="color: #000000;">){</span><span style="color: #008080;">15</span> <span style="color: #800080;">$filenamedate</span> = <span style="color: #008080;">substr</span>(<span style="color: #800080;">$value</span>, 0,10<span style="color: #000000;">);</span><span style="color: #008080;">16</span> <span style="color: #800080;">$today</span> = <span style="color: #008080;">date</span>('Y-m-d',<span style="color: #008080;">time</span><span style="color: #000000;">());</span><span style="color: #008080;">17</span> <span style="color: #800080;">$filenamedate</span> = <span style="color: #008080;">date</span>('Y-m-d',<span style="color: #008080;">strtotime</span>(<span style="color: #800080;">$filenamedate</span>)+(STATISTIC_FILE_EXPIRE_DAY-1)*24*3600<span style="color: #000000;">);</span><span style="color: #008080;">18</span> <span style="color: #0000ff;">if</span>(<span style="color: #800080;">$today</span>><span style="color: #800080;">$filenamedate</span>){<span style="color: #008000;">//</span><span style="color: #008000;">文件过期</span><span style="color: #008080;">19</span> @<span style="color: #008080;">unlink</span>(<span style="color: #800080;">$url_dir</span> . <span style="color: #800080;">$value</span><span style="color: #000000;">);</span><span style="color: #008080;">20</span> @<span style="color: #008080;">unlink</span>(<span style="color: #800080;">$url_dir</span> . 'flag_' . <span style="color: #800080;">$value</span><span style="color: #000000;">);</span><span style="color: #008080;">21</span> <span style="color: #000000;"> }</span><span style="color: #008080;">22</span> <span style="color: #000000;"> }</span><span style="color: #008080;">23</span> <span style="color: #000000;"> }</span><span style="color: #008080;">24</span> <span style="color: #000000;"> } </span><span style="color: #008080;">25</span> <span style="color: #000000;"> }</span><span style="color: #008080;">26</span> <span style="color: #000000;"> }</span><span style="color: #008080;">27</span> <span style="color: #000000;"> }</span><span style="color: #008080;">28</span> <span style="color: #008080;">29</span> <span style="color: #800080;">$this</span>->smarty->assign('uid',<span style="color: #800080;">$uid</span><span style="color: #000000;">);</span><span style="color: #008080;">30</span> <span style="color: #800080;">$this</span>->smarty->display('interact/statistic/execscript.tpl'<span style="color: #000000;">);</span><span style="color: #008080;">31</span> }</span>八、后记
大文件的导出大体就是这个样子,欢迎大家吐槽,共同交流;
当时在用命令行执行方法的时候,也参考了一下相应的资料,记录一下;
<span style="color: #000000; font-family: 'Microsoft YaHei';">http://blog.csdn.net/yysdsyl/article/details/4636457http://www.codesky.net/article/201202/163385.htmlhttp://www.cnblogs.com/zdz8207/p/3765567.htmlhttp:[email protected]/blog/static/4112219320097300922992/http://php.net/manual/en/features.commandline.phphttp://blog.csdn.net/yangjun07167/article/details/5603425http://blog.csdn.net/yunsongice/article/details/5445448http://www.cppblog.com/amazon/archive/2011/12/01/161281.aspxhttp://blog.51yip.com/tag/proc_openhttp://www.justwinit.cn/post/1418/http://limboy.me/tech/2010/12/05/php-async.html</span>
- 4楼Shannon
- 我目前在用的导出Excel使用了MS的Excel, 需要配置DCOM.,先导出XML格式,再将XML格式转换为Excel格式, 超过50000行自动换页,,在IIS中设置允许最大800M的下载, 导出几年的交易记录毫无压力.,Excel文件超过4M,自动使用7Z压缩.,,使用VBScript, 可以在Windows平台直接运行.
- Re: 糖糖果
- @Shannon,厉害!如果文件特别大的话,确实应该考虑文件下载的大小限制以及文件的压缩,,也确实是下一步优化的思路,学习了。。。
- 3楼zjeagle
- 个人认为大文件还用table的html格式,那叫耍流氓。,文件不是一般的大。
- Re: longware
- @zjeagle,csv伺候,小一半
- Re: 糖糖果
- @zjeagle,哈哈...这个确实了,还是那个office07打开的问题记得,所以最终还是用了table,不过用table确实不是很好的办法
- 2楼zjeagle
- csv还是太大了。,建议考虑标准的excel格式,用aspose.cells或者npoi之类吧。
- Re: 糖糖果
- @zjeagle,确实,有些生成的excel的工具,格式都生成的好,并且也很漂亮,满足的格式也多。。。
- 1楼zsea
- 曾经也遇到过大量数据导出Excel,还不许用csv,最后是自己写的导出的功能,一次能导出好几十万条记录到Excel,速度还可以。
- Re: 糖糖果
- @zsea,哈哈,我也遇到过,有些需求实在是变态,本来能很容易的实现,却不让用。。。

Hot AI Tools

Undresser.AI Undress
AI-powered app for creating realistic nude photos

AI Clothes Remover
Online AI tool for removing clothes from photos.

Undress AI Tool
Undress images for free

Clothoff.io
AI clothes remover

AI Hentai Generator
Generate AI Hentai for free.

Hot Article
Hot Tools

Notepad++7.3.1
Easy-to-use and free code editor

SublimeText3 Chinese version
Chinese version, very easy to use

Zend Studio 13.0.1
Powerful PHP integrated development environment

Dreamweaver CS6
Visual web development tools

SublimeText3 Mac version
God-level code editing software (SublimeText3)
Hot Topics
 1386
1386
 52
52

 What should I do if the frame line disappears when printing in Excel?
Mar 21, 2024 am 09:50 AM
What should I do if the frame line disappears when printing in Excel?
Mar 21, 2024 am 09:50 AM
If when opening a file that needs to be printed, we will find that the table frame line has disappeared for some reason in the print preview. When encountering such a situation, we must deal with it in time. If this also appears in your print file If you have questions like this, then join the editor to learn the following course: What should I do if the frame line disappears when printing a table in Excel? 1. Open a file that needs to be printed, as shown in the figure below. 2. Select all required content areas, as shown in the figure below. 3. Right-click the mouse and select the "Format Cells" option, as shown in the figure below. 4. Click the “Border” option at the top of the window, as shown in the figure below. 5. Select the thin solid line pattern in the line style on the left, as shown in the figure below. 6. Select "Outer Border"
 How to filter more than 3 keywords at the same time in excel
Mar 21, 2024 pm 03:16 PM
How to filter more than 3 keywords at the same time in excel
Mar 21, 2024 pm 03:16 PM
Excel is often used to process data in daily office work, and it is often necessary to use the "filter" function. When we choose to perform "filtering" in Excel, we can only filter up to two conditions for the same column. So, do you know how to filter more than 3 keywords at the same time in Excel? Next, let me demonstrate it to you. The first method is to gradually add the conditions to the filter. If you want to filter out three qualifying details at the same time, you first need to filter out one of them step by step. At the beginning, you can first filter out employees with the surname "Wang" based on the conditions. Then click [OK], and then check [Add current selection to filter] in the filter results. The steps are as follows. Similarly, perform filtering separately again
 How to change excel table compatibility mode to normal mode
Mar 20, 2024 pm 08:01 PM
How to change excel table compatibility mode to normal mode
Mar 20, 2024 pm 08:01 PM
In our daily work and study, we copy Excel files from others, open them to add content or re-edit them, and then save them. Sometimes a compatibility check dialog box will appear, which is very troublesome. I don’t know Excel software. , can it be changed to normal mode? So below, the editor will bring you detailed steps to solve this problem, let us learn together. Finally, be sure to remember to save it. 1. Open a worksheet and display an additional compatibility mode in the name of the worksheet, as shown in the figure. 2. In this worksheet, after modifying the content and saving it, the dialog box of the compatibility checker always pops up. It is very troublesome to see this page, as shown in the figure. 3. Click the Office button, click Save As, and then
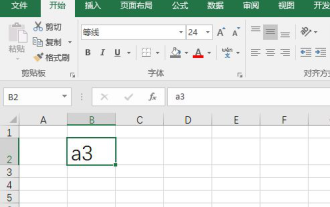 How to type subscript in excel
Mar 20, 2024 am 11:31 AM
How to type subscript in excel
Mar 20, 2024 am 11:31 AM
eWe often use Excel to make some data tables and the like. Sometimes when entering parameter values, we need to superscript or subscript a certain number. For example, mathematical formulas are often used. So how do you type the subscript in Excel? ?Let’s take a look at the detailed steps: 1. Superscript method: 1. First, enter a3 (3 is superscript) in Excel. 2. Select the number "3", right-click and select "Format Cells". 3. Click "Superscript" and then "OK". 4. Look, the effect is like this. 2. Subscript method: 1. Similar to the superscript setting method, enter "ln310" (3 is the subscript) in the cell, select the number "3", right-click and select "Format Cells". 2. Check "Subscript" and click "OK"
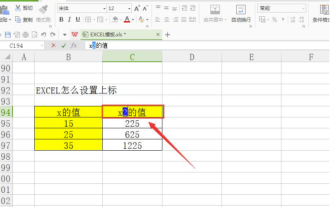 How to set superscript in excel
Mar 20, 2024 pm 04:30 PM
How to set superscript in excel
Mar 20, 2024 pm 04:30 PM
When processing data, sometimes we encounter data that contains various symbols such as multiples, temperatures, etc. Do you know how to set superscripts in Excel? When we use Excel to process data, if we do not set superscripts, it will make it more troublesome to enter a lot of our data. Today, the editor will bring you the specific setting method of excel superscript. 1. First, let us open the Microsoft Office Excel document on the desktop and select the text that needs to be modified into superscript, as shown in the figure. 2. Then, right-click and select the "Format Cells" option in the menu that appears after clicking, as shown in the figure. 3. Next, in the “Format Cells” dialog box that pops up automatically
 How to use the iif function in excel
Mar 20, 2024 pm 06:10 PM
How to use the iif function in excel
Mar 20, 2024 pm 06:10 PM
Most users use Excel to process table data. In fact, Excel also has a VBA program. Apart from experts, not many users have used this function. The iif function is often used when writing in VBA. It is actually the same as if The functions of the functions are similar. Let me introduce to you the usage of the iif function. There are iif functions in SQL statements and VBA code in Excel. The iif function is similar to the IF function in the excel worksheet. It performs true and false value judgment and returns different results based on the logically calculated true and false values. IF function usage is (condition, yes, no). IF statement and IIF function in VBA. The former IF statement is a control statement that can execute different statements according to conditions. The latter
 Where to set excel reading mode
Mar 21, 2024 am 08:40 AM
Where to set excel reading mode
Mar 21, 2024 am 08:40 AM
In the study of software, we are accustomed to using excel, not only because it is convenient, but also because it can meet a variety of formats needed in actual work, and excel is very flexible to use, and there is a mode that is convenient for reading. Today I brought For everyone: where to set the excel reading mode. 1. Turn on the computer, then open the Excel application and find the target data. 2. There are two ways to set the reading mode in Excel. The first one: In Excel, there are a large number of convenient processing methods distributed in the Excel layout. In the lower right corner of Excel, there is a shortcut to set the reading mode. Find the pattern of the cross mark and click it to enter the reading mode. There is a small three-dimensional mark on the right side of the cross mark.
 How to insert excel icons into PPT slides
Mar 26, 2024 pm 05:40 PM
How to insert excel icons into PPT slides
Mar 26, 2024 pm 05:40 PM
1. Open the PPT and turn the page to the page where you need to insert the excel icon. Click the Insert tab. 2. Click [Object]. 3. The following dialog box will pop up. 4. Click [Create from file] and click [Browse]. 5. Select the excel table to be inserted. 6. Click OK and the following page will pop up. 7. Check [Show as icon]. 8. Click OK.
