

php方式设计之 注册树模式

php模式设计之 注册树模式
在前两篇单例模式和工厂模式后,终于迎来了最后一个基础的设计模式--注册树模式。
什么是注册树模式?
注册树模式当然也叫注册模式,注册器模式。之所以我在这里矫情一下它的名称,是因为我感觉注册树这个名称更容易让人理解。像前两篇一样,我们这篇依旧是从名字入手。注册树模式通过将对象实例注册到一棵全局的对象树上,需要的时候从对象树上采摘的模式设计方法。 这让我想起了小时候买糖葫芦,卖糖葫芦的将糖葫芦插在一个大的杆子上,人们买的时候就取下来。不同的是,注册树模式摘下来还会有,能摘很多次,糖葫芦摘一次就没了。。。
为什么要采用注册树模式?
单例模式解决的是如何在整个项目中创建唯一对象实例的问题,工厂模式解决的是如何不通过new建立实例对象的方法。 那么注册树模式想解决什么问题呢? 在考虑这个问题前,我们还是有必要考虑下前两种模式目前面临的局限。 首先,单例模式创建唯一对象的过程本身还有一种判断,即判断对象是否存在。存在则返回对象,不存在则创建对象并返回。 每次创建实例对象都要存在这么一层判断。 工厂模式更多考虑的是扩展维护的问题。 总的来说,单例模式和工厂模式可以产生更加合理的对象。怎么方便调用这些对象呢?而且在项目内如此建立的对象好像散兵游勇一样,不便统筹管理安排啊。因而,注册树模式应运而生。不管你是通过单例模式还是工厂模式还是二者结合生成的对象,都统统给我“插到”注册树上。我用某个对象的时候,直接从注册树上取一下就好。这和我们使用全局变量一样的方便实用。 而且注册树模式还为其他模式提供了一种非常好的想法。
如何实现注册树?
通过上述的描述,我们似乎很容易就找到了解决方法。首先我们需要一个作为注册树的类,这毋庸置疑。所有的对象“插入”到注册树上。这个注册树应该由一个静态变量来充当。而且这个注册树应该是一个二维数组。这个类应该有一个插入对象实例的方法(set()),当让相对应的就应该有一个撤销对象实例的方法(_unset())。当然最重要的是还需要有一个读取对象的方法(get())。拥有这些,我们就可以愉快地完成注册树模式啦~~~
下面让三种模式做个小小的结合。单纯创建一个实例对象远远没有这么复杂,但运用于大型项目的话,便利性便不言而喻了。
<span style="color: #000000;">php<br>//创建单例</span><span style="color: #0000ff;">class</span><span style="color: #000000;"> Single{ </span><span style="color: #0000ff;">public</span> <span style="color: #800080;">$hash</span><span style="color: #000000;">; </span><span style="color: #0000ff;">static</span> <span style="color: #0000ff;">protected</span> <span style="color: #800080;">$ins</span>=<span style="color: #0000ff;">null</span><span style="color: #000000;">; </span><span style="color: #0000ff;">final</span> <span style="color: #0000ff;">protected</span> <span style="color: #0000ff;">function</span><span style="color: #000000;"> __construct(){ </span><span style="color: #800080;">$this</span>->hash=<span style="color: #008080;">rand</span>(1,9999<span style="color: #000000;">); } </span><span style="color: #0000ff;">static</span> <span style="color: #0000ff;">public</span> <span style="color: #0000ff;">function</span><span style="color: #000000;"> getInstance(){ </span><span style="color: #0000ff;">if</span> (self::<span style="color: #800080;">$ins</span><span style="color: #000000;"> instanceof self) { </span><span style="color: #0000ff;">return</span> self::<span style="color: #800080;">$ins</span><span style="color: #000000;">; } self</span>::<span style="color: #800080;">$ins</span>=<span style="color: #0000ff;">new</span><span style="color: #000000;"> self(); </span><span style="color: #0000ff;">return</span> self::<span style="color: #800080;">$ins</span><span style="color: #000000;">; } }//工厂模式</span><span style="color: #0000ff;">class</span><span style="color: #000000;"> RandFactory{ </span><span style="color: #0000ff;">public</span> <span style="color: #0000ff;">static</span> <span style="color: #0000ff;">function</span><span style="color: #000000;"> factory(){ </span><span style="color: #0000ff;">return</span> Single::<span style="color: #000000;">getInstance(); }}//注册树</span><span style="color: #0000ff;">class</span><span style="color: #000000;"> Register{ </span><span style="color: #0000ff;">protected</span> <span style="color: #0000ff;">static</span> <span style="color: #800080;">$objects</span><span style="color: #000000;">; </span><span style="color: #0000ff;">public</span> <span style="color: #0000ff;">static</span> <span style="color: #0000ff;">function</span> set(<span style="color: #800080;">$alias</span>,<span style="color: #800080;">$object</span><span style="color: #000000;">){ self</span>::<span style="color: #800080;">$objects</span>[<span style="color: #800080;">$alias</span>]=<span style="color: #800080;">$object</span><span style="color: #000000;">; } </span><span style="color: #0000ff;">public</span> <span style="color: #0000ff;">static</span> <span style="color: #0000ff;">function</span> get(<span style="color: #800080;">$alias</span><span style="color: #000000;">){ </span><span style="color: #0000ff;">return</span> self::<span style="color: #800080;">$objects</span>[<span style="color: #800080;">$alias</span><span style="color: #000000;">]; } </span><span style="color: #0000ff;">public</span> <span style="color: #0000ff;">static</span> <span style="color: #0000ff;">function</span> _unset(<span style="color: #800080;">$alias</span><span style="color: #000000;">){ </span><span style="color: #0000ff;">unset</span>(self::<span style="color: #800080;">$objects</span>[<span style="color: #800080;">$alias</span><span style="color: #000000;">]); }}Register</span>::set('rand',RandFactory::<span style="color: #000000;">factory());</span><span style="color: #800080;">$object</span>=Register::get('rand'<span style="color: #000000;">);</span><span style="color: #008080;">print_r</span>(<span style="color: #800080;">$object</span>);
至此,三种模式设计介绍完毕。各种模式设计本身就会相辅相成,往后介绍其他模式的时候,多多少少会用到一种或多种其他设计模式。
一种模式不懂不要紧,相信编程的深入,定会产生恍然大悟的惊喜感 ,愿诸君与我共进步。
系列文章:
php模式设计之 单例模式
php模式设计之 工厂模式
php模式设计之 注册树模式
- 1楼BarneyX
- 谢谢博主

Hot AI Tools

Undresser.AI Undress
AI-powered app for creating realistic nude photos

AI Clothes Remover
Online AI tool for removing clothes from photos.

Undress AI Tool
Undress images for free

Clothoff.io
AI clothes remover

Video Face Swap
Swap faces in any video effortlessly with our completely free AI face swap tool!

Hot Article
Hot Tools

Notepad++7.3.1
Easy-to-use and free code editor

SublimeText3 Chinese version
Chinese version, very easy to use

Zend Studio 13.0.1
Powerful PHP integrated development environment

Dreamweaver CS6
Visual web development tools

SublimeText3 Mac version
God-level code editing software (SublimeText3)
Hot Topics
 1387
1387
 52
52

 Solution: Your organization requires you to change your PIN
Oct 04, 2023 pm 05:45 PM
Solution: Your organization requires you to change your PIN
Oct 04, 2023 pm 05:45 PM
The message "Your organization has asked you to change your PIN" will appear on the login screen. This happens when the PIN expiration limit is reached on a computer using organization-based account settings, where they have control over personal devices. However, if you set up Windows using a personal account, the error message should ideally not appear. Although this is not always the case. Most users who encounter errors report using their personal accounts. Why does my organization ask me to change my PIN on Windows 11? It's possible that your account is associated with an organization, and your primary approach should be to verify this. Contacting your domain administrator can help! Additionally, misconfigured local policy settings or incorrect registry keys can cause errors. Right now
 How to adjust window border settings on Windows 11: Change color and size
Sep 22, 2023 am 11:37 AM
How to adjust window border settings on Windows 11: Change color and size
Sep 22, 2023 am 11:37 AM
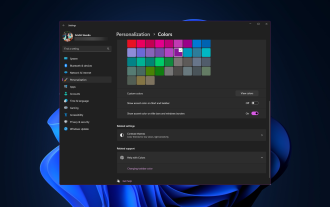
Windows 11 brings fresh and elegant design to the forefront; the modern interface allows you to personalize and change the finest details, such as window borders. In this guide, we'll discuss step-by-step instructions to help you create an environment that reflects your style in the Windows operating system. How to change window border settings? Press + to open the Settings app. WindowsI go to Personalization and click Color Settings. Color Change Window Borders Settings Window 11" Width="643" Height="500" > Find the Show accent color on title bar and window borders option, and toggle the switch next to it. To display accent colors on the Start menu and taskbar To display the theme color on the Start menu and taskbar, turn on Show theme on the Start menu and taskbar
 How to change title bar color on Windows 11?
Sep 14, 2023 pm 03:33 PM
How to change title bar color on Windows 11?
Sep 14, 2023 pm 03:33 PM
By default, the title bar color on Windows 11 depends on the dark/light theme you choose. However, you can change it to any color you want. In this guide, we'll discuss step-by-step instructions for three ways to change it and personalize your desktop experience to make it visually appealing. Is it possible to change the title bar color of active and inactive windows? Yes, you can change the title bar color of active windows using the Settings app, or you can change the title bar color of inactive windows using Registry Editor. To learn these steps, go to the next section. How to change title bar color in Windows 11? 1. Using the Settings app press + to open the settings window. WindowsI go to "Personalization" and then
 OOBELANGUAGE Error Problems in Windows 11/10 Repair
Jul 16, 2023 pm 03:29 PM
OOBELANGUAGE Error Problems in Windows 11/10 Repair
Jul 16, 2023 pm 03:29 PM
Do you see "A problem occurred" along with the "OOBELANGUAGE" statement on the Windows Installer page? The installation of Windows sometimes stops due to such errors. OOBE means out-of-the-box experience. As the error message indicates, this is an issue related to OOBE language selection. There is nothing to worry about, you can solve this problem with nifty registry editing from the OOBE screen itself. Quick Fix – 1. Click the “Retry” button at the bottom of the OOBE app. This will continue the process without further hiccups. 2. Use the power button to force shut down the system. After the system restarts, OOBE should continue. 3. Disconnect the system from the Internet. Complete all aspects of OOBE in offline mode
 How to enable or disable taskbar thumbnail previews on Windows 11
Sep 15, 2023 pm 03:57 PM
How to enable or disable taskbar thumbnail previews on Windows 11
Sep 15, 2023 pm 03:57 PM
Taskbar thumbnails can be fun, but they can also be distracting or annoying. Considering how often you hover over this area, you may have inadvertently closed important windows a few times. Another disadvantage is that it uses more system resources, so if you've been looking for a way to be more resource efficient, we'll show you how to disable it. However, if your hardware specs can handle it and you like the preview, you can enable it. How to enable taskbar thumbnail preview in Windows 11? 1. Using the Settings app tap the key and click Settings. Windows click System and select About. Click Advanced system settings. Navigate to the Advanced tab and select Settings under Performance. Select "Visual Effects"
 Display scaling guide on Windows 11
Sep 19, 2023 pm 06:45 PM
Display scaling guide on Windows 11
Sep 19, 2023 pm 06:45 PM
We all have different preferences when it comes to display scaling on Windows 11. Some people like big icons, some like small icons. However, we all agree that having the right scaling is important. Poor font scaling or over-scaling of images can be a real productivity killer when working, so you need to know how to customize it to get the most out of your system's capabilities. Advantages of Custom Zoom: This is a useful feature for people who have difficulty reading text on the screen. It helps you see more on the screen at one time. You can create custom extension profiles that apply only to certain monitors and applications. Can help improve the performance of low-end hardware. It gives you more control over what's on your screen. How to use Windows 11
 10 Ways to Adjust Brightness on Windows 11
Dec 18, 2023 pm 02:21 PM
10 Ways to Adjust Brightness on Windows 11
Dec 18, 2023 pm 02:21 PM
Screen brightness is an integral part of using modern computing devices, especially when you look at the screen for long periods of time. It helps you reduce eye strain, improve legibility, and view content easily and efficiently. However, depending on your settings, it can sometimes be difficult to manage brightness, especially on Windows 11 with the new UI changes. If you're having trouble adjusting brightness, here are all the ways to manage brightness on Windows 11. How to Change Brightness on Windows 11 [10 Ways Explained] Single monitor users can use the following methods to adjust brightness on Windows 11. This includes desktop systems using a single monitor as well as laptops. let's start. Method 1: Use the Action Center The Action Center is accessible
 How to Fix Activation Error Code 0xc004f069 in Windows Server
Jul 22, 2023 am 09:49 AM
How to Fix Activation Error Code 0xc004f069 in Windows Server
Jul 22, 2023 am 09:49 AM
The activation process on Windows sometimes takes a sudden turn to display an error message containing this error code 0xc004f069. Although the activation process is online, some older systems running Windows Server may experience this issue. Go through these initial checks, and if they don't help you activate your system, jump to the main solution to resolve the issue. Workaround – close the error message and activation window. Then restart the computer. Retry the Windows activation process from scratch again. Fix 1 – Activate from Terminal Activate Windows Server Edition system from cmd terminal. Stage – 1 Check Windows Server Version You have to check which type of W you are using
