 Web Front-end
 JS Tutorial
 Summary of submission methods of validate and form plug-ins in jquery_javascript skills
Summary of submission methods of validate and form plug-ins in jquery_javascript skills
Overview: This article mainly discusses jquery.validate combined with jquery.form to implement form verification and submission solutions.
Method 1: Through the submitHandler option of jquery.validate, that is, the callback function is executed when the form passes verification. Submit the form through jquery.form in this callback function;
Method 2: Through beforeSubmit of jquery.form, which is a callback function executed before submitting the form. If this function returns true, the form is submitted. If it returns false, the form submission is terminated. According to the valid() method of the jquery.validate plug-in, the form can be verified when submitting the form through jquery.form.
Method 3: Validate the form through jquery.validate. The advantage of this method is that you have more control over form validation
Examples: The above three methods are explained below through three examples
Load CSS style file
CSS style file content
input{
 height:25px;
 line-height:25px;
 padding-left:4px;
}

span.checked{
 padding: 0px 5px 0px 25px;
 margin-left: 10px;
 margin-top: 0px;
 margin-bottom: 3px;
 height: 25px;
 line-height:25px;
 font-size: 12px;
 white-space: nowrap;
 text-align: left;
 color: #E6594E;
 background: url("images/acion2.png") no-repeat 3px; /* #FCEAE8 */
}
span.unchecked{
 padding: 0px 5px 0px 25px;
 margin-left: 10px;
 margin-top: 0px;
 margin-bottom: 3px;
 height: 23px;
 line-height:23px;
 font-size: 12px;
 border: 1px solid #E6594E;
 white-space: nowrap;
 text-align: left;
 color: #E6594E;
 background: #FCEAE8 url("images/acion.png") no-repeat 3px;
}Load javascript file
<script language="JavaScript" type="text/JavaScript" src="js/jQuery1.6.2.js"></script>
<script language="JavaScript" type="text/JavaScript" src="js/jquery.form.js"></script>
<script language="JavaScript" type="text/JavaScript" src="js/jquery.validate.js"></script>
<script language="JavaScript" type="text/JavaScript" src="js/localization/messages_tw.js"></script>
HTML content
<body><span id="result"></span>
<form id='commentForm'>
 <fieldset>
 <legend>jquery.validate+jquery.form提交的三种方式</legend>
  <p>
   <label for='cusername'>姓名</label><em>*</em>
   <input id='cusername' name='username' size='25' />
  </p>
  <p>
   <label for='cemail'>电子邮件</label><em>*</em>
   <input id='cemail' name='email' size='25' />
  </p>
  <p>
   <input class='submit' type='submit' value='提交'>
  </p>
 </fieldset>
</form>
</body>
jquery.validate+jquery.form submits the javascript content of method 1
<script language="javascript">
function showResponse(responseText,statusText) {
if(statusText=='success'){
$("#result").html(responseText);
}
}
$(document).ready(function(){
$('#commentForm').validate({
focusCleanup:true,focusInvalid:false,
errorClass: "unchecked",
validClass: "checked",
errorElement: "span",
submitHandler:function(form){
$(form).ajaxSubmit({
type:"post",
url:"test_save.php?time="+ (new Date()).getTime(),
//beforeSubmit: showRequest,
success: showResponse
});
},
errorPlacement:function(error,element){
var s=element.parent().find("span[htmlFor='" + element.attr("id") + "']");
if(s!=null){
s.remove();
}
error.appendTo(element.parent());
},
success: function(label) {
//label.addClass("valid").text("Ok!")
label.removeClass("unchecked").addClass("checked");
},
rules:{
username:{required:true,minlength:3},
email:{
required:true
}
}
});
});
</script>jquery.validate+jquery.form submits the javascript content of method 2
<script language="javascript">
function showResponse(responseText,statusText) {
if(statusText=='success'){
$("#result").html(responseText);
}
}
function showRequest(formData,jqForm,options){
return $("#commentForm").valid();
}
$(document).ready(function(){
$('#commentForm').submit(function(){
$(this).ajaxSubmit({
type:"post",
url:"test_save.php?time="+ (new Date()).getTime(),
beforeSubmit:showRequest,
success:showResponse
});
return false; //此处必须返回false,阻止常规的form提交
});
$('#commentForm').validate({
focusCleanup:true,focusInvalid:false,
errorClass: "unchecked",
validClass: "checked",
errorElement: "span",
errorPlacement:function(error,element){
var s=element.parent().find("span[htmlFor='" + element.attr("id") + "']");
if(s!=null){
s.remove();
}
error.appendTo(element.parent());
},
success: function(label) {
//label.addClass("valid").text("Ok!")
label.removeClass("unchecked").addClass("checked");
},
rules:{
username:{required:true,minlength:3},
email:{
required:true
}
}
});
});
</script>jquery.validate+jquery.form submits the javascript content of method 3
<script language="javascript">
var options={
focusCleanup:true,focusInvalid:false,
errorClass: "unchecked",
validClass: "checked",
errorElement: "span",
errorPlacement:function(error,element){
var s=element.parent().find("span[htmlFor='" + element.attr("id") + "']");
if(s!=null){
s.remove();
}
error.appendTo(element.parent());
},
success: function(label) {
//label.addClass("valid").text("Ok!")
label.removeClass("unchecked").addClass("checked");
},
rules:{
username:{required:true,minlength:3},
email:{
required:true
}
}
};
function showResponse(responseText,statusText) {
if(statusText=='success'){
$("#result").html(responseText);
}
}
function showRequest(formData,jqForm,options){
return $("#commentForm").valid();
}
$(document).ready(function(){
validator=$('#commentForm').validate(options);
$("#reset").click(function(){
validator.resetForm();
});
$("button").click(function(){
validator.form();
});
$('#commentForm').submit(function(){
$(this).ajaxSubmit({
type:"post",
url:"test_save.php?time="+ (new Date()).getTime(),
beforeSubmit:showRequest,
success:showResponse
});
return false; //此处必须返回false,阻止常规的form提交
});
});
</script>DEMO source code: Download
Some questions
1. In fact, this problem was discovered when I wrote this article last night. When I used in the HTML file header, there seemed to be some problems with the style of the input box and error message. However, today I discovered that the problem is not that simple. When using , for the "name" input box - it only needs to reach three characters to be considered passed the verification - after entering the first character, the second character characters, the error display is normal. When the third character is entered, the error display disappears, and a "comma" picture indicating that the verification is passed is displayed. So far, everything seems to be working fine, but if you continue to enter characters, such as the fourth character, the fifth character... the problem arises. As shown below:
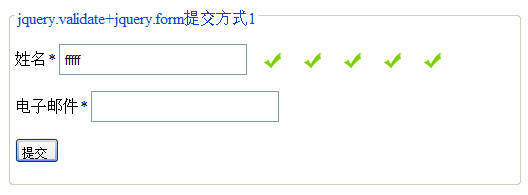
No such problem when using instead of using , everything works fine. However, the question now is, why does adding cause such a problem? Moreover, as a front-end, adding is necessary.
This problem is quite complicated to deal with. Here is a list of the process. And give a solution at the end
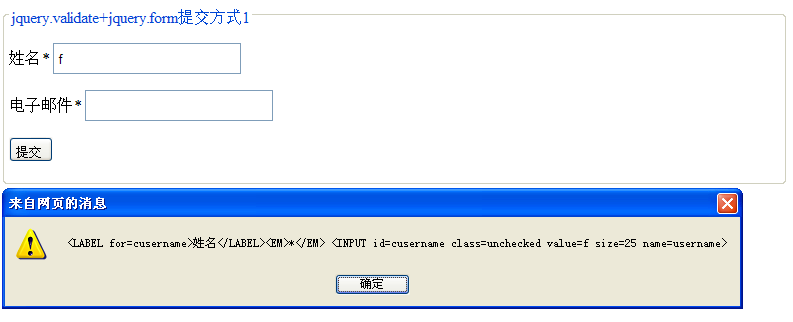
First of all, it’s because I was checking the error message yesterday and paid attention to the code that inserted the error message. I added a sentence to errorPlacement: alert(element.parent().html());
errorPlacement:function(error,element){
 alert(element.parent().html());
 var s=element.parent().find("span[htmlFor='" + element.attr("id") + "']");
 if(s!=null){
  s.remove();
 }
 error.appendTo(element.parent());
},When you enter the first character, you get something like the picture below
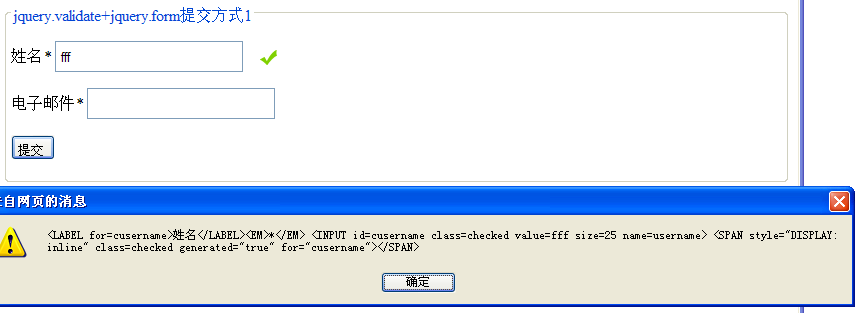
Enter three characters. After successful verification, you will get the following picture:
Continue to enter more characters and get the result as shown below
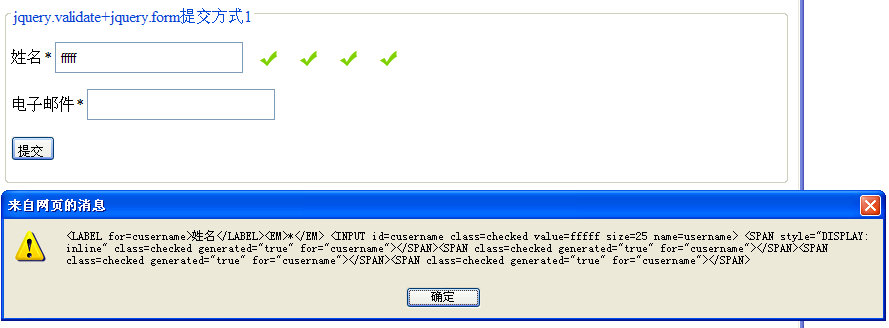
This illustrates the following issues:
1. Regardless of whether the verification fails or succeeds, errorPlacement:function(...)
will be called2. s.remove() does not work.
Since I used instead of when writing this article, the pop-up content is htmlFor="cusername" instead of for="cusername", as shown in the following figure:
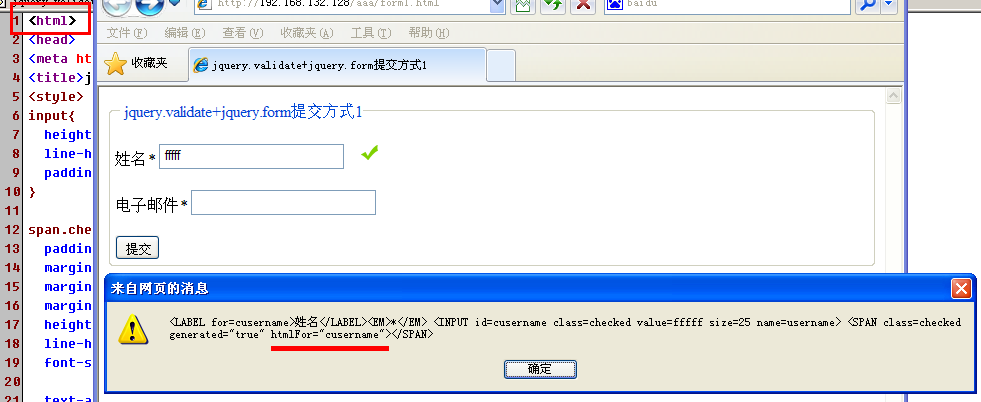
Therefore, the above code is written as follows
 var s=element.parent().find("span[htmlFor='" + element.attr("id") + "']");
 if(s!=null){
  s.remove();
}However, under , cannot be found based on htmlFor, so htmlFor should be changed to for here, that is,
errorPlacement:function(error,element){
 alert(element.parent().html());
 var s=element.parent().find("span[for='" + element.attr("id") + "']");
 if(s!=null){
  s.remove();
 }
 error.appendTo(element.parent());
},问题似乎解决了。但上面提到,不管验证成功或失败,都会调用errorPlacement:function(...),那可以在这里判断有没有错误,如果有错误,则显示。防止已经验证成功的情况下仍会调用。这样就不会寻找span的for属性值是否为当前控件的name名称了(例子中是for="cusername")。改进的代码如下:
errorPlacement:function(error,element){
 if(error.html()!=''){
  error.appendTo(element.parent());
 }
},虽然解决问题,但是在chrome、firefox下仍有问题。了解这个问题的现象,可以用firefox或chrome测试一下——焦点离开输入框后,无法验证,只有点击“提交”按钮后才可以验证——这个问题的解决方案目前还没有深入下去。但是有解决的办法是,将上面的jquery1.6.2换成jquery1.3.2或jquery1.4(其它的jquery版本未测试,可能是低于jquery1.6.2的版本都可以)即可解决这个问题。
建议:
1、使用jquery1.3.2版本,这样可以节省很多时间来解决兼容方面的问题。
更多:
本例子中的jquery.validate,解决了remote远程验证只返回true or false的局限。可以返回代码及出错的提示信息,更好的人性化需求。使用方法就在这介绍一下
增加以下函数
function GetRemoteInfo(postUrl,data){
 var remote = {
  type: "POST",
  async: false,
  url: postUrl,
  dataType: "xml",
  data: data,
  dataFilter: function(dataXML) {
   var result = new Object();
   result.Result = jQuery(dataXML).find("Result").text();
   result.Msg = jQuery(dataXML).find("Msg").text();
   //alert(result.Result);
   if (result.Result == "-1") {
    result.Result = false;
    return result;
   }else{
    result.Result = result.Result == "1" ? true : false;
    return result;
   }
  }
 };
 return remote;
}
$(document).ready(function(){
 var dataInfo ={email:function(){return $("#cemail").val();}};
 var remoteInfo = GetRemoteInfo('check-email.php?time='+(new Date()).getTime(),dataInfo);
 $('#commentForm').validate({
  rules:{
   username:{
    required:true,
    minlength:3
   },
   email:{
    required:true,
    remote:remoteInfo
   }
  }
 });
 ....
});check-email.php返回的内容为xml格式,格式如下
<?php
header("Content-Type:text/xml");
echo '<?'.'xml version="1.0" encoding="utf-8"'.' ?>';
?>
<AjaxClass>
<Msg>用户名格式不正确,用户名必须包含testa,请重新输入!</Msg>
<Result>0</Result>
</AjaxClass>result值为0,返回的是false,表示验证失败;result值为1,返回的是true,表示验证成功

Hot AI Tools

Undresser.AI Undress
AI-powered app for creating realistic nude photos

AI Clothes Remover
Online AI tool for removing clothes from photos.

Undress AI Tool
Undress images for free

Clothoff.io
AI clothes remover

AI Hentai Generator
Generate AI Hentai for free.

Hot Article

Hot Tools

Notepad++7.3.1
Easy-to-use and free code editor

SublimeText3 Chinese version
Chinese version, very easy to use

Zend Studio 13.0.1
Powerful PHP integrated development environment

Dreamweaver CS6
Visual web development tools

SublimeText3 Mac version
God-level code editing software (SublimeText3)

Hot Topics
 1378
1378
 52
52
 How do I create and publish my own JavaScript libraries?
Mar 18, 2025 pm 03:12 PM
Article discusses creating, publishing, and maintaining JavaScript libraries, focusing on planning, development, testing, documentation, and promotion strategies.
 How do I optimize JavaScript code for performance in the browser?
Mar 18, 2025 pm 03:14 PM
The article discusses strategies for optimizing JavaScript performance in browsers, focusing on reducing execution time and minimizing impact on page load speed.
 What should I do if I encounter garbled code printing for front-end thermal paper receipts?
Apr 04, 2025 pm 02:42 PM
Frequently Asked Questions and Solutions for Front-end Thermal Paper Ticket Printing In Front-end Development, Ticket Printing is a common requirement. However, many developers are implementing...
 How do I debug JavaScript code effectively using browser developer tools?
Mar 18, 2025 pm 03:16 PM
The article discusses effective JavaScript debugging using browser developer tools, focusing on setting breakpoints, using the console, and analyzing performance.
 Who gets paid more Python or JavaScript?
Apr 04, 2025 am 12:09 AM
There is no absolute salary for Python and JavaScript developers, depending on skills and industry needs. 1. Python may be paid more in data science and machine learning. 2. JavaScript has great demand in front-end and full-stack development, and its salary is also considerable. 3. Influencing factors include experience, geographical location, company size and specific skills.
 How do I use source maps to debug minified JavaScript code?
Mar 18, 2025 pm 03:17 PM
The article explains how to use source maps to debug minified JavaScript by mapping it back to the original code. It discusses enabling source maps, setting breakpoints, and using tools like Chrome DevTools and Webpack.
 Getting Started With Chart.js: Pie, Doughnut, and Bubble Charts
Mar 15, 2025 am 09:19 AM
This tutorial will explain how to create pie, ring, and bubble charts using Chart.js. Previously, we have learned four chart types of Chart.js: line chart and bar chart (tutorial 2), as well as radar chart and polar region chart (tutorial 3). Create pie and ring charts Pie charts and ring charts are ideal for showing the proportions of a whole that is divided into different parts. For example, a pie chart can be used to show the percentage of male lions, female lions and young lions in a safari, or the percentage of votes that different candidates receive in the election. Pie charts are only suitable for comparing single parameters or datasets. It should be noted that the pie chart cannot draw entities with zero value because the angle of the fan in the pie chart depends on the numerical size of the data point. This means any entity with zero proportion
 TypeScript for Beginners, Part 2: Basic Data Types
Mar 19, 2025 am 09:10 AM
Once you have mastered the entry-level TypeScript tutorial, you should be able to write your own code in an IDE that supports TypeScript and compile it into JavaScript. This tutorial will dive into various data types in TypeScript. JavaScript has seven data types: Null, Undefined, Boolean, Number, String, Symbol (introduced by ES6) and Object. TypeScript defines more types on this basis, and this tutorial will cover all of them in detail. Null data type Like JavaScript, null in TypeScript


