
 Web Front-end
JS Tutorial
Beautiful three-dimensional picture border effect realized by pure CSS, shadow code_image special effects
Web Front-end
JS Tutorial
Beautiful three-dimensional picture border effect realized by pure CSS, shadow code_image special effects
Beautiful three-dimensional picture border effect realized by pure CSS, shadow code_image special effects


Hot AI Tools

Undresser.AI Undress
AI-powered app for creating realistic nude photos

AI Clothes Remover
Online AI tool for removing clothes from photos.

Undress AI Tool
Undress images for free

Clothoff.io
AI clothes remover

AI Hentai Generator
Generate AI Hentai for free.

Hot Article
Hot Tools

Notepad++7.3.1
Easy-to-use and free code editor

SublimeText3 Chinese version
Chinese version, very easy to use

Zend Studio 13.0.1
Powerful PHP integrated development environment

Dreamweaver CS6
Visual web development tools

SublimeText3 Mac version
God-level code editing software (SublimeText3)
Hot Topics
 1359
1359
 52
52

 How to adjust window border settings on Windows 11: Change color and size
Sep 22, 2023 am 11:37 AM
How to adjust window border settings on Windows 11: Change color and size
Sep 22, 2023 am 11:37 AM
Windows 11 brings fresh and elegant design to the forefront; the modern interface allows you to personalize and change the finest details, such as window borders. In this guide, we'll discuss step-by-step instructions to help you create an environment that reflects your style in the Windows operating system. How to change window border settings? Press + to open the Settings app. WindowsI go to Personalization and click Color Settings. Color Change Window Borders Settings Window 11" Width="643" Height="500" > Find the Show accent color on title bar and window borders option, and toggle the switch next to it. To display accent colors on the Start menu and taskbar To display the theme color on the Start menu and taskbar, turn on Show theme on the Start menu and taskbar
 Detailed explanation of how to deal with all font shadows in Win10 computer
Jul 23, 2023 pm 11:13 PM
Detailed explanation of how to deal with all font shadows in Win10 computer
Jul 23, 2023 pm 11:13 PM
In the process of using the computer, some problems may occur due to improper operation and other situations. Recently, some netizens said that what to do with all the font shadows on their win10 computers, which affects viewing, and the icons on the desktop have shadows. The editor below will teach you how to clear all font shadows on your computer desktop. The specific steps are as follows: 1. First turn on the computer, enter the win+r key combination, open the run window, and enter gpedit.msc to confirm. 2. Find Enable ActiveDesktop, double-click it to open it, and disable it. 3. Next we need to open the disable ActiveDesktop button below, and then enable it. 4. Then open the system of the control panel, open its advanced system settings properties, and then enter the Properties
 How to make custom borders in Microsoft Word
Nov 18, 2023 pm 11:17 PM
How to make custom borders in Microsoft Word
Nov 18, 2023 pm 11:17 PM
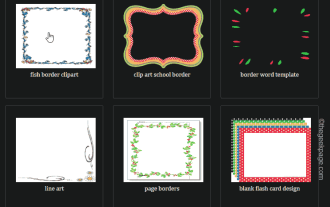
Want to make the front page of your school project look exciting? Nothing makes it stand out from other submissions like a nice, elegant border on the homepage of your workbook. However, the standard single-line borders in Microsoft Word have become very obvious and boring. Therefore, we show you the steps to create and use custom borders in Microsoft Word documents. How to Make Custom Borders in Microsoft Word Creating custom borders is very easy. However, you will need a boundary. Step 1 – Download Custom Borders There are tons of free borders on the internet. We have downloaded a border like this. Step 1 – Search the Internet for custom borders. Alternatively, you can go to clipping
 Popular science on how to set excel borders
Mar 20, 2024 am 10:30 AM
Popular science on how to set excel borders
Mar 20, 2024 am 10:30 AM
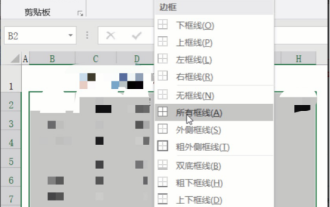
It is not uncommon for Excel to appear in our daily work and life. Whether it is the production of employee information, salary tables, or student enrollment information and transcripts, Excel is a relatively easy-to-use tool. When printing Excel, you need to set borders to meet printing requirements. In this article, the editor will introduce you to several ways to set Excel borders. Method 1. Use the function tab button. This should be a method often used by everyone. It is convenient and fast. The specific operation: select the cell area B2:H10 where you need to add a border, click the [Start] tab - [Border] drop-down on the right Button-[All Frames] to complete adding frames. Method 2. Select the cell area B2:H10 where you want to add a border.
 How to achieve the effect of adding shadow to element blocks in css
Sep 16, 2022 pm 05:08 PM
How to achieve the effect of adding shadow to element blocks in css
Sep 16, 2022 pm 05:08 PM
In CSS, you can use the box-shadow attribute to add shadow to an element block. The box-shadow attribute can realize the border shadow effect and apply the shadow to the box element. The syntax is "box-shadow: Horizontal shadow Vertical shadow Blur radius Expansion radius Shadow color Projection mode"; if the projection mode is set to "inset", inner shadow can be achieved.
 How to use CSS to animate the border of an element
Nov 21, 2023 pm 02:26 PM
How to use CSS to animate the border of an element
Nov 21, 2023 pm 02:26 PM
How to use CSS to achieve element border animation effects Introduction: In web design, in order to increase the user's visual experience and the attractiveness of the page, some animation effects are often used to make page elements more vivid and interesting. Among them, border animation is a very common effect, which can make the element border change, flicker or flow dynamically. This article will introduce how to use CSS to animate the border of elements and provide specific code examples. 1. Realize the border color change animation To realize the border color change animation effect, you can
 How to create gradient shadow using CSS?
Aug 27, 2023 pm 11:41 PM
How to create gradient shadow using CSS?
Aug 27, 2023 pm 11:41 PM
As the web continues to evolve, making a beautiful UI is one of the most important tasks to increase customer engagement on your website. One of the ways to improve the appearance of your front-end is to apply gradient shadows in CSS. The two most important methods of applying gradient shading are linear gradients and radial gradients. Gradient shadows can be used to draw user attention to specific information, apply hover or focus effects, or give a website a Web3 look and feel. In this tutorial, we'll analyze two gradient shades with practical examples. We will make use of two important CSS concepts to achieve the effect, one is the filter attribute and the other is the ::after pseudo-class. The pseudo class will be used to create a fake background, while the filter attribute will be used to apply a blur effect to the surrounding background. Method One: Linear Gradient Yin
 How to add borders to images using PHP
Aug 26, 2023 am 10:12 AM
How to add borders to images using PHP
Aug 26, 2023 am 10:12 AM
How to use PHP to add borders to pictures In web development and image processing, it is often necessary to add borders to pictures to improve the beauty and visibility of the pictures. This article will introduce how to add borders to images using PHP, with code examples. First, we need to make sure that PHP's GD library is installed on the server. The GD library is an open source library for image processing that can be used to create, manipulate and output images. Most servers have the GD library installed by default, but if it is not installed, you can manage the work through the PHP extension.
