JavaScript html5 canvas drawing clock effect (2)_javascript skills
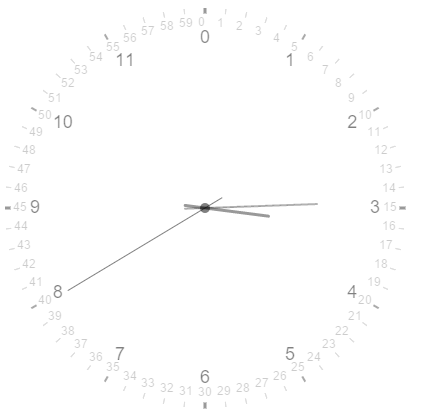
For H5, canvas can be said to be its most distinctive feature. With it, we can freely draw various graphics on the web page, make some small games and so on. There are many tutorials on how to use the canvas tag on the Internet, so I won’t introduce them here. Today we will use canvas to make a small clock. The complete code is herehttps://github.com/wwervin72/HTML5-Clock.
So first of all, I used two canvases on this page, one to draw the static clock dial and scales, and the other to draw the three hands of the clock, and then used positioning to make them overlap. Then there is nothing to say here, the code is attached below.
<canvas id="plate">
 画表盘
</canvas>
<canvas id="needles">
 画时针
</canvas>
var plate=document.getElementById('plate');
var needles=document.getElementById('needles');
needles.setAttribute('style','position:absolute;top:8px;left:8px;'); //这里因为chrome里面,body的magin值为8px,所以我这里就没设为0了。
var cntP=plate.getContext('2d');
var cntH=needles.getContext('2d');
plate.width=800;
plate.height=500;
needles.width=800;
needles.height=500;Now that the preparations are done, we are ready to draw the clock. I first defined a constructor that draws the clock face.
 function drawclock(cnt,radius,platelen,linewidth,numLen,NUMLEN){
  this.cnt=cnt;
  this.radius=radius;
  this.platelen=platelen;
  this.linewidth=linewidth;
  this.numLen=numLen;
  this.NUMLEN=NUMLEN;
  this.getCalibCoor=function(i){
  //获得表盘刻度两端的坐标
  var X=200+this.radius*Math.sin(6*i*Math.PI/180);
  var Y=200-this.radius*Math.cos(6*i*Math.PI/180);
  var x=200+(this.radius-this.platelen)*Math.sin(6*i*Math.PI/180);
  var y=200-(this.radius-this.platelen)*Math.cos(6*i*Math.PI/180);

  // 获得分钟数字的坐标
  var numx=200+(this.radius-this.platelen-this.numLen)*Math.sin(6*i*Math.PI/180);
  var numy=200-(this.radius-this.platelen-this.numLen)*Math.cos(6*i*Math.PI/180);
  //获得小时数字的坐标
  var numX=200+(this.radius-this.platelen-this.NUMLEN)*Math.sin(6*i*Math.PI/180);
  var numY=200-(this.radius-this.platelen-this.NUMLEN)*Math.cos(6*i*Math.PI/180);
  return {X:X,Y:Y,x:x,y:y,numx:numx,numy:numy,numX:numX,numY:numY};
  };
  this.drawCalibration=function(){ //画刻度
  for(var i=0,coorObj;i<60;i++){
   coorObj=this.getCalibCoor(i);
   this.cnt.beginPath();
   this.cnt.moveTo(coorObj.X,coorObj.Y);
   this.cnt.lineTo(coorObj.x,coorObj.y);
   this.cnt.closePath();

   this.cnt.lineWidth=this.linewidth;
   this.cnt.strokeStyle='#ddd';
   i%5==0&&(this.cnt.strokeStyle='#aaa')
   &&(this.cnt.lineWidth=this.linewidth*2);
   i%15==0&&(this.cnt.strokeStyle='#999')
   &&(this.cnt.lineWidth=this.linewidth*3);
   this.cnt.stroke();

   this.cnt.font='10px Arial';
   this.cnt.fillStyle='rgba(0,0,0,.2)';
   this.cnt.fillText(i,coorObj.numx-7,coorObj.numy+3);
   i%5==0&&(this.cnt.fillStyle='rgba(0,0,0,.5)')
   &&(this.cnt.font='18px Arial')
   &&(this.cnt.fillText(i/5,coorObj.numX-5,coorObj.numY+5));
  }
  };
 }
      var clock=new drawclock(cntP,200,5,1,10,25); //实例化一个表盘对象
      clock.drawCalibration();
The most important part here should be to obtain the coordinates of the scale and digital drawing. I placed the starting point of the scale on the edge of the dial, then subtracted the length of the scale from the radius of the dial to get the location of the end point of the scale, and then used angles and trigonometric functions to get the coordinates of the two points. Finally, you can draw the scale of the dial. The same method is used to draw the numbers on the dial below. The center of the dial here is placed at (200,200). At this point we have drawn a static clock face.
Below I define a constructor for drawing the clock pointer.
function clockNeedle(cnt,R,lineWidth,strokeStyle,lineCap,obj){
  this.R=R;
  this.cnt=cnt;
  this.lineWidth=lineWidth;
  this.strokeStyle=strokeStyle;
  this.lineCap=lineCap;
  this.obj=obj;
  this.getNeedleCoor=function(i){
  var X=200+this.R*0.8*Math.sin(i); //起点的坐标
  var Y=200-this.R*0.8*Math.cos(i);

  var x=200-20*Math.sin(i); //终点的坐标
  var y=200+20*Math.cos(i);
  return {X:X,Y:Y,x:x,y:y};
  };
  this.drawNeedle=function(){
  var d=new Date().getTime();
  var angle;
  switch(this.obj){
   case 0:
   angle=(d/3600000%24+8)/12*360*Math.PI/180;
   break;
   case 1:
   angle=d/60000%60/60*360*Math.PI/180;
   break;
   case 2:
   angle=d/1000%60/60*360*Math.PI/180;
   break;
  }
  var coorobj=this.getNeedleCoor(angle);
  this.cnt.beginPath();
  this.cnt.moveTo(coorobj.x,coorobj.y);
  this.cnt.lineTo(coorobj.X,coorobj.Y);
  // this.cnt.closePath();

  this.cnt.lineWidth=this.lineWidth;
  this.cnt.strokeStyle=this.strokeStyle;
  this.cnt.lineCap=this.lineCap;
  this.cnt.stroke();
  }
 }
There are two things that need to be said here: 1. When we get the milliseconds of the current time and then convert it to hours, when we take modulo 24 to calculate the hours of the day, we need to add 8 here. 2. If If you want to use the lineCap attribute, don't use closePath() when setting the path above.
At this point we also need a method to draw the pointer and make it look like it can rotate:
function draw(){
  cntH.clearRect(0,0,needles.width,needles.height);
  var mzneedle=new clockNeedle(cntH,200,1,'rgba(0,0,0,.5)','round',2);
  //最后一个参数0代表画时针,1画分针,2画秒针
  var fzneedle=new clockNeedle(cntH,80,3,'rgba(0,0,0,.4)','round',0);
  var szneedle=new clockNeedle(cntH,140,2,'rgba(0,0,0,.3)','round',1);
  mzneedle.drawNeedle();
  fzneedle.drawNeedle();
  szneedle.drawNeedle();
  cntH.arc(200,200,5,0,2*Math.PI);
  cntH.fillStyle='rgba(0,0,0,.5)';
  cntH.fill();
 }
 setInterval(draw,1);
A picture of the clock is attached below:

The above is the entire content of this article, I hope it will be helpful to everyone’s study.

Hot AI Tools

Undresser.AI Undress
AI-powered app for creating realistic nude photos

AI Clothes Remover
Online AI tool for removing clothes from photos.

Undress AI Tool
Undress images for free

Clothoff.io
AI clothes remover

AI Hentai Generator
Generate AI Hentai for free.

Hot Article

Hot Tools

Notepad++7.3.1
Easy-to-use and free code editor

SublimeText3 Chinese version
Chinese version, very easy to use

Zend Studio 13.0.1
Powerful PHP integrated development environment

Dreamweaver CS6
Visual web development tools

SublimeText3 Mac version
God-level code editing software (SublimeText3)

Hot Topics
 1377
1377
 52
52
 Table Border in HTML
Sep 04, 2024 pm 04:49 PM
Guide to Table Border in HTML. Here we discuss multiple ways for defining table-border with examples of the Table Border in HTML.
 HTML margin-left
Sep 04, 2024 pm 04:48 PM
Guide to HTML margin-left. Here we discuss a brief overview on HTML margin-left and its Examples along with its Code Implementation.
 Nested Table in HTML
Sep 04, 2024 pm 04:49 PM
This is a guide to Nested Table in HTML. Here we discuss how to create a table within the table along with the respective examples.
 HTML Table Layout
Sep 04, 2024 pm 04:54 PM
Guide to HTML Table Layout. Here we discuss the Values of HTML Table Layout along with the examples and outputs n detail.
 HTML Input Placeholder
Sep 04, 2024 pm 04:54 PM
Guide to HTML Input Placeholder. Here we discuss the Examples of HTML Input Placeholder along with the codes and outputs.
 HTML Ordered List
Sep 04, 2024 pm 04:43 PM
Guide to the HTML Ordered List. Here we also discuss introduction of HTML Ordered list and types along with their example respectively
 Moving Text in HTML
Sep 04, 2024 pm 04:45 PM
Guide to Moving Text in HTML. Here we discuss an introduction, how marquee tag work with syntax and examples to implement.
 HTML onclick Button
Sep 04, 2024 pm 04:49 PM
Guide to HTML onclick Button. Here we discuss their introduction, working, examples and onclick Event in various events respectively.


