JS random shuffling algorithm array random sorting_javascript skills
Recommended reading: JavaScript study notes: Adding, deleting, modifying and checking arrays
JavaScript Study Notes Array Sum Method
JavaScript Study Notes Array Random Sorting
Shuffling algorithm is a relatively vivid term, which essentially allows the elements in an array to be arranged randomly. For example, we have an array as shown in the figure below. The length of the array is 9, and the values of the elements in the array are 1~9:

Starting from the above array, what we have to do is to disrupt the order of the elements in the array:

Code implementation
The Fisher–Yates shuffle entry on Wikipedia provides a detailed introduction to the shuffling algorithm. The algorithm demonstrated below is also written based on the theory:
Array.prototype.shuffle = function() {
var input = this;
for (var i = input.length-1; i >=0; i--) {
var randomIndex = Math.floor(Math.random()*(i+1));
var itemAtIndex = input[randomIndex];
input[randomIndex] = input[i];
input[i] = itemAtIndex;
}
return input;
}
var tempArray = [ 1, 2, 3, 4, 5, 6, 7, 8, 9, 10 ]
tempArray.shuffle();
// and the result is...
alert(tempArray); In the above code, we created a shffle() method, which is used to randomly arrange the elements within the array. In addition, we mounted this method under the prototype of the Array object, so any array can call this method directly:
var tempArray = [ 1, 2, 3, 4, 5, 6, 7, 8, 9, 10 ]
tempArray.shuffle();
How it works
After reading the code, let’s see what it does to the array. First, this method selects the last element of the array:

Next, determine the range for selecting random elements. From the first element of the array to the element selected in the previous step, they all belong to this range:

After determining the range, randomly select a number from it, assuming that the randomly selected element is 4:

Then swap the values of the last element and the randomly selected element:

After the above exchange is completed, it is equivalent to us completing the random processing of the last element of the array. Next select the second to last element in the array:

The reason why we process it from back to front is that it is easier to determine the range of random selection. This time we assume that the randomly obtained element is 2:

Then exchange the values of the penultimate element and the 2nd element to complete the random arrangement of the penultimate element. Then select the third to last element and repeat the previous operation:

The rest is some repetitive work, so I won’t introduce it much.
Analyzing code
In the previous section, I used an illustration to demonstrate the shuffling process. Now let’s take a look at the shuffling process from the code itself. Let’s start with the shuffle function:
Array.prototype.shuffle = function() {
var input = this;
for (var i = input.length-1; i >=0; i--) {
var randomIndex = Math.floor(Math.random()*(i+1));
var itemAtIndex = input[randomIndex];
input[randomIndex] = input[i];
input[i] = itemAtIndex;
}
return input;
} The shuffle function is mounted under the prototype of the Array object, making it easy for the array to call the function directly. Inside the shuffle function, this refers to the array in which the shuffle is called:
var input = this;
In the above code, I reference this with a new variable, which is the array that the shuffle function is called on. Next, let’s take a look at what’s done inside the for loop:
for (var i = input.length-1; i >=0; i--) {
var randomIndex = Math.floor(Math.random()*(i+1));
var itemAtIndex = input[randomIndex];
input[randomIndex] = input[i];
input[i] = itemAtIndex;
}This loop is used to iterate through all elements in all arrays and perform random exchanges. Note that the traversal order is from back to front, that is to say, start from the element at position input.length-1 until you traverse to the first element in the array. The position during the traversal is specified by the variable i.
The variable i here is the selected element in the legend above:
Shuffling algorithm
Next, two lines of code are used to pick a random element in the specified range:
var randomIndex = Math.floor(Math.random()*(i+1));
var itemAtIndex = input[randomIndex];
变量 randomIndex 存储了一个随机数,该随机数可以用作数组的索引,进而提取一个随机元素。注意,该随机数的最大值并不是数组的长度,而是变量 i 的值。
确定了随机元素的索引之后,用新的变量保存该元素的值,然后交换选中元素和随机元素的值:
var itemAtIndex = input[randomIndex];
input[randomIndex] = input[i];
input[i] = itemAtIndex;
在这三行代码中,第一行使用新的变量保存了随机元素的值;第二行将选中元素 input[i] 的值赋给随机元素 input[randomIndex];第三行就随机元素的值 itemAtIndex 赋给选中元素 input[i]。本质上是一个互换两个元素的值的过程,并不难理解。
至此,循环内的逻辑就介绍完了,剩下的都是重复操作。
随机性测试

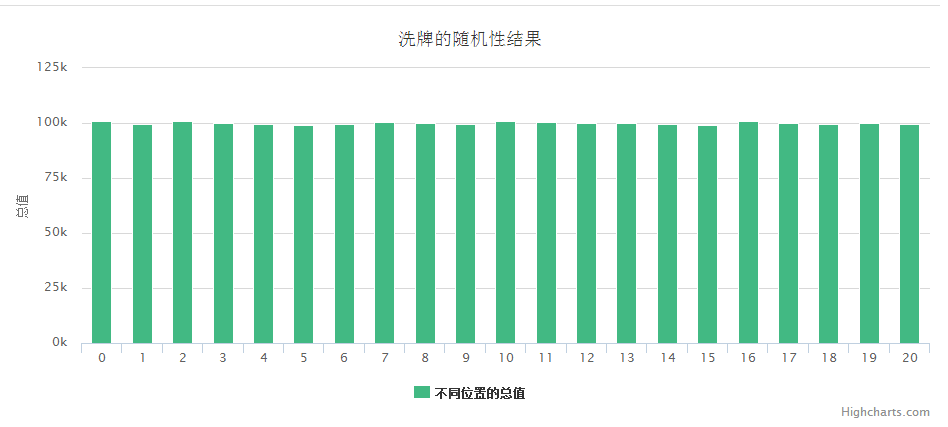
上图是使用 Highcharts 制作的随机性测试图表,以可视化的方式校验本文中洗牌算法的随机性。每次刷新页面都会重新计算和生成该图表。
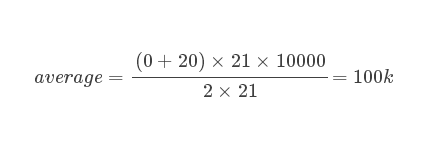
生成上图的数据是这样计算而来的:首先创建一个数组(上图使用的数组为 [0, 1, 2 ... 18, 19, 20]),然后使用本文中的洗牌算法重新排序,排序完成后记录每一个元素的值……以此步骤执行 100000 次,最后对同一索引位置上的数值进行求和。如此执行 10000 次之后,索引之间的总值应该相差不大。
由计算可得:

以上内容是小编给大家介绍的JS随机洗牌算法之给数组随机排序的相关叙述,希望对大家有所帮助!

Hot AI Tools

Undresser.AI Undress
AI-powered app for creating realistic nude photos

AI Clothes Remover
Online AI tool for removing clothes from photos.

Undress AI Tool
Undress images for free

Clothoff.io
AI clothes remover

AI Hentai Generator
Generate AI Hentai for free.

Hot Article

Hot Tools

Notepad++7.3.1
Easy-to-use and free code editor

SublimeText3 Chinese version
Chinese version, very easy to use

Zend Studio 13.0.1
Powerful PHP integrated development environment

Dreamweaver CS6
Visual web development tools

SublimeText3 Mac version
God-level code editing software (SublimeText3)

Hot Topics
 Replace String Characters in JavaScript
Mar 11, 2025 am 12:07 AM
Detailed explanation of JavaScript string replacement method and FAQ This article will explore two ways to replace string characters in JavaScript: internal JavaScript code and internal HTML for web pages. Replace string inside JavaScript code The most direct way is to use the replace() method: str = str.replace("find","replace"); This method replaces only the first match. To replace all matches, use a regular expression and add the global flag g: str = str.replace(/fi
 8 Stunning jQuery Page Layout Plugins
Mar 06, 2025 am 12:48 AM
Leverage jQuery for Effortless Web Page Layouts: 8 Essential Plugins jQuery simplifies web page layout significantly. This article highlights eight powerful jQuery plugins that streamline the process, particularly useful for manual website creation
 Build Your Own AJAX Web Applications
Mar 09, 2025 am 12:11 AM
So here you are, ready to learn all about this thing called AJAX. But, what exactly is it? The term AJAX refers to a loose grouping of technologies that are used to create dynamic, interactive web content. The term AJAX, originally coined by Jesse J
 How do I create and publish my own JavaScript libraries?
Mar 18, 2025 pm 03:12 PM
Article discusses creating, publishing, and maintaining JavaScript libraries, focusing on planning, development, testing, documentation, and promotion strategies.
 Load Box Content Dynamically using AJAX
Mar 06, 2025 am 01:07 AM
This tutorial demonstrates creating dynamic page boxes loaded via AJAX, enabling instant refresh without full page reloads. It leverages jQuery and JavaScript. Think of it as a custom Facebook-style content box loader. Key Concepts: AJAX and jQuery
 10 jQuery Fun and Games Plugins
Mar 08, 2025 am 12:42 AM
10 fun jQuery game plugins to make your website more attractive and enhance user stickiness! While Flash is still the best software for developing casual web games, jQuery can also create surprising effects, and while not comparable to pure action Flash games, in some cases you can also have unexpected fun in your browser. jQuery tic toe game The "Hello world" of game programming now has a jQuery version. Source code jQuery Crazy Word Composition Game This is a fill-in-the-blank game, and it can produce some weird results due to not knowing the context of the word. Source code jQuery mine sweeping game
 How to Write a Cookie-less Session Library for JavaScript
Mar 06, 2025 am 01:18 AM
This JavaScript library leverages the window.name property to manage session data without relying on cookies. It offers a robust solution for storing and retrieving session variables across browsers. The library provides three core methods: Session
 jQuery Parallax Tutorial - Animated Header Background
Mar 08, 2025 am 12:39 AM
This tutorial demonstrates how to create a captivating parallax background effect using jQuery. We'll build a header banner with layered images that create a stunning visual depth. The updated plugin works with jQuery 1.6.4 and later. Download the


