CakePHP中运用TinyMce详解
CakePHP中使用TinyMce详解
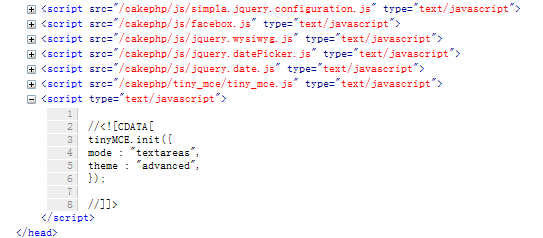
今天一直在纠结TinyMce在CakePHP中的使用方法,因为之前一直在使用CKEditor,没有太多的接触过TinyMce,第一次用就直接在框架中集成,所以中间造成了很多误解,搞了半天时间。这里把集成过程记载下来备用。
CakePHP官方出的有TinyMce视图助手,下载该视图助手之后,可以看到里边包含几个文件夹,先留意下/views/helpers/tiny_mce.php文件。/webroot/文件夹中包含的是TinyMce的源码。这个视图助手打包的时间比较久了,大概是在2010年,建议舍弃/webroot/中的TinyMce,直接从TinyMce下载。
首先,将TinyMce源码包中的/tinymce/jscripts/tiny_mce/这个文件夹复制到CakePHP根目录下的/app/webroot/js/中。然后将/views/helpers/tiny_mce.php文件复制到CakePHP根目录下的/app/views/helpers/文件夹中。这样主要文件就都准备完成了。开始进入编码阶段。进入到相应的视图文件中,会看到已经引入了tiny_mce文件。

在需要使用TinyMce的视图所属的控制器中,添加以下代码,
|
01
|
var $helpers = array('Session','Html','Form','TinyMce.TinyMce');
|
注意这里必须包含你在使用的所有试图助手,否则将被覆盖掉。添加该视图助手之后,就可以在视图文件中,像使用html,form等助手一样使用TinyMce了。下面给出一段示例代码,第一段配置TinyMce,该配置文件可以到官方网站获取更全的列表,
|
01
02
03
04
05
06
07
08
09
|
<?php
echo $this->TinyMce->editor(array(
???'mode' => "textareas",
???'theme' => "advanced",
???'mode' => "textareas",
???'plugins' => "fullpage",
???'theme_advanced_buttons3_add' => "fullpage"
));
?>
|
好了,配置齐全了,这里设置的是textareas类型表单会使用TinyMce编辑器,然后我们在视图代码中使用Form助手生成textarea就可以看到TinyMce编辑器了。

Hot AI Tools

Undresser.AI Undress
AI-powered app for creating realistic nude photos

AI Clothes Remover
Online AI tool for removing clothes from photos.

Undress AI Tool
Undress images for free

Clothoff.io
AI clothes remover

AI Hentai Generator
Generate AI Hentai for free.

Hot Article

Hot Tools

Notepad++7.3.1
Easy-to-use and free code editor

SublimeText3 Chinese version
Chinese version, very easy to use

Zend Studio 13.0.1
Powerful PHP integrated development environment

Dreamweaver CS6
Visual web development tools

SublimeText3 Mac version
God-level code editing software (SublimeText3)

Hot Topics
 CakePHP Project Configuration
Sep 10, 2024 pm 05:25 PM
In this chapter, we will understand the Environment Variables, General Configuration, Database Configuration and Email Configuration in CakePHP.
 CakePHP Date and Time
Sep 10, 2024 pm 05:27 PM
To work with date and time in cakephp4, we are going to make use of the available FrozenTime class.
 How to use the database query builder in CakePHP?
Jun 04, 2023 am 09:02 AM
CakePHP is an open source PHPMVC framework which is widely used in web application development. CakePHP has many features and tools, including a powerful database query builder for interactive performance databases. This query builder allows you to execute SQL queries using object-oriented syntax without having to write cumbersome SQL statements. This article will introduce how to use the database query builder in CakePHP. Establishing a database connection Before using the database query builder, you first need to create a database connection in Ca
 How to create custom pagination in CakePHP?
Jun 04, 2023 am 08:32 AM
CakePHP is a powerful PHP framework that provides developers with many useful tools and features. One of them is pagination, which helps us divide large amounts of data into several pages, making browsing and manipulation easier. By default, CakePHP provides some basic pagination methods, but sometimes you may need to create some custom pagination methods. This article will show you how to create custom pagination in CakePHP. Step 1: Create a custom pagination class First, we need to create a custom pagination class. this
 CakePHP File upload
Sep 10, 2024 pm 05:27 PM
To work on file upload we are going to use the form helper. Here, is an example for file upload.
 CakePHP Routing
Sep 10, 2024 pm 05:25 PM
In this chapter, we are going to learn the following topics related to routing ?
 How does CakePHP handle file uploads?
Jun 04, 2023 pm 07:21 PM
CakePHP is an open source web application framework built on the PHP language that simplifies the development process of web applications. In CakePHP, processing file uploads is a common requirement. Whether it is uploading avatars, pictures or documents, the corresponding functions need to be implemented in the program. This article will introduce how to handle file uploads in CakePHP and some precautions. Processing uploaded files in Controller In CakePHP, uploaded files are usually processed in Cont
 How to use Twig with CakePHP?
Jun 05, 2023 pm 07:51 PM
Using Twig in CakePHP is a way to separate templates and views, making the code more modular and maintainable. This article will introduce how to use Twig in CakePHP. 1. Install Twig. First install the Twig library in the project. You can use Composer to complete this task. Run the following command in the console: composerrequire "twig/twig:^2.0" This command will be displayed in the project's vendor


