

socket 同时只能有一个客户端连接一个端口并往下面发送数据

求助 socket 同时只能有一个客户端连接一个端口并往上面发送数据
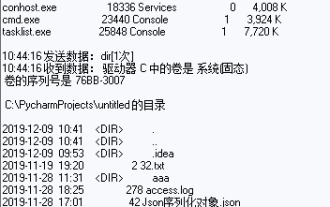
同时只能有一个客户端连接一个端口(如8090)并往上面发送数据,当有第二个客户端连接时这个8090端口时 就连接不上了
有的朋友说服务端就accept一次,那如何accept多次啊!下面贴上我的代码
- PHP code
<!--

Code highlighting produced by Actipro CodeHighlighter (freeware)
http://www.CodeHighlighter.com/

-->$commonProtocol = getprotobyname("tcp");
$socket = socket_create(AF_INET, SOCK_STREAM, $commonProtocol);
@socket_bind($socket, '192.168.1.202', 8888);
@socket_listen($socket);
// Initialize the buffer
$buffer = "NO DATA";


while(true)
{
sleep(1);
 // Accept any connections coming in on this socket

 $connection = @socket_accept($socket);
 printf("Socket connected\r\n");
 // Check to see if there is anything in the buffer
 if($buffer != "")
 {
  printf("Something is in the buffer...sending data...\r\n");
  @socket_write($connection, $buffer . "\r\n");
  printf("Wrote to socket\r\n");
 }
 else
 {
  printf("No Data in the buffer\r\n");
 }
 // Get the input
 while($data = @socket_read($connection, 14, PHP_NORMAL_READ))
 {

     if (!empty($data)){
         $buffer = $data;

 //文件驱动模式
      /*$f = fopen(dirname(__FILE__).'/file/'.date('YmdHis').'.txt','w');
    fwrite($f,$buffer);
    fclose($f); */

   socket_set_nonblock($connection);
   socket_getpeername($connection,&$remoteIP,&$remotePort);
echo $remoteIP."\r\n";
echo $remotePort."\r\n";


 $data=str_split($buffer);

 print_r($data);

 foreach($data as $v){
     echo dechex(ord($v))."\t";
     }
 echo "\r\n";

     }


 }
 @socket_close($connection);
 printf("Closed the socket\r\n\r\n");


}
------解决方案--------------------
用非阻塞模式,具体百度

Hot AI Tools

Undresser.AI Undress
AI-powered app for creating realistic nude photos

AI Clothes Remover
Online AI tool for removing clothes from photos.

Undress AI Tool
Undress images for free

Clothoff.io
AI clothes remover

AI Hentai Generator
Generate AI Hentai for free.

Hot Article
Hot Tools

Notepad++7.3.1
Easy-to-use and free code editor

SublimeText3 Chinese version
Chinese version, very easy to use

Zend Studio 13.0.1
Powerful PHP integrated development environment

Dreamweaver CS6
Visual web development tools

SublimeText3 Mac version
God-level code editing software (SublimeText3)
Hot Topics


 How to use Python's socket and socketserver
May 28, 2023 pm 08:10 PM
How to use Python's socket and socketserver
May 28, 2023 pm 08:10 PM
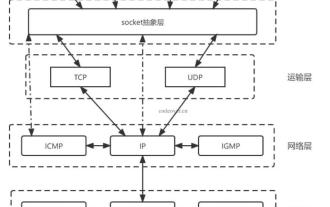
1. Socket programming based on TCP protocol 1. The socket workflow starts with the server side. The server first initializes the Socket, then binds to the port, listens to the port, calls accept to block, and waits for the client to connect. At this time, if a client initializes a Socket and then connects to the server (connect), if the connection is successful, the connection between the client and the server is established. The client sends a data request, the server receives the request and processes the request, then sends the response data to the client, the client reads the data, and finally closes the connection. An interaction ends. Use the following Python code to implement it: importso
 How to solve connection error
Nov 07, 2023 am 10:44 AM
How to solve connection error
Nov 07, 2023 am 10:44 AM
Solution: 1. Check the network connection; 2. Check the server status; 3. Clear the cache and cookies; 4. Check the firewall and security software settings; 5. Try to use other networks, etc.
 What does CONNECTION_REFUSED mean?
Jul 31, 2023 pm 02:48 PM
What does CONNECTION_REFUSED mean?
Jul 31, 2023 pm 02:48 PM
CONNECTION_REFUSED is a network connection error that usually occurs when trying to connect to a remote server. When a client device attempts to establish a network connection with a server, and the server rejects the connection request, a CONNECTION_REFUSED error is returned. Common reasons include: the server is not started, the server cannot accept more connection requests, the server firewall blocks the connection, etc.
 IO multiplexing of PHP+Socket series and implementation of web server
Feb 02, 2023 pm 01:43 PM
IO multiplexing of PHP+Socket series and implementation of web server
Feb 02, 2023 pm 01:43 PM
This article brings you relevant knowledge about php+socket, which mainly introduces IO multiplexing and how php+socket implements web server? Friends who are interested can take a look below. I hope it will be helpful to everyone.
 How to use Spring Boot+Vue to implement Socket notification push
May 27, 2023 am 08:47 AM
How to use Spring Boot+Vue to implement Socket notification push
May 27, 2023 am 08:47 AM
The first step on the SpringBoot side is to introduce dependencies. First we need to introduce the dependencies required for WebSocket, as well as the dependencies for processing the output format com.alibabafastjson1.2.73org.springframework.bootspring-boot-starter-websocket. The second step is to create the WebSocket configuration class importorg. springframework.context.annotation.Bean;importorg.springframework.context.annotation.Config
 What to do if php socket cannot connect
Nov 09, 2022 am 10:34 AM
What to do if php socket cannot connect
Nov 09, 2022 am 10:34 AM
Solution to the problem that the php socket cannot be connected: 1. Check whether the socket extension is enabled in php; 2. Open the php.ini file and check whether "php_sockets.dll" is loaded; 3. Uncomment "php_sockets.dll".
 PHP+Socket series realizes data transmission between client and server
Feb 02, 2023 am 11:35 AM
PHP+Socket series realizes data transmission between client and server
Feb 02, 2023 am 11:35 AM
This article brings you relevant knowledge about php+socket. It mainly introduces what is socket? How does php+socket realize client-server data transmission? Friends who are interested can take a look below. I hope it will be helpful to everyone.
 Research on real-time file transfer technology using PHP and Socket
Jun 28, 2023 am 09:11 AM
Research on real-time file transfer technology using PHP and Socket
Jun 28, 2023 am 09:11 AM
With the development of the Internet, file transfer has become an indispensable part of people's daily work and entertainment. However, traditional file transfer methods such as email attachments or file sharing websites have certain limitations and cannot meet the needs of real-time and security. Therefore, using PHP and Socket technology to achieve real-time file transfer has become a new solution. This article will introduce the technical principles, advantages and application scenarios of using PHP and Socket technology to achieve real-time file transfer, and demonstrate the implementation method of this technology through specific cases. technology
