
 Web Front-end
JS Tutorial
A brief discussion on the improved implementation of Sticky components_javascript skills
Web Front-end
JS Tutorial
A brief discussion on the improved implementation of Sticky components_javascript skills
A brief discussion on the improved implementation of Sticky components_javascript skills

In the previous articleUsing the getBoundingClientRect method to implement a simple sticky component introduced a simple implementation of the sticky component. After thinking about it for the past two days, I found that there are more implementations provided last time. The shortcomings are that the effects achieved on other websites are also somewhat different when unfixing. The unfixing method provided last time was not good. Based on the above, this article provides an improved version of the sticky component. The functions are more complete, I hope you are interested in reading.
1. Problems with old versions
There are multiple problems in the implementation of the previous sticky component:
First, in terms of the effect of sticky, before and after the sticky element is fixed, what will not change is the position relative to the left side of the browser and the overall width of the sticky element. What may change is the position relative to the top or bottom of the browser. and the height of the sticky element. In the implementation provided above, the latter two changing values are regarded as constant values. Why is the top value or bottom value always 0 when it is fixed? Of course, it can be other than 0, such as top: 20px, bottom: 15px. In some scenes, adding some such offsets will make the sticky effect look better, such as the affix component example used in the bootstrap official documentation (this component The function is similar to the sticky component implemented in this article):

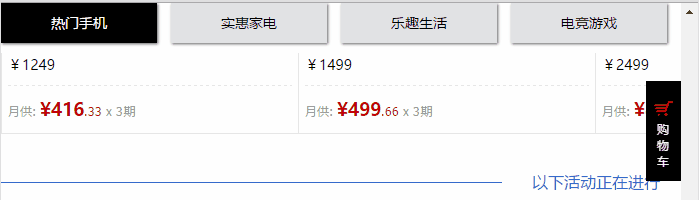
It sets the position relative to the top of the browser to top: 20px when fixed. The same goes for the height of sticky elements. In order to display a better-looking effect when fixed, it is also a very common requirement to adjust the original Line-height or padding-top and other height-related attributes. For example, this page of Tmall Huabei, this Block content uses the sticky component:

Before fixed, the height of the sticky element is:

After fixed, the height of sticky element is:
Second, when canceling the fixation, taking the sticky element fixed at the top as an example, the implementation provided above is to directly cancel the position of the sticky element when the distance between the target element and the top of the browser is less than stickyHeight: fixed attribute, the sticky element is immediately restored to the normal document flow, and the effect is:

It disappears immediately when it reaches the critical point, but the effect of Tmall Huabei is not like this:
It does not disappear immediately when it reaches the critical point, but re-adjusts the top value of the sticky element so that it can scroll up along with the main content of the webpage in conjunction with the scroll bar:
From an experience point of view, it is obvious that the effect of Tmall Huabei is better. From a functional point of view, the implementation provided above has a fatal shortcoming: when the height of the sticky element is very large, it exceeds the browser's capabilities. When viewing the height of the area, there will be a bug that no matter how you scroll, you cannot browse all the contents of the sticky elements. If you are interested, you can try the code implemented last time on the sidebar of your blog. I tried and found this problem, so I wanted to improve the sticky component: (
Third, the last implementation still has several shortcomings:
1) documentElement.clientHeight is not cached, causing it to be re-acquired every time the critical point is judged:

2) The default value of the scroll callback interval is too large and should be set smaller. This time it is 5 and bootstrap uses 1. Only in this way can the effect be guaranteed to be smooth;
3) In some scenarios, the width of the sticky element may not need to be reset when resizing is required. An option should be added to control it;
4) When the sticky element is fixed and unfixed, a callback function should be provided so that other components can do things at key points when they depend on this component.
2. How to improve
The component options have been redefined:
1 2 3 4 5 6 7 8 9 10 11 |
|
The ones in bold are new or modified. The original height has been removed and replaced with unStickyDistance. When fixing, the position relative to the top or bottom of the browser is specified with stickyOffset, so that there is no need to write the top or bottom attribute value in the css of .sticky--in-top or .sticky--in-bottom. If isFixedWidth is false, a callback for refreshing the width of the sticky element during resize will be added:
1 2 3 4 5 |
|
Compared with the last time, the trouble in this implementation is the logical processing when canceling the fixation. Last time, the sticky element only had two states, sticky or unsticky. This time it is different. The sticky state is divided into staticSticky and dynamicSticky. The former It represents the sticky state in which the top or bottom value remains unchanged. The latter represents the sticky state in which the top or bottom value changes. In fact, the latter corresponds to the range when the fixation is about to be cancelled. In order to solve this problem more clearly, the original judgment is The critical points and the code that performs different processing at different critical points are restructured into the following:
1 2 3 4 5 6 7 8 9 10 11 12 13 14 15 16 17 18 19 20 21 22 23 24 25 26 27 28 29 30 31 32 33 34 35 36 37 38 39 40 41 42 43 44 45 |
|
There is a bit of the idea of the state model in it, but it is more concise. When I wrote this code, I really wanted to use the state machine I had learned about before. I thought it was definitely possible to write it using a state machine, but I just wanted to save one class library from being referenced. I’ll wait someday. Give it a try again when you want to practice state machines.
The overall implementation is as follows:
1 2 3 4 5 6 7 8 9 10 11 12 13 14 15 16 17 18 19 20 21 22 23 24 25 26 27 28 29 30 31 32 33 34 35 36 37 38 39 40 41 42 43 44 45 46 47 48 49 50 51 52 53 54 55 56 57 58 59 60 61 62 63 64 65 66 67 68 69 70 71 72 73 74 75 76 77 78 79 80 81 82 83 84 85 86 87 88 89 90 91 |
|
What is difficult to understand may be the logic of the getState method. Some of the ideas in this part are explained in more detail in the previous blog.
3. Blog sidebar application instructions
First, you must paste this implementation into the blog settings footer html text field, and then add the following code to initialize:
1 2 3 4 5 6 7 8 9 10 11 12 13 14 15 |
|
Timer is used because the content of the sidebar is loaded by ajax, and it is impossible to add callbacks during these ajax requests. You can only judge whether the sidebar is loaded through the content they return.
4. Summary
This weekend I thought about how to improve the sticky component. In addition, I spent most of the day writing this article. At least now I feel a little satisfied with the function and implementation of the sticky component. I finished writing last time. It felt weird, like it was lacking something, but it turned out to be because there were still so many things missing. At present, this component can only achieve the effect of fixing and unfixing. For actual work, the effect of this level may not be enough. The common functions on the Internet that support navigation scrolling or tab navigation while being fixed are also very common. Next This article will introduce the sticky component based on this article, how to implement navScrollSticky and tabSticky components, so stay tuned.
Thank you for reading :)
Additional explanation:
In IE and Firefox, when refreshing the page, if the page is scrolling before refreshing, the refresh operation will set the scroll position of the page to the refresh position, but the scroll event will not be triggered, so it must be called immediately after the component is initialized. A sticky function:

Hot AI Tools

Undresser.AI Undress
AI-powered app for creating realistic nude photos

AI Clothes Remover
Online AI tool for removing clothes from photos.

Undress AI Tool
Undress images for free

Clothoff.io
AI clothes remover

AI Hentai Generator
Generate AI Hentai for free.
Hot Article
Hot Tools

Notepad++7.3.1
Easy-to-use and free code editor

SublimeText3 Chinese version
Chinese version, very easy to use

Zend Studio 13.0.1
Powerful PHP integrated development environment

Dreamweaver CS6
Visual web development tools

SublimeText3 Mac version
God-level code editing software (SublimeText3)
Hot Topics
 1374
1374
 52
52

 Replace String Characters in JavaScript
Mar 11, 2025 am 12:07 AM
Replace String Characters in JavaScript
Mar 11, 2025 am 12:07 AM
Detailed explanation of JavaScript string replacement method and FAQ This article will explore two ways to replace string characters in JavaScript: internal JavaScript code and internal HTML for web pages. Replace string inside JavaScript code The most direct way is to use the replace() method: str = str.replace("find","replace"); This method replaces only the first match. To replace all matches, use a regular expression and add the global flag g: str = str.replace(/fi
 How do I create and publish my own JavaScript libraries?
Mar 18, 2025 pm 03:12 PM
How do I create and publish my own JavaScript libraries?
Mar 18, 2025 pm 03:12 PM
Article discusses creating, publishing, and maintaining JavaScript libraries, focusing on planning, development, testing, documentation, and promotion strategies.
 How do I optimize JavaScript code for performance in the browser?
Mar 18, 2025 pm 03:14 PM
How do I optimize JavaScript code for performance in the browser?
Mar 18, 2025 pm 03:14 PM
The article discusses strategies for optimizing JavaScript performance in browsers, focusing on reducing execution time and minimizing impact on page load speed.
 How do I debug JavaScript code effectively using browser developer tools?
Mar 18, 2025 pm 03:16 PM
How do I debug JavaScript code effectively using browser developer tools?
Mar 18, 2025 pm 03:16 PM
The article discusses effective JavaScript debugging using browser developer tools, focusing on setting breakpoints, using the console, and analyzing performance.
 jQuery Matrix Effects
Mar 10, 2025 am 12:52 AM
jQuery Matrix Effects
Mar 10, 2025 am 12:52 AM
Bring matrix movie effects to your page! This is a cool jQuery plugin based on the famous movie "The Matrix". The plugin simulates the classic green character effects in the movie, and just select a picture and the plugin will convert it into a matrix-style picture filled with numeric characters. Come and try it, it's very interesting! How it works The plugin loads the image onto the canvas and reads the pixel and color values: data = ctx.getImageData(x, y, settings.grainSize, settings.grainSize).data The plugin cleverly reads the rectangular area of the picture and uses jQuery to calculate the average color of each area. Then, use
 How to Build a Simple jQuery Slider
Mar 11, 2025 am 12:19 AM
How to Build a Simple jQuery Slider
Mar 11, 2025 am 12:19 AM
This article will guide you to create a simple picture carousel using the jQuery library. We will use the bxSlider library, which is built on jQuery and provides many configuration options to set up the carousel. Nowadays, picture carousel has become a must-have feature on the website - one picture is better than a thousand words! After deciding to use the picture carousel, the next question is how to create it. First, you need to collect high-quality, high-resolution pictures. Next, you need to create a picture carousel using HTML and some JavaScript code. There are many libraries on the web that can help you create carousels in different ways. We will use the open source bxSlider library. The bxSlider library supports responsive design, so the carousel built with this library can be adapted to any
 Enhancing Structural Markup with JavaScript
Mar 10, 2025 am 12:18 AM
Enhancing Structural Markup with JavaScript
Mar 10, 2025 am 12:18 AM
Key Points Enhanced structured tagging with JavaScript can significantly improve the accessibility and maintainability of web page content while reducing file size. JavaScript can be effectively used to dynamically add functionality to HTML elements, such as using the cite attribute to automatically insert reference links into block references. Integrating JavaScript with structured tags allows you to create dynamic user interfaces, such as tab panels that do not require page refresh. It is crucial to ensure that JavaScript enhancements do not hinder the basic functionality of web pages; even if JavaScript is disabled, the page should remain functional. Advanced JavaScript technology can be used (
 How to Upload and Download CSV Files With Angular
Mar 10, 2025 am 01:01 AM
How to Upload and Download CSV Files With Angular
Mar 10, 2025 am 01:01 AM
Data sets are extremely essential in building API models and various business processes. This is why importing and exporting CSV is an often-needed functionality.In this tutorial, you will learn how to download and import a CSV file within an Angular
