The "write less, do more" feature of jQuery is well-known to everyone. Even people without extensive JS programming experience can quickly learn how to use it through the API it provides. Of course, if you are experienced, I still recommend that you can Understand the implementation principles of each main function of jQuery. Let’s not talk about other things. Let’s just see how to use it to achieve the magical effect of the menu.

Step1 - HTML structure
Take a look at the HTML code of the menu. It is no different from the normal menu code:
Key The method is to use scripts to create several separation layers in each anchor point (a element), so that they can be controlled to animate when the mouse is hovered. To do this, we need to modify the structure of the DOM when the DOM is loaded so that each anchor code becomes as follows:
Original each The content in the anchor point will be appended to two span elements (.out and .over), and the other span element (.bg) is the background image layer.
As for how to modify the DOM structure, the JS code will be explained in Step 3.
Step2 - CSS Style In the example, two styles are shown, one with a background image and one without a background image (see the demo for details). You can also customize your own freely. Style to design a cooler menu, basic styles and explanations are provided here:
/* The following is the basic style of the menu*/
.menu ul li {
float: left;
/* The content of the menu sub-element exceeds the invisible level*/
overflow: hidden;
/* Some codes are omitted below*/
}
.menu ul li a {
/* Must be relative positioning*/
position: relative;
display : block;
width: 110px;
/* Some code is omitted below*/
}
.menu ul li a span {
/* All layers will use absolute positioning*/
position: absolute;
left: 0;
width: 110px;
}
.menu ul li a span.out {
top: 0px;
}
. menu ul li a span.over,
.menu ul li a span.bg {
/* Initially, the .over layer and the .bg layer are -45px relative to the a element to achieve the hidden effect*/
top: -45px;
}
/* The following is an example of using a background image*/
#menu {
/* Menu background*/
background:url(bg_menu.gif) scroll 0 - 1px repeat-x;
border:1px solid #CCC;
}
#menu ul li a {
color: #000;
}
#menu ul li a span. over {
color: #FFF;
}
#menu ul li span.bg {
/* Specify height and background image*/
height: 45px;
background: url (bg_over.gif) center center no-repeat;
}
You can also customize the CSS style yourself, and a simplified version of the style is also provided here (view demo)
Step3 - JavaScript code The first thing to do is to implement what is mentioned in Step 1 and modify the DOM structure after the DOM is loaded. The specific method is as follows:
// Include the content in each a into a layer (span.out),
// Then add a background layer (span.bg) behind the span.out layer
$("#menu li a").wrapInner( '' )
.append( '< /span>' );
// Loop to add a layer (span.over) for each a of the menu
$("#menu li a").each(function() {
$( '' $(this).text() '' )
.appendTo( this );
});
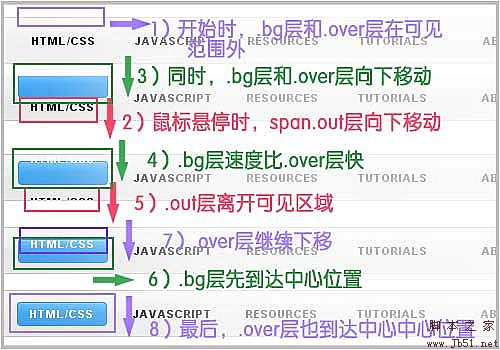
Before talking about the animation code, let’s take a look at the animation process, as shown in the figure below:

In Step 1 we know that after the DOM is loaded, several separation layers are established in the a element. In Step 2 In the CSS style, we set the top properties of the span.bg and span.over layers to -45px. Because the span element has been set to absolute positioning, it will be -45px upward relative to the li a element, because the content of the li element exceeds Visible, so initially, the .bg layer and the .over layer are outside the spatial range.
The animation process we want to set up is that when the mouse is hovering, the three layers move down at the same time, the span.out layer moves down to remove the visible range, and span.over and span.bg move in In the visible area, the speed of setting span.bg is slightly faster than that of span.over, and the misalignment produces more effects.
To achieve such animation effect, it is easy to use jQuery’s .animate() method. The following is the JS code and explanation:
$("#menu li a").hover(function() {
// Function that is triggered when the mouse hovers
$(".out",this).stop().animate({'top':'45px'},250);//Slide to hide
$(".over",this). stop().animate({'top':'0px'},250); //Slide down to display
$(".bg",this).stop().animate({'top':'0px '},120); //Scroll down to display
}, function() {
// Function that is triggered when the mouse is moved out
$(".out",this).stop().animate ({'top':'0px'},250); //Swipe up to display
$(".over",this).stop().animate({'top':'-45px'}, 250);//Slide up to hide
$(".bg",this).stop().animate({'top':'-45px'},120);//Slide up to hide
});
Summary
The above explains how to create a jQuery dynamic drop-down menu step by step. You can implement one yourself step by step, or you can download the source code to modify and customize it. Of course, what do you have in mind? If you have any suggestions or questions, you can leave me a message.
View the final effect jOuery dynamic sliding menu package download PS: This article is summarized by Vicchi


