Hello everyone, when we usually use Javascript, we often need to provide some feedback information to users. There are many ways to complete this function. But in normal development, the alert function is probably what we use most (only the general situation is mentioned here, individual experts are not excluded~). It is really convenient to use this function, and it can easily provide some interactive information to the user. However, it also has many shortcomings. For example, its appearance is very simple and uncontrollable. In addition, it is a browser-level function that is implemented by each browser itself, so it cannot be used on different browsers. , its interfaces are all different. In the past, this situation might have been easily accepted by most users, but as time goes by, users increasingly want a better experience. So now you often see various dialog boxes made with JS on many websites. These interfaces will improve the user experience
a lot, so let’s talk about this aspect today. Enter Let’s get to the point, let’s not talk nonsense~
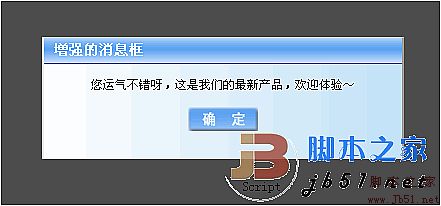
First, let me show you the effect, so that you can have an intuitive understanding:
As shown in the picture above, after my testing, this dialog box can Used in IE6 7 8, Firefox, Chrome and other mainstream browsers. Let’s take a look at his code with everyone.
First, we need to determine the type of browser. Several bool variables are used here to represent different browsers.

Copy code
var springweb_typeIsWebkit = false;
var springweb_typeIsIE6 = false;
var springweb_typeIsIE7 = false;
var springweb_typeIsIE8 = false; 🎜>var springweb_typeIsSafari = false;
var agent = window.navigator.userAgent;
if (agent.indexOf("MSIE 6") != -1) {
springweb_typeIsIE6 = true;
springweb_typeIsIE = true;
}
else if (agent.indexOf("MSIE 7") != -1) {
springweb_typeIsIE7 = true;
springweb_typeIsIE = true;
}
else if (agent.indexOf("MSIE 8") != -1) {
springweb_typeIsIE8 = true;
springweb_typeIsIE = true;
}
else if (agent.indexOf("Firefox") ! = -1) {
springweb_typeIsFireFox = true;
springweb_typeIsGecko = true;
} else if (agent.indexOf("Chrome") != -1) {
springweb_typeIsChrome = true;
springweb_typeIsWebkit = true;
}
else if (agent.indexOf("Safari") != -1) {
springweb_typeIsSafari = true;
springweb_typeIsWebkit = true;
}
As shown above, different browsers are judged by detecting the agent header. This is a relatively simple method of judgment.
Let’s start constructing our dialog box. Before constructing the dialog box, we must first create the effect of a modal form (that is, when the dialog box pops up, the user cannot operate the rest of the content on the page), here We will use a black transparent layer to achieve this effect.
Copy code
The code is as follows:
divBackground.style.width = "100%";
divBackground.style.height = "100%";
if (springweb_typeIsChrome || springweb_typeIsFireFox) {
divBackground.style. backgroundColor = "rgba(0,0,0,0.7)";
} else {
divBackground.style.backgroundColor = "#000000";
divBackground.style.filter = "alpha(opacity=70 )";
}
divBackground.style.zIndex = "99";
document.body.appendChild(divBackground);
In the above code, we first add the browser The scroll bar is disabled to prevent the user from scrolling the browser window when the dialog box pops up. Next, set the corresponding style. One of the more important ones is lines 8-13. Here, different CSS styles are applied according to the type of browser. To achieve a transparent effect, for IE browser, we use the filter function that comes with IE, while for other browsers, we use the rgba method based on CSS3 to achieve a transparent effect.
Next, we have to construct the dialog box. Here we first create a div layer to represent our entire dialog box. The method is as follows:
Copy the code
The code is as follows:
var dialogWidth = 260;
var dialogHeight = 120;
var fontSize = 14;
var lineWidth = document.body.clientWidth * 0.7;
if ((fontSize * msg.length) < lineWidth) {
dialogWidth = parseInt(fontSize * msg.length) 50;
} else {
dialogWidth = parseInt(lineWidth);
dialogHeight = parseInt(((fontSize * msg.length) / lineWidth) * fontSize);
}
divDialog.style.width = dialogWidth "px";
divDialog.style.height = dialogHeight "px";
divDialog.style.position = "absolute";
divDialog.style.border = "1px solid #C0D7FA";
divDialog.style.borderRight = "2px outset #DEDEDE";
divDialog.style.borderLeft = "2px outset #DEDEDE";
divDialog.style.left = ((document.body.clientWidth / 2) - (dialogWidth / 2)) "px";
divDialog.style.top = ((document.body.clientHeight / 2) - (dialogHeight / 2)) "px";
divDialog.style.zIndex = "100";
这里,首先根据消息的字数计算了对话框的尺寸(这里的计算方法不一定最好,如果有更好的计算方法还望大家指教),后面那些DOM代码就不用我多解释了吧。
接下来,我们创建对话框的标题栏,这个用来显示对话框的标题,并且用它了实现对话框的拖动操作。
var divHead = document.createElement("div");
if (title != undefined) {
divHead.innerHTML = title;
} else {
divHead.appendChild(document.createTextNode("消息"));
}
divHead.style.width = "100%";
divHead.style.height = "25px";
divHead.style.lineHeight = "25px";
divHead.style.fontSize = "14px";
divHead.style.fontWeight = "bold";
divHead.style.borderBottom = "1px outset #8989FF";
divHead.style.color = "white";
divHead.style.textIndent = "10px";
divHead.style.backgroundColor = "blue";
divHead.style.backgroundImage = "url('" springweb_basePath "/images/headbg.png')";
divHead.style.cursor = "move";
divHead.onmousedown = function() {
divDialog.dragging = true;
};
divHead.onmouseup = function() {
divDialog.dragging = false;
};
document.body.onmousemove = function(e) {
if (!divDialog.dragging) return;
e = e || window.event;
var mouseX, mouseY;
var mouseOffsetX, mouseOffsetY;
if (e.pageX || e.pageY) {
mouseX = e.pageX;
mouseY = e.pageY;
} else {
mouseX =
e.clientX document.body.scrollLeft -
document.body.clientLeft;
mouseY =
e.clientY document.body.scrollTop -
document.body.clientTop;
}
divDialog.style.left = (mouseX - dialogWidth * 0.4) "px";
divDialog.style.top = (mouseY - 10) "px";
};
divDialog.appendChild(divHead);
这里呢,有必要说一下的就是,鼠标按下和弹起事件,这里给div对象多增加了一个dragging的属性,用来代表对话框是否正在拖动中(这也是JS的特性之一,对object类型的对象指定新属性的一个方法:如果之前对象没有这个属性,只需通过对象名.属性名="值" 的方式,就可以为对象增加新属性),在鼠标移动事件中,我们通过对象的dragging属性,来决定是否移动对话框,关于对话框的移动位置,这里我偷懒了~没有判断对话框和鼠标的相对位置,而是给了一个常量,这样每次开始拖动时,对话框会稍微"瞬移"一下,有兴趣的朋友可以帮忙完善一下,呵呵。
最后,是关于对话框内容区域的创建:
var divContent = document.createElement("div");
divContent.style.textAlign = "center";
divContent.style.padding = "15px";
divContent.style.fontSize = "12px";
if (springweb_typeIsIE) {
divContent.style.height = parseInt(dialogHeight - 25) "px";
} else {
divContent.style.height = parseInt(dialogHeight - 55) "px";
}
divContent.style.backgroundColor = "#ffffff";
if (springweb_typeIsIE6 || springweb_typeIsIE7 || springweb_typeIsIE8) {
divContent.style.filter =
"progid:DXImageTransform.Microsoft.Gradient(gradientType=1,startColorStr=#FFFFFF,endColorStr=#C2E2F8)";
} else if (springweb_typeIsFireFox) {
divContent.style.backgroundImage =
"-moz-linear-gradient(left,rgba(255,255,255,1),rgba(194,226,248,1))";
} else if (springweb_typeIsWebkit) {
divContent.style.backgroundImage =
"-webkit-gardient(linear,0% 0%,100% 100%,from(#FFFFFF),to(#000000))";
}
divContent.innerHTML = msg "
";
divDialog.appendChild(divContent);
var closeButton = document.createElement("img");
closeButton.style.cursor = "hand";
closeButton.setAttribute("src", springweb_basePath "/images/okButton.png");
closeButton.setAttribute("alt", "确定");
//the click event when the dialog is closing.
closeButton.onclick = function() {
document.body.removeChild(divBackground);
document.body.removeChild(divDialog);
document.body.style.overflowY = "";
};
divContent.appendChild(closeButton);
divDialog.focus();
document.body.appendChild(divDialog);
这里应该不用多做解释了,稍微说一下,就是在13-22行的代码,这个是根据不同的浏览器来分别实现渐变效果,IE的话,用微软提供的渐变,Webkit或者Gecko内核的浏览器使用相应的CSS3标准也可以实现渐变效果。
最后嘛,这个方法支持大多数浏览器,个别浏览器如果不能完全支持,还请各位见谅,期待大家有更加完善的方法一起讨论,下面是一个示例,有兴趣的朋友可以看看。转载请注明出处~
示例文件:
JS对话框实现


![[Web front-end] Node.js quick start](https://img.php.cn/upload/course/000/000/067/662b5d34ba7c0227.png)


