Python的Flask站点中集成xhEditor文本编辑器的教程
xhEditor简介
xhEditor是一个基于jQuery开发的简单迷你并且高效的可视化HTML编辑器,基于网络访问并且兼容IE 6.0+, Firefox 3.0+, Opera 9.6+, Chrome 1.0+, Safari 3.22+。
xhEditor曾经是我比较喜欢的编辑器,也是率先支持拖拽上传的编辑器之一。xhEditor在当年是优秀的编辑器,功能足够强大,使用体验也相当好,拖拽上传是我最喜欢的功能,只可惜已经停止开发了。xhEditor最后的稳定版本是1.1.14,至今已超过2年未更新(2013年发布了开发版本1.2.1),作者已经停止开发和维护了,社区论坛完全不能打开。
由于xhEditor基于jQuery开发,而对于新版本的jQuery,它并不能很好的支持,只有1.4版本的jQuery是支持得最好的。
虽然已经不再更新了,但在一些需要富文本编辑器的场合,她还是可以完全胜任的。
本文以1.1.14版本为例,讲述如何在Flask项目中使用xhEditor编辑器,并实现图片上传、文件上传的后端功能。
xhEditor主要特点:
精简迷你:初始加载4个文件,包括:1个js(50k)+2个css(10k)+1个图片(5k),总共65k。若js和css文件进行gzip压缩传输,可以进一步缩减为24k左右。
使用简单:简单的调用方式,加一个class属性就能将您的textarea立马变成一个功能丰富的可视化编辑器。
无障碍访问:提供WAI-ARIA全面支持,全键盘精细操作,全程语音向导,提供完美无障碍访问体验,让残疾人也能够谱写精彩人生。
内置Ajax上传:内置强大的Ajax上传,包括HTML4和HTML5上传支持(多文件上传、真实上传进度及文件拖放上传),剪切板上传及远程抓取上传,追求完美的用户上传体验。
Word自动清理:实现Word代码自动检测并清理,提供高效完美的Word代码过滤方案,生成代码最优化精简,但是却不丢失任何细节效果。
UBB可视化编辑:提供完美的UBB可视化编辑解决方案,在您获得安全高效代码存储的同时,又能享受可视化编辑的便捷。
在Flask项目中使用xhEditor
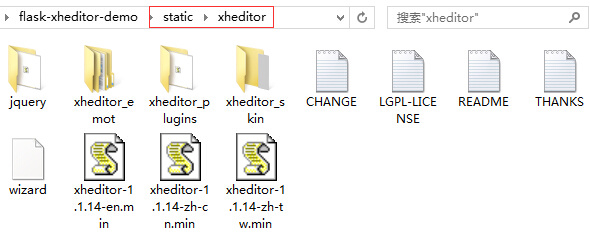
首先我们需要到xhEditor官网下载1.1.14版本的xhEditor编辑器,下载之后解压到
Flask项目的static/xheditor目录。


xhEditor提供2种初始化方式:Class初始化和JavaScript初始化。Class初始化只需要给textarea设置值为xheditor的class属性,它就会自动变成xhEditor编辑器,一个页面可以同时同在多个编辑器,而且这个类属性可以添加参数。(PS:CKEditor也有这个功能)
对于这两种初始化方式,官网有提供设置很方便的设置向导,使得配置相对比较简单。
示例代码:
<head>
<script type="text/javascript" charset="utf-8"
src="{{ url_for('static', filename='xheditor/jquery/jquery-1.4.4.min.js') }}"></script>
<script type="text/javascript" charset="utf-8"
src="{{ url_for('static', filename='xheditor/xheditor-1.1.14-zh-cn.min.js') }}"></script>
<style>.xheditor {width: 640px; height:320px;}</style>
</head>
<body>
<textarea id="content" name="content" class="xheditor {tools:'mfull'}"></textarea>
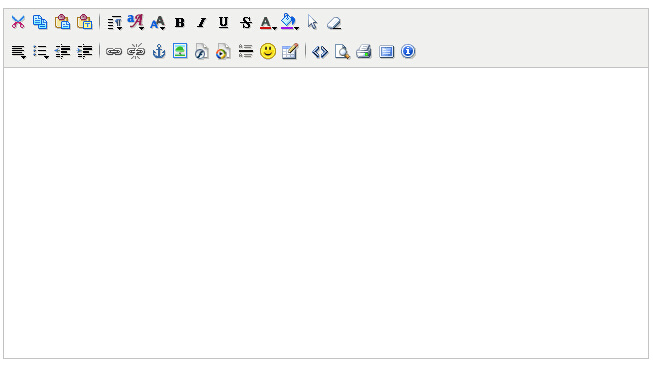
</body>现在,我们就拥有一个xhEditor编辑器了。

开启上传功能
xhEditor的上传功能需要设置几个参数(以图片上传为例):
upImgUrl : 图片文件上传接收URL,例:/upload/,可使用内置变量{editorRoot}
upImgExt : 图片上传前限制本地文件扩展名,默认:jpg,jpeg,gif,png
这里假设上传文件接收URL为/upload/,我们的编辑器初始化代码就变成:
<textarea class="xheditor {tools:'mfull',upImgUrl:'/upload/'}"></textarea>其他类型的文件上传设置类推。
Flask处理上传请求
xhEditor支持2种上传方式:标准HTML4上传和HTML5上传。
HTML4上传使用标准的表单上传域,上传文件域的name为:filedata
HTML5上传的整个POST数据流就是上传的文件完整数据,而本地文件名等信息储
存于HTTP_CONTENT_DISPOSITION这个服务器变量中
返回内容必需是标准的json字符串,结构可以是如下:
{"err":"","msg":"200906030521128703.gif"} 或者
{"err":"","msg":{"url":"200906030521128703.jpg","localfile":"test.jpg","id":"1"}}注:若选择结构2,则url变量是必有。
文件上传处理示例代码:
def gen_rnd_filename():
  filename_prefix = datetime.datetime.now().strftime('%Y%m%d%H%M%S')
  return '%s%s' % (filename_prefix, str(random.randrange(1000, 10000)))

@app.route('/upload/', methods=['GET', 'POST'])
def upload():
  '''文件上传函数

  本函数未做上传类型判断及上传大小判断。
  '''
  result = {"err": "", "msg": {"url": "", "localfile": ""}}

  if request.method == 'POST' and 'filedata' in request.files:
    # 传统上传模式,IE浏览器使用这种模式
    fileobj = request.files['filedata']
    fname, fext = os.path.splitext(fileobj.filename)
    rnd_name = '%s%s' % (gen_rnd_filename(), fext)
    fileobj.save(os.path.join(app.static_folder, 'upload', rnd_name))
    result["msg"]["localfile"] = fileobj.filename
    result["msg"]["url"] = '!%s' %
      url_for('static', filename='%s/%s' % ('upload', rnd_name))

  elif 'CONTENT_DISPOSITION' in request.headers:
    # HTML5上传模式,FIREFOX等默认使用此模式
    pattern = re.compile(r"""s.*?s?filenames*=s*['|"]?([^s'"]+).*?""", re.I)
    _d = request.headers.get('CONTENT_DISPOSITION').encode('utf-8')
    if urllib.quote(_d).count('%25') > 0:
      _d = urllib.unquote(_d)
    filenames = pattern.findall(_d)
    if len(filenames) == 1:
      result["msg"]["localfile"] = urllib.unquote(filenames[0])
      fname, fext = os.path.splitext(filenames[0])
    img = request.data
    rnd_name = '%s%s' % (gen_rnd_filename(), fext)
    with open(os.path.join(app.static_folder, 'upload', rnd_name), 'wb') as fp:
      fp.write(img)

    result["msg"]["url"] = '!%s' %
      url_for('static', filename='%s/%s' % ('upload', rnd_name))

return json.dumps(result)远程抓图
一般情况下,当复制站外的图片时,我们希望可以把图片保存到本地,远程抓图就可以完成这个事情。
启用远程抓图功能,需要设置2个参数:
localUrlTest : 非本站域名测试正则表达式
remoteImgSaveUrl : 远程图片抓取接收程序URL
设置这2个参数之后,我们的编辑器初始化代码变成:
<textarea class="xheditor {tools:'mfull',upImgUrl:'/upload/',localUrlTest:/^https?://[^/]*?(localhost:?d*)//i,
remoteImgSaveUrl:'/uploadremote/'}"></textarea>这里表示抓取除localhost之外其它域名的图片。
远程抓图处理示例代码:
def gen_rnd_filename():
  filename_prefix = datetime.datetime.now().strftime('%Y%m%d%H%M%S')
  return '%s%s' % (filename_prefix, str(random.randrange(1000, 10000)))

@app.route('/uploadremote/', methods=['POST'])
def uploadremote():
  """
  xheditor保存远程图片简单实现
  URL用"|"分隔,返回的字符串也是用"|"分隔
  返回格式是字符串,不是JSON格式
  """
  localdomain_re = re.compile(r'https?://[^/]*?(localhost:?d*)/', re.I)
  imageTypes = {'gif': '.gif', 'jpeg': '.jpg', 'jpg': '.jpg', 'png': '.png'}
  urlout = []
  result = ''
  srcUrl = request.form.get('urls')
  if srcUrl:
    urls = srcUrl.split('|')
    for url in urls:
      if not localdomain_re.search(url.strip()):
        downfile = urllib.urlopen(url)
        fext = imageTypes[downfile.headers.getsubtype().lower()]
        rnd_name = '%s%s' % (gen_rnd_filename(), fext)
        with open(os.path.join(app.static_folder, 'upload', rnd_name), 'wb') as fp:
          fp.write(downfile.read())
        urlreturn = url_for('static', filename='%s/%s' % ('upload', rnd_name))
        urlout.append(urlreturn)
      else:
        urlout.append(url)
  result = '|'.join(urlout)
return result以上就是Python的Flask站点中集成xhEditor文本编辑器的教程的内容,更多相关内容请关注PHP中文网(www.php.cn)!

Hot AI Tools

Undresser.AI Undress
AI-powered app for creating realistic nude photos

AI Clothes Remover
Online AI tool for removing clothes from photos.

Undress AI Tool
Undress images for free

Clothoff.io
AI clothes remover

AI Hentai Generator
Generate AI Hentai for free.

Hot Article

Hot Tools

Notepad++7.3.1
Easy-to-use and free code editor

SublimeText3 Chinese version
Chinese version, very easy to use

Zend Studio 13.0.1
Powerful PHP integrated development environment

Dreamweaver CS6
Visual web development tools

SublimeText3 Mac version
God-level code editing software (SublimeText3)

Hot Topics
 1386
1386
 52
52
 PHP and Python: Code Examples and Comparison
Apr 15, 2025 am 12:07 AM
PHP and Python have their own advantages and disadvantages, and the choice depends on project needs and personal preferences. 1.PHP is suitable for rapid development and maintenance of large-scale web applications. 2. Python dominates the field of data science and machine learning.
 Python vs. JavaScript: Community, Libraries, and Resources
Apr 15, 2025 am 12:16 AM
Python and JavaScript have their own advantages and disadvantages in terms of community, libraries and resources. 1) The Python community is friendly and suitable for beginners, but the front-end development resources are not as rich as JavaScript. 2) Python is powerful in data science and machine learning libraries, while JavaScript is better in front-end development libraries and frameworks. 3) Both have rich learning resources, but Python is suitable for starting with official documents, while JavaScript is better with MDNWebDocs. The choice should be based on project needs and personal interests.
 How to run programs in terminal vscode
Apr 15, 2025 pm 06:42 PM
In VS Code, you can run the program in the terminal through the following steps: Prepare the code and open the integrated terminal to ensure that the code directory is consistent with the terminal working directory. Select the run command according to the programming language (such as Python's python your_file_name.py) to check whether it runs successfully and resolve errors. Use the debugger to improve debugging efficiency.
 Can visual studio code be used in python
Apr 15, 2025 pm 08:18 PM
VS Code can be used to write Python and provides many features that make it an ideal tool for developing Python applications. It allows users to: install Python extensions to get functions such as code completion, syntax highlighting, and debugging. Use the debugger to track code step by step, find and fix errors. Integrate Git for version control. Use code formatting tools to maintain code consistency. Use the Linting tool to spot potential problems ahead of time.
 Detailed explanation of docker principle
Apr 14, 2025 pm 11:57 PM
Docker uses Linux kernel features to provide an efficient and isolated application running environment. Its working principle is as follows: 1. The mirror is used as a read-only template, which contains everything you need to run the application; 2. The Union File System (UnionFS) stacks multiple file systems, only storing the differences, saving space and speeding up; 3. The daemon manages the mirrors and containers, and the client uses them for interaction; 4. Namespaces and cgroups implement container isolation and resource limitations; 5. Multiple network modes support container interconnection. Only by understanding these core concepts can you better utilize Docker.
 Is the vscode extension malicious?
Apr 15, 2025 pm 07:57 PM
VS Code extensions pose malicious risks, such as hiding malicious code, exploiting vulnerabilities, and masturbating as legitimate extensions. Methods to identify malicious extensions include: checking publishers, reading comments, checking code, and installing with caution. Security measures also include: security awareness, good habits, regular updates and antivirus software.
 Can vs code run in Windows 8
Apr 15, 2025 pm 07:24 PM
VS Code can run on Windows 8, but the experience may not be great. First make sure the system has been updated to the latest patch, then download the VS Code installation package that matches the system architecture and install it as prompted. After installation, be aware that some extensions may be incompatible with Windows 8 and need to look for alternative extensions or use newer Windows systems in a virtual machine. Install the necessary extensions to check whether they work properly. Although VS Code is feasible on Windows 8, it is recommended to upgrade to a newer Windows system for a better development experience and security.
 Python: Automation, Scripting, and Task Management
Apr 16, 2025 am 12:14 AM
Python excels in automation, scripting, and task management. 1) Automation: File backup is realized through standard libraries such as os and shutil. 2) Script writing: Use the psutil library to monitor system resources. 3) Task management: Use the schedule library to schedule tasks. Python's ease of use and rich library support makes it the preferred tool in these areas.


