Extjs Study Notes 9 Data Model (Part 1)_extjs
The data model of Extjs is divided into the following parts:
Data record Record
A record in the data collection, including the definition and value of the data. Equivalent to entity class.
Data Proxy Proxy
A proxy used to obtain data. Equivalent to Datasource.
Data parser DataReader
is responsible for parsing the data obtained by the Proxy, transferring it into a Record and storing it in the Store. Equivalent to C#'s DataReader.
Dataset Store
A collection that saves data, similar to C#'s Datatable.
The Proxy of Extjs3 has some changes compared to the previous version. There is very little information, and the official documentation is quite concise, so there is not even a complete example... I try my best to understand...
1. Data recording
A data record is generally composed of multiple fields. Fields are defined by the Ext.data.Field class. Field's configuration items are very rich, giving us enough information to process our data in a weakly typed language. The main ones are:
name: field name; defaultValue: default value; type: data type, which can be string, int, float, boolean, date and auto (default). This much will be introduced first, and the rest will be introduced when they are actually used.
To create a data record class (note not a specific piece of data), you can use the Ext.data.Record.create method. This method accepts an array of configuration items of the Field class and returns a constructor. Look at an example:
What is demonstrated here is only the most basic function of Record: defining fields and storing Get data. Record can also work with Store, and Store can track the changes of Record. Just like C#'s DataTable, you can track changes to its internal DataRow. Extjs almost turns front-end development into back-end development. These contents will be introduced later when the Store is introduced.
2. Data Proxy
Ext.data.DataProxy is the abstract base class of data proxy and implements the general public interface of DataProxy. The most important general method of DataProxy is doRequest. After executing this method, data will be read from various specific data sources. The specific Proxy classes inherited from DataProxy are:
2.1 HttpProxy
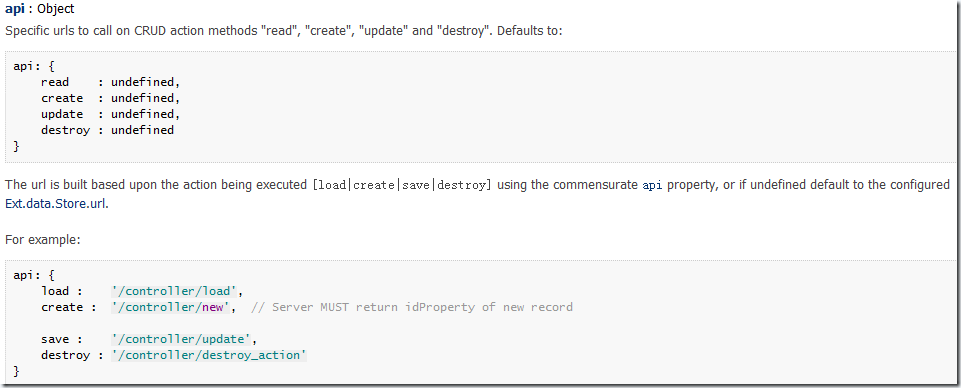
This is the most commonly used proxy, which obtains data from a remote server through an http request. The most important configuration item of HttpProxy is to configure the URL for obtaining data. HttpProxy not only supports obtaining data, it also supports CRUD operations on data. The api attribute of DataProxy is used to configure the URLs corresponding to these four operations. If not configured, the url attribute of HttpProxy will be used. For example:
api: {
read: '/ controller/load',
create : '/controller/new', // Server MUST return idProperty of new record
save : '/controller/update',
destroy : '/controller/ destroy_action'
}
Note that the official documentation of extjs is quite vague here:

Is the first of the four operations read or load? ? ?
After configuring the api, you can execute the doRequest method. The parameters of the doRequest method are relatively complex:
doRequest( String action, Ext.data.Record/Ext.data.Record[] rs, Object params, Ext.data.DataReader reader, Function callback, Object scope, Object arg) have the following meanings: action: Indicates what kind of operation is performed, which can be one of create, read, update, and destroy. rs: After looking at it for a long time, I still didn’t find out what the use of this parameter is... Looking at the source code, I found that the expression url rs.id appeared in it. Maybe this is used to better build URLs for MVC architecture programs? Just ignore it and set it to null. params: The attribute:value pairs in this object will be passed to the server as parameters of post/get, which is very useful.
reader: DataReader, parses the data returned by the server into an array of Records. A more detailed explanation follows.
callback: Function executed after reading server data. This function accepts three parameters, which are: r Ext.Record[], the array returned by the server through the reader. This is the official statement. In actual testing, it seems that this is only true when the action is read. It is introduced below; options: is the value of the arg parameter. success: Whether it is successful or not, bool, this is also returned by the server.
scope: Scope
arg: Some additional parameters will be passed to the options parameter of callback.
Let’s complete an example below, using httpproxy to complete basic CRUD operations. Let’s look at the server-side code first:
<%@ WebHandler Language ="C#" Class="dataproxy" %>
using System;
using System.Web;
using System.Collections.Generic;
public class dataproxy : IHttpHandler {
static List
static dataproxy()
{
db.Add(new Student { Id = "1", Name = "Li ", Telephone = "1232" });
db.Add(new Student { Id = "2", Name = "Wang", Telephone = "5568" });
db.Add(new Student { Id = "3", Name = "Chen", Telephone = "23516" });
db.Add(new Student { Id = "4", Name = "Zhu", Telephone = "45134" });
db.Add(new Student { Id = "5", Name = "Zhou", Telephone = "3455" });
}
public void ProcessRequest (HttpContext context) {
string id = context.Request.Params["id"];
string action=context.Request.Params["action"];
string result = "{success:false}";
if (action = = "create")
{
}
else if (action == "read")
{
foreach (Student stu in db)
{
if (stu .Id == id)
{
result = "{success:true,r:[['" stu.Id "','" stu.Name "','" stu.Telephone "']] }";
break;
}
}
}
else if (action == "update")
{
}
else if (action == "delete")
{
}
context.Response.ContentType = "text/plain";
context.Response.Write(result);
}
public bool IsReusable {
get {
return false;
}
}
class Student
{
string id;
public string Id
{
get { return id; }
set { id = value; }
}
string name;
public string Name
{
get { return name; }
set { name = value; }
}
string telephone;
public string Telephone
{
get { return telephone; }
set { telephone = value; }
}
}
}
We use a static List to imitate the database. Four situations are dealt with respectively in the processing function. The above only implements the read code and returns an array, because our final client uses ArrayReader to parse the data. The server-side code is nothing to explain, it is very simple. Let’s look at the client-side code:
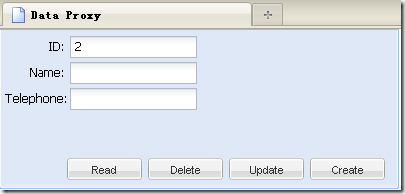
There are some things that need to be explained here. First, a Student's Record is defined, which is consistent with the server-side code. Then ArrayReader is defined. ArrayReader reads the data in the array. The data format refers to the server-side code. It has a root attribute that is very important. It specifies which attribute value in the json data is read (this value is an array literal. ).idIndex must also be specified, which indicates which field is the primary key. Fields are easy to understand, the fields of the Record are read. The order in the array must correspond to the field order of the Record. Otherwise, it can be specified through the mapping attribute of the Record. For example: {name:'Telephone',mapping:4} means to read the fourth value in the array and put it into the Telephone field. . The following is to define httpProxy and set up the API. Then we create a form:
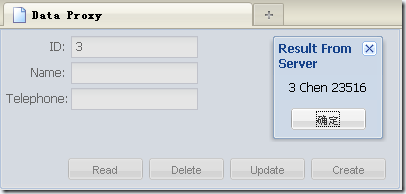
Add 4 buttons. First write the processing function for the Read button: one parameter of doRequest is 'read', the second parameter is null, because I don't understand its use; the third parameter passes the value of the ID to be queried to the server, and the third parameter The four parameters are a reader, and the fifth parameter callback is very important. We handle the return value of the server here. Note that I set the last parameter to arrayReader, so the value of the option parameter of this function is actually arrayReader. Why should I do this? Firstly, it is to give a demonstration. What is the use of the last parameter? Secondly, because ArrayReader is rather weird. Note that it does not have a public successProperty configuration item, which means that it cannot determine the success property returned by the server. That is, the success parameter of this callback is always undefined! I thought at first that my server-side code was wrong, but then I debugged into the source code and found that it did not handle the success attribute. Perhaps ArrayReader was not designed to be used in this environment. But as a demonstration, let’s use it like this. In fact, it does not handle the success parameter, but we can still handle it ourselves. There is an arrayData attribute inside arrayReader, which is a parsed json object. If the returned json string has a success attribute, then this object also has a success attribute, so that we can get the return value of the server. In the same way, we can also process the server. Any data returned. Of course, this usage is not in the documentation and is for demonstration only. Pay special attention to the first parameter of this callback. The document says it is Record[], but in fact it is an object, and its record attribute is Record[]. All I can say is that the documentation for this part of extjs is terrible. Fortunately, this part of the code is very good. Friends who are interested can debug it and have a look in order to have a deeper understanding. Okay, everything is ready, click the Read button, and the result comes out:
This article comes to an end for the time being. Several other operations are similar in principle, but I suddenly found that it seems inappropriate to simply use this example to demonstrate. Because neither Delete nor Update server needs to return any data, and doRequest forces a DataReader to be used to parse the returned data, which is very inconvenient. Perhaps other methods of doRequest will come into play when operating tabular data. For CRUD of a single object, you can directly use the lower-level Ext.ajax method (described in another article), or use the form method to handle it.
This article is just a brief introduction to the functions and principles of the Extjs data model. In practice, how to efficiently organize the code and transfer data between the server and the client is another topic. Extjs is still very flexible, and the communication contract between the client and the server can still be decided by the programmer.
It’s too long…Go to the next chapter…

Hot AI Tools

Undresser.AI Undress
AI-powered app for creating realistic nude photos

AI Clothes Remover
Online AI tool for removing clothes from photos.

Undress AI Tool
Undress images for free

Clothoff.io
AI clothes remover

AI Hentai Generator
Generate AI Hentai for free.

Hot Article

Hot Tools

Notepad++7.3.1
Easy-to-use and free code editor

SublimeText3 Chinese version
Chinese version, very easy to use

Zend Studio 13.0.1
Powerful PHP integrated development environment

Dreamweaver CS6
Visual web development tools

SublimeText3 Mac version
God-level code editing software (SublimeText3)

Hot Topics
 1374
1374
 52
52
 Replace String Characters in JavaScript
Mar 11, 2025 am 12:07 AM
Detailed explanation of JavaScript string replacement method and FAQ This article will explore two ways to replace string characters in JavaScript: internal JavaScript code and internal HTML for web pages. Replace string inside JavaScript code The most direct way is to use the replace() method: str = str.replace("find","replace"); This method replaces only the first match. To replace all matches, use a regular expression and add the global flag g: str = str.replace(/fi
 How do I create and publish my own JavaScript libraries?
Mar 18, 2025 pm 03:12 PM
Article discusses creating, publishing, and maintaining JavaScript libraries, focusing on planning, development, testing, documentation, and promotion strategies.
 How do I optimize JavaScript code for performance in the browser?
Mar 18, 2025 pm 03:14 PM
The article discusses strategies for optimizing JavaScript performance in browsers, focusing on reducing execution time and minimizing impact on page load speed.
 How do I debug JavaScript code effectively using browser developer tools?
Mar 18, 2025 pm 03:16 PM
The article discusses effective JavaScript debugging using browser developer tools, focusing on setting breakpoints, using the console, and analyzing performance.
 jQuery Matrix Effects
Mar 10, 2025 am 12:52 AM
Bring matrix movie effects to your page! This is a cool jQuery plugin based on the famous movie "The Matrix". The plugin simulates the classic green character effects in the movie, and just select a picture and the plugin will convert it into a matrix-style picture filled with numeric characters. Come and try it, it's very interesting! How it works The plugin loads the image onto the canvas and reads the pixel and color values: data = ctx.getImageData(x, y, settings.grainSize, settings.grainSize).data The plugin cleverly reads the rectangular area of the picture and uses jQuery to calculate the average color of each area. Then, use
 10 Ways to Instantly Increase Your jQuery Performance
Mar 11, 2025 am 12:15 AM
This article outlines ten simple steps to significantly boost your script's performance. These techniques are straightforward and applicable to all skill levels. Stay Updated: Utilize a package manager like NPM with a bundler such as Vite to ensure
 Enhancing Structural Markup with JavaScript
Mar 10, 2025 am 12:18 AM
Key Points Enhanced structured tagging with JavaScript can significantly improve the accessibility and maintainability of web page content while reducing file size. JavaScript can be effectively used to dynamically add functionality to HTML elements, such as using the cite attribute to automatically insert reference links into block references. Integrating JavaScript with structured tags allows you to create dynamic user interfaces, such as tab panels that do not require page refresh. It is crucial to ensure that JavaScript enhancements do not hinder the basic functionality of web pages; even if JavaScript is disabled, the page should remain functional. Advanced JavaScript technology can be used (
 How to Build a Simple jQuery Slider
Mar 11, 2025 am 12:19 AM
This article will guide you to create a simple picture carousel using the jQuery library. We will use the bxSlider library, which is built on jQuery and provides many configuration options to set up the carousel. Nowadays, picture carousel has become a must-have feature on the website - one picture is better than a thousand words! After deciding to use the picture carousel, the next question is how to create it. First, you need to collect high-quality, high-resolution pictures. Next, you need to create a picture carousel using HTML and some JavaScript code. There are many libraries on the web that can help you create carousels in different ways. We will use the open source bxSlider library. The bxSlider library supports responsive design, so the carousel built with this library can be adapted to any


