
 Web Front-end
JS Tutorial
js implements ctrl+v to paste and upload pictures (compatible with chrome, firefox, ie11)_javascript skills
Web Front-end
JS Tutorial
js implements ctrl+v to paste and upload pictures (compatible with chrome, firefox, ie11)_javascript skills
js implements ctrl+v to paste and upload pictures (compatible with chrome, firefox, ie11)_javascript skills

We have all used various rich text editors more or less. There is a very convenient function among them. Copy an image and paste it into the text box, and the image will be uploaded. So this is convenient How is the function implemented?
Principle Analysis
Extraction operation: copy=>paste=>upload
During this operation, all we need to do is: listen to the paste event => get the content in the clipboard => send a request to upload
In order to understand the following easily, you need to understand a few points first:
- We can only upload webpage pictures (right-click the picture on the webpage, and then copy) and screenshots (pictures taken by the screenshot tool, eg: qq screenshot). We cannot paste and upload pictures in the system (from the desktop on the computer, copied to the hard disk), they exist in completely different places.
- The picture captured by the snipping tool is somewhat different from the picture copied by right-clicking on the web page, so the processing methods are also different.
- Be aware of the paste event: When you perform a paste (right-click paste/ctrl+v) operation, this action will trigger a clipboard event named 'paste'. This event is triggered when cutting The data in the board is inserted before the target element. If the target element (where the cursor is located) is an editable element (eg: a div with the contenteditable attribute set. Textarea does not work.), the paste action will insert the data in the clipboard into the target element in the most appropriate format. ; If the target element is not editable, data will not be inserted, but the paste event will still be triggered. The data is read-only during the pasting process. This paragraph is translated from w3.org_the-paste-action.
- Unfortunately, after testing, it was found that the implementation of paste events in chrome (the latest version), firefox (the latest version), and ie11 are not completely in accordance with w3c, and each has its own differences (w3c The paste standard is therefore only in the draft stage).
The test code and screenshots are as follows:
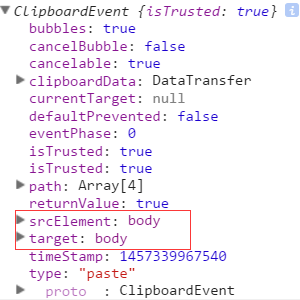
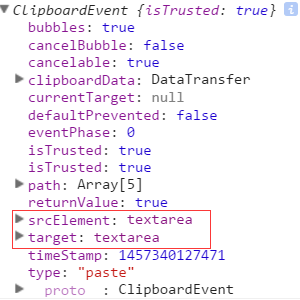
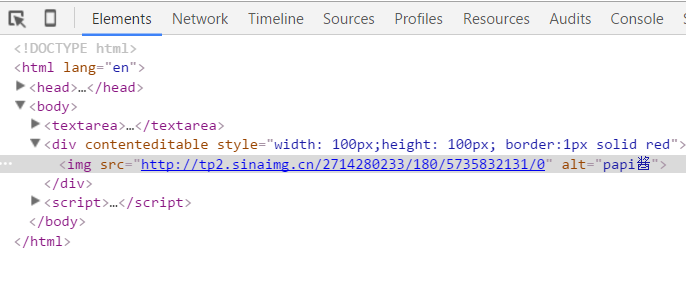
chrome:
<textarea ></textarea>
<div contenteditable style="width: 100px;height: 100px; border:1px solid">
</div>
<script>
document.addEventListener('paste', function (event) {
  console.log(event)
})
</script>
- event有clipboardData属性,且clipboardData有item属性,clipboardData.item中的元素(对象)有type和kind属性;
- 无论在哪进行粘贴,均可触发paste事件;
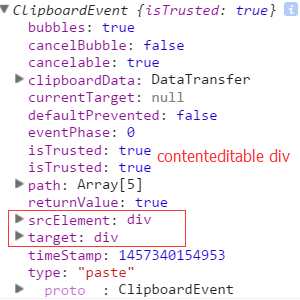
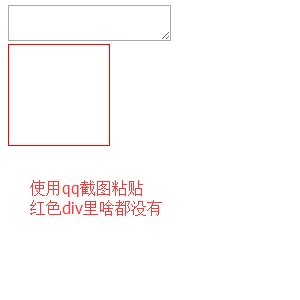
- 在div(未特殊声明时,本文div均指设置了contenteditable属性的div) 里粘贴截图,不显示图片。img.src为base64编码字符串;
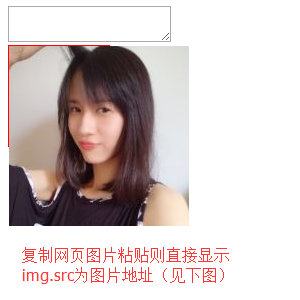
- 在div里粘贴网页图片,直接显示图片,img.src为图片地址。
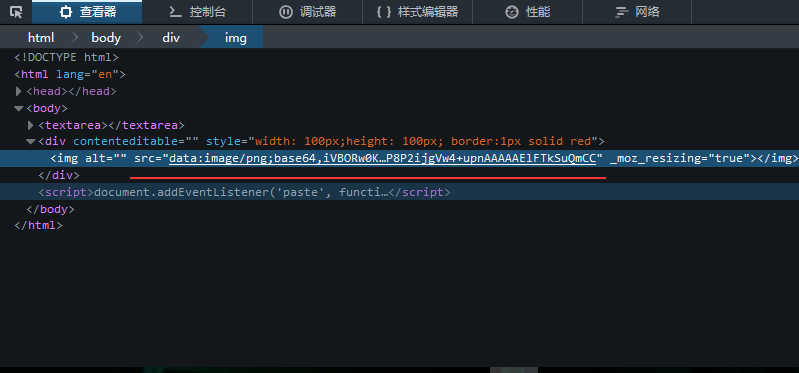
firefox:
- event有clipboardData属性,clipboardData没有item属性;
- 只有在textarea里或者可编辑的div(里才粘贴才触发paste事件;
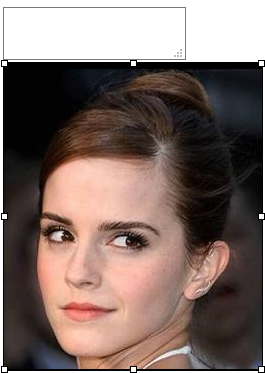
- 在div里粘贴截图,直接显示图片,img.src为base64编码字符串;
- 在div里粘贴网页图片,表现同chrome。
ie11:(不截图了,可自行试验,其他浏览器同理<( ̄▽ ̄)/,因为懒...)
- event没有clipboardData属性;
- 只在可编辑的div中粘贴才触发paste事件;
- 在div里粘贴截图,直接显示图片,img.src为base64编码字符串;
- 在div里粘贴网页图片,表现同chrome。
监听了paste事件,也知道了表现形式,接下来就是如何获取数据了:
chrome有特定的方法,利用clipboardData.items、getAsFile()、new FileReader()等api可以在paste回调函数里获取到剪贴板里图片的base64编码字符串(无论是截图粘贴的还是网页图片复制粘贴的),ie11,firefox没有这样的api,不过依然有办法可以获取,因为数据已经表现在img的src里了,对于截图粘贴的,直接取img的src属性值(base64),对于网页粘贴的,则把地址传给后台,然后根据地址down下来,存在自己的服务器,最后把新地址返回来交给前端展示就ok了。为了保持一致性便于管理,统一将所有情况(截图、网页)中的img的src属性替换为自己存储的地址。因此可以得到以下核心代码(注释很全哦~~):
html展示:
<head>
<meta charset="UTF-8">
<title>Document</title>
<style>
body {
  display: -webkit-flex;
  display: flex;
  -webkit-justify-content: center;
  justify-content: center;
}
#tar_box {
  width: 500px;
  height: 500px;
  border: 1px solid red;
}
</style>
前端js处理逻辑:
document.addEventListener('paste', function (event) {
  console.log(event)
  var isChrome = false;
  if ( event.clipboardData || event.originalEvent ) {
    //not for ie11  某些chrome版本使用的是event.originalEvent
    var clipboardData = (event.clipboardData || event.originalEvent.clipboardData);
    if ( clipboardData.items ) {
      // for chrome
      var  items = clipboardData.items,
        len = items.length,
        blob = null;
      isChrome = true;
      //items.length比较有意思,初步判断是根据mime类型来的,即有几种mime类型,长度就是几(待验证)
      //如果粘贴纯文本,那么len=1,如果粘贴网页图片,len=2, items[0].type = 'text/plain', items[1].type = 'image/*'
      //如果使用截图工具粘贴图片,len=1, items[0].type = 'image/png'
      //如果粘贴纯文本+HTML,len=2, items[0].type = 'text/plain', items[1].type = 'text/html'
      // console.log('len:' + len);
      // console.log(items[0]);
      // console.log(items[1]);
      // console.log( 'items[0] kind:', items[0].kind );
      // console.log( 'items[0] MIME type:', items[0].type );
      // console.log( 'items[1] kind:', items[1].kind );
      // console.log( 'items[1] MIME type:', items[1].type );

      //阻止默认行为即不让剪贴板内容在div中显示出来
      event.preventDefault();

      //在items里找粘贴的image,据上面分析,需要循环
      for (var i = 0; i < len; i++) {
        if (items[i].type.indexOf("image") !== -1) {
          // console.log(items[i]);
          // console.log( typeof (items[i]));

          //getAsFile() 此方法只是living standard firefox ie11 并不支持
          blob = items[i].getAsFile();
        }
      }
      if ( blob !== null ) {
        var reader = new FileReader();
        reader.onload = function (event) {
          // event.target.result 即为图片的Base64编码字符串
          var base64_str = event.target.result
          //可以在这里写上传逻辑 直接将base64编码的字符串上传(可以尝试传入blob对象,看看后台程序能否解析)
          uploadImgFromPaste(base64_str, 'paste', isChrome);
        }
        reader.readAsDataURL(blob);
      }
    } else {
      //for firefox
      setTimeout(function () {
        //设置setTimeout的原因是为了保证图片先插入到div里,然后去获取值
        var imgList = document.querySelectorAll('#tar_box img'),
          len = imgList.length,
          src_str = '',
          i;
        for ( i = 0; i < len; i ++ ) {
          if ( imgList[i].className !== 'my_img' ) {
            //如果是截图那么src_str就是base64 如果是复制的其他网页图片那么src_str就是此图片在别人服务器的地址
            src_str = imgList[i].src;
          }
        }
        uploadImgFromPaste(src_str, 'paste', isChrome);
      }, 1);
    }
  } else {
    //for ie11
    setTimeout(function () {
      var imgList = document.querySelectorAll('#tar_box img'),
        len = imgList.length,
        src_str = '',
        i;
      for ( i = 0; i < len; i ++ ) {
        if ( imgList[i].className !== 'my_img' ) {
          src_str = imgList[i].src;
        }
      }
      uploadImgFromPaste(src_str, 'paste', isChrome);
    }, 1);
  }
})

function uploadImgFromPaste (file, type, isChrome) {
  var formData = new FormData();
  formData.append('image', file);
  formData.append('submission-type', type);

  var xhr = new XMLHttpRequest();
  xhr.open('POST', '/upload_image_by_paste');
  xhr.onload = function () {
    if ( xhr.readyState === 4 ) {
      if ( xhr.status === 200 ) {
        var data = JSON.parse( xhr.responseText ),
          tarBox = document.getElementById('tar_box');
        if ( isChrome ) {
          var img = document.createElement('img');
          img.className = 'my_img';
          img.src = data.store_path;
          tarBox.appendChild(img);
        } else {
          var imgList = document.querySelectorAll('#tar_box img'),
            len = imgList.length,
            i;
          for ( i = 0; i < len; i ++) {
            if ( imgList[i].className !== 'my_img' ) {
              imgList[i].className = 'my_img';
              imgList[i].src = data.store_path;
            }
          }
        }

      } else {
        console.log( xhr.statusText );
      }
    };
  };
  xhr.onerror = function (e) {
    console.log( xhr.statusText );
  }
  xhr.send(formData);
}
用express.js搭的简易后台的接收逻辑:
router.post('/', upload.array(), function (req, res, next) {
//1.获取客户端传来的src_str字符串=>判断是base64还是普通地址=>获取图片类型后缀(jpg/png etc)
//=>如果是base64替换掉"前缀"("data:image\/png;base64," etc)
//2.base64 转为 buffer对象 普通地址则先down下来
//3.写入硬盘(后续可以将地址存入数据库)
//4.返回picture地址
var src_str = req.body.image,
  timestamp = new Date().getTime();
if ( src_str.match(/^data:image\/png;base64,|^data:image\/jpg;base64,|^data:image\/jpg;base64,|^data:image\/bmp;base64,/) ) {
  //处理截图 src_str为base64字符串
  var pic_suffix = src_str.split(';',1)[0].split('/',2)[1],
    base64 = src_str.replace(/^data:image\/png;base64,|^data:image\/jpg;base64,|^data:image\/jpg;base64,|^data:image\/bmp;base64,/, ''),
    buf = new Buffer(base64, 'base64'),
    store_path = 'public/images/test_' + timestamp + '.' + pic_suffix;

  fs.writeFile(store_path, buf, function (err) {
    if (err) {
      throw err;
    } else {
      res.json({'store_path': store_path});
    }
  });
} else {// 处理非chrome的网页图片 src_str为图片地址
  var temp_array = src_str.split('.'),
    pic_suffix = temp_array[temp_array.length - 1],
    store_path = 'public/images/test_' + timestamp + '.' + pic_suffix,
    wstream = fs.createWriteStream(store_path);

  request(src_str).pipe(wstream);
  wstream.on('finish', function (err) {
    if( err ) {
      throw err;
    } else {
      res.json({"store_path": store_path});
    }
  });
}
});
需要node环境:安装node=>npm intall=>node app.js)
以上就是本文的全部内容,希望对大家的学习有所帮助。

Hot AI Tools

Undresser.AI Undress
AI-powered app for creating realistic nude photos

AI Clothes Remover
Online AI tool for removing clothes from photos.

Undress AI Tool
Undress images for free

Clothoff.io
AI clothes remover

Video Face Swap
Swap faces in any video effortlessly with our completely free AI face swap tool!

Hot Article
Hot Tools

Notepad++7.3.1
Easy-to-use and free code editor

SublimeText3 Chinese version
Chinese version, very easy to use

Zend Studio 13.0.1
Powerful PHP integrated development environment

Dreamweaver CS6
Visual web development tools

SublimeText3 Mac version
God-level code editing software (SublimeText3)
Hot Topics
 1664
1664
 14
1422
52
1316
25
1267
29
1239
24
14
1422
52
1316
25
1267
29
1239
24

 Recommended: Excellent JS open source face detection and recognition project
Apr 03, 2024 am 11:55 AM
Recommended: Excellent JS open source face detection and recognition project
Apr 03, 2024 am 11:55 AM
Face detection and recognition technology is already a relatively mature and widely used technology. Currently, the most widely used Internet application language is JS. Implementing face detection and recognition on the Web front-end has advantages and disadvantages compared to back-end face recognition. Advantages include reducing network interaction and real-time recognition, which greatly shortens user waiting time and improves user experience; disadvantages include: being limited by model size, the accuracy is also limited. How to use js to implement face detection on the web? In order to implement face recognition on the Web, you need to be familiar with related programming languages and technologies, such as JavaScript, HTML, CSS, WebRTC, etc. At the same time, you also need to master relevant computer vision and artificial intelligence technologies. It is worth noting that due to the design of the Web side
 How to use JS and Baidu Maps to implement map pan function
Nov 21, 2023 am 10:00 AM
How to use JS and Baidu Maps to implement map pan function
Nov 21, 2023 am 10:00 AM
How to use JS and Baidu Map to implement map pan function Baidu Map is a widely used map service platform, which is often used in web development to display geographical information, positioning and other functions. This article will introduce how to use JS and Baidu Map API to implement the map pan function, and provide specific code examples. 1. Preparation Before using Baidu Map API, you first need to apply for a developer account on Baidu Map Open Platform (http://lbsyun.baidu.com/) and create an application. Creation completed
 Essential tools for stock analysis: Learn the steps to draw candle charts with PHP and JS
Dec 17, 2023 pm 06:55 PM
Essential tools for stock analysis: Learn the steps to draw candle charts with PHP and JS
Dec 17, 2023 pm 06:55 PM
Essential tools for stock analysis: Learn the steps to draw candle charts in PHP and JS. Specific code examples are required. With the rapid development of the Internet and technology, stock trading has become one of the important ways for many investors. Stock analysis is an important part of investor decision-making, and candle charts are widely used in technical analysis. Learning how to draw candle charts using PHP and JS will provide investors with more intuitive information to help them make better decisions. A candlestick chart is a technical chart that displays stock prices in the form of candlesticks. It shows the stock price
 How to create a stock candlestick chart using PHP and JS
Dec 17, 2023 am 08:08 AM
How to create a stock candlestick chart using PHP and JS
Dec 17, 2023 am 08:08 AM
How to use PHP and JS to create a stock candle chart. A stock candle chart is a common technical analysis graphic in the stock market. It helps investors understand stocks more intuitively by drawing data such as the opening price, closing price, highest price and lowest price of the stock. price fluctuations. This article will teach you how to create stock candle charts using PHP and JS, with specific code examples. 1. Preparation Before starting, we need to prepare the following environment: 1. A server running PHP 2. A browser that supports HTML5 and Canvas 3
 How to use JS and Baidu Map to implement map click event processing function
Nov 21, 2023 am 11:11 AM
How to use JS and Baidu Map to implement map click event processing function
Nov 21, 2023 am 11:11 AM
Overview of how to use JS and Baidu Maps to implement map click event processing: In web development, it is often necessary to use map functions to display geographical location and geographical information. Click event processing on the map is a commonly used and important part of the map function. This article will introduce how to use JS and Baidu Map API to implement the click event processing function of the map, and give specific code examples. Steps: Import the API file of Baidu Map. First, import the file of Baidu Map API in the HTML file. This can be achieved through the following code:
 How to use JS and Baidu Maps to implement map heat map function
Nov 21, 2023 am 09:33 AM
How to use JS and Baidu Maps to implement map heat map function
Nov 21, 2023 am 09:33 AM
How to use JS and Baidu Maps to implement the map heat map function Introduction: With the rapid development of the Internet and mobile devices, maps have become a common application scenario. As a visual display method, heat maps can help us understand the distribution of data more intuitively. This article will introduce how to use JS and Baidu Map API to implement the map heat map function, and provide specific code examples. Preparation work: Before starting, you need to prepare the following items: a Baidu developer account, create an application, and obtain the corresponding AP
 PHP and JS Development Tips: Master the Method of Drawing Stock Candle Charts
Dec 18, 2023 pm 03:39 PM
PHP and JS Development Tips: Master the Method of Drawing Stock Candle Charts
Dec 18, 2023 pm 03:39 PM
With the rapid development of Internet finance, stock investment has become the choice of more and more people. In stock trading, candle charts are a commonly used technical analysis method. It can show the changing trend of stock prices and help investors make more accurate decisions. This article will introduce the development skills of PHP and JS, lead readers to understand how to draw stock candle charts, and provide specific code examples. 1. Understanding Stock Candle Charts Before introducing how to draw stock candle charts, we first need to understand what a candle chart is. Candlestick charts were developed by the Japanese
 The relationship between js and vue
Mar 11, 2024 pm 05:21 PM
The relationship between js and vue
Mar 11, 2024 pm 05:21 PM
The relationship between js and vue: 1. JS as the cornerstone of Web development; 2. The rise of Vue.js as a front-end framework; 3. The complementary relationship between JS and Vue; 4. The practical application of JS and Vue.
