
 Web Front-end
JS Tutorial
JavaScript Component Journey (2) Coding Implementation and Algorithms_Javascript Skills
Web Front-end
JS Tutorial
JavaScript Component Journey (2) Coding Implementation and Algorithms_Javascript Skills
JavaScript Component Journey (2) Coding Implementation and Algorithms_Javascript Skills

首先,我们要考虑一下它的源文件布局,也就是决定代码如何拆分到独立的文件中去。为什么要这么做呢?还记得上期结尾处我提到这个组件会使用“外部代码”吗?为了区分代码的用途,决定将代码至少分成两部分:外部代码文件和 Smart Queue 文件。
区分用途只是其一,其二,分散到独立文件有利于代码的维护。试想,以后的某一天你决定要在现有的队列管理基本功能之上,添加一些新的扩展功能,或是把它包装成某个实现特定任务的组件,而又希望保持现有功能(内部实现)和调用方式(对外接口)不变,那么将新的代码写到单独的文件是最好的选择。
嗯,下期会重点谈谈文件布局的话题,现在要开始切入正题了。第一步,当然是要为组件创建自己的命名空间,组件所有的代码都将限制在这个顶层命名空间内:
<span style="COLOR: #0000c0">var</span> SmartQueue = window.SmartQueue || {};
SmartQueue.version = <span style="COLOR: #008000">'0.1'</span>;初始化的时候,如果碰到命名空间冲突就把它拉过来用。通常这个冲突是由重复引用组件代码导致的,因此“拉过来用”会将对象以同样的实现重写一次;最坏的情况下,如果碰巧页面上另一个对象也叫 SmartQueue, 那不好意思了,我会覆盖你的实现——如果没有进一步的命名冲突,基本上两个组件可以相安无事地运行。同时顺便给它一个版本号。
接着,按三个优先级为 SmartQueue 创建三个队列:
<span style="COLOR: #0000c0">var</span> Q = SmartQueue.Queue = [[], [], []];
每个都是空数组,因为还没有任务加进去嘛。又顺便给它建个“快捷方式”,后面要访问数组直接写 Q[n] 就可以啦。
接下来,我们的主角 Task 隆重登场——怎么 new 一个 Task, 定义在这里:
  <span style="COLOR: #0000c0">var</span> T = SmartQueue.Task = <span style="COLOR: #b000b0">function</span>(fn, level, name, dependencies) {
    <span style="COLOR: #c00000">if</span>(<span style="COLOR: #c00000">typeof</span> fn !== FUNCTION) {
      <span style="COLOR: #c00000">throw</span> <span style="COLOR: #c00000">new</span> <span style="COLOR: #606060">Error</span>(<span style="COLOR: #008000">'Invalid argument type: fn.'</span>);
    }
    <span style="COLOR: #0000c0">this</span>.fn = fn;
    <span style="COLOR: #0000c0">this</span>.level = _validateLevel(level) ? level : LEVEL_NORMAL;

<span style="COLOR: #707070">    // detect type of name</span>
    <span style="COLOR: #0000c0">this</span>.name = <span style="COLOR: #c00000">typeof</span> name === STRING && name ? name : <span style="COLOR: #008000">'t'</span> + _id++;

<span style="COLOR: #707070">    // dependencies could be retrieved as an 'Object', so use instanceof instead.</span>
    <span style="COLOR: #0000c0">this</span>.dependencies = dependencies <span style="COLOR: #c00000">instanceof</span> <span style="COLOR: #606060">Array</span> ? dependencies : [];
};里面的具体细节就不说了,有必要的注释,一般我们的代码也能做到自我描述,后面代码也是这样。这里告诉客户(使用者):你想新建一个 SmartQueue.Task 实例,就要至少传一个参数给这个构造函数(后 3 个都可以省略进行缺省处理),否则抛出异常伺候。
但是这还不够,有时候,客户希望从已有 Task 克隆一个新实例,或是从一个“残废体”(具有部分 Task 属性的对象)修复出“健康体”(真正的 Task 对象实例),通过上面的构造方式就有点不爽了——客户得这样写:
<span style="COLOR: #0000c0">var</span> task1 = <span style="COLOR: #c00000">new</span> SmartQueue.Task(obj.fn, <span style="COLOR: #008000">1</span>, <span style="COLOR: #008000">''</span>, obj.dependencies);
我很懒,我只想传 fn 和 dependencies 两个属性,不想做额外的事情。好吧,我们来重构一下构造函数:
  <span style="COLOR: #0000c0">var</span> _setupTask = <span style="COLOR: #b000b0">function</span>(fn, level, name, dependencies) {
    <span style="COLOR: #c00000">if</span>(<span style="COLOR: #c00000">typeof</span> fn !== FUNCTION) {
      <span style="COLOR: #c00000">throw</span> <span style="COLOR: #c00000">new</span> <span style="COLOR: #606060">Error</span>(<span style="COLOR: #008000">'Invalid argument type: fn.'</span>);
    }
    <span style="COLOR: #0000c0">this</span>.fn = fn;
    <span style="COLOR: #0000c0">this</span>.level = _validateLevel(level) ? level : LEVEL_NORMAL;

<span style="COLOR: #707070">    // detect type of name</span>
    <span style="COLOR: #0000c0">this</span>.name = <span style="COLOR: #c00000">typeof</span> name === STRING && name ? name : <span style="COLOR: #008000">'t'</span> + _id++;

<span style="COLOR: #707070">    // dependencies could be retrieved as an 'Object', so use instanceof instead.</span>
    <span style="COLOR: #0000c0">this</span>.dependencies = dependencies <span style="COLOR: #c00000">instanceof</span> <span style="COLOR: #606060">Array</span> ? dependencies : [];
  };

  <span style="COLOR: #0000c0">var</span> T = SmartQueue.Task = <span style="COLOR: #b000b0">function</span>(task) {
    <span style="COLOR: #c00000">if</span>(arguments.length > <span style="COLOR: #008000">1</span>) {
      _setupTask.apply(<span style="COLOR: #0000c0">this</span>, arguments);
    } <span style="COLOR: #c00000">else</span> {
      _setupTask.call(<span style="COLOR: #0000c0">this</span>, task.fn, task.level, task.name, task.dependencies);
    }

<span style="COLOR: #707070">    // init context/scope and data for the task.</span>
    <span style="COLOR: #0000c0">this</span>.context = task.context || window;
    <span style="COLOR: #0000c0">this</span>.data = task.data || {};
};如此一来,原来的构造方式可以继续工作,而上面的懒人可以这样传入一个“残废体”:
<span style="COLOR: #0000c0">var</span> task1 = <span style="COLOR: #c00000">new</span> SmartQueue.Task({<span style="COLOR: #c00000">fn</span>: obj.fn, <span style="COLOR: #c00000">dependencies</span>: obj.dependencies});当构造函数收到多个参数时,按之前的方案等同处理;否则,视唯一的参数为 Task 对象或“残废体”。这里通过 JavaScript 中的 <font face="新宋体">apply</font>/<font face="新宋体">call</font> 方法将新实例传给重构出来的 <font face="新宋体">_setupTask</font> 方法,作为该方法的上下文 (context, 也有称为 scope), <font face="新宋体">apply</font>/<font face="新宋体">call</font> 是 JavaScript 在方法之间传递上下文的法宝,要用心体会哦。同时,允许用户定义 <font face="新宋体">task.fn</font> 在执行时的上下文,并将自定义的数据传递给执行中的 fn.
经典的 JavaScript 对象三段式是什么?
- 定义对象的构造函数
- 在原型上定义属性和方法
- new 对象,拿来用
所以,下面要为 <font face="新宋体">SmartQueue.Task</font> 对象的原型定义属性和方法。上期分析过 Task (任务)有几个属性和方法,部分属性我们已经在 <font face="新宋体">_setupTask</font> 中定义了,下面是原型提供的属性和方法:
  T.prototype = {
    <span style="COLOR: #c00000">enabled</span>: <span style="COLOR: #008000">true</span>,
    <span style="COLOR: #c00000">register</span>: <span style="COLOR: #b000b0">function</span>() {
      <span style="COLOR: #0000c0">var</span> queue = Q[<span style="COLOR: #0000c0">this</span>.level];
      <span style="COLOR: #c00000">if</span>(_findTask(queue, <span style="COLOR: #0000c0">this</span>.name) !== -<span style="COLOR: #008000">1</span>) {
        <span style="COLOR: #c00000">throw</span> <span style="COLOR: #c00000">new</span> <span style="COLOR: #606060">Error</span>(<span style="COLOR: #008000">'Specified name exists: '</span> + <span style="COLOR: #0000c0">this</span>.name);
      }
      queue.push(<span style="COLOR: #0000c0">this</span>);
    },
    <span style="COLOR: #c00000">changeTo</span>: <span style="COLOR: #b000b0">function</span>(level) {
      <span style="COLOR: #c00000">if</span>(!_validateLevel(level)) {
        <span style="COLOR: #c00000">throw</span> <span style="COLOR: #c00000">new</span> <span style="COLOR: #606060">Error</span>(<span style="COLOR: #008000">'Invalid argument: level'</span>);
      }
      level = parseInt(level, <span style="COLOR: #008000">10</span>);
      <span style="COLOR: #c00000">if</span>(<span style="COLOR: #0000c0">this</span>.level === level) {
        <span style="COLOR: #c00000">return</span>;
      }
      Q[<span style="COLOR: #0000c0">this</span>.level].remove(<span style="COLOR: #0000c0">this</span>);
      <span style="COLOR: #0000c0">this</span>.level = level;
      <span style="COLOR: #0000c0">this</span>.register();
    },
    <span style="COLOR: #c00000">execute</span>: <span style="COLOR: #b000b0">function</span>() {
      <span style="COLOR: #c00000">if</span>(<span style="COLOR: #0000c0">this</span>.enabled) {
<span style="COLOR: #707070">        // pass context and data</span>
        <span style="COLOR: #0000c0">this</span>.fn.call(<span style="COLOR: #0000c0">this</span>.context, <span style="COLOR: #0000c0">this</span>.data);
      }
    },
    <span style="COLOR: #c00000">toString</span>: <span style="COLOR: #b000b0">function</span>() {
      <span style="COLOR: #0000c0">var</span> str = <span style="COLOR: #0000c0">this</span>.name;
      <span style="COLOR: #c00000">if</span>(<span style="COLOR: #0000c0">this</span>.dependencies.length) {
        str += <span style="COLOR: #008000">' depends on: ['</span> + <span style="COLOR: #0000c0">this</span>.dependencies.join(<span style="COLOR: #008000">', '</span>) + <span style="COLOR: #008000">']'</span>;
      }
      <span style="COLOR: #c00000">return</span> str;
    }
};如你所见,逻辑非常简单,也许你已经在一分钟内扫过了代码,嘴角不经意间露出一丝心领神会。不过,这里要说的是简单而且通常最不被重视的 <font face="新宋体">toString</font> 方法。在一些高级语言中,为自定义对象实现 <font face="新宋体">toString</font> 方法被作为最佳实践准则而推荐,为什么呢?因为 <font face="新宋体">toString</font> 可以很方便地在调试器中提供有用的信息,可以方便地将对象基本信息写入日志;在统一的编程模式中,实现 <font face="新宋体">toString</font> 可以让你少写一些代码。
嗯,我们继续推进,我们要实现 SmartQueue 的具体功能。上期分析过,SmartQueue 只有一个实例,因此我们决定直接在 SmartQueue 下面创建方法:
  SmartQueue.init = <span style="COLOR: #b000b0">function</span>() {
    Q.forEach(<span style="COLOR: #b000b0">function</span>(queue) {
      queue.length = <span style="COLOR: #008000">0</span>;
    });
};这里用到 JavaScript 1.6 为 Array 对象提供的遍历方法 <font face="新宋体">forEach</font>. 之所以这样写是因为我们假定“外部代码”已经在前面运行过了。设置 Array 对象的 <font face="新宋体">length</font> 属性为 <font face="新宋体">0</font> 导致,它被清空并且释放所有的项(数组单元)。
最后一个方法 <font face="新宋体">fire</font>, 是整个组件最主要的方法,它负责对所有任务队列进行排序,并逐个执行。由于代码稍长了一点,这里只介绍排序使用的算法和实现方式,完整代码在这里。
<span style="COLOR: #0000c0">var</span> _dirty = <span style="COLOR: #008000">true</span>, <span style="COLOR: #707070">// A flag indicates weather the Queue need to be fired.</span>
  _sorted = [], index;
<span style="COLOR: #707070">// Sort all Queues.</span>
<span style="COLOR: #707070">// ref: <a href="http://en.wikipedia.org/wiki/Topological_sorting"><font color="#0000ff">http://en.wikipedia.org/wiki/Topological_sorting</font></a></span>
<span style="COLOR: #0000c0">var</span> _visit = <span style="COLOR: #b000b0">function</span>(queue, task) {
    <span style="COLOR: #c00000">if</span>(task._visited >= <span style="COLOR: #008000">1</span>) {
      task._visited++;
      <span style="COLOR: #c00000">return</span>;
    }
    task._visited = <span style="COLOR: #008000">1</span>;
<span style="COLOR: #707070">    // find out and visit all dependencies.</span>
    <span style="COLOR: #0000c0">var</span> dependencies = [], i;
    task.dependencies.forEach(<span style="COLOR: #b000b0">function</span>(dependency) {
      i = _findTask(queue, dependency);
      <span style="COLOR: #c00000">if</span>(i != -<span style="COLOR: #008000">1</span>) {
        dependencies.push(queue[i]);
      }
    });
    dependencies.forEach(<span style="COLOR: #b000b0">function</span>(t) {
      _visit(queue, t);
    });
    <span style="COLOR: #c00000">if</span>(task._visited === <span style="COLOR: #008000">1</span>) {
      _sorted[index].push(task);
    }
  },
  _start = <span style="COLOR: #b000b0">function</span>(queue) {
    queue.forEach(<span style="COLOR: #b000b0">function</span>(task) {
      _visit(queue, task);
    });
  },
  _sort = <span style="COLOR: #b000b0">function</span>(suppress) {
    <span style="COLOR: #c00000">for</span>(index = LEVEL_LOW; index <= LEVEL_HIGH; index++) {
      <SPAN style="COLOR: #0000c0">var</SPAN> queue = Q[index];
      _sorted[index] = [];
      _start(queue);
      <SPAN style="COLOR: #c00000">if</SPAN>(!suppress && queue.length > _sorted[index].length) {
        <span style="COLOR: #c00000">throw</span> <span style="COLOR: #c00000">new</span> <span style="COLOR: #606060">Error</span>(<span style="COLOR: #008000">'Cycle found in queue: '</span> + queue);
      }
    }
};我们将按任务指定的依赖关系对同一优先级内的任务进行排序,确保被依赖的任务在设置依赖的任务之前运行。这是一个典型的深度优先的拓扑排序问题,维基百科提供了一个深度优先排序算法,大致描述如下:

图片来自维基百科
- 访问待排序的每一个节点
- 如果已经访问过了,则返回
- 否则标记为已访问
- 找出它连接(在这里是依赖)的每个节点
- 跳到内层1递归访问这些节点
- 访问完了就把当前节点加入已排序列表
- 继续访问下一个
如果 A 依赖 B, B 依赖 C, C 依赖 A, 那么这 3 个节点形成了循环依赖。 文中指出这个算法并不能检测出循环依赖。通过标记节点是否已访问,可以解决循环依赖造成的递归死循环。我们来分析一下循环依赖的场景:
从节点 A 出发的时候,它被标记为已访问,当从节点 C 再回到节点 A 的时候,它已经被访问过了。不过这个时候 C 并不知道 A 是否在自己的上游链上,所以不能直接判定发生了循环依赖,因为 A 可能是其他已“处理”(跑完了内层递归)过的节点。如果我们知道节点是不是第一次被访问过,就可以判断是哪一种情况。
改造一下上面的算法,将“是否已访问”改成“访问计数” (<font face="新宋体">task._visited++</font>)。仅当节点被访问过 1 次的时候 (<font face="新宋体">task._visited === 1</font>),才将其加入到已排序列表,全部遍历完之后,如果待排序的节点数比已排序的多 (<font face="新宋体">queue.length > _sorted[index].length</font>),则表明待排序中多出的节点发生了循环依赖。
至此,队列管理组件的编码实现已经完成。什么?怎么使用?很简单啦:
<span style="COLOR: #0000c0">var</span> t1 = <span style="COLOR: #c00000">new</span> SmartQueue.Task(<span style="COLOR: #b000b0">function</span>() {
    alert(<span style="COLOR: #008000">"Hello, world!"</span>);
  }), t2 = <span style="COLOR: #c00000">new</span> SmartQueue.Task(<span style="COLOR: #b000b0">function</span>() {
    alert(<span style="COLOR: #008000">"High level task has name"</span>);
  }, <span style="COLOR: #008000">2</span>, <span style="COLOR: #008000">'myname'</span>);
t1.register(); t2.register();
SmartQueue.fire();更多功能,如任务的依赖,等待你去发掘哦。
本期贴出的代码都是一些局部片段,部分 helper 方法代码没有贴出来。查看完整的代码请访问这里。后面我们将介绍如何管理组件文件,以及构建组件,下期不见不散哦。

Hot AI Tools

Undresser.AI Undress
AI-powered app for creating realistic nude photos

AI Clothes Remover
Online AI tool for removing clothes from photos.

Undress AI Tool
Undress images for free

Clothoff.io
AI clothes remover

Video Face Swap
Swap faces in any video effortlessly with our completely free AI face swap tool!

Hot Article
Hot Tools

Notepad++7.3.1
Easy-to-use and free code editor

SublimeText3 Chinese version
Chinese version, very easy to use

Zend Studio 13.0.1
Powerful PHP integrated development environment

Dreamweaver CS6
Visual web development tools

SublimeText3 Mac version
God-level code editing software (SublimeText3)
Hot Topics
 1386
1386
 52
52

 CLIP-BEVFormer: Explicitly supervise the BEVFormer structure to improve long-tail detection performance
Mar 26, 2024 pm 12:41 PM
CLIP-BEVFormer: Explicitly supervise the BEVFormer structure to improve long-tail detection performance
Mar 26, 2024 pm 12:41 PM
Written above & the author’s personal understanding: At present, in the entire autonomous driving system, the perception module plays a vital role. The autonomous vehicle driving on the road can only obtain accurate perception results through the perception module. The downstream regulation and control module in the autonomous driving system makes timely and correct judgments and behavioral decisions. Currently, cars with autonomous driving functions are usually equipped with a variety of data information sensors including surround-view camera sensors, lidar sensors, and millimeter-wave radar sensors to collect information in different modalities to achieve accurate perception tasks. The BEV perception algorithm based on pure vision is favored by the industry because of its low hardware cost and easy deployment, and its output results can be easily applied to various downstream tasks.
 Implementing Machine Learning Algorithms in C++: Common Challenges and Solutions
Jun 03, 2024 pm 01:25 PM
Implementing Machine Learning Algorithms in C++: Common Challenges and Solutions
Jun 03, 2024 pm 01:25 PM
Common challenges faced by machine learning algorithms in C++ include memory management, multi-threading, performance optimization, and maintainability. Solutions include using smart pointers, modern threading libraries, SIMD instructions and third-party libraries, as well as following coding style guidelines and using automation tools. Practical cases show how to use the Eigen library to implement linear regression algorithms, effectively manage memory and use high-performance matrix operations.
 Explore the underlying principles and algorithm selection of the C++sort function
Apr 02, 2024 pm 05:36 PM
Explore the underlying principles and algorithm selection of the C++sort function
Apr 02, 2024 pm 05:36 PM
The bottom layer of the C++sort function uses merge sort, its complexity is O(nlogn), and provides different sorting algorithm choices, including quick sort, heap sort and stable sort.
 Can artificial intelligence predict crime? Explore CrimeGPT's capabilities
Mar 22, 2024 pm 10:10 PM
Can artificial intelligence predict crime? Explore CrimeGPT's capabilities
Mar 22, 2024 pm 10:10 PM
The convergence of artificial intelligence (AI) and law enforcement opens up new possibilities for crime prevention and detection. The predictive capabilities of artificial intelligence are widely used in systems such as CrimeGPT (Crime Prediction Technology) to predict criminal activities. This article explores the potential of artificial intelligence in crime prediction, its current applications, the challenges it faces, and the possible ethical implications of the technology. Artificial Intelligence and Crime Prediction: The Basics CrimeGPT uses machine learning algorithms to analyze large data sets, identifying patterns that can predict where and when crimes are likely to occur. These data sets include historical crime statistics, demographic information, economic indicators, weather patterns, and more. By identifying trends that human analysts might miss, artificial intelligence can empower law enforcement agencies
 Improved detection algorithm: for target detection in high-resolution optical remote sensing images
Jun 06, 2024 pm 12:33 PM
Improved detection algorithm: for target detection in high-resolution optical remote sensing images
Jun 06, 2024 pm 12:33 PM
01 Outlook Summary Currently, it is difficult to achieve an appropriate balance between detection efficiency and detection results. We have developed an enhanced YOLOv5 algorithm for target detection in high-resolution optical remote sensing images, using multi-layer feature pyramids, multi-detection head strategies and hybrid attention modules to improve the effect of the target detection network in optical remote sensing images. According to the SIMD data set, the mAP of the new algorithm is 2.2% better than YOLOv5 and 8.48% better than YOLOX, achieving a better balance between detection results and speed. 02 Background & Motivation With the rapid development of remote sensing technology, high-resolution optical remote sensing images have been used to describe many objects on the earth’s surface, including aircraft, cars, buildings, etc. Object detection in the interpretation of remote sensing images
 Practice and reflections on Jiuzhang Yunji DataCanvas multi-modal large model platform
Oct 20, 2023 am 08:45 AM
Practice and reflections on Jiuzhang Yunji DataCanvas multi-modal large model platform
Oct 20, 2023 am 08:45 AM
1. The historical development of multi-modal large models. The photo above is the first artificial intelligence workshop held at Dartmouth College in the United States in 1956. This conference is also considered to have kicked off the development of artificial intelligence. Participants Mainly the pioneers of symbolic logic (except for the neurobiologist Peter Milner in the middle of the front row). However, this symbolic logic theory could not be realized for a long time, and even ushered in the first AI winter in the 1980s and 1990s. It was not until the recent implementation of large language models that we discovered that neural networks really carry this logical thinking. The work of neurobiologist Peter Milner inspired the subsequent development of artificial neural networks, and it was for this reason that he was invited to participate in this project.
 Application of algorithms in the construction of 58 portrait platform
May 09, 2024 am 09:01 AM
Application of algorithms in the construction of 58 portrait platform
May 09, 2024 am 09:01 AM
1. Background of the Construction of 58 Portraits Platform First of all, I would like to share with you the background of the construction of the 58 Portrait Platform. 1. The traditional thinking of the traditional profiling platform is no longer enough. Building a user profiling platform relies on data warehouse modeling capabilities to integrate data from multiple business lines to build accurate user portraits; it also requires data mining to understand user behavior, interests and needs, and provide algorithms. side capabilities; finally, it also needs to have data platform capabilities to efficiently store, query and share user profile data and provide profile services. The main difference between a self-built business profiling platform and a middle-office profiling platform is that the self-built profiling platform serves a single business line and can be customized on demand; the mid-office platform serves multiple business lines, has complex modeling, and provides more general capabilities. 2.58 User portraits of the background of Zhongtai portrait construction
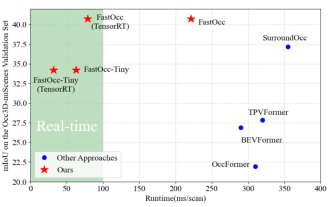 Add SOTA in real time and skyrocket! FastOcc: Faster inference and deployment-friendly Occ algorithm is here!
Mar 14, 2024 pm 11:50 PM
Add SOTA in real time and skyrocket! FastOcc: Faster inference and deployment-friendly Occ algorithm is here!
Mar 14, 2024 pm 11:50 PM
Written above & The author’s personal understanding is that in the autonomous driving system, the perception task is a crucial component of the entire autonomous driving system. The main goal of the perception task is to enable autonomous vehicles to understand and perceive surrounding environmental elements, such as vehicles driving on the road, pedestrians on the roadside, obstacles encountered during driving, traffic signs on the road, etc., thereby helping downstream modules Make correct and reasonable decisions and actions. A vehicle with self-driving capabilities is usually equipped with different types of information collection sensors, such as surround-view camera sensors, lidar sensors, millimeter-wave radar sensors, etc., to ensure that the self-driving vehicle can accurately perceive and understand surrounding environment elements. , enabling autonomous vehicles to make correct decisions during autonomous driving. Head
