
 Web Front-end
JS Tutorial
JavaScript image enlargement effect and code description_image special effects
Web Front-end
JS Tutorial
JavaScript image enlargement effect and code description_image special effects
JavaScript image enlargement effect and code description_image special effects

[Ctrl A Select all Note: If you need to introduce external Js, you need to refresh to execute
[Program description ]
is mainly a magnifier class, the main methods in it are:
init: running method
start: it is the event processing of the mouse moving into the div
move: it is the mouse moving in the div Event processing
end: Event processing after the mouse moves out
[Program introduction]
Main idea: When the mouse moves into the picture, the DIV of the enlargement layer appears, and then according to The mouse movement changes the top and left values of the image in the magnification layer, so that the two places maintain a consistent reality. The width and height values of the two images are set according to the proportion to produce an enlargement effect. Details below Explanation:
In the init method, it mainly deals with the size of the browsing box div layer, the size of the magnification box and the size of the enlarged image.
The width and height of the browsing box div are based on the size of the original image. /The ratio value can be obtained, see the code:
The code is as follows:
css(m.cont.getElementsByTagName('div')[0],{ //m.cont.getElementsByTagName('div')[0] is the browsing box
'display' : 'none', //Start setting Invisible
'width' : m.cont.clientWidth / m.scale - borderWid 'px', //The width/proportion value of the original image - the width of the border
'height' : m.cont.clientHeight / m.scale - borderWid 'px', ////Height/proportion value of the original image - width of border
'opacity' : 0.5 //Set transparency
})
The size of the magnification box is set to the same size as the original image. The code is as follows: The code is as follows:
css(m.mag,{
'display' : 'none',
'width' : m.cont.clientWidth 'px', //m.cont is the original image
'height' : m.cont.clientHeight 'px',
'position' : 'absolute',
'left' : m.cont.offsetLeft m.cont.offsetWidth 10 'px', / /The position of the magnification box is 10px far to the right of the original image
'top' : m.cont.offsetTop 'px'
})
The size of the enlarged image is, the original image Size*ratio value, the code is as follows:
The code is as follows:
css (m.img,{
'position' : 'absolute',
'width' : (m.cont.clientWidth * m.scale) 'px', //The width* ratio value of the original image
'height' : (m.cont.clientHeight * m.scale) 'px' //High* scale value of the original image
})
Since magnification is based on the ratio, careful calculation is required on the browsing box and the enlarged image. This is one of the main ideas of this program.
In the first program written, Onmouseover is omitted directly, because using onmousemove directly can satisfy the function. This time onmouseover is used to avoid encountering select during use. Under IE6, select cannot set the z-Index value, causing the sudden appearance of the magnification box. The select cannot be overridden. The details are discussed below.
In the move method, the most important thing is that if the mouse is moving, the browsing box will move with the mouse, and the enlarged image will also move, making the image enlarged. The displayed range is consistent with the original image position of the browsing box.
First let’s talk about the browsing box following the movement of the mouse. The main code is as follows:
top:pos.y - this.offsetTop - parseInt(this.getElementsByTagName('div')[0].style.height) / 2
left:pos.x - this.offsetLeft - parseInt(this.getElementsByTagName('div')[0].style.width) / 2
Because it is, bind to m.cont A certain event, so at this time this points to m.cont.
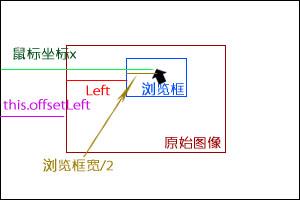
From the image, we can know that left=mouse x - this.offsetLeft - the width of the browsing box/2, so according to this geometric idea, we can get As for the code, the value of top is also obtained based on the same principle, so I won’t explain it in detail here.
The next step is to change the top and left values when the mouse is moving and the image is enlarged. The code is as follows:
css(magnifier.m.img,{
'top' : - (parseInt(this.getElementsByTagName('div')[0].style.top) * magnifier.m.scale) 'px',
'left' : - (parseInt(this.getElementsByTagName ('div')[0].style.left) * magnifier.m.scale) 'px'
})
The code is very clear, just click in the browser box Just add * proportion to the top and left values. The reason for adding the negative sign is that the default coordinate is (0,0), and during the movement process, the initial coordinate will only move in the negative direction.
In this method There are 2 things to note:
1.
this.getElementsByTagName('div')[0].style.display = '';
should be placed at the top of setting this.getElementsByTagName('div')[0] before left, the reason is that if display is none, its width and height cannot be obtained. If display = '' is placed after setting top and left, a strange phenomenon will occur. You can try it. This problem has been bothering me for a long time. It took me a long time and many attempts to find the problem here. The phenomenon is as follows:
2.
'top' : Math.min(Math.max(pos.y - this.offsetTop - parseInt(this.getElementsByTagName('div')[0] .style.height) / 2,0),this.clientHeight - this.getElementsByTagName('div')[0].offsetHeight) 'px';
Such a long code may be confusing Confused, I just used Math.max() and Math.min() to avoid using if statements. I was a little lazy just to ensure that the browsing box would not exceed the original image. It will be clear after a closer look. ^^
The end method is very clear, that is, the browsing box and the magnification box are hidden.
[Override select]
In order to cover the select under IE6, I added two methods, createIframe and removeIframe. They are in Create an iframe in the onmouseover event and destroy the iframe in onmouseout.
createIframe:function(elem){
var layer = document.createElement('iframe');
layer.tabIndex = '-1';
layer.src = 'javascript:false;';
elem.parentNode.appendChild(layer);
layer.style.width = elem.offsetWidth 'px';
layer.style.height = elem.offsetHeight 'px';
}
First, you need to use a negative tabIndex value to exclude the iframe from the tab sequence. Otherwise, the user may use the keyboard to navigate to it, which will cause chaos, so the tabIndex value needs to be set to negative. In addition, you need to Set src. This value is set to avoid problems on SSL pages. In IE, an iframe without src will automatically load about:blank. IE regards this as an unsafe page and will generate a warning dialog box. The content is "This page contains secure and non-secure content". In order to avoid this problem, you can set src to "javascript:false;". (This paragraph is excerpted from <
To avoid the confusion caused by iframe on the page, destroy the iframe in onmouseout without hiding it.
[Usage Instructions]
Due to time issues, it is not encapsulated very well, mainly in CSS Above, it’s best to set it up according to what I set up. It feels a bit messy. I hope everyone can understand it, and the modification will not be too difficult. Because I have a css() function, just set it up a little. Usage example:
magnifier.init({
cont : document. getElementById('magnifier'),
img : document.getElementById('magnifierImg'),
mag : document.getElementById('mag'),
scale : 3
});
cont is the abbreviation of container, which refers to the div that loads the original image.
img is the enlarged image.
mag is the abbreviation of magnifier, which refers to the magnification box.
scale is the proportion value, set The larger the value, the greater the magnification, but there is a problem here. If it is not divisible, some small white edges will be produced. I don’t know how to solve it at the moment
As for the browsing box and the original image, it is m.cont.getElementsByTagName( 'img')[0] and m.cont.getElementsByTagName('div')[0], so it is recommended to put only one div and img in the div that loads the image.
[Program code]
function getEventObject(W3CEvent) { //Event normalization function
return W3CEvent || window.event;
}
function getPointerPosition(e) { //Compatible The browser's mouse x, y gets the function
e = e || getEventObject(e);
var x = e.pageX || (e.clientX (document.documentElement.scrollLeft || document.body.scrollLeft ));
var y = e.pageY || (e.clientY (document.documentElement.scrollTop || document.body.scrollTop));
return { 'x':x,'y ':y };
}
function setOpacity(elem,level) { //Compatible browsers set transparent value
if(elem.filters) {
elem.style.filter = 'alpha(opacity=' level * 100 ')';
} else {
elem.style.opacity = level;
}
}
function css(elem,prop ) { //css setting function, which can easily set css values and is compatible with setting transparent values
for(var i in prop) {
if(i == 'opacity') {
setOpacity(elem, prop[i]);
} else {
elem.style[i] = prop[i];
}
}
return elem;
}
var magnifier = {
m : null,
init:function(magni){
var m = this.m = magni || {
cont : null, //Load original Image div
img : null, //Enlarged image
mag : null, //Magnification box
scale : 15 //Proportion value, the larger the value set, the greater the magnification, but here is a The problem is that if it is not divisible, some small white edges will be produced. I don’t know how to solve it at the moment
}
css(m.img,{
'position' : 'absolute',
'width' : (m.cont.clientWidth * m.scale) 'px', //Width*ratio value of the original image
'height' : (m.cont.clientHeight * m.scale) ' px' //high*scale value of original image
})
css(m.mag,{
'display' : 'none',
'width' : m.cont .clientWidth 'px', //m.cont is the original image, the same width as the original image
'height' : m.cont.clientHeight 'px',
'position' : 'absolute',
'left' : m.cont.offsetLeft m.cont.offsetWidth 10 'px', //The position of the magnification box is 10px far to the right of the original image
'top' : m.cont.offsetTop 'px'
})
var borderWid = m.cont.getElementsByTagName('div')[0].offsetWidth - m.cont.getElementsByTagName('div')[0].clientWidth; //Get the width of the border
css(m.cont.getElementsByTagName('div')[0],{ //m.cont.getElementsByTagName('div')[0] is the browsing box
'display' : 'none ', //Start setting to invisible
'width': m.cont.clientWidth / m.scale - borderWid 'px', //The width/proportion value of the original image - the width of the border
'height' : m.cont.clientHeight / m.scale - borderWid 'px', //The height/proportion value of the original image - the width of the border
'opacity' : 0.5 //Set transparency
})
m.img.src = m.cont.getElementsByTagName('img')[0].src; //Let the src value of the original image be given to the enlarged image
m.cont.style.cursor = 'crosshair';
m.cont.onmouseover = magnifier.start;
},
start:function(e){
if(document.all){ //Only executed under IE, mainly to avoid IE6's select from being unable to overwrite
magnifier.createIframe(magnifier.m.img);
}
this.onmousemove = magnifier.move; //this Point to m.cont
this.onmouseout = magnifier.end;
},
move:function(e){
var pos = getPointerPosition(e); //Event normalization
this.getElementsByTagName('div')[0].style.display = '';
css(this.getElementsByTagName('div')[0],{
'top' : Math.min(Math.max(pos.y - this.offsetTop - parseInt(this.getElementsByTagName('div')[0].style.height) / 2,0),this.clientHeight - this.getElementsByTagName(' div')[0].offsetHeight) 'px',
'left' : Math.min(Math.max(pos.x - this.offsetLeft - parseInt(this.getElementsByTagName('div')[0]. style.width) / 2,0),this.clientWidth - this.getElementsByTagName('div')[0].offsetWidth) 'px' //left=mouse x - this.offsetLeft - browsing box width/2,Math. max and Math.min prevent the browsing box from exceeding the image
})
magnifier.m.mag.style.display = '';
css(magnifier.m.img, {
'top' : - (parseInt(this.getElementsByTagName('div')[0].style.top) * magnifier.m.scale) 'px',
'left' : - (parseInt( this.getElementsByTagName('div')[0].style.left) * magnifier.m.scale) 'px'
})
},
end:function(e ){
this.getElementsByTagName('div')[0].style.display = 'none';
magnifier.removeIframe(magnifier.m.img); //Destroy iframe
magnifier .m.mag.style.display = 'none';
},
createIframe:function(elem){
var layer = document.createElement('iframe');
layer .tabIndex = '-1';
layer.src = 'javascript:false;';
elem.parentNode.appendChild(layer);
layer.style.width = elem.offsetWidth ' px';
layer.style.height = elem.offsetHeight 'px';
},
removeIframe:function(elem){
var layers = elem.parentNode.getElementsByTagName(' iframe');
while(layers.length >0){
layers[0].parentNode.removeChild(layers[0]);
}
}
}
File package download

Hot AI Tools

Undresser.AI Undress
AI-powered app for creating realistic nude photos

AI Clothes Remover
Online AI tool for removing clothes from photos.

Undress AI Tool
Undress images for free

Clothoff.io
AI clothes remover

AI Hentai Generator
Generate AI Hentai for free.

Hot Article
Hot Tools

Notepad++7.3.1
Easy-to-use and free code editor

SublimeText3 Chinese version
Chinese version, very easy to use

Zend Studio 13.0.1
Powerful PHP integrated development environment

Dreamweaver CS6
Visual web development tools

SublimeText3 Mac version
God-level code editing software (SublimeText3)
Hot Topics
 1377
1377
 52
52

 How to implement an online speech recognition system using WebSocket and JavaScript
Dec 17, 2023 pm 02:54 PM
How to implement an online speech recognition system using WebSocket and JavaScript
Dec 17, 2023 pm 02:54 PM
How to use WebSocket and JavaScript to implement an online speech recognition system Introduction: With the continuous development of technology, speech recognition technology has become an important part of the field of artificial intelligence. The online speech recognition system based on WebSocket and JavaScript has the characteristics of low latency, real-time and cross-platform, and has become a widely used solution. This article will introduce how to use WebSocket and JavaScript to implement an online speech recognition system.
 WebSocket and JavaScript: key technologies for implementing real-time monitoring systems
Dec 17, 2023 pm 05:30 PM
WebSocket and JavaScript: key technologies for implementing real-time monitoring systems
Dec 17, 2023 pm 05:30 PM
WebSocket and JavaScript: Key technologies for realizing real-time monitoring systems Introduction: With the rapid development of Internet technology, real-time monitoring systems have been widely used in various fields. One of the key technologies to achieve real-time monitoring is the combination of WebSocket and JavaScript. This article will introduce the application of WebSocket and JavaScript in real-time monitoring systems, give code examples, and explain their implementation principles in detail. 1. WebSocket technology
 How to use JavaScript and WebSocket to implement a real-time online ordering system
Dec 17, 2023 pm 12:09 PM
How to use JavaScript and WebSocket to implement a real-time online ordering system
Dec 17, 2023 pm 12:09 PM
Introduction to how to use JavaScript and WebSocket to implement a real-time online ordering system: With the popularity of the Internet and the advancement of technology, more and more restaurants have begun to provide online ordering services. In order to implement a real-time online ordering system, we can use JavaScript and WebSocket technology. WebSocket is a full-duplex communication protocol based on the TCP protocol, which can realize real-time two-way communication between the client and the server. In the real-time online ordering system, when the user selects dishes and places an order
 How to implement an online reservation system using WebSocket and JavaScript
Dec 17, 2023 am 09:39 AM
How to implement an online reservation system using WebSocket and JavaScript
Dec 17, 2023 am 09:39 AM
How to use WebSocket and JavaScript to implement an online reservation system. In today's digital era, more and more businesses and services need to provide online reservation functions. It is crucial to implement an efficient and real-time online reservation system. This article will introduce how to use WebSocket and JavaScript to implement an online reservation system, and provide specific code examples. 1. What is WebSocket? WebSocket is a full-duplex method on a single TCP connection.
 JavaScript and WebSocket: Building an efficient real-time weather forecasting system
Dec 17, 2023 pm 05:13 PM
JavaScript and WebSocket: Building an efficient real-time weather forecasting system
Dec 17, 2023 pm 05:13 PM
JavaScript and WebSocket: Building an efficient real-time weather forecast system Introduction: Today, the accuracy of weather forecasts is of great significance to daily life and decision-making. As technology develops, we can provide more accurate and reliable weather forecasts by obtaining weather data in real time. In this article, we will learn how to use JavaScript and WebSocket technology to build an efficient real-time weather forecast system. This article will demonstrate the implementation process through specific code examples. We
 How to use insertBefore in javascript
Nov 24, 2023 am 11:56 AM
How to use insertBefore in javascript
Nov 24, 2023 am 11:56 AM
Usage: In JavaScript, the insertBefore() method is used to insert a new node in the DOM tree. This method requires two parameters: the new node to be inserted and the reference node (that is, the node where the new node will be inserted).
 Simple JavaScript Tutorial: How to Get HTTP Status Code
Jan 05, 2024 pm 06:08 PM
Simple JavaScript Tutorial: How to Get HTTP Status Code
Jan 05, 2024 pm 06:08 PM
JavaScript tutorial: How to get HTTP status code, specific code examples are required. Preface: In web development, data interaction with the server is often involved. When communicating with the server, we often need to obtain the returned HTTP status code to determine whether the operation is successful, and perform corresponding processing based on different status codes. This article will teach you how to use JavaScript to obtain HTTP status codes and provide some practical code examples. Using XMLHttpRequest
 How to get HTTP status code in JavaScript the easy way
Jan 05, 2024 pm 01:37 PM
How to get HTTP status code in JavaScript the easy way
Jan 05, 2024 pm 01:37 PM
Introduction to the method of obtaining HTTP status code in JavaScript: In front-end development, we often need to deal with the interaction with the back-end interface, and HTTP status code is a very important part of it. Understanding and obtaining HTTP status codes helps us better handle the data returned by the interface. This article will introduce how to use JavaScript to obtain HTTP status codes and provide specific code examples. 1. What is HTTP status code? HTTP status code means that when the browser initiates a request to the server, the service
