

用 Pam_Abl 来保护 SSH 不被强行攻击

几乎所有的Unix和Linux服务器上都运行着SSH服务器,它使得管理员能够安全地远程访问服务器。然而不幸的是,最近针对SSH的服务的攻击非常常见。本文将讲述如何利用SSH即插授权模块(PAM)的pam_abl插件来保护运行着SSH服务的机器不被暴力攻击。
你自己可以下载并编译pam_abl模块,也可以下载并安装一个二进制的存档。如果想要编译该模块,你可以下载该源代码并搜集关于如何在pam_abl主页上编译它的信息。如果想要在Ubuntu Dapper或者Edgy服务器和PC上配置pam_abl,你可以把一个Roman Balitsky的定制存档加载到/etc/apt/sources.list文件:
<ccid_code>deb http://ubuntu.tolero.org/ dapper main (for Dapper)deb http://ubuntu.tolero.org/ edgy main (for Edgy)</ccid_code> Copy after login |
添加了安装源之后,更新列表,安装pam_abl,然后重启SSH服务器:
<ccid_code>sudo apt-get updatesudo apt-get install libpam-ablsudo /etc/init.d/ssh restart</ccid_code> Copy after login |
接下来,你可以在/etc/security/pam_abl.conf文件中配置pam_abl:
<ccid_code>#/etc/security/pam_abl.confhost_db=/var/lib/abl/hosts.dbhost_purge=2dhost_rule=*:3/1h,30/1duser_db=/var/lib/abl/users.dbuser_purge=2duser_rule=!root:3/1h,30/1d</ccid_code> Copy after login |
第二行和第五行显示了被封用户和主机的列表的存放位置。第三和第六行设置了封禁的刷新时间;本例中,系统将在2天内刷新封主机和封用户的规则。第四和第七行分别是主机和用户规则,我们来详细分析一下。
文件的配置方法如下:
<ccid_code>host/user_rule=<host>:<number of tries>/<ban time>,<number of tries>/<ban time></ban></number></ban></number></host></ccid_code> Copy after login |
因此第四行表示的意思是封禁最近一小时输入错误认证3次以上的所有主机,或者在最近一天内尝试的次数超过30次的所有主机。
第七行的规则表示除了用户根目录(“!root”指向的)的用户以外,封禁在1小时内三次输入错误的密码或者一天内错误尝试超过30次的所有用户。
还可以通过定义来保护选中的用户。假设你需要保护anze,dasa,kimzet和madison这几个用户,配置方法如下:
<ccid_code>anze|dasa|kimzet|madison:20/1h</ccid_code> Copy after login |
本句的意思是如果在1小时内这四个用户登录失败次数达到20次就将被封禁。
更多选项和触发设置请参考pam_abl说明主页。
测试
如果想要测试你的设置,你可以在目标上打开一个终端,察看/var/log/auth.log文件,尝试3次用错误的密码登录服务器,看看pam_abl插件是否封禁你。如果被封了,以madison用户为例,登录文件如下:
<ccid_code>pam_abl[6248]: Blocking access from sataras.example.com to service ssh, user madison</ccid_code> Copy after login |
这表示目标主机上madison用户被封禁2天。
你可以用如下pam_abl语句随时查看被封禁的用户和主机:
<ccid_code>~$ sudo pam_ablFailed users:madison (3)Blocking users [!root]Failed hosts:sataras.example.com (3)Blocking users [*]</ccid_code> Copy after login |
结论
你可以用很多方法保护机器不受黑客攻击,包括改变SSH监听端口,用iptables和TCP wrappers定义允许连接到SSH服务的主机等等。使用pam_abl模块可保护SSH服务器不被暴力攻击;但你配置该模块时得小心,免得黑客把你自己关在自己服务器外。

Hot AI Tools

Undresser.AI Undress
AI-powered app for creating realistic nude photos

AI Clothes Remover
Online AI tool for removing clothes from photos.

Undress AI Tool
Undress images for free

Clothoff.io
AI clothes remover

AI Hentai Generator
Generate AI Hentai for free.

Hot Article
Hot Tools

Notepad++7.3.1
Easy-to-use and free code editor

SublimeText3 Chinese version
Chinese version, very easy to use

Zend Studio 13.0.1
Powerful PHP integrated development environment

Dreamweaver CS6
Visual web development tools

SublimeText3 Mac version
God-level code editing software (SublimeText3)
Hot Topics
 1378
1378
 52
52

![Telnet in Windows 11 Complete Tutorial [Installation/Enablement and Troubleshooting]](https://img.php.cn/upload/article/000/000/164/168476253791019.jpg?x-oss-process=image/resize,m_fill,h_207,w_330) Telnet in Windows 11 Complete Tutorial [Installation/Enablement and Troubleshooting]
May 22, 2023 pm 09:35 PM
Telnet in Windows 11 Complete Tutorial [Installation/Enablement and Troubleshooting]
May 22, 2023 pm 09:35 PM
<p>Telnet is the abbreviation of "Terminal Network". It is a protocol that users can use to connect one computer to a local computer. </p><p>Here, the local computer refers to the device that initiates the connection, and the computer connected to the local computer is called the remote computer. </p><p>Telnet runs on a client/server principal, and although it is outdated, it is still used by many people in 2022. Many people have already switched to Windows 11 operating system, which is the latest operating system offered by Microsoft. &
 How to SSH from iPad to Mac
Apr 14, 2023 pm 12:22 PM
How to SSH from iPad to Mac
Apr 14, 2023 pm 12:22 PM
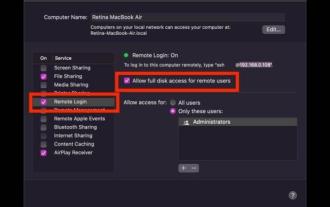
How to SSH from iPad to Mac This is a two-part walkthrough. First, you'll enable the SSH server on your Mac, and then you'll use the ssh client app to connect to it from your iPad. On Mac, start an SSH server You can enable an SSH server on your Mac by turning on a feature called Remote Login. Go to Apple Menu > System Preferences > Sharing > Enable "Remote Login" and check the "Allow remote users full access to disk" box Your Mac is now an SSH server, providing you with a shell to connect from your iPad. Notice
 Python server programming: Using Paramiko to implement SSH remote operation
Jun 18, 2023 pm 01:10 PM
Python server programming: Using Paramiko to implement SSH remote operation
Jun 18, 2023 pm 01:10 PM
With the development of cloud computing and the Internet of Things, remote operation of servers has become increasingly important. In Python, we can use the Paramiko module to easily implement SSH remote operations. In this article, we will introduce the basic usage of Paramiko and how to use Paramiko in Python to remotely manage servers. What is Paramiko Paramiko is a Python module for SSHv1 and SSHv2 that can be used to connect and control SSH clients
 OpenSSH on Windows: Installation, Configuration, and Usage Guide
Mar 08, 2024 am 09:31 AM
OpenSSH on Windows: Installation, Configuration, and Usage Guide
Mar 08, 2024 am 09:31 AM
For most Windows users, Remote Desktop Protocol (RDP) has always been the first choice for remote management because it provides a friendly graphical interface. However, for system administrators who require more granular control, SSH may better suit their needs. Through SSH, administrators can interact with remote devices through the command line, which can make management work more efficient. The advantage of SSH is its security and flexibility, making it easier for administrators to perform remote management and maintenance work, especially when dealing with a large number of devices or performing automated tasks. So while RDP excels in terms of user-friendliness, for system administrators, SSH is superior in terms of power and control. Previously, Windows users needed to borrow
 How to connect to Mysql database remotely using Python based on ssh
May 27, 2023 pm 04:07 PM
How to connect to Mysql database remotely using Python based on ssh
May 27, 2023 pm 04:07 PM
Background: If you need to access the Mysql database of a remote server, but for the security period of the Mysql database, the security measures are set to only allow local connections (that is, you need to log in to the server to use it), and other remote connections cannot be accessed directly, and The corresponding port has also been modified, so you need to connect to the database based on ssh. Connecting to the database in this way is the same as the interface in Navicat based on ssh connection. Navicat connects to the database installation support library. If you want to connect to Mysql, you first need to install pymysqlpipinstallpymysql to install the ssh-based library sshtunnelpipinstallsshtunnel#
 Linux SSH login mutual trust configuration
Feb 19, 2024 pm 07:48 PM
Linux SSH login mutual trust configuration
Feb 19, 2024 pm 07:48 PM
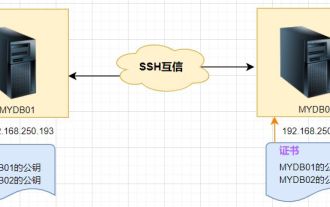
1. The purpose of ssh mutual trust 1. SSH mutual trust is required when building a cluster, which is conducive to convenient operation on another node. 2. When using scp remote copy operation, you need to enter the user name and password of the target server. At this time, you can configure SSH mutual trust between Linux servers, so that you can log in without a password when operating between multiple Linux servers. 2. The principle of ssh mutual trust configuration. In short, the server stores the certificate of the target host so that authentication can be completed automatically without entering a password. 3. SSH mutual trust configuration steps 1. Each node generates its own public key and private key pair. 2. Send your public key file to the other party. 3. Verify whether the mutual trust configuration is successful. 4. Configure ssh mutual trust here with MYDB01 and
 Does linux come with ssh?
Apr 06, 2023 pm 03:55 PM
Does linux come with ssh?
Apr 06, 2023 pm 03:55 PM
Linux comes with ssh. The Linux system will come with its own ssh software. The default is the OpenSSH related software package, and the ssh service is added to start automatically at boot. You can use the "ssh -V" command to view the installed ssh version information. Execute the "systemctl start sshd" command to start the sshd service. The default port is port 22.
 CentOS 7.9 installation and centos 7.9 installation ssh
Feb 13, 2024 pm 10:30 PM
CentOS 7.9 installation and centos 7.9 installation ssh
Feb 13, 2024 pm 10:30 PM
CentOS7.9 is a very commonly used operating system version when building servers or system management. This article will provide you with detailed steps and instructions for installing CentOS7.9 and installing SSH. CentOS7.9 is a free and open source Linux operating system. It is a binary compatible version based on Red Hat Enterprise Linux (RHEL). The following are the steps to install CentOS7.9: 1. You need to download the ISO image file of CentOS7.9. You can download it from Download the latest CentOS7.9 ISO image file from the CentOS official website. 2. Create a new virtual machine or physical machine on your computer and install
