

一个分页导航类

分页
// +----------------------------------------------------------------------+
// | PHP Version 4 |
// +----------------------------------------------------------------------+
// | Copyright (c) 1997-2002 The PHP Group |
// +----------------------------------------------------------------------+
// | This source file is subject to version 2.02 of the PHP license, |
// | that is bundled with this package in the file LICENSE, and is |
// | available at through the world-wide-web at |
// | http://www.php.net/license/2_02.txt. |
// | If you did not receive a copy of the PHP license and are unable to |
// | obtain it through the world-wide-web, please send a note to |
// | license@php.net so we can mail you a copy immediately. |
// +----------------------------------------------------------------------+
// | Authors: Richard Heyes
// +----------------------------------------------------------------------+
/**
* Pager class
*
* Handles paging a set of data. For usage see the example.php provided.
*
*/
class Pager {
/**
* Current page
* @var integer
*/
var $_currentPage;
/**
* Items per page
* @var integer
*/
var $_perPage;
/**
* Total number of pages
* @var integer
*/
var $_totalPages;
/**
* Item data. Numerically indexed array...
* @var array
*/
var $_itemData;
/**
* Total number of items in the data
* @var integer
*/
var $_totalItems;
/**
* Page data generated by this class
* @var array
*/
var $_pageData;
/**
* Constructor
*
* Sets up the object and calculates the total number of items.
*
* @param $params An associative array of parameters This can contain:
* currentPage Current Page number (optional)
* perPage Items per page (optional)
* itemData Data to page
*/
function pager($params = array())
{
global $HTTP_GET_VARS;
$this->_currentPage = max((int)@$HTTP_GET_VARS['pageID'], 1);
$this->_perPage = 8;
$this->_itemData = array();
foreach ($params as $name => $value) {
$this->{'_' . $name} = $value;
}
$this->_totalItems = count($this->_itemData);
}
/**
* Returns an array of current pages data
*
* @param $pageID Desired page ID (optional)
* @return array Page data
*/
function getPageData($pageID = null)
{
if (isset($pageID)) {
if (!empty($this->_pageData[$pageID])) {
return $this->_pageData[$pageID];
} else {
return FALSE;
}
}
if (!isset($this->_pageData)) {
$this->_generatePageData();
}
return $this->getPageData($this->_currentPage);
}
/**
* Returns pageID for given offset
*
* @param $index Offset to get pageID for
* @return int PageID for given offset
*/
function getPageIdByOffset($index)
{
if (!isset($this->_pageData)) {
$this->_generatePageData();
}
if (($index % $this->_perPage) > 0) {
$pageID = ceil((float)$index / (float)$this->_perPage);
} else {
$pageID = $index / $this->_perPage;
}
return $pageID;
}
/**
* Returns offsets for given pageID. Eg, if you
* pass it pageID one and your perPage limit is 10
* it will return you 1 and 10. PageID of 2 would
* give you 11 and 20.
*
* @params pageID PageID to get offsets for
* @return array First and last offsets
*/
function getOffsetByPageId($pageid = null)
{
$pageid = isset($pageid) ? $pageid : $this->_currentPage;
if (!isset($this->_pageData)) {
$this->_generatePageData();
}
if (isset($this->_pageData[$pageid])) {
return array(($this->_perPage * ($pageid - 1)) + 1, min($this->_totalItems, $this->_perPage * $pageid));
} else {
return array(0,0);
}
}
/**
* Returns back/next and page links
*
* @param $back_html HTML to put inside the back link
* @param $next_html HTML to put inside the next link
* @return array Back/pages/next links
*/
function getLinks($back_html = '>')
{
$url = $this->_getLinksUrl();
$back = $this->_getBackLink($url, $back_html);
$pages = $this->_getPageLinks($url);
$next = $this->_getNextLink($url, $next_html);
return array($back, $pages, $next, 'back' => $back, 'pages' => $pages, 'next' => $next);
}
/**
* Returns number of pages
*
* @return int Number of pages
*/
function numPages()
{
return $this->_totalPages;
}
/**
* Returns whether current page is first page
*
* @return bool First page or not
*/
function isFirstPage()
{
return ($this->_currentPage == 1);
}
/**
* Returns whether current page is last page
*
* @return bool Last page or not
*/
function isLastPage()
{
return ($this->_currentPage == $this->_totalPages);
}
/**
* Returns whether last page is complete
*
* @return bool Last age complete or not
*/
function isLastPageComplete()
{
return !($this->_totalItems % $this->_perPage);
}
/**
* Calculates all page data
*/
function _generatePageData()
{
$this->_totalItems = count($this->_itemData);
$this->_totalPages = ceil((float)$this->_totalItems / (float)$this->_perPage);
$i = 1;
if (!empty($this->_itemData)) {
foreach ($this->_itemData as $value) {
$this->_pageData[$i][] = $value;
if (count($this->_pageData[$i]) >= $this->_perPage) {
$i++;
}
}
} else {
$this->_pageData = array();
}
}
/**
* Returns the correct link for the back/pages/next links
*
* @return string Url
*/
function _getLinksUrl()
{
global $HTTP_SERVER_VARS;
// Sort out query string to prevent messy urls
$querystring = array();
if (!empty($HTTP_SERVER_VARS['QUERY_STRING'])) {
$qs = explode('&', $HTTP_SERVER_VARS['QUERY_STRING']);
for ($i = 0, $cnt = count($qs); $i list($name, $value) = explode('=', $qs[$i]);
if ($name != 'pageID') {
$qs[$name] = $value;
}
unset($qs[$i]);
}
}
if(is_array($qs)){
foreach ($qs as $name => $value) {
$querystring[] = $name . '=' . $value;
}
}
return $HTTP_SERVER_VARS['SCRIPT_NAME'] . '?' . implode('&', $querystring) . (!empty($querystring) ? '&' : '') . 'pageID=';
}
/**
* Returns back link
*
* @param $url URL to use in the link
* @param $link HTML to use as the link
* @return string The link
*/
function _getBackLink($url, $link = ' {
// Back link
if ($this->_currentPage > 1) {
$back = '' . $link . '';
} else {
$back = '';
}
return $back;
}
/**
* Returns pages link
*
* @param $url URL to use in the link
* @return string Links
*/
function _getPageLinks($url)
{
// Create the range
$params['itemData'] = range(1, max(1, $this->_totalPages));
$pager =& new Pager($params);
$links = $pager->getPageData($pager->getPageIdByOffset($this->_currentPage));
for ($i=0; $i
$links[$i] = '' . $links[$i] . '';
}
}
return implode(' ', $links);
}
/**
* Returns next link
*
* @param $url URL to use in the link
* @param $link HTML to use as the link
* @return string The link
*/
function _getNextLink($url, $link = 'Next >>')
{
if ($this->_currentPage _totalPages) {
$next = '' . $link . '';
} else {
$next = '';
}
return $next;
}
}
?>

Hot AI Tools

Undresser.AI Undress
AI-powered app for creating realistic nude photos

AI Clothes Remover
Online AI tool for removing clothes from photos.

Undress AI Tool
Undress images for free

Clothoff.io
AI clothes remover

AI Hentai Generator
Generate AI Hentai for free.

Hot Article
Hot Tools

Notepad++7.3.1
Easy-to-use and free code editor

SublimeText3 Chinese version
Chinese version, very easy to use

Zend Studio 13.0.1
Powerful PHP integrated development environment

Dreamweaver CS6
Visual web development tools

SublimeText3 Mac version
God-level code editing software (SublimeText3)
Hot Topics


 Solution: Your organization requires you to change your PIN
Oct 04, 2023 pm 05:45 PM
Solution: Your organization requires you to change your PIN
Oct 04, 2023 pm 05:45 PM
The message "Your organization has asked you to change your PIN" will appear on the login screen. This happens when the PIN expiration limit is reached on a computer using organization-based account settings, where they have control over personal devices. However, if you set up Windows using a personal account, the error message should ideally not appear. Although this is not always the case. Most users who encounter errors report using their personal accounts. Why does my organization ask me to change my PIN on Windows 11? It's possible that your account is associated with an organization, and your primary approach should be to verify this. Contacting your domain administrator can help! Additionally, misconfigured local policy settings or incorrect registry keys can cause errors. Right now
 How to adjust window border settings on Windows 11: Change color and size
Sep 22, 2023 am 11:37 AM
How to adjust window border settings on Windows 11: Change color and size
Sep 22, 2023 am 11:37 AM
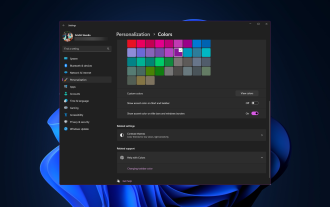
Windows 11 brings fresh and elegant design to the forefront; the modern interface allows you to personalize and change the finest details, such as window borders. In this guide, we'll discuss step-by-step instructions to help you create an environment that reflects your style in the Windows operating system. How to change window border settings? Press + to open the Settings app. WindowsI go to Personalization and click Color Settings. Color Change Window Borders Settings Window 11" Width="643" Height="500" > Find the Show accent color on title bar and window borders option, and toggle the switch next to it. To display accent colors on the Start menu and taskbar To display the theme color on the Start menu and taskbar, turn on Show theme on the Start menu and taskbar
 How to change title bar color on Windows 11?
Sep 14, 2023 pm 03:33 PM
How to change title bar color on Windows 11?
Sep 14, 2023 pm 03:33 PM
By default, the title bar color on Windows 11 depends on the dark/light theme you choose. However, you can change it to any color you want. In this guide, we'll discuss step-by-step instructions for three ways to change it and personalize your desktop experience to make it visually appealing. Is it possible to change the title bar color of active and inactive windows? Yes, you can change the title bar color of active windows using the Settings app, or you can change the title bar color of inactive windows using Registry Editor. To learn these steps, go to the next section. How to change title bar color in Windows 11? 1. Using the Settings app press + to open the settings window. WindowsI go to "Personalization" and then
 OOBELANGUAGE Error Problems in Windows 11/10 Repair
Jul 16, 2023 pm 03:29 PM
OOBELANGUAGE Error Problems in Windows 11/10 Repair
Jul 16, 2023 pm 03:29 PM
Do you see "A problem occurred" along with the "OOBELANGUAGE" statement on the Windows Installer page? The installation of Windows sometimes stops due to such errors. OOBE means out-of-the-box experience. As the error message indicates, this is an issue related to OOBE language selection. There is nothing to worry about, you can solve this problem with nifty registry editing from the OOBE screen itself. Quick Fix – 1. Click the “Retry” button at the bottom of the OOBE app. This will continue the process without further hiccups. 2. Use the power button to force shut down the system. After the system restarts, OOBE should continue. 3. Disconnect the system from the Internet. Complete all aspects of OOBE in offline mode
 How to enable or disable taskbar thumbnail previews on Windows 11
Sep 15, 2023 pm 03:57 PM
How to enable or disable taskbar thumbnail previews on Windows 11
Sep 15, 2023 pm 03:57 PM
Taskbar thumbnails can be fun, but they can also be distracting or annoying. Considering how often you hover over this area, you may have inadvertently closed important windows a few times. Another disadvantage is that it uses more system resources, so if you've been looking for a way to be more resource efficient, we'll show you how to disable it. However, if your hardware specs can handle it and you like the preview, you can enable it. How to enable taskbar thumbnail preview in Windows 11? 1. Using the Settings app tap the key and click Settings. Windows click System and select About. Click Advanced system settings. Navigate to the Advanced tab and select Settings under Performance. Select "Visual Effects"
 What are the differences between Huawei GT3 Pro and GT4?
Dec 29, 2023 pm 02:27 PM
What are the differences between Huawei GT3 Pro and GT4?
Dec 29, 2023 pm 02:27 PM
Many users will choose the Huawei brand when choosing smart watches. Among them, Huawei GT3pro and GT4 are very popular choices. Many users are curious about the difference between Huawei GT3pro and GT4. Let’s introduce the two to you. . What are the differences between Huawei GT3pro and GT4? 1. Appearance GT4: 46mm and 41mm, the material is glass mirror + stainless steel body + high-resolution fiber back shell. GT3pro: 46.6mm and 42.9mm, the material is sapphire glass + titanium body/ceramic body + ceramic back shell 2. Healthy GT4: Using the latest Huawei Truseen5.5+ algorithm, the results will be more accurate. GT3pro: Added ECG electrocardiogram and blood vessel and safety
 Display scaling guide on Windows 11
Sep 19, 2023 pm 06:45 PM
Display scaling guide on Windows 11
Sep 19, 2023 pm 06:45 PM
We all have different preferences when it comes to display scaling on Windows 11. Some people like big icons, some like small icons. However, we all agree that having the right scaling is important. Poor font scaling or over-scaling of images can be a real productivity killer when working, so you need to know how to customize it to get the most out of your system's capabilities. Advantages of Custom Zoom: This is a useful feature for people who have difficulty reading text on the screen. It helps you see more on the screen at one time. You can create custom extension profiles that apply only to certain monitors and applications. Can help improve the performance of low-end hardware. It gives you more control over what's on your screen. How to use Windows 11
 10 Ways to Adjust Brightness on Windows 11
Dec 18, 2023 pm 02:21 PM
10 Ways to Adjust Brightness on Windows 11
Dec 18, 2023 pm 02:21 PM
Screen brightness is an integral part of using modern computing devices, especially when you look at the screen for long periods of time. It helps you reduce eye strain, improve legibility, and view content easily and efficiently. However, depending on your settings, it can sometimes be difficult to manage brightness, especially on Windows 11 with the new UI changes. If you're having trouble adjusting brightness, here are all the ways to manage brightness on Windows 11. How to Change Brightness on Windows 11 [10 Ways Explained] Single monitor users can use the following methods to adjust brightness on Windows 11. This includes desktop systems using a single monitor as well as laptops. let's start. Method 1: Use the Action Center The Action Center is accessible
