1. Install bower front-end package manager
Bower is a front-end package manager that facilitates the installation, update, and uninstallation of javascript, css, html and other framework resources, and resolves interdependencies between them.
npm install -g bower // 安装
bower help // 查看帮助
YY here:
npm is the package manager of node.js. Through it, express, express-generator, supervisor, bower and other software are installed. Bower is the software package of the front-end framework, and some dependent packages such as bootstrap and jquery are installed. Suddenly I found that the bags were intertwined, and I gradually became drunk. The water is really too deep, and it is not easy to simply learn web development. It feels a little sad. However, there are still eggs, and my heart yearns for it, as always.
2. Install bootstrap and jquery
Of course, you can also directly download bootstrap and jquery and put them into the project document. You don’t need to install any package manager. You can just solve the simple dependencies yourself. But isn’t it all for building a website quickly? Just install a package. The manager automatically resolves dependencies. And when you publish your own project, you don't need to publish all the framework packages together, but just put the relevant json files into the project. Others can see your dependencies at a glance, which makes it easy to build quickly.
With bower, just bower install bootstrap. Because of dependencies, it will automatically install jquery for you, and you’re done.
3. Introduce bootstrap and jquery into the template engine
After bootstrap and jquery are installed or have been placed in the project, the next step is to reference it in the file and create a head.jade file in the views folder. As the name suggests, it is to place some of the head tags in HTML. content. The following code:
link(href='/bootstrap/dist/css/bootstrap.min.css',rel='stylesheet')
script(src='/jquery/dist/jquery.min.js')
script(src='/bootstrap/dist/js/bootstrap.min.js')
After creating head.jade, add include head.jade to all required pages and include it in the page.
4. Use template layout
Since basically all pages need to include head.jade, you can’t write include head.jade on every page, so the layout document layout.jade will take effect. Create a separate layout.jade file and write some common code into it.
doctype html
html
 head
 title= title
 link(rel='stylesheet', href='/stylesheets/style.css')
 include ./includes/head
 body
 include ./includes/header
 h1= title
 block content
As above, some independent modules can still be loaded through the include statement. The last sentence, block content, is the key to the template layout, which means inserting the page here in the template, which is the difference in applying this template layout.
Then add extent layout to the page where this template layout is applied. As follows:
extends ../layout
block content
p Welcome to #{title}Note: Try to use relative paths for files used in extends template files and include codes.
5. Start editing page
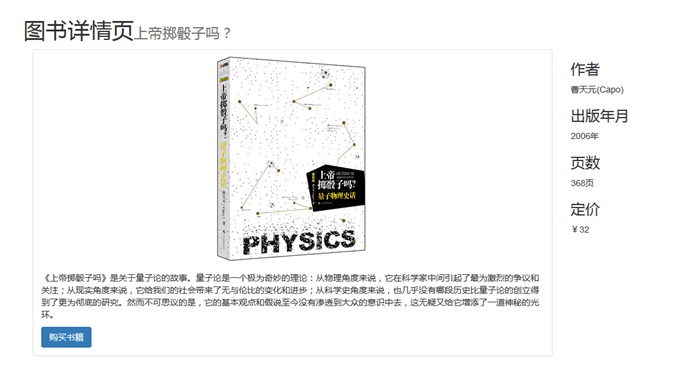
The preparations are almost done, so the next step is to use jade syntax and bootstrap style to edit the page. Let’s briefly write down the homepage (index) and detail page (detail).

// index.jade
extends ../layout

block content
 .container
 .row
  h1= title
  small 图书列表
  each item in books
  .col-md-3.col-xm-6
   .thumbnail.text-center
   a(href='/books/#{item._id}')
    img(src='#{item.poster}',alt='#{item.title}')
   .caption
    h3= item.title
    .btn-group
    a.btn.btn-primary(href='/books/#{item._id}') 查看详情
    a.btn.btn-primary(href='#{item.buyUrl}') 购买书籍

// detail.jade
extends ../layout

block content
 .container
 .row
  h1= title
  small= book_title
  .col-md-9.col-sm-9
  .thumbnail
   img(src='#{book_poster}')
   .caption
   p= book_info
   a.btn.btn-primary(href='#{book_buyUrl}') 购买书籍
  .col-md-3.col-sm-3
  h3 作者
  p #{book_author}
  h3 出版年月
  p #{book_year}年
  h3 页数
  p #{book_pages}页
  h3 定价
  p ¥#{book_price}
Friends who want to know more about Bootstrap can click "bootstrap Learning Tutorial" for in-depth study.
The above two pages are the most basic layouts in bootstrap. This article will introduce them to you. Interested friends can continue to study and discuss together.
 Advantages and Disadvantages of Free Overseas Website Servers
 What should I do if the secondary web page cannot be opened?
 app testing tools
 How to configure default gateway
 what is ed
 Website source code
 Detailed explanation of java displacement operator
 How to use mysql cursor
 What does the other party show after being blocked on WeChat?


