

ExtJs study notes Hello World!_extjs

I recently learned ajax and came into contact with the powerful framework of Extjs. I want to use my study notes to finally enable everyone to get started using Ext in projects. First, I will write some basic articles for getting started with Ext. It is important to lay a good foundation.
After understanding the basics, you may use Ext ajax to develop a simple small project. I will explain the project development process step by step. I hope it can bring benefits to everyone! Because I am also learning this framework, please give me any suggestions on the article, which may help me learn more. 
Seeing this picture, you may think it is some software, or Flash, Flex, silverlight, etc., but this is implemented by javascript Css. 
Looking at this style and effect, if you add it to your own project, the user’s visual and operational experience should be very pleasant. There are more special effects so I won’t take screenshots one by one.
Now let’s talk about this component. ExtJs is a good Ajax framework, written in javascript. You can see the effect above. We can apply ExtJs to any web development language. Its client effect is very powerful. At the same time, Ext also provides a mechanism for interacting with the server, which is very convenient to use. The article on the interaction between Ext and the server will be written later.
We need to obtain this framework before applying it. You can download it from the official website at http://www.php.cn/, which is open source. After downloading and decompressing, you will get the following directory. 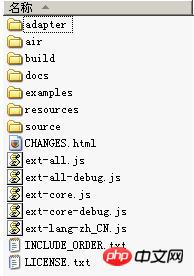
Adapter: Responsible for mapping the third-party underlying libraries provided (including those provided by Ext) to the underlying libraries supported by Ext.
build: all compressed Ext source code (categorized storage)
docs: API help documentation
examples: some examples of effects made by Extjs
resources: Ext UI resource file directory, css, pictures are all there This
source: All source codes of uncompressed Ext
ext-all.js: All source codes of compressed Ext, key files, more than 500K
ext-all-debug.js: All source codes of uncompressed Ext (for debugging)
ext-core.js: core components, including all classes under source/core
ext-core-debug.js: uncompressed core components
Next will be a For testing in purely static html pages, if you want to use ExtJs, you first need to import 3 script files and a style sheet
 <link rel="stylesheet" type="text/css" href="extjs/resources/css/ext-all.css" /> <script src="extjs/ext-base.js" type="text/javascript">script> <script src="extjs/ext-all.js" type="text/javascript">script> <script src="extjs/ext-lang-zh_CN.js" type="text/javascript">script>
这里要说明一下,在Extjs文件加载完毕后,会执行Ext.onReady中指定的函数,我们可以用简单的代码做一个测试。
Two writing methods can achieve the same effect
Note that Ext.onReady(start) does not need to add ().
Ext.MessageBox.alert("ok"," Extjs framework has been loaded! "); is used to output a dialog box.
Ext.MessageBox.alert('title','pop-up content'); It can also be written as Ext.Msg.alert('','');
The operation effect is as follows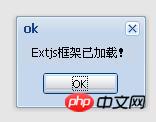
An alert dialog box can be easily implemented using Extjs. prompt('',''); also has relative application in Extjs.
function Prompt(){
Ext.MessageBox.prompt(
"Input",
"input a number:",
function(button,text){
if(button=="ok")
Ext.MessageBox.alert("number","the number is " text);
else
Ext.MessageBox.alert("sorry", "the number is null.");
}
);
}
This syntax is a little troublesome, Ext.MessageBox.prompt('Title', 'Description:', executed after completion function); The executed function requires two parameters, button and text. button is used to determine whether the user has selected the Cancel or OK option. OK means the value is 'ok'. text is the input text. 
I only give two small examples for explanation, and the usages such as confim are similar.
There is also a Window box that is more commonly used and easier to understand.
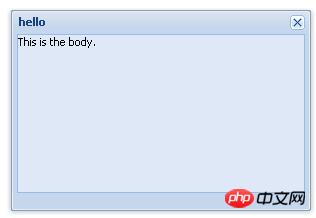
This beautiful frame can be dragged and clicked to close.
Usage is as follows:
function Window(){
var win=new Ext.Window({title:"hello",width:300,height:200,html:'This is the body.'});
win .show();
}
Here you need to create an Ext.Window object and call the show method to display it.
Ext.Window can pass in many parameters in the constructor. Here only the title, width, height and content displayed in the body area are used.
new Ext.Window({title:"",width:300,height:200,html:'This is the body.'});
title:"" Set title
width:300 width
height:200 height
html:'xxxx' can place any html code
The following is excerpted from the information:
Element: The core of Ext. Most JavaScript operations need to first obtain a reference to an element on the page. Good Let you do something substantial. The traditional JavaScript method is to obtain the Dom node through the ID:
var myp = document.getElementById('myp');
This is no problem, but it only returns an object (DOM node), which is not easy to use. Not very practical and convenient. In order to do something with that node, you will have to write a lot of code by hand; in addition, the differences between different types of browsers are really difficult to deal with.
Enter the Ext.element object. Elements are indeed the heart of Ext - whether you are accessing elements or completing some other action, you must involve it. Element's API is the basis of the entire Ext library. If you don't have much time and just want to know one or two classes in Ext, Element must be your first choice!
The corresponding code to get an Ext Element by ID is as follows (the homepage ExtStart.htm contains a p with the ID "myp", then add the following statements to ExtStart.js): The corresponding code to get an Ext Element by ID looks like this (the starter page ExtStart.html contains a p with the id "myp," so go ahead and add this code to ExtStart.js):
Ext.onReady(function() {
var myp = Ext .get('myp');
});
Looking back at the Element object, did you find anything interesting?
Element contains common DOM methods and attributes, providing a fast, unified, cross-browser interface (if you use Element.dom, you can directly access the underlying DOM nodes.);
Element. The get() method provides a built-in cache (Cache), which has great advantages in efficiency when accessing the same object multiple times;
Built-in commonly used DOM node actions, and cross-browser positioning, size, animation, drag and drop Etc. (add/remove CSS classes, add/remove event handlers, positioning, resize, animation, drag and drop).
This means you can do a variety of things with a small amount of code, here is just a simple example (the full list is in the Element API documentation).
Continue in ExtStart.js and add the following to the position where we just obtained myp:
myp.highlight(); //The yellow highlight then fades away
myp.addClass('red') ; // Add a custom CSS class (defined in ExtStart.css)
myp.center(); // Center the element in the view
myp.setOpacity(.25); // Make the element translucent
Get multiple DOM nodes. Normally, if you want to get multiple DOM nodes, it is difficult to obtain them by ID. It may be because the ID is not set, or you don't know the ID, or there are too many elements referenced directly by ID. In this case, you would not use the ID as the basis for retrieving the element, and might use an attribute or CSS Classname instead. Based on the above reasons, Ext introduces an extremely powerful Dom Selector library called DomQuery.
DomQuery can be used as a separate library, but it is often used in Ext. You can get multiple elements in the context (Context) and then call it through the Element interface. What is gratifying is that the Element object itself has the Element.select method to implement the query, that is, DomQuery is called internally to select the element. In this simple example, ExtStart.htm contains several paragraphs (
tags), none of which has an ID. If you want to easily obtain each paragraph immediately through one operation and perform their actions collectively, you can do this:
// Highlight each paragraph
Ext.select('p').highlight();
The convenience of Element.select in this example is obvious. It returns a composite element, each element accessible through the Element interface. The advantage of this is that you don't need to loop and access each element separately.
DomQuery's selection parameters can be a long array, including W3C CSS3 Dom selectors, basic XPatch, HTML attributes and more. Please refer to the DomQuery API documentation for details on this powerful library.
Responding to events Up to this example, the code we have written is placed in onReady, that is, it will always be executed immediately after the page is loaded, and the function is relatively simple - in this way, you will know how to respond to an action or Events to perform what you want to do, the approach is to first assign a function, and then define an event handler event handler to respond. We start with this simple example, open ExtStart.js and edit the following code:
Ext.onReady(function() {
Ext.get('myButton').on('click', function() {
alert("You clicked the button");
});
});
The code will still be executed after loading the page, but the important difference is that the code containing alert() The function is defined, but it will not be executed immediately. It is assigned to the click event of the button. To explain in plain text, it is: get a reference to the element with the ID 'myDottom', monitor any click on this element, and assign a function to prepare for any click on the element.
Generally speaking, Element.select can also do the same thing, that is, it can be used to obtain a set of elements. The next example demonstrates that after a certain paragraph in the page is clicked, a pop-up window will appear:
Ext.onReady(function() {
Ext.select('p').on('click', function() {
alert("You clicked a paragraph;");
});
});
In these two examples, the event processing function is a few simple sentences. There is no name for the function. This type of function is called an "anonymous function", which is a function without a name. You can also assign a named event handler, which is useful for code reuse or multiple events. The next example is equivalent to the previous one:
Ext.onReady(function() {
var paragraphClicked = function() {
alert("You clicked a paragraph;");
}
Ext.select('p').on('click', paragraphClicked);
});
So far, we already know how to perform an action. But when an event is triggered, how do we know which specific element this event handler is acting on when executing? To clarify this is very simple, the Element.on method is passed into the function of the even handler (we will discuss the first parameter here, but you should browse the API documentation to learn more details about the even handler). In our previous example, the function ignored these parameters, but there are a few changes here - we provide a deeper control over the function. It must be noted first that this is actually an Ext event object, a cross-browser and more controllable event object. For example, you can use the following statement to get the DOM node where this event response is located:
Ext.onReady(function() {
var paragraphClicked = function(e) {
Ext.get(e.target) .highlight();
}
Ext.select('p').on('click', paragraphClicked);
});
Note that the obtained e.target is a DOM node, so We first convert it into an EXT Elemnet element, and then execute the event we want to complete. In this example, we see that the paragraph is highlighted.
Okay, today I will simply write a few to let everyone know about them. It's late at night, it's time to go to bed, and I will continue to write after learning. This thing is so useful.
Demo download address http://www.php.cn/

Hot AI Tools

Undresser.AI Undress
AI-powered app for creating realistic nude photos

AI Clothes Remover
Online AI tool for removing clothes from photos.

Undress AI Tool
Undress images for free

Clothoff.io
AI clothes remover

Video Face Swap
Swap faces in any video effortlessly with our completely free AI face swap tool!

Hot Article
Hot Tools

Notepad++7.3.1
Easy-to-use and free code editor

SublimeText3 Chinese version
Chinese version, very easy to use

Zend Studio 13.0.1
Powerful PHP integrated development environment

Dreamweaver CS6
Visual web development tools

SublimeText3 Mac version
God-level code editing software (SublimeText3)
Hot Topics
 1392
1392
 52
52

 What should I do if I encounter garbled code printing for front-end thermal paper receipts?
Apr 04, 2025 pm 02:42 PM
What should I do if I encounter garbled code printing for front-end thermal paper receipts?
Apr 04, 2025 pm 02:42 PM
Frequently Asked Questions and Solutions for Front-end Thermal Paper Ticket Printing In Front-end Development, Ticket Printing is a common requirement. However, many developers are implementing...
 Who gets paid more Python or JavaScript?
Apr 04, 2025 am 12:09 AM
Who gets paid more Python or JavaScript?
Apr 04, 2025 am 12:09 AM
There is no absolute salary for Python and JavaScript developers, depending on skills and industry needs. 1. Python may be paid more in data science and machine learning. 2. JavaScript has great demand in front-end and full-stack development, and its salary is also considerable. 3. Influencing factors include experience, geographical location, company size and specific skills.
 Demystifying JavaScript: What It Does and Why It Matters
Apr 09, 2025 am 12:07 AM
Demystifying JavaScript: What It Does and Why It Matters
Apr 09, 2025 am 12:07 AM
JavaScript is the cornerstone of modern web development, and its main functions include event-driven programming, dynamic content generation and asynchronous programming. 1) Event-driven programming allows web pages to change dynamically according to user operations. 2) Dynamic content generation allows page content to be adjusted according to conditions. 3) Asynchronous programming ensures that the user interface is not blocked. JavaScript is widely used in web interaction, single-page application and server-side development, greatly improving the flexibility of user experience and cross-platform development.
 How to merge array elements with the same ID into one object using JavaScript?
Apr 04, 2025 pm 05:09 PM
How to merge array elements with the same ID into one object using JavaScript?
Apr 04, 2025 pm 05:09 PM
How to merge array elements with the same ID into one object in JavaScript? When processing data, we often encounter the need to have the same ID...
 How to achieve parallax scrolling and element animation effects, like Shiseido's official website?
or:
How can we achieve the animation effect accompanied by page scrolling like Shiseido's official website?
Apr 04, 2025 pm 05:36 PM
How to achieve parallax scrolling and element animation effects, like Shiseido's official website?
or:
How can we achieve the animation effect accompanied by page scrolling like Shiseido's official website?
Apr 04, 2025 pm 05:36 PM
Discussion on the realization of parallax scrolling and element animation effects in this article will explore how to achieve similar to Shiseido official website (https://www.shiseido.co.jp/sb/wonderland/)...
 The difference in console.log output result: Why are the two calls different?
Apr 04, 2025 pm 05:12 PM
The difference in console.log output result: Why are the two calls different?
Apr 04, 2025 pm 05:12 PM
In-depth discussion of the root causes of the difference in console.log output. This article will analyze the differences in the output results of console.log function in a piece of code and explain the reasons behind it. �...
 Is JavaScript hard to learn?
Apr 03, 2025 am 12:20 AM
Is JavaScript hard to learn?
Apr 03, 2025 am 12:20 AM
Learning JavaScript is not difficult, but it is challenging. 1) Understand basic concepts such as variables, data types, functions, etc. 2) Master asynchronous programming and implement it through event loops. 3) Use DOM operations and Promise to handle asynchronous requests. 4) Avoid common mistakes and use debugging techniques. 5) Optimize performance and follow best practices.
 How to implement panel drag and drop adjustment function similar to VSCode in front-end development?
Apr 04, 2025 pm 02:06 PM
How to implement panel drag and drop adjustment function similar to VSCode in front-end development?
Apr 04, 2025 pm 02:06 PM
Explore the implementation of panel drag and drop adjustment function similar to VSCode in the front-end. In front-end development, how to implement VSCode similar to VSCode...
