

阿里云centos部署apache+php

经过一个下午的尝试,终于完成了阿里云apache+php服务器的搭建,我的数据库用的是阿里云的RDS,不需要在服务器中安装mysql了。在我的服务器中最后部署了phpMyAdmin,测试可以管理RDS上的数据库。服务器的搭建宣布完成。留下了做个记录。下次再部署的话就不用大量的搜索和尝试了。
一、下载Xshell+xftp,安装xftp。
二、Xshell新建连接,服务器的外网IP,用户名:root,密码:连接服务的密码
三、打开刚创建的连接,确保成功连接到服务器
四、因为我没有买数据盘,所以数据盘的挂载略过;
五、安装apache,执行 yum install httpd 安装apache。
执行:chkconfig --levels 235 httpd on 使apache开机自启动,执行:chkconfig --list 可以查看设置是否成功
六、在浏览器中输入服务器地址访问,如果正常打开页面,说明apache安装成功;
七、安装PHP,执行 yum install php安装;安装完成php后,执行命令安装 yum install php-mysql php-gd php-imap php-mbstring 等php模块,我暂时用这几个。
八、新建一个php文件,index.php。
内容:
<span style="font-family:Microsoft YaHei;font-size:14px;"> <meta http-equiv="Content-Type" content="text/html; charset=utf-8"> <title>my www</title> <?php phpinfo() ?></span>
九、在浏览器中输入服务器地址访问,如果正常打开如下页面,说明php安装成功
十、我买了阿里云RDS数据库,所以没有安装mysql。如果需要安装mysql,执行命令 yum -install mysql-server,自启动设置同apache,具体的配置我没有尝试。
十一、部署phpMyAdmin到服务器上,管理RDS上的远程数据库。
下载phpMyAdmin,解压后上传到服务的 /var/www/html/ 目录中。
进入phpMyAdmin配置文件目录 /var/www/html/phpMyAdmin/libraries/,
编辑config.default.php文件(执行:vim config.default.php)
设置$cfg['Servers'][$i]['host'] = '(RDS内网地址)';(因为服务器是阿里云的,所以可以直接用RDS的内网地址访问数据库)
保存,退出(:wq)
在浏览器中输入:服务器地址/phpMyAdmin/
输入用户名和密码,执行->
大功告成!!!

Hot AI Tools

Undresser.AI Undress
AI-powered app for creating realistic nude photos

AI Clothes Remover
Online AI tool for removing clothes from photos.

Undress AI Tool
Undress images for free

Clothoff.io
AI clothes remover

AI Hentai Generator
Generate AI Hentai for free.

Hot Article
Hot Tools

Notepad++7.3.1
Easy-to-use and free code editor

SublimeText3 Chinese version
Chinese version, very easy to use

Zend Studio 13.0.1
Powerful PHP integrated development environment

Dreamweaver CS6
Visual web development tools

SublimeText3 Mac version
God-level code editing software (SublimeText3)
Hot Topics


 Alibaba Cloud announced that the 2024 Yunqi Conference will be held in Hangzhou from September 19th to 21st. Free application for free tickets
Aug 07, 2024 pm 07:12 PM
Alibaba Cloud announced that the 2024 Yunqi Conference will be held in Hangzhou from September 19th to 21st. Free application for free tickets
Aug 07, 2024 pm 07:12 PM
According to news from this website on August 5, Alibaba Cloud announced that the 2024 Yunqi Conference will be held in Yunqi Town, Hangzhou from September 19th to 21st. There will be a three-day main forum, 400 sub-forums and parallel topics, as well as nearly four Ten thousand square meters of exhibition area. Yunqi Conference is free and open to the public. From now on, the public can apply for free tickets through the official website of Yunqi Conference. An all-pass ticket of 5,000 yuan can be purchased. The ticket website is attached on this website: https://yunqi.aliyun.com/2024 /ticket-list According to reports, the Yunqi Conference originated in 2009 and was originally named the First China Website Development Forum. In 2011, it evolved into the Alibaba Cloud Developer Conference. In 2015, it was officially renamed the "Yunqi Conference" and has continued to successful move
 How to input Chinese in centos
Apr 07, 2024 pm 08:21 PM
How to input Chinese in centos
Apr 07, 2024 pm 08:21 PM
Methods for using Chinese input in CentOS include: using the fcitx input method: install and enable fcitx, set shortcut keys, press the shortcut keys to switch input methods, and input pinyin to generate candidate words. Use iBus input method: Install and enable iBus, set shortcut keys, press the shortcut keys to switch input methods, and input pinyin to generate candidate words.
 How to read USB disk files in centos7
Apr 07, 2024 pm 08:18 PM
How to read USB disk files in centos7
Apr 07, 2024 pm 08:18 PM
To read U disk files in CentOS 7, you need to first connect the U disk and confirm its device name. Then, use the following steps to read the file: Mount the USB flash drive: mount /dev/sdb1 /media/sdb1 (replace "/dev/sdb1" with the actual device name) Browse the USB flash drive file: ls /media/sdb1; cd /media /sdb1/directory; cat file name
 SCP usage tips-recursively exclude files
Apr 22, 2024 am 09:04 AM
SCP usage tips-recursively exclude files
Apr 22, 2024 am 09:04 AM
One can use the scp command to securely copy files between network hosts. It uses ssh for data transfer and authentication. Typical syntax is: scpfile1user@host:/path/to/dest/scp -r/path/to/source/user@host:/path/to/dest/scp exclude files I don't think you can when using scp command Filter or exclude files. However, there is a good workaround to exclude the file and copy it securely using ssh. This page explains how to filter or exclude files when copying directories recursively using scp. How to use rsync command to exclude files The syntax is: rsyncav-essh-
 How to enable root permissions in centos7
Apr 07, 2024 pm 08:03 PM
How to enable root permissions in centos7
Apr 07, 2024 pm 08:03 PM
CentOS 7 disables root permissions by default. You can enable it by following the following steps: Temporarily enable it: Enter "su root" on the terminal and enter the root password. Permanently enabled: Edit "/etc/ssh/sshd_config", change "PermitRootLogin no" to "yes", and restart the SSH service.
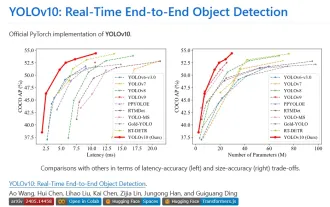 Yolov10: Detailed explanation, deployment and application all in one place!
Jun 07, 2024 pm 12:05 PM
Yolov10: Detailed explanation, deployment and application all in one place!
Jun 07, 2024 pm 12:05 PM
1. Introduction Over the past few years, YOLOs have become the dominant paradigm in the field of real-time object detection due to its effective balance between computational cost and detection performance. Researchers have explored YOLO's architectural design, optimization goals, data expansion strategies, etc., and have made significant progress. At the same time, relying on non-maximum suppression (NMS) for post-processing hinders end-to-end deployment of YOLO and adversely affects inference latency. In YOLOs, the design of various components lacks comprehensive and thorough inspection, resulting in significant computational redundancy and limiting the capabilities of the model. It offers suboptimal efficiency, and relatively large potential for performance improvement. In this work, the goal is to further improve the performance efficiency boundary of YOLO from both post-processing and model architecture. to this end
 How to enter root permissions in centos
Apr 07, 2024 pm 08:06 PM
How to enter root permissions in centos
Apr 07, 2024 pm 08:06 PM
There are two ways to perform tasks with root privileges in CentOS: 1) Use the sudo command to temporarily obtain root privileges; 2) Log in directly using the root user password. Extreme caution should be used when using root privileges and it is recommended to only use them when necessary.
 How to obtain root permissions in centos7
Apr 07, 2024 pm 07:57 PM
How to obtain root permissions in centos7
Apr 07, 2024 pm 07:57 PM
There are several ways to gain root privileges in CentOS 7: 1. Run the command using "su". 2. Use "sudo" to run a single command. 3. Enable the root user and set a password. NOTE: Be cautious when using root privileges as they may damage the system.
