 Backend Development
 PHP Tutorial
 What is OneThink? Steps to add plug-ins in oneThink background_php tips
What is OneThink? Steps to add plug-ins in oneThink background_php tips
OneThink, with its convenient website building, rich expansion, flexible secondary development, and cloud service support, has brought new opportunities and opportunities to the majority of individuals and enterprises to build websites, and will become a new era of the Internet. The trendsetter.
OneThink feature introduction:
1. Based on the latest version of ThinkPHP, Thinkphp3.2.
2. Modularity: Brand-new architecture and modular development mechanism facilitate flexible expansion and secondary development.
3. Document model/classification system: By binding to the document model and different document types, different classifications can achieve differentiated functions and easily implement functions such as information, downloads, discussions, and pictures.
4. Open source and free: OneThink follows the Apache2 open source agreement and is free for use.
5. User behavior: Supports customized user behavior, which can record and share the behavior of individual users or groups of users, providing effective reference data for your operational decisions.
6. Cloud deployment: Platform deployment can be easily supported through the driver, allowing your website to be migrated seamlessly. SAE is already supported built-in.
7. Cloud service support: Support for cloud storage, cloud security, cloud filtering, cloud statistics and other services will soon be launched. More considerate services will make your website more secure.
8. Safe and Robust: Provides a robust security strategy, including backup and recovery, fault tolerance, prevention of malicious attack login, web page anti-tampering and many other security management functions to ensure safe, reliable and stable operation of the system.
9. Application Warehouse: The official application warehouse has a large number of third-party plug-ins, application modules, template themes, and many contributions from the open source community to make your website "One" beautiful.
Steps to add plug-ins in oneThink background:
Version: V1.1.141212 (Note: There are many versions of v1.1. I accidentally downloaded it to V1.1.140202. There are other versions. It is recommended to download the latest version from the code hosting platform)
I am not lazy either, I record every step.
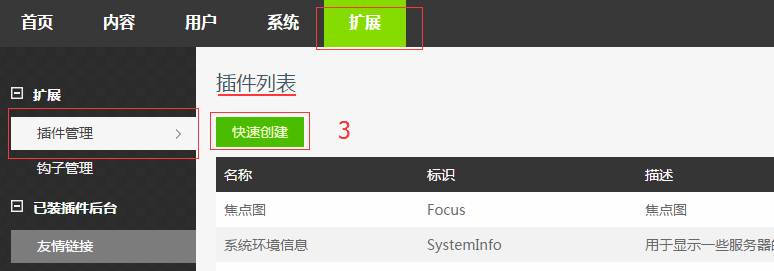
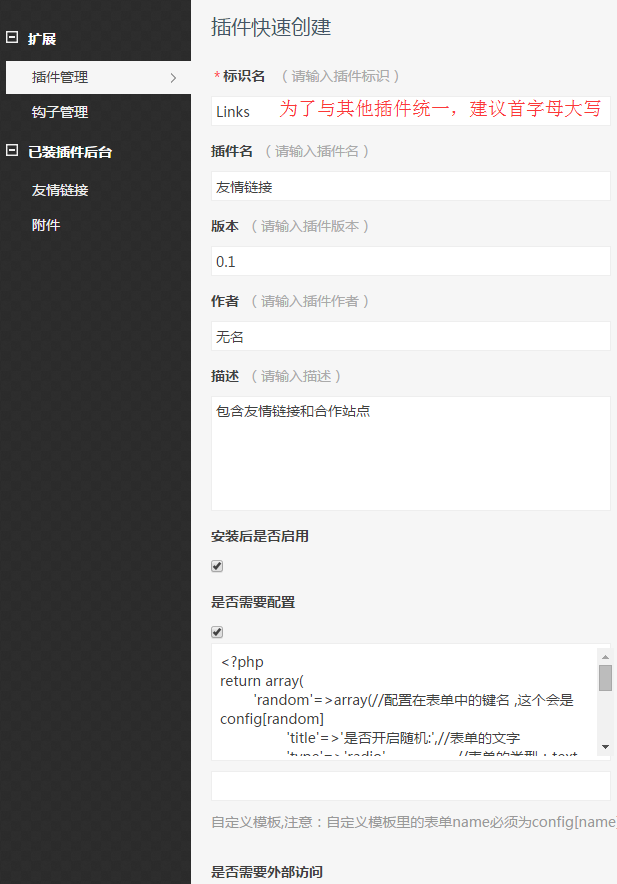
1. Enter the background and create a plug-in


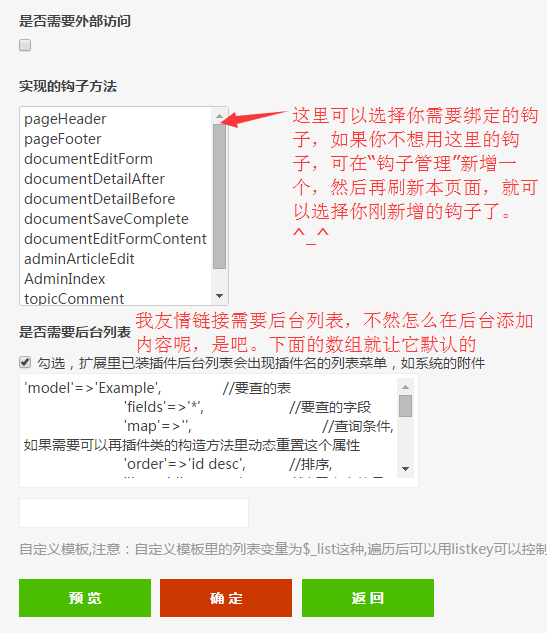
For the hook here, I created a new indexFooter because I only need to display the friendly links at the bottom of the front page. We check all the places that need to be checked above. As for the difference, you can create a few examples to distinguish and see whether the generated files are the same. OK! Here our friendly link plug-in is created! Click OK. (Please leave all the custom templates blank here. I will demonstrate the effect of adding custom templates in the next article)

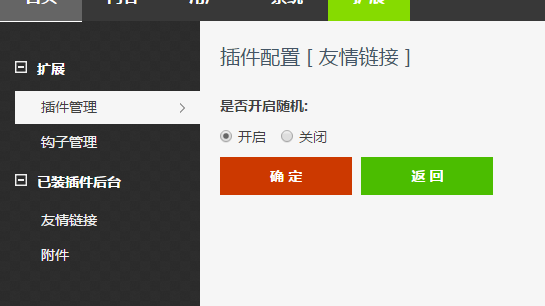
2. Click "Install", find the Links plug-in we just installed, click "Settings", you will see that it has a default "Whether to turn on randomization" option, we don't care about it here, because we It's no longer needed and will be deleted later. After installation, we can see our new "Friendly Links" in the left navigation "Installed Plug-in Backend"

3. When we click "Friendly Links" in the left navigation, you will find an error, which probably means that a certain table does not exist. Yes, we just built the plug-in. If it involves storing data in the database, we also need to create tables. We don’t build it directly in the database here, because doing so is very inhumane. Then we will find the function to install the plug-in and create the database when installing the plug-in. That will be fine. First, all system plug-ins are stored under the root directory /Addons/ folder. When we open this folder, we see a Links folder. This is the plug-in we just created. One plug-in corresponds to one folder. Open the Links folder, there are 2 files and 2 folders inside.

4. In fact, oneThink is becoming more and more concise now. People who don’t understand PHP can still create plug-ins, and you will find out later. Of course, if you have your own ideas and don't want to be limited to official restrictions, you still need to learn PHP well.
5. Open the plug-in entry file: LinksAddon.class.php. There is a class LinksAddon in it. Let’s analyze this file first

I changed the model value of the $admin_list array to links here, in order to correspond to the plug-in. Next, we add the statement to create a new database in the install method, so that when we install the plug-in, a new database will be created. My code is as follows:
1 2 3 4 5 6 7 8 9 10 11 12 13 14 15 16 17 18 19 20 21 22 23 24 25 26 27 28 |
|
我这里省略了很多细节判断,大家自己完善。
六、既然在安装插件的时候,新建了表,我们在卸载的插件的时候就要把表给删除,不然下次安装该插件的时候就会出问题。所以我们uninstall 方法代码如下:
1 2 3 4 5 6 7 8 9 |
|
好了,到这里就差不多了,保存一下LinksAddon.class.php 文件,应该可以正常显示了,我们来看看。进入插件列表,先把Links插件卸载,然后重新安装。点击左侧菜单“友情链接”,可以看到

之所以能正常显示这个列表,是因为系统有默认的模板,在\Application\Admin\View\Addons 文件夹里,有兴趣的同学可以研究一下这几个模板文件,其中这个列表的模板就是adminlist.html,那么我们要把封面、书名、描述等等这些字眼改掉,要去模板里改吗?细心的同学估计注意到了,在LinksAddon.class.php 文件 的$admin_list 数组里配置的,其他的看后面的注释就明白,这里详细说一下list_grid 关联的数组。我们刚才新建的links数据表有id、title、link等字段,你想在这个列表显示什么字段,都可以添加。我这里代码如下:
1 2 3 4 5 6 7 |
|
保存,刷新后台友情链接列表

我们点击“新增” 来增加一个友情链接吧,你会发现,只有一个书名字段。我们打开Model/LinksModel.class.php 文件,我这里分别解释一下这两个自带的数组,具体看下面代码里的注释
1 2 3 4 5 6 7 8 9 10 11 12 13 14 15 16 17 18 19 20 21 22 23 24 25 26 27 28 29 30 31 |
|
ok,我最后的效果是这样的:

添加一条数据看看吧:

这里要显示具体类型、显示图片等,需要自定义adminlist.html模板了。关于自定义模板,我们下一篇文章再说。关于钩子,其实就是写一个函数从数据库读取数据,然后在前台需要的地方调用钩子就行。如果需要模板,则在钩子函数里解析模板。钩子调用格式一般:
{:hook("钩子名称"),"[参数]"} 没参数就不写。直接写成这样{:hook("钩子名称")}
到此为止就是用系统默认的模板,一步一步的建立自己的插件,是不是很简单,就像填空题一样,只要按照它的规则填空,就ok了。
以上就是本文的全部内容,希望对大家学习PHP程序设计有所帮助。

Hot AI Tools

Undresser.AI Undress
AI-powered app for creating realistic nude photos

AI Clothes Remover
Online AI tool for removing clothes from photos.

Undress AI Tool
Undress images for free

Clothoff.io
AI clothes remover

AI Hentai Generator
Generate AI Hentai for free.

Hot Article

Hot Tools

Notepad++7.3.1
Easy-to-use and free code editor

SublimeText3 Chinese version
Chinese version, very easy to use

Zend Studio 13.0.1
Powerful PHP integrated development environment

Dreamweaver CS6
Visual web development tools

SublimeText3 Mac version
God-level code editing software (SublimeText3)

Hot Topics
 Working with Flash Session Data in Laravel
Mar 12, 2025 pm 05:08 PM
Laravel simplifies handling temporary session data using its intuitive flash methods. This is perfect for displaying brief messages, alerts, or notifications within your application. Data persists only for the subsequent request by default: $request-
 Build a React App With a Laravel Back End: Part 2, React
Mar 04, 2025 am 09:33 AM
This is the second and final part of the series on building a React application with a Laravel back-end. In the first part of the series, we created a RESTful API using Laravel for a basic product-listing application. In this tutorial, we will be dev
 cURL in PHP: How to Use the PHP cURL Extension in REST APIs
Mar 14, 2025 am 11:42 AM
The PHP Client URL (cURL) extension is a powerful tool for developers, enabling seamless interaction with remote servers and REST APIs. By leveraging libcurl, a well-respected multi-protocol file transfer library, PHP cURL facilitates efficient execution of various network protocols, including HTTP, HTTPS, and FTP. This extension offers granular control over HTTP requests, supports multiple concurrent operations, and provides built-in security features.
 Simplified HTTP Response Mocking in Laravel Tests
Mar 12, 2025 pm 05:09 PM
Laravel provides concise HTTP response simulation syntax, simplifying HTTP interaction testing. This approach significantly reduces code redundancy while making your test simulation more intuitive. The basic implementation provides a variety of response type shortcuts: use Illuminate\Support\Facades\Http; Http::fake([ 'google.com' => 'Hello World', 'github.com' => ['foo' => 'bar'], 'forge.laravel.com' =>
 12 Best PHP Chat Scripts on CodeCanyon
Mar 13, 2025 pm 12:08 PM
Do you want to provide real-time, instant solutions to your customers' most pressing problems? Live chat lets you have real-time conversations with customers and resolve their problems instantly. It allows you to provide faster service to your custom
 Notifications in Laravel
Mar 04, 2025 am 09:22 AM
In this article, we're going to explore the notification system in the Laravel web framework. The notification system in Laravel allows you to send notifications to users over different channels. Today, we'll discuss how you can send notifications ov
 Explain the concept of late static binding in PHP.
Mar 21, 2025 pm 01:33 PM
Article discusses late static binding (LSB) in PHP, introduced in PHP 5.3, allowing runtime resolution of static method calls for more flexible inheritance.Main issue: LSB vs. traditional polymorphism; LSB's practical applications and potential perfo
 PHP Logging: Best Practices for PHP Log Analysis
Mar 10, 2025 pm 02:32 PM
PHP logging is essential for monitoring and debugging web applications, as well as capturing critical events, errors, and runtime behavior. It provides valuable insights into system performance, helps identify issues, and supports faster troubleshoot


