JavaScript File API file upload preview_javascript skills
For browser-based applications, accessing local files is a headache. Usually all we can do is to use tag to upload files. The implementation process is: when selecting a file, the value attribute saves the name of the file specified by the user. When the form is submitted, the browser will send the content of the selected file to the server instead of just the file name. Then get the address returned by the server and preview it.
But if one day we want to upload a picture, and after uploading the picture, preview and want to change another picture, we have to upload it to the server first and then preview it. When the network is relatively slow, this is really a hassle.
So sometimes we need to preview before uploading to the server, especially those with cutting functions, such as avatar replacement on Sina Weibo. However, the only thing we can do at present is to use plug-in development or use flash. Since the technical implementation of different browsers is different, in order to make the program support multiple browsers, our program will become very complex and difficult to maintain. Fortunately, there is now File API.
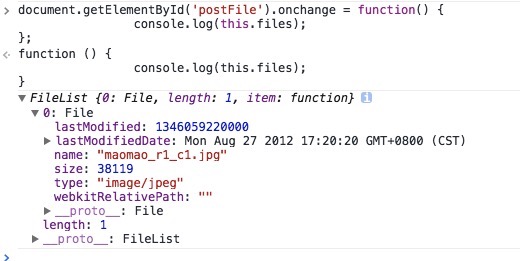
By listening to the change event, we can know the file selected by the user, and add a files collection, which will contain file objects, and each file object corresponds to a file. And all have the following read-only attributes name, size, type, lastModifiedDate.
Take as an example, monitor onchange and print its file object:

From this we can know some information about the file format, file name, file size, etc. selected by the user. Therefore, it is easy for us to verify whether the selected documents meet some of our requirements.
In addition, the File API also provides the FileReader type to read data in files.
The FileReader type implements an asynchronous file reading mechanism, similar to XMLHttpRequest, but it reads the file system rather than the remote server. And provides several reading methods:
- readAsText(file,encoding): Read the file in plain text form and save the read text in the result attribute. The second parameter is used to specify the encoding type, optional.
- readAsDataURL(file): The read file is saved in the result attribute in the form of data URL.
- readAsBinaryString(file): Read the file and save a string in the result attribute.
- readAsArrayBuffer(file): Read the file and save an ArrayBuffer containing the file content in the result attribute
Read the same local image through the above methods, and print out the information saved in the result attribute for comparison as follows:
readAsText(file,encoding):

readAsDataURL(file):

Through the above comparison, we found that these methods of reading files provide great convenience for flexible processing of file data. For example, reading an image file and saving it as a data URL can be used as a preview function before uploading.
Since the reading process is asynchronous, there are several events in FileReader to handle different situations: progress (whether new data has been read), erro (whether an error has occurred), load (whether the entire file has been read) document).
If the file cannot be read due to various reasons, the error event will be triggered. When the error event is triggered, there will be an attribute code (error code) saved in an object in the error attribute of FileReader.
Example of using FileReader for upload preview:
HTML:
<label class="item_label">上传照片:
 <span style="width: 100px; height: 100px;border:1px solid #ccc; display:inline-block"><img src="#" id="uploadPreview" style="width: 100%; height: 100%;"></span>
 <input type="file" name="file" id="postFile" style="width:74px;">
 <span id="error_text" style="display: none;">提示</span>
</label>
JavaScript:
document.getElementById('postFile').onchange = function() {
 var val = this.value;
 var upLoadType = '.jpg,.gif,.bmp,.png';//['.jpg','.gif','.bmp','.png']; //可上传的格式
 var fileExt = val.substr(val.lastIndexOf(".")).toLowerCase(); //从字符串中抽出最后一次出现.之后的字符,并且转换成小写
 var result = upLoadType.indexOf(fileExt); //查找后缀名是否符合条件,如果符合返回>=0,如果不符合则返回负数;
 _alertMsg = $('#error_text');
 var oFReader = new FileReader();
 if (this.files.length === 0) { return; }
 var oFile = this.files[0]; //如果只有一个文件则只需要访问这个FileList对象中的第一个元素.

 if (oFile.size / 1024 < 100) {
  _alertMsg.html("<font style='color:blue'>√</font>").show()
 };
 if (result < 0) {
  _alertMsg.html("请输入正确格式:" + upLoadType).show();
 } else{
  _alertMsg.html("<font style='color:blue'>√</font>").show();
 };

 oFReader.readAsDataURL(oFile); // 开始在后台进行读取操作。当图像文件的所有内容加载后,他们转换成一个data:URL,传递到onload回调函数中
 oFReader.onload = function (oFREvent) { //当读取操作成功完成时调用.
  document.getElementById("uploadPreview").src = oFREvent.target.result;
 };
};
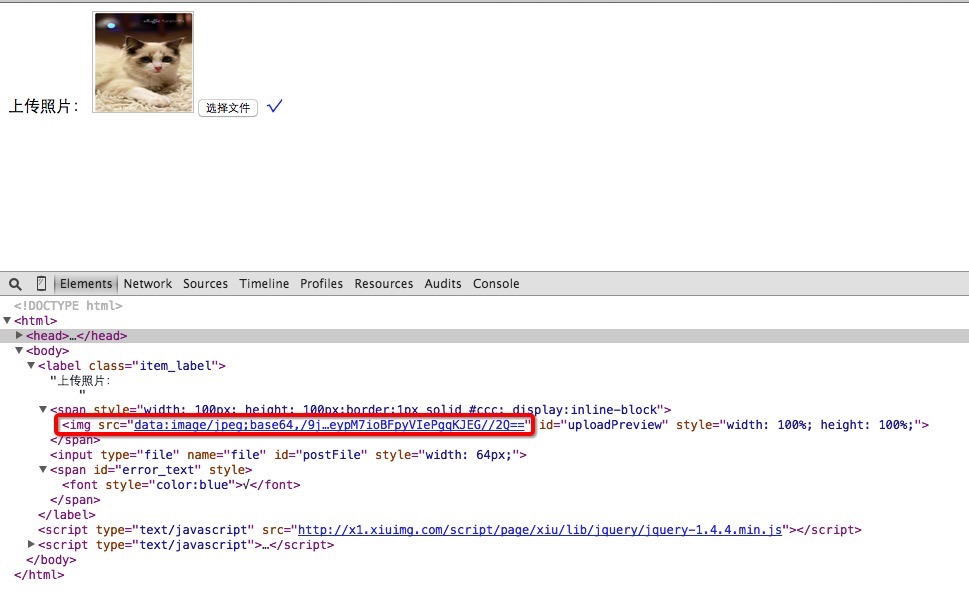
Effect and returned image URL:

The above is the entire content of this article, I hope it will be helpful to everyone’s study.

Hot AI Tools

Undresser.AI Undress
AI-powered app for creating realistic nude photos

AI Clothes Remover
Online AI tool for removing clothes from photos.

Undress AI Tool
Undress images for free

Clothoff.io
AI clothes remover

AI Hentai Generator
Generate AI Hentai for free.

Hot Article

Hot Tools

Notepad++7.3.1
Easy-to-use and free code editor

SublimeText3 Chinese version
Chinese version, very easy to use

Zend Studio 13.0.1
Powerful PHP integrated development environment

Dreamweaver CS6
Visual web development tools

SublimeText3 Mac version
God-level code editing software (SublimeText3)

Hot Topics
 1376
1376
 52
52
 Hongmeng native application random poetry
Feb 19, 2024 pm 01:36 PM
To learn more about open source, please visit: 51CTO Hongmeng Developer Community https://ost.51cto.com Running environment DAYU200:4.0.10.16SDK: 4.0.10.15IDE: 4.0.600 1. To create an application, click File- >newFile->CreateProgect. Select template: [OpenHarmony] EmptyAbility: Fill in the project name, shici, application package name com.nut.shici, and application storage location XXX (no Chinese, special characters, or spaces). CompileSDK10, Model: Stage. Device
 How to implement an online speech recognition system using WebSocket and JavaScript
Dec 17, 2023 pm 02:54 PM
How to use WebSocket and JavaScript to implement an online speech recognition system Introduction: With the continuous development of technology, speech recognition technology has become an important part of the field of artificial intelligence. The online speech recognition system based on WebSocket and JavaScript has the characteristics of low latency, real-time and cross-platform, and has become a widely used solution. This article will introduce how to use WebSocket and JavaScript to implement an online speech recognition system.
 WebSocket and JavaScript: key technologies for implementing real-time monitoring systems
Dec 17, 2023 pm 05:30 PM
WebSocket and JavaScript: Key technologies for realizing real-time monitoring systems Introduction: With the rapid development of Internet technology, real-time monitoring systems have been widely used in various fields. One of the key technologies to achieve real-time monitoring is the combination of WebSocket and JavaScript. This article will introduce the application of WebSocket and JavaScript in real-time monitoring systems, give code examples, and explain their implementation principles in detail. 1. WebSocket technology
 How to implement an online reservation system using WebSocket and JavaScript
Dec 17, 2023 am 09:39 AM
How to use WebSocket and JavaScript to implement an online reservation system. In today's digital era, more and more businesses and services need to provide online reservation functions. It is crucial to implement an efficient and real-time online reservation system. This article will introduce how to use WebSocket and JavaScript to implement an online reservation system, and provide specific code examples. 1. What is WebSocket? WebSocket is a full-duplex method on a single TCP connection.
 How to use JavaScript and WebSocket to implement a real-time online ordering system
Dec 17, 2023 pm 12:09 PM
Introduction to how to use JavaScript and WebSocket to implement a real-time online ordering system: With the popularity of the Internet and the advancement of technology, more and more restaurants have begun to provide online ordering services. In order to implement a real-time online ordering system, we can use JavaScript and WebSocket technology. WebSocket is a full-duplex communication protocol based on the TCP protocol, which can realize real-time two-way communication between the client and the server. In the real-time online ordering system, when the user selects dishes and places an order
 JavaScript and WebSocket: Building an efficient real-time weather forecasting system
Dec 17, 2023 pm 05:13 PM
JavaScript and WebSocket: Building an efficient real-time weather forecast system Introduction: Today, the accuracy of weather forecasts is of great significance to daily life and decision-making. As technology develops, we can provide more accurate and reliable weather forecasts by obtaining weather data in real time. In this article, we will learn how to use JavaScript and WebSocket technology to build an efficient real-time weather forecast system. This article will demonstrate the implementation process through specific code examples. We
 Simple JavaScript Tutorial: How to Get HTTP Status Code
Jan 05, 2024 pm 06:08 PM
JavaScript tutorial: How to get HTTP status code, specific code examples are required. Preface: In web development, data interaction with the server is often involved. When communicating with the server, we often need to obtain the returned HTTP status code to determine whether the operation is successful, and perform corresponding processing based on different status codes. This article will teach you how to use JavaScript to obtain HTTP status codes and provide some practical code examples. Using XMLHttpRequest
 How to use insertBefore in javascript
Nov 24, 2023 am 11:56 AM
Usage: In JavaScript, the insertBefore() method is used to insert a new node in the DOM tree. This method requires two parameters: the new node to be inserted and the reference node (that is, the node where the new node will be inserted).


