
 Backend Development
Python Tutorial
Combined with Python's SimpleHTTPServer source code to parse socket communication
Backend Development
Python Tutorial
Combined with Python's SimpleHTTPServer source code to parse socket communication
Combined with Python's SimpleHTTPServer source code to parse socket communication

What is socket
Computers, as the name suggests, are used for calculations. Therefore, input and output are also needed. The conditions to be calculated are input and the calculation results are output. These input and output can be abstracted as I/O (input output).
Unix computers handle IO through the abstraction of files. There is also input and output, that is, communication between different computer processes. Therefore, this communication is also carried out through the abstract file descriptor of the file.
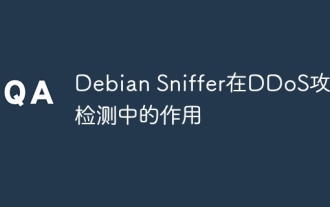
On the same computer, processes can communicate like this. What if they are different computers? Different computers on the network can also communicate, so they must use network sockets. A socket is an abstraction for communication between different computers. He works on an abstraction between the application layer and transport layer in the TCP/IP protocol. As shown below:

Server communication
Socket ensures communication between different computers, that is, network communication. For websites, the communication model is client-server communication. Both ends establish a socket object, and then transmit data through the socket object. Usually the server is in a wireless loop, waiting for clients to connect:

socket communication example
The socket interface is provided by the operating system and is an interface for calling the operating system. Of course, high-level languages generally encapsulate useful function interfaces. Here is a simple socket server example using python code:
server.py
import socket

HOST = 'localhost'   # 服务器主机地址
PORT = 5000       # 服务器监听端口
BUFFER_SIZE = 2048   # 读取数据大小

# 创建一个套接字
sock = socket.socket(socket.AF_INET, socket.SOCK_STREAM)
# 绑定主机和端口
sock.bind((HOST, PORT))
# 开启socket监听
sock.listen(5)


print 'Server start, listening {}'.format(PORT)


while True:
  # 建立连接,连接为建立的时候阻塞
  conn, addr = sock.accept()
  while True:
    # 读取数据,数据还没到来阻塞
    data = conn.recv(BUFFER_SIZE)
    if len(data):
      print 'Server Recv Data: {}'.format(data)
      conn.send(data)
      print 'Server Send Data: {}'.format(data)
    else:
      print 'Server Recv Over'
      break
  conn.close()
sock.close()
client.py
import socket

HOST = 'localhost'
PORT = 5000
BUFFER_SIZE = 1024

# 创建客户端套接字
sock = socket.socket(socket.AF_INET, socket.SOCK_STREAM)
# 连接到服务器
sock.connect((HOST, PORT))

try:
  message = "Hello"
  # 发起数据给服务器
  sock.sendall(message)
  amount_received = 0
  amount_expected = len(message)
  while amount_received < amount_expected:
    # 接收服务器返回的数据
    data = sock.recv(10)
    amount_received += len(data)
    print 'Client Received: {}'.format(data)

except socket.errno, e:
  print 'Socket error: {}'.format(e)
except Exception, e:
  print 'Other exception: %s'.format(e)
finally:
  print 'Closing connection to the server'
  sock.close()
TCP three-way handshake
Writing sockets in python code is very simple. How is the legendary TCP three-way handshake embodied? What is a three-way handshake?
First handshake: First, the client sends a syn to request a connection,
Second handshake: The server confirms after receiving it and sends a syn ack response
Third step: After receiving the response from the server, the client sends a confirmation to the server to establish a connection.
Use the following metaphor:
C: Do you want to make an appointment?
S: About
C: OK
Dating
This establishes a TCP connection session. If you want to disconnect, the general process is:

The above picture also clearly shows the specific process of the three-way handshake socket.
- The client socket object blocks after calling connect, and a syn is sent in this process.
- The server socket object blocks after calling the accept function until the syn is sent from the client, and then sends syn and ack responses
- After the client socket object receives the response sent by the server, it sends an ack to the server and returns the connect call to establish the connection.
- The server socket object accepts the client's last handshake, confirms ack, returns the accept function, and establishes a connection.
At this point, the socket communication connection between the client and the server is established. All that remains is for the connection objects at both ends to send and receive data to complete network communication.
SimpleHTTPServer
To build a simple HTTP service, you need to inherit HTTPServer, and the requesthandler also needs to inherit BaseHTTPRequestHandler. Python has implemented an example, that is SimpleHTTPServer. So analyze SimpleHTTPServer to see how to build an http service using some of the previous classes.
In order to show the simplicity and elegance of Python, examples like this were often given. Python can start a server with one line of code.
$ python -m SimpleHTTPServer
The SimpleHTTPServer here is the module that implements HTTPServer.
SimpleHTTPServer serves as the entry point by calling the test method of the BaseHTTPServer module.
def test(HandlerClass = SimpleHTTPRequestHandler,
     ServerClass = BaseHTTPServer.HTTPServer):
  BaseHTTPServer.test(HandlerClass, ServerClass)
The test method does two things. The first is to use HTTPServer to accept a listening address and requestClass parameters, create an instance object, and call the server_forever method to start the service.
1.SimpleHTTPRequestHandler
According to the previous analysis, to use the httpserver service, we only need to continue the BaseHTTPRequestHandler and provide the introspection method.
class SimpleHTTPRequestHandler(BaseHTTPServer.BaseHTTPRequestHandler):
  server_version = "SimpleHTTP/" + __version__

  def do_GET(self):
    f = self.send_head()
    if f:
      self.copyfile(f, self.wfile)
      f.close()

  def do_HEAD(self):
    f = self.send_head()
    if f:
      f.close()
do_GET and do_HEAD implement the processing of http get request and head request respectively. They call the send_head method:
def send_head(self):

    path = self.translate_path(self.path)
    f = None
    if os.path.isdir(path):
      if not self.path.endswith('/'):
        self.send_response(301)
        self.send_header("Location", self.path + "/")
        self.end_headers()
        return None
      for index in "index.html", "index.htm":
        index = os.path.join(path, index)
        if os.path.exists(index):
          path = index
          break
      else:
        return self.list_directory(path)
    ctype = self.guess_type(path)
    try:
      f = open(path, 'rb')
    except IOError:
      self.send_error(404, "File not found")
      return None
    self.send_response(200)
    self.send_header("Content-type", ctype)
    fs = os.fstat(f.fileno())
    self.send_header("Content-Length", str(fs[6]))
    self.send_header("Last-Modified", self.date_time_string(fs.st_mtime))
    self.end_headers()
    return f
The send_head method obtains the network path requested by the customer through path analysis of the uri. Construct the mime meta information of head and send it to the client, and then return a file handle to open the path.
2.copyfile
The next step of do_GET is to write the file data of the path requested by the client into a buffered writable file through the copyfile method and send it to the client.
3.list_directory
SimpleHTTPServer模块还提供了list_directory方法,用于响应path是一个目录,而不是文件的情况。
def list_directory(self, path):
  try:
    list = os.listdir(path)
  except os.error:
    self.send_error(404, "No permission to list directory")
    return None
  list.sort(key=lambda a: a.lower())
  f = StringIO()
  displaypath = cgi.escape(urllib.unquote(self.path))
  f.write('<!DOCTYPE html PUBLIC "-//W3C//DTD HTML 3.2 Final//EN">')
  f.write("<html>\n<title>Directory listing for %s</title>\n" % displaypath)
  f.write("<body>\n<h2>Directory listing for %s</h2>\n" % displaypath)
  f.write("<hr>\n<ul>\n")
  for name in list:
    fullname = os.path.join(path, name)
    displayname = linkname = name
    # Append / for directories or @ for symbolic links
    if os.path.isdir(fullname):
      displayname = name + "/"
      linkname = name + "/"
    if os.path.islink(fullname):
      displayname = name + "@"
      # Note: a link to a directory displays with @ and links with /
    f.write('<li><a href="%s">%s</a>\n'
        % (urllib.quote(linkname), cgi.escape(displayname)))
  f.write("</ul>\n<hr>\n</body>\n</html>\n")
  length = f.tell()
  f.seek(0)
  self.send_response(200)
  encoding = sys.getfilesystemencoding()
  self.send_header("Content-type", "text/html; charset=%s" % encoding)
  self.send_header("Content-Length", str(length))
  self.end_headers()
  return f
由此可见,处理客户端的请求,只需要使用 send_reponse, send_header 和 end_headers ,就能向客户端发送reponse。
4.自定义http服务
定义一个CustomHTTPRequestHadnler继承自BaseHTTPRequestHandler。在其内实现do_GET 方法来处理get请求。
然后再定义一个CustomHTTPServer继承自HTTPServer,它接受CustomHTTPRequestHadnler作为自己的handler。简单的代码如下:
# -*- coding: utf-8 -*-

from BaseHTTPServer import BaseHTTPRequestHandler, HTTPServer


class CustomHTTPRequestHandler(BaseHTTPRequestHandler):
  def do_GET(self):
    self.send_response(200)
    self.send_header('Content-type', 'text/html')
    self.end_headers()
    self.wfile.write("hello world\r\n")


class CustomHTTPServer(HTTPServer):
  def __init__(self, host, port):
    HTTPServer.__init__(self, (host, port), CustomHTTPRequestHandler)


def main():
  server = CustomHTTPServer('127.0.0.1', 8000)
  server.serve_forever()


if __name__ == '__main__':
  main()
使用curl访问可以得到
➜ ~ curl http://127.0.0.1:8000
hello world
➜ ~
控制台会打出访问的log。
127.0.0.1 - - [01/Jun/2015 11:42:33] "GET / HTTP/1.1" 200 -
从socket的建立,select的IO模式,再到Server和Handler的组合构建服务。我们已经熟悉了python的基本网络编程。python的web开发中,更多是使用WSGI协议。实现该协议的还有 uWSGI和gunicorn等库。相比那些库,python内部提供了一个wsgiref模块,实现了一个简单wsgi服务--simple_server。
接下来将会通过分析simple_server,更好的掌握WSGI协议。

Hot AI Tools

Undresser.AI Undress
AI-powered app for creating realistic nude photos

AI Clothes Remover
Online AI tool for removing clothes from photos.

Undress AI Tool
Undress images for free

Clothoff.io
AI clothes remover

AI Hentai Generator
Generate AI Hentai for free.

Hot Article
Hot Tools

Notepad++7.3.1
Easy-to-use and free code editor

SublimeText3 Chinese version
Chinese version, very easy to use

Zend Studio 13.0.1
Powerful PHP integrated development environment

Dreamweaver CS6
Visual web development tools

SublimeText3 Mac version
God-level code editing software (SublimeText3)
Hot Topics
 1378
1378
 52
52

 How to use Debian Apache logs to improve website performance
Apr 12, 2025 pm 11:36 PM
How to use Debian Apache logs to improve website performance
Apr 12, 2025 pm 11:36 PM
This article will explain how to improve website performance by analyzing Apache logs under the Debian system. 1. Log Analysis Basics Apache log records the detailed information of all HTTP requests, including IP address, timestamp, request URL, HTTP method and response code. In Debian systems, these logs are usually located in the /var/log/apache2/access.log and /var/log/apache2/error.log directories. Understanding the log structure is the first step in effective analysis. 2. Log analysis tool You can use a variety of tools to analyze Apache logs: Command line tools: grep, awk, sed and other command line tools.
 Python: Games, GUIs, and More
Apr 13, 2025 am 12:14 AM
Python: Games, GUIs, and More
Apr 13, 2025 am 12:14 AM
Python excels in gaming and GUI development. 1) Game development uses Pygame, providing drawing, audio and other functions, which are suitable for creating 2D games. 2) GUI development can choose Tkinter or PyQt. Tkinter is simple and easy to use, PyQt has rich functions and is suitable for professional development.
 PHP and Python: Comparing Two Popular Programming Languages
Apr 14, 2025 am 12:13 AM
PHP and Python: Comparing Two Popular Programming Languages
Apr 14, 2025 am 12:13 AM
PHP and Python each have their own advantages, and choose according to project requirements. 1.PHP is suitable for web development, especially for rapid development and maintenance of websites. 2. Python is suitable for data science, machine learning and artificial intelligence, with concise syntax and suitable for beginners.
 The role of Debian Sniffer in DDoS attack detection
Apr 12, 2025 pm 10:42 PM
The role of Debian Sniffer in DDoS attack detection
Apr 12, 2025 pm 10:42 PM
This article discusses the DDoS attack detection method. Although no direct application case of "DebianSniffer" was found, the following methods can be used for DDoS attack detection: Effective DDoS attack detection technology: Detection based on traffic analysis: identifying DDoS attacks by monitoring abnormal patterns of network traffic, such as sudden traffic growth, surge in connections on specific ports, etc. This can be achieved using a variety of tools, including but not limited to professional network monitoring systems and custom scripts. For example, Python scripts combined with pyshark and colorama libraries can monitor network traffic in real time and issue alerts. Detection based on statistical analysis: By analyzing statistical characteristics of network traffic, such as data
 How debian readdir integrates with other tools
Apr 13, 2025 am 09:42 AM
How debian readdir integrates with other tools
Apr 13, 2025 am 09:42 AM
The readdir function in the Debian system is a system call used to read directory contents and is often used in C programming. This article will explain how to integrate readdir with other tools to enhance its functionality. Method 1: Combining C language program and pipeline First, write a C program to call the readdir function and output the result: #include#include#include#includeintmain(intargc,char*argv[]){DIR*dir;structdirent*entry;if(argc!=2){
 Python and Time: Making the Most of Your Study Time
Apr 14, 2025 am 12:02 AM
Python and Time: Making the Most of Your Study Time
Apr 14, 2025 am 12:02 AM
To maximize the efficiency of learning Python in a limited time, you can use Python's datetime, time, and schedule modules. 1. The datetime module is used to record and plan learning time. 2. The time module helps to set study and rest time. 3. The schedule module automatically arranges weekly learning tasks.
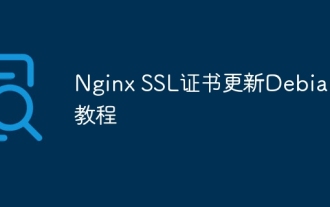 Nginx SSL Certificate Update Debian Tutorial
Apr 13, 2025 am 07:21 AM
Nginx SSL Certificate Update Debian Tutorial
Apr 13, 2025 am 07:21 AM
This article will guide you on how to update your NginxSSL certificate on your Debian system. Step 1: Install Certbot First, make sure your system has certbot and python3-certbot-nginx packages installed. If not installed, please execute the following command: sudoapt-getupdatesudoapt-getinstallcertbotpython3-certbot-nginx Step 2: Obtain and configure the certificate Use the certbot command to obtain the Let'sEncrypt certificate and configure Nginx: sudocertbot--nginx Follow the prompts to select
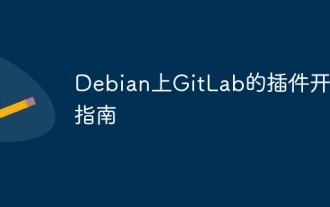 GitLab's plug-in development guide on Debian
Apr 13, 2025 am 08:24 AM
GitLab's plug-in development guide on Debian
Apr 13, 2025 am 08:24 AM
Developing a GitLab plugin on Debian requires some specific steps and knowledge. Here is a basic guide to help you get started with this process. Installing GitLab First, you need to install GitLab on your Debian system. You can refer to the official installation manual of GitLab. Get API access token Before performing API integration, you need to get GitLab's API access token first. Open the GitLab dashboard, find the "AccessTokens" option in the user settings, and generate a new access token. Will be generated
