Initialize components without a single js code_javascript skills
I recently discovered an usability problem when using bootstrap components. Many simple component initializations require writing a lot of initialization code in JS, such as a simple select tag, because it only needs to get data from the background to fill in the options. Inside, fetching data from the background requires js initialization, so when the page is initialized, there are many repeated codes in the js initialization code, which looks very annoying. Then I thought of the data attribute in bootstrap table. It would be great if I could use data-* directly in HTML to initialize simple components. Let’s take a look at the documentation of bootstrap table first:
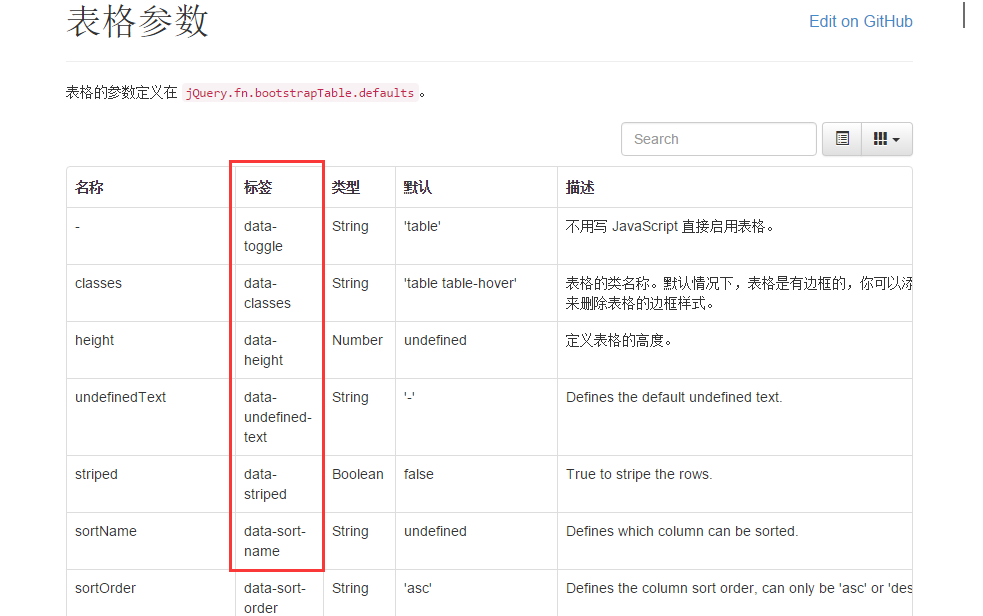
You can see that almost all attributes and events in the bootstrap table can be done using data-*, which feels pretty good. Then the blogger will start researching. Where does data-* come from?
1. A preliminary study on jquery data()
After searching around on the Internet, I finally found the source of data-*. It turns out that it is in Jquery and html5. Good stuff, really good stuff! Let’s take a look at jquery’s API first
The original usage is as follows:
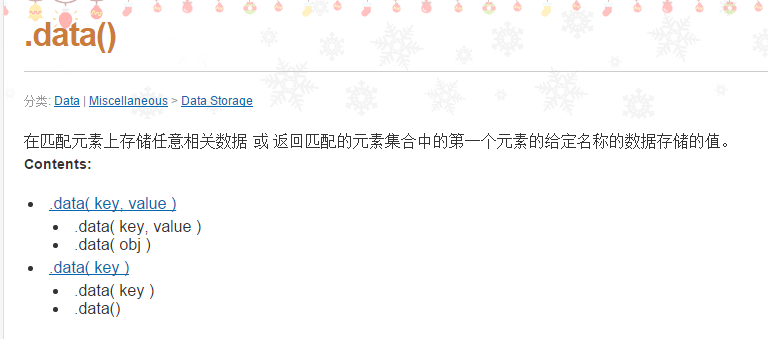
The function is actually very obvious, which is to add certain attributes and data to the element, or take a value.
Let’s look at the combination of data() method and html5 data-* attributes
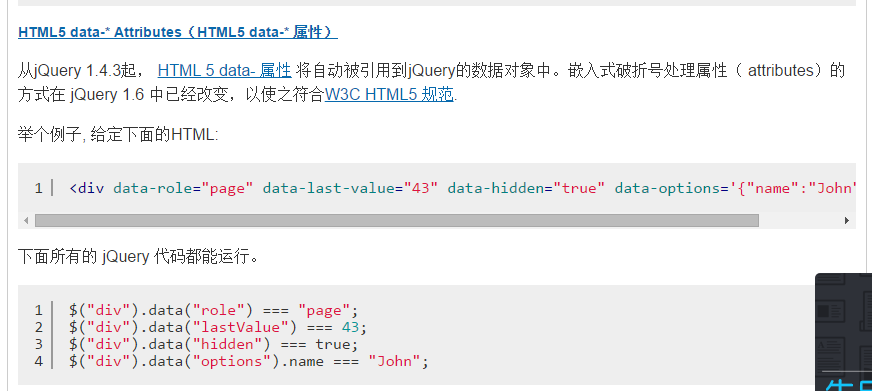
Haha, this thing is good. The value set through the data-* of html5 can be obtained using the data() method of jquery. The rules here are as follows:
- 1) All data attributes must start with "data-",
- 2) Attributes are separated by "-",
- 3) Just remove "data" and "-" when fetching attributes in jquery.
With this as the basis, we will know how to set attributes in tags, and then get the corresponding attributes in js. The following will be explained based on the example of encapsulating combobox last time.
2. jquery data() implements data-* initialization component
Still remember the previous series of JS components - encapsulating your own JS components. You can also encapsulate a simple combobox in this article, which can fetch data from the background through the URL. So below we are still doing tricks on the basis of this component to add the data-* attribute directly to the select tag to initialize the drop-down box component.
1. js component packaging code
(function ($) {
  //1.定义jquery的扩展方法combobox
  $.fn.combobox = function (options, param) {
    if (typeof options == 'string') {
      return $.fn.combobox.methods[options](this, param);
    }
    //2.将调用时候传过来的参数和default参数合并
    options = $.extend({}, $.fn.combobox.defaults, options || {});
    //3.添加默认值
    var target = $(this);
    target.attr('valuefield', options.valueField);
    target.attr('textfield', options.textField);
    target.empty();
    var option = $('<option></option>');
    option.attr('value', '');
    option.text(options.placeholder);
    target.append(option);
    //4.判断用户传过来的参数列表里面是否包含数据data数据集,如果包含,不用发ajax从后台取,否则否送ajax从后台取数据
    if (options.data) {
      init(target, options.data);
    }
    else {
      //var param = {};
      options.onBeforeLoad.call(target, options.param);
      if (!options.url) return;
      if (typeof options.param == "string"){
        options.param = JSON.parse(options.param);
      }
      $.getJSON(options.url, options.param, function (data) {
        init(target, data);
      });
    }
    function init(target, data) {
      $.each(data, function (i, item) {
        var option = $('<option></option>');
        option.attr('value', item[options.valueField]);
        option.text(item[options.textField]);
        target.append(option);
      });
      options.onLoadSuccess.call(target);
    }
    target.unbind("change");
    target.on("change", function (e) {
      if (options.onChange)
        return options.onChange(target.val());
    });
  }

  //5.如果传过来的是字符串,代表调用方法。
  $.fn.combobox.methods = {
    getValue: function (jq) {
      return jq.val();
    },
    setValue: function (jq, param) {
      jq.val(param);
    },
    load: function (jq, url) {
      $.getJSON(url, function (data) {
        jq.empty();
        var option = $('<option></option>');
        option.attr('value', '');
        option.text('请选择');
        jq.append(option);
        $.each(data, function (i, item) {
          var option = $('<option></option>');
          option.attr('value', item[jq.attr('valuefield')]);
          option.text(item[jq.attr('textfield')]);
          jq.append(option);
        });
      });
    }
  };

  //6.默认参数列表
  $.fn.combobox.defaults = {
    url: null,
    param: null,
    data: null,
    valueField: 'value',
    textField: 'text',
    placeholder: '请选择',
    onBeforeLoad: function (param) { },
    onLoadSuccess: function () { },
    onChange: function (value) { }
  };

  //这一段是新加的,在页面初始化完成之后调用初始化方法
  $(document).ready(function () {
    $('.combobox').each(function () {
      var $combobox = $(this);
      $.fn.combobox.call($combobox, $combobox.data());
    })
  });

})(jQuery);
大部分代码和上次的没啥区别,我们重点看看最下面这一段
  //这一段是新加的,在页面初始化完成之后调用初始化方法
  $(document).ready(function () {
    $('.combobox').each(function () {
      var $combobox = $(this);
      $.fn.combobox.call($combobox, $combobox.data());
    })
  });
Obviously, the component is initialized through the style selector after the page initialization is completed. Using each, if there are multiple .combobox styles, initialize each one in turn. Call the call method through $.fn.combobox.call($combobox, $combobox.data()); to call the combobox initialization. The two parameters in the call method correspond to:
- 1) Currently initialized jquery object
- 2) Parameter list. What you get here through $combobox.data() is the data-* attributes in all html. Pass all data-* attributes as parameters into the combobox's initialization method.
2. Initialize through data-* in html
 <select id="Search_"
     name="Search_province"
     class="form-control combobox"
     data-url="/Home/GetProvince"
     data-param='{"type":"0"}'
     data-text-field="Name"
     data-value-field="Id">
 </select>
Specify data-* attributes. From the above we know that the initialization here is to initialize the component through the style selector.combobox, so it is required that if you want to use data-* to initialize the component, you must set a class="combobox" style so that the background can obtain Tags that need to be initialized.
3. Backend C# method
 public class HomeController : Controller
 {
    public List<string> lstProvince = new List<string>() { "北京市", "天津市", "重庆市", "上海市", "河北省", "山西省", "辽宁省", "吉林省", "黑龙江省", "江苏省", "浙江省", "安徽省", "福建省", "江西省", "山东省", "河南省", "湖北省", "湖南省", "广东省", "海南省", "四川省", "贵州省", "云南省", "陕西省", "甘肃省", "青海省", "台湾省", "内蒙古自治区", "广西壮族自治区", "西藏自治区", "宁夏回族自治区", "新疆维吾尔自治区", "香港特别行政区", "澳门特别行政区" };

    public JsonResult GetProvince(string type)
    {
      var lstRes = new List<Province>();
      for (var i = 0; i < 10; i++)
      {
        var oModel = new Province();
        oModel.Id = i;
        oModel.Name = lstProvince[i];
        lstRes.Add(oModel);
      }
      return Json(lstRes, JsonRequestBehavior.AllowGet);
    }

  }

  public class Province
  {
    public int Id { get; set; }

    public string Name { get; set; }
  }
測試程式碼,沒什麼好說的。
4、調試效果
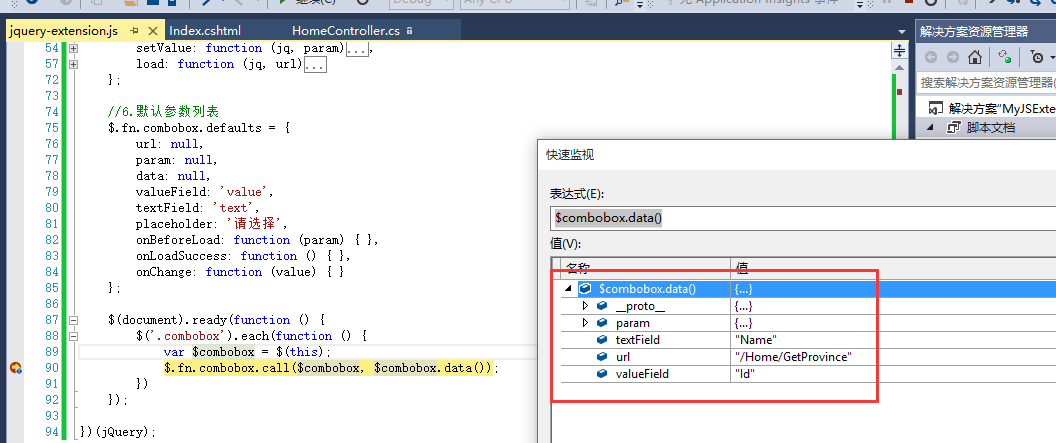
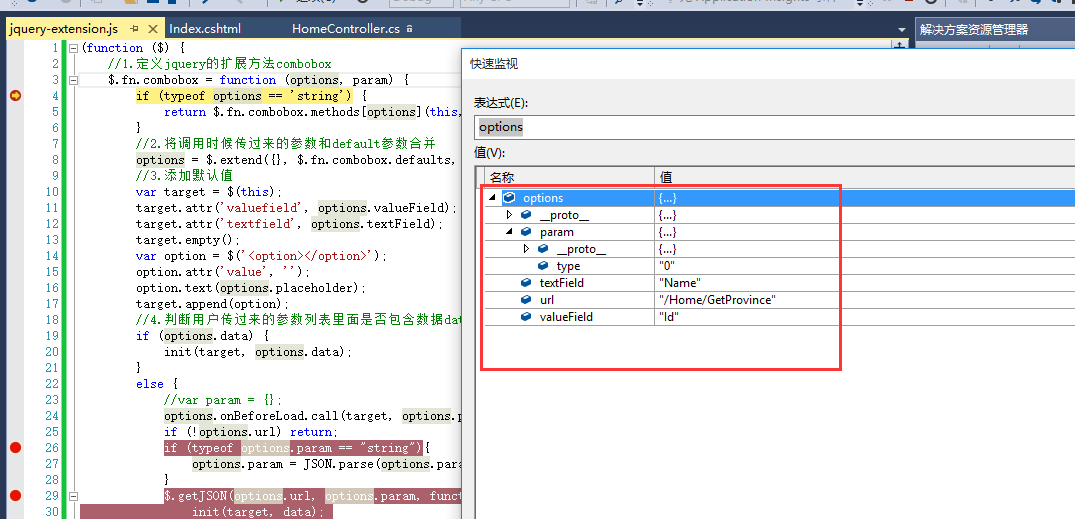
得到效果
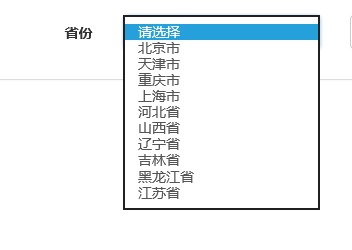
這樣基本上就完成透過data-*來初始化元件了。
上面簡單示範了下jquery data()方法結合html5 data-*屬性的使用。基本上能達到需求:不用多寫一行js程式碼直接初始化標籤。使用的時候直接引用jquery.js和jquery.extension.js檔案即可。但我們知道既然是html5裡面的特性,那麼對瀏覽器就得有一定的要求了。當然,此用法功能比較初級,但是對於一些簡單組件的初始化就夠用了。
以上就是本文的全部內容,希望對大家的學習有所幫助。

Hot AI Tools

Undresser.AI Undress
AI-powered app for creating realistic nude photos

AI Clothes Remover
Online AI tool for removing clothes from photos.

Undress AI Tool
Undress images for free

Clothoff.io
AI clothes remover

AI Hentai Generator
Generate AI Hentai for free.

Hot Article

Hot Tools

Notepad++7.3.1
Easy-to-use and free code editor

SublimeText3 Chinese version
Chinese version, very easy to use

Zend Studio 13.0.1
Powerful PHP integrated development environment

Dreamweaver CS6
Visual web development tools

SublimeText3 Mac version
God-level code editing software (SublimeText3)

Hot Topics
 How to use JS and Baidu Maps to implement map pan function
Nov 21, 2023 am 10:00 AM
How to use JS and Baidu Map to implement map pan function Baidu Map is a widely used map service platform, which is often used in web development to display geographical information, positioning and other functions. This article will introduce how to use JS and Baidu Map API to implement the map pan function, and provide specific code examples. 1. Preparation Before using Baidu Map API, you first need to apply for a developer account on Baidu Map Open Platform (http://lbsyun.baidu.com/) and create an application. Creation completed
 Essential tools for stock analysis: Learn the steps to draw candle charts with PHP and JS
Dec 17, 2023 pm 06:55 PM
Essential tools for stock analysis: Learn the steps to draw candle charts in PHP and JS. Specific code examples are required. With the rapid development of the Internet and technology, stock trading has become one of the important ways for many investors. Stock analysis is an important part of investor decision-making, and candle charts are widely used in technical analysis. Learning how to draw candle charts using PHP and JS will provide investors with more intuitive information to help them make better decisions. A candlestick chart is a technical chart that displays stock prices in the form of candlesticks. It shows the stock price
 Recommended: Excellent JS open source face detection and recognition project
Apr 03, 2024 am 11:55 AM
Face detection and recognition technology is already a relatively mature and widely used technology. Currently, the most widely used Internet application language is JS. Implementing face detection and recognition on the Web front-end has advantages and disadvantages compared to back-end face recognition. Advantages include reducing network interaction and real-time recognition, which greatly shortens user waiting time and improves user experience; disadvantages include: being limited by model size, the accuracy is also limited. How to use js to implement face detection on the web? In order to implement face recognition on the Web, you need to be familiar with related programming languages and technologies, such as JavaScript, HTML, CSS, WebRTC, etc. At the same time, you also need to master relevant computer vision and artificial intelligence technologies. It is worth noting that due to the design of the Web side
 How to create a stock candlestick chart using PHP and JS
Dec 17, 2023 am 08:08 AM
How to use PHP and JS to create a stock candle chart. A stock candle chart is a common technical analysis graphic in the stock market. It helps investors understand stocks more intuitively by drawing data such as the opening price, closing price, highest price and lowest price of the stock. price fluctuations. This article will teach you how to create stock candle charts using PHP and JS, with specific code examples. 1. Preparation Before starting, we need to prepare the following environment: 1. A server running PHP 2. A browser that supports HTML5 and Canvas 3
 PHP and JS Development Tips: Master the Method of Drawing Stock Candle Charts
Dec 18, 2023 pm 03:39 PM
With the rapid development of Internet finance, stock investment has become the choice of more and more people. In stock trading, candle charts are a commonly used technical analysis method. It can show the changing trend of stock prices and help investors make more accurate decisions. This article will introduce the development skills of PHP and JS, lead readers to understand how to draw stock candle charts, and provide specific code examples. 1. Understanding Stock Candle Charts Before introducing how to draw stock candle charts, we first need to understand what a candle chart is. Candlestick charts were developed by the Japanese
 How to use JS and Baidu Maps to implement map polygon drawing function
Nov 21, 2023 am 10:53 AM
How to use JS and Baidu Maps to implement map polygon drawing function. In modern web development, map applications have become one of the common functions. Drawing polygons on the map can help us mark specific areas for users to view and analyze. This article will introduce how to use JS and Baidu Map API to implement map polygon drawing function, and provide specific code examples. First, we need to introduce Baidu Map API. You can use the following code to import the JavaScript of Baidu Map API in an HTML file
 How to use JS and Baidu Maps to implement map heat map function
Nov 21, 2023 am 09:33 AM
How to use JS and Baidu Maps to implement the map heat map function Introduction: With the rapid development of the Internet and mobile devices, maps have become a common application scenario. As a visual display method, heat maps can help us understand the distribution of data more intuitively. This article will introduce how to use JS and Baidu Map API to implement the map heat map function, and provide specific code examples. Preparation work: Before starting, you need to prepare the following items: a Baidu developer account, create an application, and obtain the corresponding AP
 How to use JS and Baidu Map to implement map click event processing function
Nov 21, 2023 am 11:11 AM
Overview of how to use JS and Baidu Maps to implement map click event processing: In web development, it is often necessary to use map functions to display geographical location and geographical information. Click event processing on the map is a commonly used and important part of the map function. This article will introduce how to use JS and Baidu Map API to implement the click event processing function of the map, and give specific code examples. Steps: Import the API file of Baidu Map. First, import the file of Baidu Map API in the HTML file. This can be achieved through the following code:


