

Encapsulate your own JS components_javascript skills

1. Extend existing components
1. Demand background
Many times, we use jquery.ajax to send requests to the background, such as
$.ajax({
        type: "post",
        url: "/User/Edit",
        data: { data: JSON.stringify(postdata) },
        success: function (data, status) {
          if (status == "success") {
            toastr.success('提交数据成功');
            $("#tb_aaa").bootstrapTable('refresh');
          }
        },
        error: function (e) {
        },
        complete: function () {
        }

      });
This kind of code is too common. At this time, we have a need: when we call the ajax request ourselves, we don’t want to write code like error:function(e){} every time, but we also want it to Each time, the ajax error message is output to the browser so that the user can see it. What to do?
2. Implementation principle
It is not difficult to achieve the above effect. We can encapsulate $.ajax({}) and define the event corresponding to error in the encapsulated public method. Indeed, this can meet our requirements, but it is not perfect. The reason is very simple: 1) Encapsulating a layer on top of jquery is not efficient enough; 2) The caller's habits need to be changed, and every time ajax is called, We don’t want to see it written according to the rules of the method we defined, instead of directly using the native $.ajax({}) method.
In this case, how can we achieve the above requirements without encapsulating controls? The answer is to extend the native jquery.ajax through our $.extend.
In fact, it is not difficult to implement. Our requirements can be achieved through the following piece of code.
(function ($) {
  //1.得到$.ajax的对象
  var _ajax = $.ajax;
  $.ajax = function (options) {
    //2.每次调用发送ajax请求的时候定义默认的error处理方法
    var fn = {
      error: function (XMLHttpRequest, textStatus, errorThrown) {
        toastr.error(XMLHttpRequest.responseText, '错误消息', { closeButton: true, timeOut: 0, positionClass: 'toast-top-full-width' });
      },
      success: function (data, textStatus) { },
      beforeSend: function (XHR) { },
      complete: function (XHR, TS) { }
    }
    //3.如果在调用的时候写了error的处理方法,就不用默认的
    if (options.error) {
      fn.error = options.error;
    }
    if (options.success) {
      fn.success = options.success;
    }
    if (options.beforeSend) {
      fn.beforeSend = options.beforeSend;
    }
    if (options.complete) {
      fn.complete = options.complete;
    }
    //4.扩展原生的$.ajax方法,返回最新的参数
    var _options = $.extend(options, {
      error: function (XMLHttpRequest, textStatus, errorThrown) {
        fn.error(XMLHttpRequest, textStatus, errorThrown);
      },
      success: function (data, textStatus) {
        fn.success(data, textStatus);
      },
      beforeSend: function (XHR) {
        fn.beforeSend(XHR);
      },
      complete: function (XHR, TS) {
        fn.complete(XHR, TS);
      }
    });
    //5.将最新的参数传回ajax对象
    _ajax(_options);
  };
})(jQuery);
If you have not been exposed to the $.extend method in jquery, you may not understand what the above means. Okay, let's first take a look at how the jquery API explains the $.extend() method.
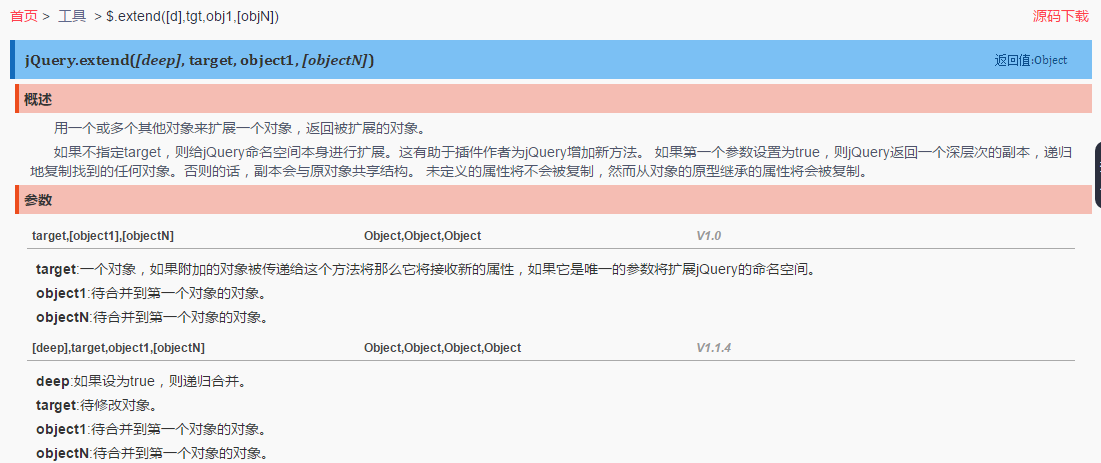
What does it mean? Let’s look at the two official examples to find out
Chestnut 1:
var settings = { validate: false, limit: 5, name: "foo" };
var options = { validate: true, name: "bar" };
$.extend(settings, options);
Result:
settings == { validate: true, limit: 5, name: "bar" }
Chestnut 2:
var empty = {};
var defaults = { validate: false, limit: 5, name: "foo" };
var options = { validate: true, name: "bar" };
var settings = $.extend(empty, defaults, options);
Result:
settings == { validate: true, limit: 5, name: "bar" }
empty == { validate: true, limit: 5, name: "bar" }
The above two simple examples illustrate that the function of the extend() method is to merge another object. If there are the same objects, they will be overwritten. If there are no identical objects, they will be added. It's that simple.
Understanding the role of $.extend(), we can roughly understand the implementation of the above extension jquery.ajax. The main steps are divided into:
1) Define the default error handling method.
var fn = {
      error: function (XMLHttpRequest, textStatus, errorThrown) {
        toastr.error(XMLHttpRequest.responseText, '错误消息', { closeButton: true, timeOut: 0, positionClass: 'toast-top-full-width' });
      },
      success: function (data, textStatus) { },
      beforeSend: function (XHR) { },
      complete: function (XHR, TS) { }
    }
2) Determine whether the user has customized error:function(){} when calling $.ajax({}). If it has been defined, the user-defined one will be used. Otherwise, the default error handling method will be used.
3) Use $.extend() to pass the default error handling method into the parameter of $.ajax(). When we look at the options parameter, it includes all the parameters in the $.ajax() method, and then use the default fn to expand it.
Through the above three steps, you can implement the default error handling method in the $.ajax() method. With this expansion, our users will not feel the change at all. We can still send ajax requests like $.ajax({});. If there are no special circumstances, there is no need to write an error handling method.
3. The meaning of component extension
Using component extensions can help us add some processing requirements related to our system business to the original components. When using them, we can still call them just like using native components, eliminating the need to encapsulate them again. A layer of bloat.
2. Expand your own components
The error event handling method of $.ajax() is extended above through the $.extend() method. Let's try encapsulating a component of our own. The function is very simple, but relatively illustrative. Let's take the select component as an example. In many cases, the options in our select need to fetch data from the database, so the general approach is to send an ajax request and then spell html in the success method. Now we will encapsulate a method to select remote data retrieval.
1. Code implementation and usage examples
Let’s start with the practical stuff and write it out:
(function ($) {
   //1.定义jquery的扩展方法combobox
  $.fn.combobox = function (options, param) {
    if (typeof options == 'string') {
      return $.fn.combobox.methods[options](this, param);
    }
    //2.将调用时候传过来的参数和default参数合并
    options = $.extend({}, $.fn.combobox.defaults, options || {});
    //3.添加默认值
    var target = $(this);
    target.attr('valuefield', options.valueField);
    target.attr('textfield', options.textField);
    target.empty();
    var option = $('<option></option>');
    option.attr('value', '');
    option.text(options.placeholder);
    target.append(option);
    //4.判断用户传过来的参数列表里面是否包含数据data数据集,如果包含,不用发ajax从后台取,否则否送ajax从后台取数据
    if (options.data) {
      init(target, options.data);
    }
    else {
      //var param = {};
      options.onBeforeLoad.call(target, options.param);
      if (!options.url) return;
      $.getJSON(options.url, options.param, function (data) {
        init(target, data);
      });
    }
    function init(target, data) {
      $.each(data, function (i, item) {
        var option = $('<option></option>');
        option.attr('value', item[options.valueField]);
        option.text(item[options.textField]);
        target.append(option);
      });
      options.onLoadSuccess.call(target);
    }
    target.unbind("change");
    target.on("change", function (e) {
      if (options.onChange)
        return options.onChange(target.val());
    });
  }

  //5.如果传过来的是字符串,代表调用方法。
  $.fn.combobox.methods = {
    getValue: function (jq) {
      return jq.val();
    },
    setValue: function (jq, param) {
      jq.val(param);
    },
    load: function (jq, url) {
      $.getJSON(url, function (data) {
        jq.empty();
        var option = $('<option></option>');
        option.attr('value', '');
        option.text('请选择');
        jq.append(option);
        $.each(data, function (i, item) {
          var option = $('<option></option>');
          option.attr('value', item[jq.attr('valuefield')]);
          option.text(item[jq.attr('textfield')]);
          jq.append(option);
        });
      });
    }
  };

  //6.默认参数列表
  $.fn.combobox.defaults = {
    url: null,
    param: null,
    data: null,
    valueField: 'value',
    textField: 'text',
    placeholder: '请选择',
    onBeforeLoad: function (param) { },
    onLoadSuccess: function () { },
    onChange: function (value) { }
  };
})(jQuery);
Let’s first take a look at how to use our custom components:
Usage 1: Remotely retrieve data through URL and initialize
First define an empty select
<select id="sel_search_plant" class="form-control"></select>
Then initialize it
$(function(){
   $('#sel_search_plant').combobox({
      url: '/apiaction/Plant/Find',
      valueField: 'TM_PLANT_ID',
      textField: 'NAME_C'
   });
})
The parameters are very simple, so I won’t introduce them one by one. It’s very simple, is there any~~
Usage 2: Value and setting
var strSelectedValue = $('#sel_search_plant').combobox("getValue");
$('#sel_search_plant').combobox("setValue", "aaa");
其实对于简单的select标签,博主觉得这里的getValu和SetValue意义不大,因为直接通过$('#sel_search_plant').val()就能解决的事,何必要再封一层。这里仅仅是做演示,试想,如果是封装成类似select2或者multiselect这种组件,getValue和setValue的意义就有了,你觉得呢?
2、代码详细讲解
上面的实现代码,如果您一眼就能看懂,证明您是经常封组件的大虾了,下面的就不用看了。如果看不懂,也没关系,我们将代码拆开详细看看里面是什么鬼。
(1)首先看看我们最常看到的如下写法:
(function ($) {
   //....封装组件逻辑
})(jQuery);
初初看到这种用法,博主也是狂抓,这是什么鬼嘛,四不像啊。使用多了之后才知道原来这就是一个匿名函数的形式。将它拆开来看如下:
var fn = function($){
    //.....组件封装逻辑
};
fn(jQuery);
也就是说这种写法就表示先定义一个方法,然后立即调用这个方法,jQuery相当于实参。打开jquery.js的原文件可以看到,jQuery是这个文件里面的一个全局变量。
(2)定义自己的组件的代码:
$.fn.combobox = function (options, param) {

};
习惯这种写法的应该知道,这个就表示向jquery对象添加自定义方法,比如你想使用文章开始的 $("#id").MyJsControl({}) 这种用法,你就可以这样定义 $.fn.MyJsControl=function(options){} 。
(3) options = $.extend({}, $.fn.combobox.defaults, options || {}); 这一句,看过上文的朋友应该还记得extend这么一个方法吧,怎么样,又来了你。这句话其实就没什么好说的了,合并默认参数和用户传进来的参数。
(4)默认参数列表
 $.fn.combobox.defaults = {
    url: null,
    param: null,
    data: null,
    valueField: 'value',
    textField: 'text',
    placeholder: '请选择',
    onBeforeLoad: function (param) { },
    onLoadSuccess: function () { },
    onChange: function (value) { }
  };
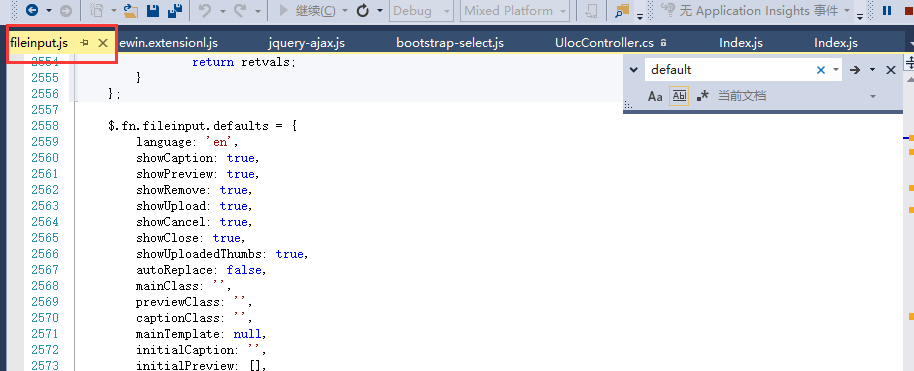
如果用户没有传参,就用默认的参数列表。如果你够细心,你会发现博主之前分享的其他bootstrap组件的js文件里面都有这么一个default参数列表。我们随便找两个:
bootstrap上传组件
bootstrap table组件
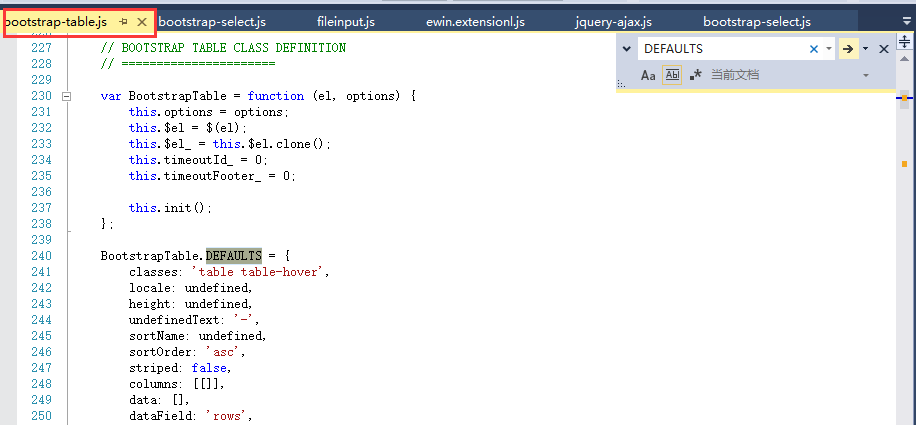
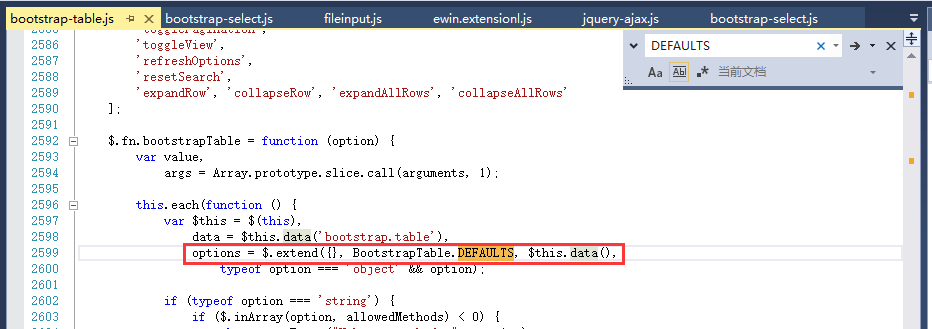
基本都是这么些用法。这样来看,是否也可以自己封一个js组件~~
以上就是对js组件扩展以及封装用法的认识和总结,希望大家喜欢。

Hot AI Tools

Undresser.AI Undress
AI-powered app for creating realistic nude photos

AI Clothes Remover
Online AI tool for removing clothes from photos.

Undress AI Tool
Undress images for free

Clothoff.io
AI clothes remover

AI Hentai Generator
Generate AI Hentai for free.

Hot Article
Hot Tools

Notepad++7.3.1
Easy-to-use and free code editor

SublimeText3 Chinese version
Chinese version, very easy to use

Zend Studio 13.0.1
Powerful PHP integrated development environment

Dreamweaver CS6
Visual web development tools

SublimeText3 Mac version
God-level code editing software (SublimeText3)
Hot Topics


 TrendForce: Nvidia's Blackwell platform products drive TSMC's CoWoS production capacity to increase by 150% this year
Apr 17, 2024 pm 08:00 PM
TrendForce: Nvidia's Blackwell platform products drive TSMC's CoWoS production capacity to increase by 150% this year
Apr 17, 2024 pm 08:00 PM
According to news from this site on April 17, TrendForce recently released a report, believing that demand for Nvidia's new Blackwell platform products is bullish, and is expected to drive TSMC's total CoWoS packaging production capacity to increase by more than 150% in 2024. NVIDIA Blackwell's new platform products include B-series GPUs and GB200 accelerator cards integrating NVIDIA's own GraceArm CPU. TrendForce confirms that the supply chain is currently very optimistic about GB200. It is estimated that shipments in 2025 are expected to exceed one million units, accounting for 40-50% of Nvidia's high-end GPUs. Nvidia plans to deliver products such as GB200 and B100 in the second half of the year, but upstream wafer packaging must further adopt more complex products.
 AMD 'Strix Halo” FP11 package size exposed: equivalent to Intel LGA1700, 60% larger than Phoenix
Jul 18, 2024 am 02:04 AM
AMD 'Strix Halo” FP11 package size exposed: equivalent to Intel LGA1700, 60% larger than Phoenix
Jul 18, 2024 am 02:04 AM
This website reported on July 9 that the AMD Zen5 architecture "Strix" series processors will have two packaging solutions. The smaller StrixPoint will use the FP8 package, while the StrixHalo will use the FP11 package. Source: videocardz source @Olrak29_ The latest revelation is that StrixHalo’s FP11 package size is 37.5mm*45mm (1687 square millimeters), which is the same as the LGA-1700 package size of Intel’s AlderLake and RaptorLake CPUs. AMD’s latest Phoenix APU uses an FP8 packaging solution with a size of 25*40mm, which means that StrixHalo’s F
 Introduction to Axios encapsulation and common methods in Vue
Jun 09, 2023 pm 04:13 PM
Introduction to Axios encapsulation and common methods in Vue
Jun 09, 2023 pm 04:13 PM
Introduction to Axios encapsulation and common methods in Vue Axios is an HTTP library based on Promise. Its advantage is that it has good readability, ease of use and scalability. As a popular front-end framework, Vue also provides full support for Axios. This article will introduce how to encapsulate Axios in Vue, and introduce some commonly used methods of Axios. 1. Axios encapsulation During the development process, we often need to perform some customized encapsulation of Axios, such as
 Packaging technology and application in PHP
Oct 12, 2023 pm 01:43 PM
Packaging technology and application in PHP
Oct 12, 2023 pm 01:43 PM
Encapsulation technology and application encapsulation in PHP is an important concept in object-oriented programming. It refers to encapsulating data and operations on data together in order to provide a unified access interface to external programs. In PHP, encapsulation can be achieved through access control modifiers and class definitions. This article will introduce encapsulation technology in PHP and its application scenarios, and provide some specific code examples. 1. Encapsulated access control modifiers In PHP, encapsulation is mainly achieved through access control modifiers. PHP provides three access control modifiers,
 How do C++ functions improve the efficiency of GUI development by encapsulating code?
Apr 25, 2024 pm 12:27 PM
How do C++ functions improve the efficiency of GUI development by encapsulating code?
Apr 25, 2024 pm 12:27 PM
By encapsulating code, C++ functions can improve GUI development efficiency: Code encapsulation: Functions group code into independent units, making the code easier to understand and maintain. Reusability: Functions create common functionality that can be reused across applications, reducing duplication and errors. Concise code: Encapsulated code makes the main logic concise and easy to read and debug.
 How to implement encapsulation and inheritance in Go language
Jul 23, 2023 pm 08:17 PM
How to implement encapsulation and inheritance in Go language
Jul 23, 2023 pm 08:17 PM
How to implement encapsulation and inheritance in Go language Encapsulation and inheritance are two important concepts in object-oriented programming. They can make the code more modular and maintainable, and also provide convenience for code reuse. This article will introduce how to implement encapsulation and inheritance in Go language and provide corresponding code examples. Encapsulation Encapsulation is to encapsulate data and functions, hide implementation details, and only expose necessary interfaces for external use. In Go language, encapsulation is achieved through exported and non-exported identifiers. Identifiers with capital letters can be accessed by other packages
 PHP Code Encapsulation Tips: How to Use Classes and Objects to Encapsulate Reusable Code Blocks
Jul 29, 2023 pm 11:19 PM
PHP Code Encapsulation Tips: How to Use Classes and Objects to Encapsulate Reusable Code Blocks
Jul 29, 2023 pm 11:19 PM
PHP code encapsulation skills: How to use classes and objects to encapsulate reusable code blocks Summary: During development, we often encounter code blocks that need to be reused. In order to improve the maintainability and reusability of the code, we can use class and object encapsulation techniques to encapsulate these code blocks. This article explains how to use classes and objects to encapsulate reusable blocks of code and provides several concrete code examples. Advantages of using classes and objects to encapsulate. Using classes and objects to encapsulate has the following advantages: 1.1 Improve the maintainability of code by reducing duplication
 Foxconn builds AI one-stop service, and invested Sharp to enter advanced semiconductor packaging: put into production in 2026, designed to produce 20,000 wafers per month
Jul 18, 2024 pm 02:17 PM
Foxconn builds AI one-stop service, and invested Sharp to enter advanced semiconductor packaging: put into production in 2026, designed to produce 20,000 wafers per month
Jul 18, 2024 pm 02:17 PM
According to news from this site on July 11, the Economic Daily reported today (July 11) that Foxconn Group has entered the advanced packaging field, focusing on the current mainstream panel-level fan-out packaging (FOPLP) semiconductor solution. 1. Following its subsidiary Innolux, Sharp, invested by Foxconn Group, also announced its entry into Japan's panel-level fan-out packaging field and is expected to be put into production in 2026. Foxconn Group itself has sufficient influence in the AI field, and by making up for its shortcomings in advanced packaging, it can provide "one-stop" services to facilitate the acceptance of more AI product orders in the future. According to public information consulted on this site, Foxconn Group currently holds 10.5% of Sharp's shares. The group stated that it will not increase or reduce its holdings at this stage and will maintain its holdings.
