Home Web Front-end JS Tutorial Super cool animation effect realized by HTML5 game engine LTweenLite (with demo source code download)_javascript skills

Super cool animation effect realized by HTML5 game engine LTweenLite (with demo source code download)_javascript skills

May 16, 2016 pm 03:17 PM
html5 Animation effects Game Engine

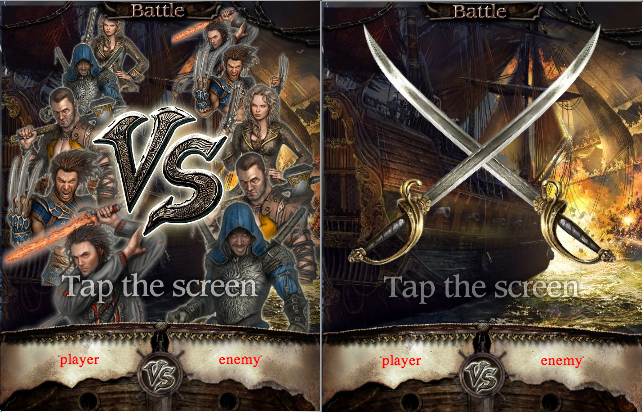
The example in this article describes the super cool animation effect achieved by the HTML5 game engine LTweenLite. Share it with everyone for your reference, the details are as follows:

lufylegend.js is an open source HTML5 game engine. There are often various animations in games. Some of these animations are flash files and some are video files. This time, we will use lufylegend to create a handsome game animation. As shown below.

The test connection is as follows:
http://lufylegend.com/demo/effects01/

1. Preparation

The preparation is of course to download the engine.

lufylegend.js engine official website
http://lufylegend.com/lufylegend

lufylegend.js engine online API documentation link
http://lufylegend.com/lufylegend/api

2. Production process

To do animation, you generally need to use the timeline. The usage of timeline events in the lufylegend.js engine is as follows

Copy code The code is as follows:
layer.addEventListener(LEvent.ENTER_FRAME, onframe);

For example, if we want an object A to continuously move to the right, we can do this

1

2

3

4

layer.addEventListener(LEvent.ENTER_FRAME, onframe);

function onframe(event){

  A.x += 1;

}

Copy after login

Timeline is the most commonly used method in the production of games and animations, but this time we used another method to produce animations, which is LTweenLite.

LTweenLite is the easing class in the lufylegend.js engine. It is very useful in the animation production process and is even more convenient than ordinary timeline events. In the following development, all animations will be eased through LTweenLite Implemented by class class.

1. Of course, you must prepare HTML first

1

2

3

4

5

6

7

8

9

10

11

12

13

14

<!DOCTYPE html>

<html lang="en">

<head>

  <meta charset="utf-8" />

  <title>effects01</title>

  <script type="text/javascript" src="js/lufylegend-1.8.0.simple.min.js"></script>

  <script type="text/javascript" src="js/lufylegend.LoadingSample4-0.1.0.min.js"></script>

</head>

<body style="margin:0px 0px 0px 0px;">

  <div id="legend"></div>

<script>

</script>

  </body>

</html>

Copy after login

2. Then the engine is initialized and images are read

1

2

3

4

5

6

7

8

9

10

11

12

13

14

15

16

17

18

19

20

21

22

23

24

25

26

27

28

var imgData = [

  {name:"background",path:"background.jpg"},

  {name:"background_ad",path:"background_ad.jpg"},

  {name:"card01",path:"card01.png"},

  {name:"card02",path:"card02.png"},

  {name:"card03",path:"card03.png"},

  {name:"card04",path:"card04.png"},

  {name:"card05",path:"card05.png"},

  {name:"effects",path:"effects.png"},

  {name:"stable_assets",path:"stable_assets.png"}

];

var dataList;

var loadingLayer,charaLayer,stageLayer;

var warshipDown,playerText,enemyText,windowUp,title,big_vs,background,swords,swords02;

if(LGlobal.canTouch){

  LGlobal.stageScale = LStageScaleMode.EXACT_FIT;

  LSystem.screen(LStage.FULL_SCREEN);

}

init(20,"legend",320,410,main);

function main(){

  loadingLayer = new LoadingSample4();

  addChild(loadingLayer);

  /**读取图片*/

  LLoadManage.load(imgData,

    function(progress){

      loadingLayer.setProgress(progress);

    },gameInit);

}

Copy after login

The above code will set the interface to full screen when browsing on a mobile phone.

3. Create an automatic flashing background

1

2

3

4

5

6

7

8

9

10

11

12

13

14

15

16

17

18

19

20

21

22

/**

 * 背景

 * */

function BackGround(bg01,bg02){

  var self = this;

  base(self,LSprite,[]);

  self.bitmapBG01 = new LBitmap(new LBitmapData(bg01));

  self.addChild(self.bitmapBG01);

  self.bitmapBG02 = new LBitmap(new LBitmapData(bg02));

  self.addChild(self.bitmapBG02);

  self.run();

}

/**

 * 让背景类的两个图片中的上层图片,不断的交替显示和隐藏状态,以达到明暗交替闪烁的效果

 * */

BackGround.prototype.run = function(){

  var self = this;

  var tween = LTweenLite.to(self.bitmapBG02,0.5,{alpha:0,ease:Bounce.easeIn}).

  to(self.bitmapBG02,0.5,{alpha:1,ease:Bounce.easeIn,onComplete:function(){

    self.run();

  }});

}

Copy after login

The above code uses the new function of lufylegend.js engine version 1.8.0, which continuously eases, and when the ease ends, it calls its own run function, thereby realizing a loop.

4. A battleship that continuously fires cannonballs

1

2

3

4

5

6

7

8

9

10

11

12

13

14

15

16

17

18

19

20

21

22

23

24

25

26

27

28

29

30

31

32

33

34

35

36

37

38

39

40

41

42

43

44

45

46

47

48

49

50

/**

 * 战舰

 * */

function Warship(shipData,shotData){

  var self = this;

  base(self,LSprite,[]);

  self.bitmapShip = new LBitmap(shipData);

  self.addChild(self.bitmapShip);

  self.bitmapShot = new LBitmap(shotData);

  self.bitmapShot.x = -10;

  self.bitmapShot.y = self.bitmapShip.y + 123;

  self.addChild(self.bitmapShot);

  self.bitmapShot.rotate = -75;

  self.bitmapShot.alpha = 0;

  self.bitmapShot02 = new LBitmap(shotData);

  self.bitmapShot02.scaleX = self.bitmapShot02.scaleY = 0.7;

  self.bitmapShot02.x = 65;

  self.bitmapShot02.y = self.bitmapShip.y + 220;

  self.addChild(self.bitmapShot02);

  self.bitmapShot02.rotate = -80;

  self.bitmapShot02.alpha = 0;

  self.run();

  self.shot();

}

/**

 * 让战舰上下浮动

 * */

Warship.prototype.run = function(){

  var self = this;

  LTweenLite.to(self.bitmapShip,1,{y:5,ease:Quad.easeInOut}).

  to(self.bitmapShip,1,{y:0,ease:Quad.easeInOut,onComplete:function(){

    self.run();

  }});

}

/**

 * 让战舰开火发炮

 * */

Warship.prototype.shot = function(){

  var self = this;

  LTweenLite.to(self.bitmapShot,0.1,{delay:1.5,alpha:1,ease:Quad.easeInOut,onUpdate:function(obj){

    obj.y = obj.parent.bitmapShip.y + 123;

  }})

  .to(self.bitmapShot,0.1,{alpha:0,ease:Quad.easeInOut})

  .to(self.bitmapShot02,0.1,{delay:0.5,alpha:1,ease:Quad.easeInOut,onUpdate:function(obj){

    obj.y = obj.parent.bitmapShip.y + 220;

  }})

  .to(self.bitmapShot02,0.1,{alpha:0,ease:Quad.easeInOut,onComplete:function(){

    self.shot();

  }});

}

Copy after login

The above code uses the same method to implement the loop.

5. A flashing title

1

2

3

4

5

6

7

8

9

10

11

12

13

14

15

16

17

18

19

20

21

/**

 * 标题

 * */

function Title(bitmapData){

  var self = this;

  base(self,LSprite,[]);

  self.bitmap = new MiddleBitmap(bitmapData);

  self.bitmap.scaleX = self.bitmap.scaleY = 0.5;

  self.addChild(self.bitmap);

  self.run();

}

/**

 * 通过改变标题的透明状态,让标题明暗交替闪烁

 * */

Title.prototype.run = function(){

  var self = this;

  LTweenLite.to(self.bitmap,1,{alpha:0.4,ease:Quad.easeInOut}).

  to(self.bitmap,1,{alpha:1,ease:Quad.easeInOut,onComplete:function(obj){

    obj.parent.run();

  }});

}

Copy after login

The above code realizes the flashing display of the title by continuously changing the transparency of the image.

6. Sword type that can flip the display image

1

2

3

4

5

6

7

8

9

10

11

12

13

14

15

/**

 * 剑,通过参数scale的直,来设定剑的图片是否翻转

 * */

function Swords(bitmapData,scale){

  var self = this;

  base(self,LSprite,[]);

  self.bitmapSwords = new LBitmap(bitmapData);

  self.bitmapSwords.x = -self.bitmapSwords.getWidth()*0.5;

  self.bitmapSwords.y = -self.bitmapSwords.getHeight()*0.5;

  if(scale == -1){

    self.bitmapSwords.scaleY = scale;

    self.bitmapSwords.y += self.bitmapSwords.getHeight();

  }

  self.addChild(self.bitmapSwords);

}

Copy after login

7. Move the image to the vertex object. If the center of the sub-object LBitmap is moved to the origin of the object, the advantage is that the displayed position of the object will not change regardless of whether the object is stretched or rotated.

1

2

3

4

5

6

7

8

9

10

11

/**

 * 将LBitmap对象的中心放到一个对象的原点,并返回这个对象

 * */

function MiddleBitmap(bitmapData){

  var self = this;

  base(self,LSprite,[]);

  self.bitmapTitle = new LBitmap(bitmapData);

  self.bitmapTitle.x = -self.bitmapTitle.getWidth()*0.5;

  self.bitmapTitle.y = -self.bitmapTitle.getHeight()*0.5;

  self.addChild(self.bitmapTitle);

}

Copy after login

8. A special effects class

1

2

3

4

5

6

7

8

9

10

11

12

13

14

15

16

17

18

19

20

21

22

23

24

25

26

27

28

29

30

31

32

33

/**

 * 特效类,特效图片加入后,特效显示完毕之后自动消失

 * */

function Effect(index){

  var self = this;

  base(self,LSprite,[]);

  var bitmapData;

  switch(index){

    case 0:

      bitmapData = new LBitmapData(dataList["effects"],99,45,116,96);

      break;

    case 1:

      bitmapData = new LBitmapData(dataList["effects"],102,278,110,88);

      break;

    case 2:

      bitmapData = new LBitmapData(dataList["effects"],357,85,122,127);

      break;

    case 3:

      bitmapData = new LBitmapData(dataList["effects"],346,357,108,99);

      break;

    case 4:

      bitmapData = new LBitmapData(dataList["effects"],246,918,57,62);

      break;

  }

  self.item = new MiddleBitmap(bitmapData);

  self.item.scaleX = self.item.scaleY = 0.1;

  self.addChild(self.item);

  LTweenLite.to(self.item,0.1,{scaleX:2,scaleY:2,ease:Quad.easeInOut})

  .to(self.item,0.2,{scaleX:3,scaleY:3,alpha:0,ease:Quad.easeInOut,onComplete:function(obj){

    var eff = obj.parent;

    eff.parent.removeChild(eff);

  }});

}

Copy after login

The above special effects class will gradually disappear automatically when the special effects object is added to the screen.

9. Add characters to the screen

1

2

3

4

5

6

7

8

9

10

11

12

13

14

15

16

17

18

19

20

21

22

23

24

25

26

27

28

29

30

31

32

33

34

35

36

37

38

39

40

41

42

43

44

45

46

47

48

49

50

51

52

53

54

55

56

57

58

59

60

61

62

63

64

65

66

67

68

69

70

71

72

73

74

75

76

77

78

79

/**

 * 添加人物图片到界面里

 * */

function setChara(){

  charaLayer = new LSprite();

  stageLayer.addChild(charaLayer);

  var charaBitmap,sy = 220;

  var charaBitmap = new MiddleBitmap(new LBitmapData(dataList["card01"]));

  charaBitmap.scale = 0.4;

  charaBitmap.x = 110;

  charaBitmap.ty = 50;

  charaBitmap.y = sy;

  charaBitmap.alpha = 0;

  charaLayer.addChild(charaBitmap);

  charaBitmap = new MiddleBitmap(new LBitmapData(dataList["card02"]));

  charaBitmap.scale = 0.45;

  charaBitmap.x = 85;

  charaBitmap.ty = 90;

  charaBitmap.y = sy;

  charaBitmap.alpha = 0;

  charaLayer.addChild(charaBitmap);

  charaBitmap = new MiddleBitmap(new LBitmapData(dataList["card03"]));

  charaBitmap.scale = 0.55;

  charaBitmap.x = 70;

  charaBitmap.ty = 140;

  charaBitmap.y = sy;

  charaBitmap.alpha = 0;

  charaLayer.addChild(charaBitmap);

  charaBitmap = new MiddleBitmap(new LBitmapData(dataList["card04"]));

  charaBitmap.scale = 0.65;

  charaBitmap.x = 75;

  charaBitmap.ty = 215;

  charaBitmap.y = sy;

  charaBitmap.alpha = 0;

  charaLayer.addChild(charaBitmap);

  charaBitmap = new MiddleBitmap(new LBitmapData(dataList["card05"]));

  charaBitmap.scale = 0.75;

  charaBitmap.x = 85;

  charaBitmap.ty = 280;

  charaBitmap.y = sy;

  charaBitmap.alpha = 0;

  charaLayer.addChild(charaBitmap);

  //right

  charaBitmap = new MiddleBitmap(new LBitmapData(dataList["card05"]));

  charaBitmap.scale = 0.4;

  charaBitmap.x = 215;

  charaBitmap.ty = 50;

  charaBitmap.y = sy;

  charaBitmap.alpha = 0;

  charaLayer.addChild(charaBitmap);

  charaBitmap = new MiddleBitmap(new LBitmapData(dataList["card04"]));

  charaBitmap.scale = 0.45;

  charaBitmap.x = 240;

  charaBitmap.ty = 90;

  charaBitmap.y = sy;

  charaBitmap.alpha = 0;

  charaLayer.addChild(charaBitmap);

  charaBitmap = new MiddleBitmap(new LBitmapData(dataList["card01"]));

  charaBitmap.scale = 0.55;

  charaBitmap.x = 260;

  charaBitmap.ty = 140;

  charaBitmap.y = sy;

  charaBitmap.alpha = 0;

  charaLayer.addChild(charaBitmap);

  charaBitmap = new MiddleBitmap(new LBitmapData(dataList["card03"]));

  charaBitmap.scale = 0.65;

  charaBitmap.x = 260;

  charaBitmap.ty = 215;

  charaBitmap.y = sy;

  charaBitmap.alpha = 0;

  charaLayer.addChild(charaBitmap);

  charaBitmap = new MiddleBitmap(new LBitmapData(dataList["card02"]));

  charaBitmap.scale = 0.75;

  charaBitmap.x = 242;

  charaBitmap.ty = 280;

  charaBitmap.y = sy;

  charaBitmap.alpha = 0;

  charaLayer.addChild(charaBitmap);

}

Copy after login

Add five characters to the left and right sides, and set the target position and target size that they will eventually display on the screen.

Use the following function to add a special effect

1

2

3

4

5

6

function addEff(index,x,y){

  var eff = new Effect(index);

  eff.x = x;

  eff.y = y;

  stageLayer.addChild(eff);

}

Copy after login

10. Next, add all the objects to the screen. For objects that are not to be displayed at the beginning, set their visible attribute to false;

1

2

3

4

5

6

7

8

9

10

11

12

13

14

15

16

17

18

19

20

21

22

23

24

25

26

27

28

29

30

31

32

33

34

35

36

37

38

39

40

41

42

43

44

45

46

47

48

49

50

51

52

53

54

55

56

57

58

59

60

61

62

63

64

65

66

67

68

69

70

71

72

73

74

75

76

77

78

79

80

81

82

83

84

85

86

/**

 * 将所有对象和图片都添加到界面上

 * */

function addItem(){

  backLayer = new LSprite();

  stageLayer.addChild(backLayer);

  backLayer.scaleX = backLayer.scaleY = 2;

  background = new BackGround(dataList["background"],dataList["background_ad"]);

  background.x = -60;

  background.y = -50;

  backLayer.addChild(background);

  var warship = new Warship(new LBitmapData(dataList["stable_assets"],0,0,409,480)

      ,new LBitmapData(dataList["stable_assets"],754,0,270,250));

  warship.scaleX = warship.scaleY = 0.8;

  backLayer.addChild(warship);

  setChara();

  warshipDown = new LSprite();

  warshipDown.y = LGlobal.height;

  stageLayer.addChild(warshipDown);

  var warship02 = new LBitmap(new LBitmapData(dataList["stable_assets"],0,505,720,310));

  warship02.scaleX = warship02.scaleY = 0.5;

  warship02.x = (LGlobal.width - warship02.getWidth())*0.5;

  warshipDown.addChild(warship02);

  var small_vs = new MiddleBitmap(new LBitmapData(dataList["stable_assets"],726,502,120,120));

  small_vs.scaleX = small_vs.scaleY = 0.6;

  small_vs.x = LGlobal.width*0.5;

  small_vs.y = LGlobal.height - 355;

  warshipDown.addChild(small_vs);

  playerText = new LTextField();

  playerText.color = "red";

  playerText.text = "player";

  playerText.x = (LGlobal.width*0.5 - playerText.getWidth())*0.5;

  playerText.y = 30;

  warshipDown.addChild(playerText);

  enemyText = new LTextField();

  enemyText.color = "red";

  enemyText.text = "enemy";

  enemyText.x = LGlobal.width*0.5 + (LGlobal.width*0.5 - enemyText.getWidth())*0.5;

  enemyText.y = 30;

  warshipDown.addChild(enemyText);

  windowUp = new LSprite();

  windowUp.y = -50;

  stageLayer.addChild(windowUp);

  var title_battle = new MiddleBitmap(new LBitmapData(dataList["stable_assets"],897,469,45,239));

  title_battle.rotate = -90;

  title_battle.scaleX = title_battle.scaleY = 0.55;

  title_battle.x = LGlobal.width*0.5;

  title_battle.y = 10;

  windowUp.addChild(title_battle);

  var chain = new LBitmap(new LBitmapData(dataList["stable_assets"],880,264,71,180));

  chain.rotate = -90;

  chain.scaleX = chain.scaleY = 0.5;

  windowUp.addChild(chain);

  var chain01 = new LBitmap(new LBitmapData(dataList["stable_assets"],851,740,100,173));

  chain01.rotate = -90;

  chain01.scaleX = chain01.scaleY = 0.6;

  chain01.x = 240;

  windowUp.addChild(chain01);

  title = new Title(new LBitmapData(dataList["stable_assets"],415,425,405,80));

  title.x = LGlobal.width*0.5;

  title.y = 290;

  title.alpha = 0;

  title.visible = false;

  stageLayer.addChild(title);

  big_vs = new MiddleBitmap(new LBitmapData(dataList["stable_assets"],420,5,340,330));

  big_vs.rotate = -90;

  big_vs.x = LGlobal.width*0.5;

  big_vs.y = 170;

  big_vs.alpha = 0;

  big_vs.visible = false;

  stageLayer.addChild(big_vs);

  swords = new Swords(new LBitmapData(dataList["stable_assets"],405,335,454,89),1);

  swords.x = LGlobal.width*0.5;

  swords.y = LGlobal.height*0.5 - 60;

  swords.rotate = -135;

  swords.scaleX = swords.scaleY = 0.8;

  swords.visible = false;

  stageLayer.addChild(swords);

  swords02 = new Swords(new LBitmapData(dataList["stable_assets"],405,335,454,89),-1);

  swords02.x = LGlobal.width*0.5;

  swords02.y = LGlobal.height*0.5 - 60;

  swords02.rotate = -45;

  swords02.scaleX = swords02.scaleY = 0.8;

  swords02.visible = false;

  stageLayer.addChild(swords02);

}

Copy after login

11. Use the easing function to realize animation.

Watch the first animation first

1

2

3

4

5

6

7

8

9

10

11

12

13

14

15

16

17

18

19

20

21

22

23

24

25

26

27

28

29

30

31

32

33

34

35

36

37

38

39

40

/*

 * 第一个动画开始播放

 * */

function animation01Start(event){

  if(event){

    stageLayer.die();

    stageLayer.removeAllChild();

  }

  /*添加所有对象*/

  addItem();

  /*所有人物开始缓动*/

  var charaList = charaLayer.childList,chara,delayValue,duration;

  for(var i=0,l=charaList.length;i<l i="" chara="charaList[i];" y="220;" scalex="chara.scaleY" 2="" delayvalue="0.1*i;" if="">= 5){

      delayValue = 0.1*(i - 5);

    }

    duration = 1 - delayValue;

    chara.y = 220;

    LTweenLite.to(chara,duration,{delay:delayValue,alpha:1,scaleX:chara.scale,scaleY:chara.scale,ease:Strong.easeOut})

    .to(chara,1,{y:chara.ty,ease:Strong.easeOut});

  }

  /*背景缓动,变大左移上移→变小右移下移*/

  LTweenLite.to(backLayer,1,{scaleX:1.3,scaleY:1.3,x:-100,y:-50,ease:Strong.easeOut})

  .to(backLayer,1,{scaleX:1,scaleY:1,x:0,y:0,ease:Strong.easeOut});

  /*下面窗口缓动,延时→上移→标题可显示+VS可显示*/

  LTweenLite.to(warshipDown,0.5,{delay:1.5,y:320,ease:Elastic.easeOut,onComplete:function(){

    title.visible = big_vs.visible = true;

  }});

  /*上面窗口缓动,延时→下移*/

  LTweenLite.to(windowUp,0.5,{delay:1.5,y:0,ease:Elastic.easeOut});

  /*上面窗口缓动,延时→不透明*/

  LTweenLite.to(title,0.2,{delay:1.5,alpha:1,ease:Elastic.easeOut});

  /*VS标题缓动,延时→不透明缩小→缩小→添加特效并且进入第二个动画初始化*/

  LTweenLite.to(big_vs,0.5,{delay:1.5,alpha:1,scaleX:1,scaleY:1,ease:Elastic.easeOut})

  .to(big_vs,1,{scaleX:0.45,scaleY:0.45,ease:Elastic.easeOut,onComplete:function(){

    addEff(1,big_vs.x,big_vs.y);

    addEff(1,big_vs.x,big_vs.y);

    /*所有缓动后,动画2开始准备*/

    animation02Init();

  }});

}

Copy after login

The second animation

1

2

3

4

5

6

7

8

9

10

11

12

13

14

15

16

17

18

19

20

21

22

23

24

25

26

27

28

29

30

31

32

33

34

35

36

37

38

39

40

41

42

43

44

45

/*

 * 第二个动画开始播放

 * */

function animation02Start(event){

  stageLayer.removeEventListener(LMouseEvent.MOUSE_UP, animation02Start);

  /*VS缓动,变大变透明→然后消失*/

  LTweenLite.to(big_vs,1,{scaleX:2,scaleY:2,alpha:0,ease:Elastic.easeIn,onComplete:function(){

    big_vs.parent.removeChild(big_vs);

  }});

  /*背景缓动,变大→变大→变小*/

  LTweenLite.to(backLayer,2,{delay:1,scaleX:1.2,scaleY:1.2,x:-100,y:-50,ease:Sine.easeInOut})

    .to(backLayer,1,{scaleX:1.5,scaleY:1.5,ease:Sine.easeInOut})

    .to(backLayer,0.5,{scaleX:1,scaleY:1,x:0,y:0,ease:Sine.easeInOut});

  /*下面窗口缓动,下移→上移*/

  LTweenLite.to(warshipDown,0.5,{delay:0.5,y:LGlobal.height,ease:Strong.easeOut})

  .to(warshipDown,0.5,{delay:3,y:320,ease:Strong.easeOut});

  /*上面窗口缓动,上移→下移*/

  LTweenLite.to(windowUp,0.5,{delay:0.5,y:-50,ease:Strong.easeOut})

  .to(windowUp,0.5,{delay:3,y:0,ease:Strong.easeOut});

  /*标题缓动,无效果→不显示+人物缓动开始→显示*/

  LTweenLite.to(title,0.5,{delay:0.5,ease:Strong.easeOut,onComplete:function(obj){

    obj.visible = false;

    charaBattle();

  }})

  .to(title,0.5,{delay:3,ease:Strong.easeOut,onComplete:function(obj){

    obj.visible = true;

  }});

  /*宝剑变为可显示,且坐标设定在画面之外*/

  swords.visible = true;

  swords02.visible = true;

  swords.x = -200;

  swords02.x = LGlobal.width + 200;

  var wait = 4;

  /*左边宝剑缓动,向右移动屏幕中间*/

  LTweenLite.to(swords,0.5,{delay:wait,x:LGlobal.width*0.5,ease:Elastic.easeOut});

  /*右边宝剑缓动,向左移动屏幕中间*/

  LTweenLite.to(swords02,0.5,{delay:wait,x:LGlobal.width*0.5,ease:Elastic.easeOut});

  /*stageLayer缓动,无效果延时,结束后添加特效并且进入第一个动画初始化*/

  LTweenLite.to(stageLayer,0.2,{delay:wait,onComplete:function(){

    addEff(Math.random()*5 >> 0,LGlobal.width*0.5,LGlobal.height*0.4);

    addEff(Math.random()*5 >> 0,LGlobal.width*0.5,LGlobal.height*0.4);

    addEff(Math.random()*5 >> 0,LGlobal.width*0.5,LGlobal.height*0.4);

    animation01Init();

  }});

}

Copy after login

12. Finally, you need to add a click event after the two animations are over. Click the screen so that the two animations can switch to each other

1

2

3

4

5

6

7

8

9

10

11

12

/*

 * 点击画面后,第一个动画开始播放

 * */

function animation01Init(){

  stageLayer.addEventListener(LMouseEvent.MOUSE_UP, animation01Start);

}

/*

 * 点击画面后,第二个动画开始播放

 * */

function animation02Init(){

  stageLayer.addEventListener(LMouseEvent.MOUSE_UP, animation02Start);

}

Copy after login

Done, the above is all the code. Welcome everyone to communicate together

3. Source code

Click here for complete example codeDownload from this site.

I hope this article will be helpful to everyone in JavaScript programming.

Statement of this Website
The content of this article is voluntarily contributed by netizens, and the copyright belongs to the original author. This site does not assume corresponding legal responsibility. If you find any content suspected of plagiarism or infringement, please contact admin@php.cn

Hot AI Tools

Undresser.AI Undress

Undresser.AI Undress

AI-powered app for creating realistic nude photos

AI Clothes Remover

AI Clothes Remover

Online AI tool for removing clothes from photos.

Undress AI Tool

Undress AI Tool

Undress images for free

Clothoff.io

Clothoff.io

AI clothes remover

AI Hentai Generator

AI Hentai Generator

Generate AI Hentai for free.

Hot Tools

Notepad++7.3.1

Notepad++7.3.1

Easy-to-use and free code editor

SublimeText3 Chinese version

SublimeText3 Chinese version

Chinese version, very easy to use

Zend Studio 13.0.1

Zend Studio 13.0.1

Powerful PHP integrated development environment

Dreamweaver CS6

Dreamweaver CS6

Visual web development tools

SublimeText3 Mac version

SublimeText3 Mac version

God-level code editing software (SublimeText3)

Table Border in HTML Table Border in HTML Sep 04, 2024 pm 04:49 PM

Guide to Table Border in HTML. Here we discuss multiple ways for defining table-border with examples of the Table Border in HTML.

HTML margin-left HTML margin-left Sep 04, 2024 pm 04:48 PM

Guide to HTML margin-left. Here we discuss a brief overview on HTML margin-left and its Examples along with its Code Implementation.

Nested Table in HTML Nested Table in HTML Sep 04, 2024 pm 04:49 PM

This is a guide to Nested Table in HTML. Here we discuss how to create a table within the table along with the respective examples.

HTML Table Layout HTML Table Layout Sep 04, 2024 pm 04:54 PM

Guide to HTML Table Layout. Here we discuss the Values of HTML Table Layout along with the examples and outputs n detail.

HTML Input Placeholder HTML Input Placeholder Sep 04, 2024 pm 04:54 PM

Guide to HTML Input Placeholder. Here we discuss the Examples of HTML Input Placeholder along with the codes and outputs.

HTML Ordered List HTML Ordered List Sep 04, 2024 pm 04:43 PM

Guide to the HTML Ordered List. Here we also discuss introduction of HTML Ordered list and types along with their example respectively

Moving Text in HTML Moving Text in HTML Sep 04, 2024 pm 04:45 PM

Guide to Moving Text in HTML. Here we discuss an introduction, how marquee tag work with syntax and examples to implement.

HTML onclick Button HTML onclick Button Sep 04, 2024 pm 04:49 PM

Guide to HTML onclick Button. Here we discuss their introduction, working, examples and onclick Event in various events respectively.

See all articles