1. Component effect preview
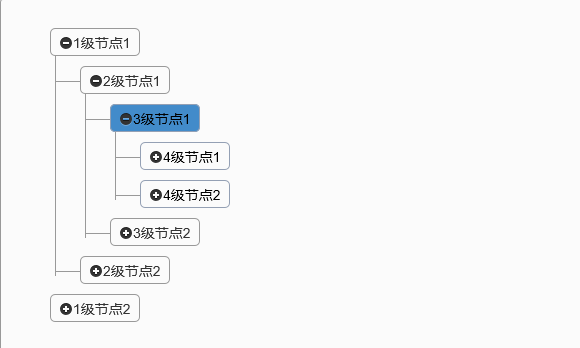
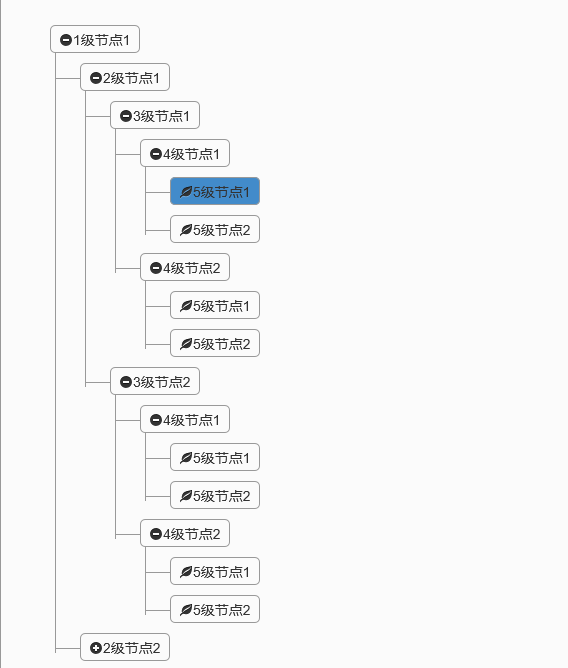
In fact, the effect is similar to the previous one. The blogger just added a selected background color based on the previous one.
Collapse all

Expand

Expand all

2. Code examples
In fact, the effect is very simple. Let’s focus on how the code is encapsulated. It's still the old rule, post the implemented code, and then explain it step by step.
(function ($) {
  //使用js的严格模式
  'use strict';

  $.fn.jqtree = function (options) {
    //合并默认参数和用户传过来的参数
    options = $.extend({}, $.fn.jqtree.defaults, options || {});

    var that = $(this);
    var strHtml = "";
    //如果用户传了data的值,则直接使用data,否则发送ajax请求去取data
    if (options.data) {
      strHtml = initTree(options.data);
      that.html(strHtml);
      initClickNode();
    }
    else {
      //在发送请求之前执行事件
      options.onBeforeLoad.call(that, options.param);
      if (!options.url)
        return;
      //发送远程请求获得data
      $.getJSON(options.url, options.param, function (data) {
        strHtml = initTree(data);
        that.html(strHtml);
        initClickNode();

        //请求完成之后执行事件
        options.onLoadSuccess.call(that, data);
      });
    }

    //注册节点的点击事件
    function initClickNode() {
      $('.tree li').addClass('parent_li').find(' > span').attr('title', '收起');
      $('.tree li.parent_li > span').on('click', function (e) {
        var children = $(this).parent('li.parent_li').find(' > ul > li');
        if (children.is(":visible")) {
          children.hide('fast');
          $(this).attr('title', '展开').find(' > i').addClass('icon-plus-sign').removeClass('icon-minus-sign');
        } else {
          children.show('fast');
          $(this).attr('title', '收起').find(' > i').addClass('icon-minus-sign').removeClass('icon-plus-sign');
        }

        $('.tree li[class="parent_li"]').find("span").css("background-color", "transparent");
        $(this).css("background-color", "#428bca");

        options.onClickNode.call($(this), $(this));
      });
    };

    //递归拼接html构造树形子节点
    function initTree(data) {
      var strHtml = "";
      for (var i = 0; i < data.length; i++) {
        var arrChild = data[i].nodes;
        var strHtmlUL = "";
        var strIconStyle = "icon-leaf";
        if (arrChild && arrChild.length > 0) {
          strHtmlUL = "<ul>";
          strHtmlUL += initTree(arrChild) + "</ul>";
          strIconStyle = "icon-minus-sign";
        }

        strHtml += "<li id=\"li_" + data[i].id + "\"><span id=\"span_" + data[i].id + "\"><i class=\"" + strIconStyle + "\"></i>" + data[i].text + "</span>" + strHtmlUL + "</li>";

      }
      return strHtml;
    };
  };

  //默认参数
  $.fn.jqtree.defaults = {
    url: null,
    param: null,
    data: null,
    onBeforeLoad: function (param) { },
    onLoadSuccess: function (data) { },
    onClickNode: function (selector) { }
  };

})(jQuery);
1. Packaging instructions, let’s take a brief look at the above code
(1) Use (function ($) {})(jQuery) to declare an anonymous function and execute it immediately. The function is to add a custom method to the jquery object. If this way of writing is If you don’t understand, you can read the previous article explaining the JS component series - encapsulating your own JS components, you can too. After encapsulating in this way, we can directly initialize the tree component through $("#id").jqtree({});.
(2) After defining the default parameters, the user can only pass the parameters that he needs to pass. For the parameters that are not needed, just use the default values. This is why many bootstrap components have such a default parameter list.
(3) The encapsulated component supports two ways of transmitting data at the same time. If the user directly passes the data parameter, it will be initialized directly with the data parameter. Otherwise, the same URL will be sent to the ajax request to retrieve the data from the background.
(4) If the data is retrieved through URL, the user can customize the event processing method before the component is loaded and after the loading is completed. Corresponding to the above onBeforeLoad and onLoadSuccess. The parameters of the onLoadSuccess event correspond to the data data requested by ajax. Sometimes you need to do some special processing after the component is loaded, which can be written in this method.
(5) You can customize the click event processing method of the node, which corresponds to the onClickNode above. The parameter passed is the jquery object of the currently clicked node.
2. Component calling
Having said so much, how to use it?
First of all, our html only needs an empty ul tag
<div class="tree well">
  <ul id="ul_tree">
  </ul>
</div>
As mentioned above, components can support two calling methods at the same time:
1) Directly pass the Json array;
var testdata = [{
  id: '1',
  text: '系统设置',
  nodes: [{
    id: '11',
    text: '编码管理',
    nodes: [{
      id: '111',
      text: '自动管理',
      nodes: [{
        id: '1111',
        text: '手动管理',
        nodes: [{
          id: '11111',
          text: '底层管理',
        }]
      }]
    }]
  }]
}, {
  id: '2',
  text: '基础数据',
  nodes: [{
    id: '21',
    text: '基础特征'
  }, {
    id: '22',
    text: '特征管理'
  }]
}];

$(function () {
  $("#ul_tree").jqtree({
    data: testdata,
    param: { },
    onBeforeLoad: function (param) {
    },
    onLoadSuccess: function (data) {
    },
    onClickNode: function (selector) {
    }
  });
});
2) Get data remotely through URL:
The background C# request method constructs the data type in the above data format.
 public class Tree
  {
    public string id { get; set; }
    public string text { get; set; }
    public object nodes { get; set; }
  }


     //返回tree的节点数据
    public JsonResult GetTreeData()
    {
      var lstRes = GetNode(1);
      return Json(lstRes, JsonRequestBehavior.AllowGet);
    }

    public List<Tree> GetNode(int iNum)
    {
      var lstRes = new List<Tree>();
      if (iNum > 5)
      {
        return lstRes;
      }
      for (var i = 1; i < 3; i++)
      {
        var oNode = new Tree { id = Guid.NewGuid().ToString(), text = iNum + "级节点" + i };
        var lstRes2 = GetNode(iNum + 1);
        oNode.nodes = lstRes2;
        lstRes.Add(oNode);
      }
      return lstRes;
    }
Front-end call
$(function () {
  $("#ul_tree").jqtree({
    url: "/Home/GetTreeData",
    param: { },
    onBeforeLoad: function (param) {
    },
    onLoadSuccess: function (data) {
    },
    onClickNode: function (selector) {
    }
  });
});
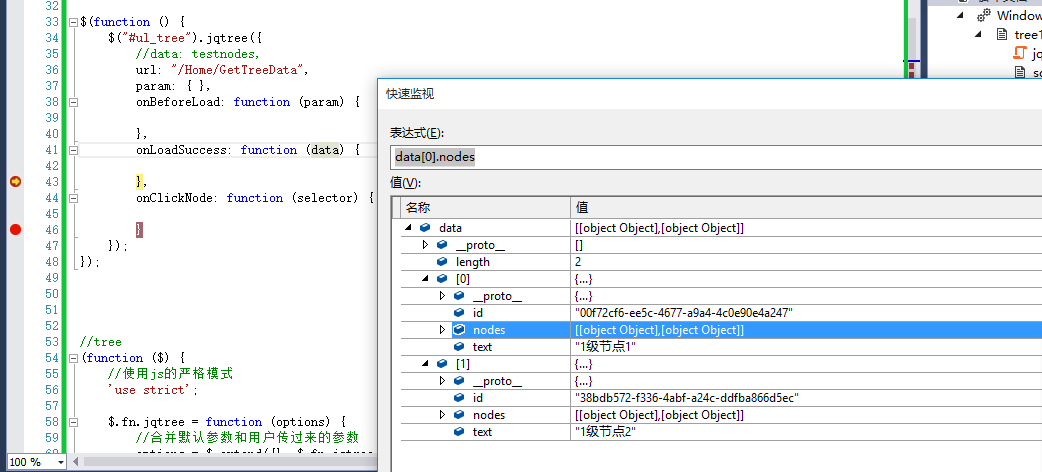
onLoadSuccess event debuggingHave a look

onClickNode event callTry to see, the selector corresponds to the jquery object of the currently clicked node.

3. Summary
The above is a simple encapsulation of jquery tree. The first version just completed today may not be very effective, but the basic functions have been implemented.
I hope this article will be helpful to everyone in learning javascript programming.


