js to achieve seamless picture scrolling effects_javascript skills
First of all, the first key point of seamless scrolling is movement. Regarding how to make the element nodes of the page move, you need to learn the relevant knowledge about timers in JavaScript.
There are two ways to create a timer in JS: setTimeout and setInterval. First of all, they receive the same parameters: the first parameter is a function for timer execution, and the second parameter is a number representing the number of milliseconds after which the timer executes the function. The difference between them is that setTimeout only executes the function once after the specified time, while setInterval executes the function once every specified time. To put it simply, setInterval is the cyclic version of setTimeout.
There is another usage of timers: eliminating timers. There are also two methods: clearTimeout and clearInterval, which correspond to different types of timers respectively. In addition, they only receive one parameter, which is a value returned by the timer (I debugged in chrome and found that the return values are all numbers), which is used to specify which timer to eliminate.
After mastering the knowledge of timers, we began to analyze how to use timers to make elements move. In fact, this is very simple. It is similar to the principle of movies, allowing elements to continuously shift in a short period of time. From our perspective, this element seems to be in constant motion. Regarding how to cause displacement of elements, it can be achieved by modifying the style of the element through JS, such as
1 |
|
In the above code, speed is the displacement generated each time. It’s quite interesting to use speed: we can modify the positive and negative values of speed to modify the direction of scrolling.
In addition, regarding the attribute offsetLeft of the element, I personally think that two points need to be noted: the value of offsetLeft is determined by the sum of its own positioning left and its own margin. offsetLeft is the distance relative to its containing layer (offsetTop similar). Of course, this is all my own understanding, and it is definitely not very accurate. I will remember this pitfall and solve it specifically next time.
The principle of making elements move is basically like this. Let’s start to analyze the implementation method of this seamless scrolling display of pictures. The examples I gave are all scrolling to the left. The principle is the same for the right. It is mentioned in the code:
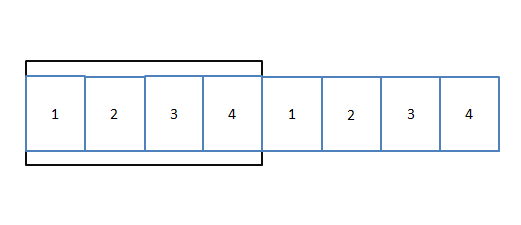
First, assume that there are only 4 pictures that need to be scrolled in a loop. In order to meet the requirement of scrolling the pictures in a loop, you need to scroll the pictures as shown in (1):

In this way, when the first picture 1 scrolls out of the border, the following picture 1 will appear behind picture 4, so that the effect looks the same as a loop~
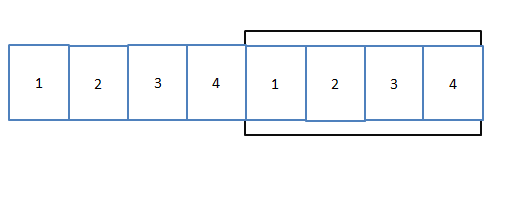
When the picture scrolls to the following situation:

Continuing to scroll will result in a blank space behind the picture, which is no longer the effect of circular scrolling. In fact, this is also the key to the program. Whenever the picture scrolls to the situation in Figure (2), the picture should be returned to Continue scrolling when you reach the state shown in Figure (1). This will create a seamless loop scrolling effect.
In addition, I expanded the program and wrote the effect of moving the mouse into the picture to stop scrolling, and moving out to continue scrolling. This is achieved by eliminating the timer. The code is very simple and will not be introduced. Also, in order to make the style look better, I set all the images to the size of 160*120. You need to prepare the images yourself to run the code.
The code is as follows:
1 2 3 4 5 6 7 8 9 10 11 12 13 14 15 16 17 18 19 20 21 22 23 24 25 26 27 28 29 30 31 32 33 34 35 36 37 38 39 40 41 42 43 44 45 46 47 48 49 50 51 52 53 54 55 56 57 58 59 60 61 62 63 64 65 66 67 68 69 70 71 72 73 74 75 76 77 78 79 80 81 82 83 84 85 86 87 88 89 90 91 |
|
The above is the detailed code for implementing seamless scrolling effects in js. I hope it will be helpful to everyone’s learning.

Hot AI Tools

Undresser.AI Undress
AI-powered app for creating realistic nude photos

AI Clothes Remover
Online AI tool for removing clothes from photos.

Undress AI Tool
Undress images for free

Clothoff.io
AI clothes remover

AI Hentai Generator
Generate AI Hentai for free.

Hot Article

Hot Tools

Notepad++7.3.1
Easy-to-use and free code editor

SublimeText3 Chinese version
Chinese version, very easy to use

Zend Studio 13.0.1
Powerful PHP integrated development environment

Dreamweaver CS6
Visual web development tools

SublimeText3 Mac version
God-level code editing software (SublimeText3)

Hot Topics
 1377
1377
 52
52
 How to use JS and Baidu Maps to implement map pan function
Nov 21, 2023 am 10:00 AM
How to use JS and Baidu Map to implement map pan function Baidu Map is a widely used map service platform, which is often used in web development to display geographical information, positioning and other functions. This article will introduce how to use JS and Baidu Map API to implement the map pan function, and provide specific code examples. 1. Preparation Before using Baidu Map API, you first need to apply for a developer account on Baidu Map Open Platform (http://lbsyun.baidu.com/) and create an application. Creation completed
 Recommended: Excellent JS open source face detection and recognition project
Apr 03, 2024 am 11:55 AM
Face detection and recognition technology is already a relatively mature and widely used technology. Currently, the most widely used Internet application language is JS. Implementing face detection and recognition on the Web front-end has advantages and disadvantages compared to back-end face recognition. Advantages include reducing network interaction and real-time recognition, which greatly shortens user waiting time and improves user experience; disadvantages include: being limited by model size, the accuracy is also limited. How to use js to implement face detection on the web? In order to implement face recognition on the Web, you need to be familiar with related programming languages and technologies, such as JavaScript, HTML, CSS, WebRTC, etc. At the same time, you also need to master relevant computer vision and artificial intelligence technologies. It is worth noting that due to the design of the Web side
 Essential tools for stock analysis: Learn the steps to draw candle charts with PHP and JS
Dec 17, 2023 pm 06:55 PM
Essential tools for stock analysis: Learn the steps to draw candle charts in PHP and JS. Specific code examples are required. With the rapid development of the Internet and technology, stock trading has become one of the important ways for many investors. Stock analysis is an important part of investor decision-making, and candle charts are widely used in technical analysis. Learning how to draw candle charts using PHP and JS will provide investors with more intuitive information to help them make better decisions. A candlestick chart is a technical chart that displays stock prices in the form of candlesticks. It shows the stock price
 How to create a stock candlestick chart using PHP and JS
Dec 17, 2023 am 08:08 AM
How to use PHP and JS to create a stock candle chart. A stock candle chart is a common technical analysis graphic in the stock market. It helps investors understand stocks more intuitively by drawing data such as the opening price, closing price, highest price and lowest price of the stock. price fluctuations. This article will teach you how to create stock candle charts using PHP and JS, with specific code examples. 1. Preparation Before starting, we need to prepare the following environment: 1. A server running PHP 2. A browser that supports HTML5 and Canvas 3
 Tips and methods to achieve seamless scrolling effect with CSS
Oct 25, 2023 pm 12:31 PM
CSS techniques and methods to achieve seamless scrolling effects require specific code examples. With the development of Internet technology, seamless scrolling effects are widely used in web design. It can bring users a better browsing experience and can also increase the dynamics and visual effects of web pages. In this article, I will introduce several commonly used CSS techniques and methods to achieve seamless scrolling effects, and provide specific code examples. Use CSS Animation to Achieve Seamless Scroll Effect CSS animation is a simple and efficient way to achieve seamless scrolling effect. We can use @key
 How to use CSS to create a seamless scrolling text carousel effect
Oct 25, 2023 am 10:24 AM
How to use CSS to create a seamless scrolling text carousel effect requires specific code examples. With the development of the Internet and designers' increasing requirements for user experience, the text carousel effect on websites has become one of the common display forms. Text carousels can attract users' attention, increase the dynamics and vitality of the page, and increase users' attention to the content. In this article, I will introduce you to how to use CSS to create a seamless scrolling text carousel effect, and provide specific code examples. Before creating a seamless scrolling text carousel effect, I
 How to use JS and Baidu Maps to implement map heat map function
Nov 21, 2023 am 09:33 AM
How to use JS and Baidu Maps to implement the map heat map function Introduction: With the rapid development of the Internet and mobile devices, maps have become a common application scenario. As a visual display method, heat maps can help us understand the distribution of data more intuitively. This article will introduce how to use JS and Baidu Map API to implement the map heat map function, and provide specific code examples. Preparation work: Before starting, you need to prepare the following items: a Baidu developer account, create an application, and obtain the corresponding AP
 How to use JS and Baidu Map to implement map click event processing function
Nov 21, 2023 am 11:11 AM
Overview of how to use JS and Baidu Maps to implement map click event processing: In web development, it is often necessary to use map functions to display geographical location and geographical information. Click event processing on the map is a commonly used and important part of the map function. This article will introduce how to use JS and Baidu Map API to implement the click event processing function of the map, and give specific code examples. Steps: Import the API file of Baidu Map. First, import the file of Baidu Map API in the HTML file. This can be achieved through the following code:


