

IIS+php server cannot upload images solution_PHP tutorial

The main purpose is to test where the uploaded files are temporarily stored when the value of upload_dir_tmp is not set in my php.ini. After this test, I found that when the value of upload_dir_tmp in php.ini is not configured, the default storage location is C:windowstemp directory, and the temporary file is stored with the .tmp suffix. The file will be deleted immediately, so if you want to use the file modification search function of the operating system, it cannot be found, and it cannot be found. The default path of upload_dir_tmp is where.
IIS+php tutorial server cannot upload images solution
The server uses Apache2+PHP to run normally, and then changed to IIS+PHP. The environment variable of php.ini cannot be read successively. Verify in php The code cannot be displayed, and now some people have reported the problem of being unable to upload pictures.
The process of replacing Apache2 from IIS is just to open IIS and close Apache2. There are no other changes, but there are so many differences. It seems that IIS still needs to make many modifications to support PHP.
Analysis:
Based on the above description, I suspect that the problem lies in the permission configuration of IIS. The IUSR_MACHINE account does not have write permissions for upload, so I modified the permissions and set the permissions under IIS. , the permissions under NTFS were modified, but in the end it was useless. There was no corresponding search for information on the network. Test the upload page. The process is:
The swf file calls save.php to upload the file-- -->swf file renames the uploaded file--->The name is returned to save.php--->The last name is displayed.
The current problem has been stuck in the renaming of the file by swf. The last name has not been displayed, and the swf file does not participate in the upload process, so the problem can only be found in the save.php file. Now, test in this file. The variable used for the last displayed name is fileName, so insert the following statement for testing:
echo "fileName=2008*****.gif";
The function of this sentence is to make fileName have a value, and save.php can be displayed normally. First, the original statement is shielded and tested sentence by sentence, and everything is returned normally, but when the test reaches:
if ( !@move_uploaded_file($f["tmp_name"], $dest_dir.'/'.$fileName)) header("HTTP/1.0 404 Not Found");
A problem occurred when saying this, and it cannot be uploaded. Searching the context, I have never found the tmp_name variable, but it seems that the file is uploaded to a temporary file first, and then moved to the destination location. So where is the tmp location? Is it because this location is not writable that the file cannot be uploaded?
Searching for online information, I found that there are 2 places under php.ini for upload configuration:
file_uploads = On file_uploads = Set here Temporary location for storing uploaded files
I try to set up file uploading under IIS 7 and PHP 5.
but "upload_tmp" won't work.
Final analysis answer:
The above content was written in 2009, but now in July 2010, I added a new server and this problem occurred again. At the same time, I implemented the above solution again. During the operation, something probably went wrong. Wrong, it didn't work. I had to take some time to study the specific reasons, and found the following reasons for the problem.
Being unable to upload files does not mean that all files cannot be uploaded, because on one of my websites, flash calls fwrite() to transfer avatars and the like successfully, but calling @move_uploaded_file($f["tmp_name"], $dest_dir. '/'.$fileName) still cannot be uploaded when using a function like this to transfer photos.
After my analysis, the reason is that fwrite() transfers a binary file, while move_uploaded_file() transfers a text file, and the Windows operating system distinguishes between these two types of files [Refer to the PHP manual for the fwrite() function Note], which means that the temporary upload directories stored when these two different files are uploaded in the PHP environment are different. When configuring PHP in the IIS environment, the temporary directory is set to E:tmp. The directory is writable by the iusr user, and binary files can be uploaded, so I suspect that this directory is the storage location for temporary files for binary file upload. So where is the temporary file storage location for the text file passed by move_uploaded_file()? In fact, in the above paragraph in English, the path set by upload_tmp_dir is the path. However, among several of my servers, the value of this setting of each server is the commented out "no value". Why can some servers upload? , but some servers cannot upload? This also goes back to the question I asked before, why can Apache2 can upload but iis can't?
This time I analyzed the upload.php file again and analyzed the code that caused the failure. The specific content is as follows:
// Check whether there is a file uploaded
if (! $_FILES['upload'. $num]['name'] == ""){
if ($_FILES['upload'.$num]['size'] < $max_size) {
1. echo "File upload path : ".$location.$_FILES['upload'.$num]['name'];
2. echo "File temporary file name: ".$_FILES['upload'.$num]['tmp_name' ];
3. move_uploaded_file($_FILES['upload'.$num]['tmp_name'],$location.$_FILES['upload'.$num]['name']) or $event = "Failure ";
} else {
$event = "File too large!";
}
The second sentence in the normal code does not exist. I added it for the convenience of testing. , its main purpose is to test where the uploaded files are temporarily stored when my php.ini does not set the value of upload_dir_tmp. After this test, I found that when the value of upload_dir_tmp in php.ini is not configured, the default storage The location is in the C:windowstemp directory, and the temporary file is stored with the .tmp suffix. The file will be deleted immediately, so you cannot find it through the file modification search function of the operating system, and you cannot find upload_dir_tmp. Where is the default path.
Now that the default path of upload_dir_tmp has been found, modify the access permissions of c:windowstemp, make it writable by the IUSR_ user, restart the IIS Admin service, upload the file, and finally succeed. This is why when the upload_dir_tmp values of multiple servers of mine are all empty, some can be transferred and some cannot.

Hot AI Tools

Undresser.AI Undress
AI-powered app for creating realistic nude photos

AI Clothes Remover
Online AI tool for removing clothes from photos.

Undress AI Tool
Undress images for free

Clothoff.io
AI clothes remover

AI Hentai Generator
Generate AI Hentai for free.

Hot Article
Hot Tools

Notepad++7.3.1
Easy-to-use and free code editor

SublimeText3 Chinese version
Chinese version, very easy to use

Zend Studio 13.0.1
Powerful PHP integrated development environment

Dreamweaver CS6
Visual web development tools

SublimeText3 Mac version
God-level code editing software (SublimeText3)
Hot Topics
 1376
1376
 52
52

 How to set the scheduled time for publishing works on Douyin? How does it set the video duration?
Mar 27, 2024 pm 06:11 PM
How to set the scheduled time for publishing works on Douyin? How does it set the video duration?
Mar 27, 2024 pm 06:11 PM
Publishing works on Douyin can attract more attention and likes, but sometimes it may be difficult for us to publish works in real time. In this case, we can use Douyin's scheduled release function. Douyin’s scheduled release function allows users to automatically publish works at a scheduled time, which can better plan the release plan and increase the exposure and influence of the work. 1. How to set the scheduled time for publishing works on Douyin? To set a scheduled release time, first go to Douyin's personal homepage, find the "+" button in the upper right corner, and click to enter the release page. There is a clock icon in the lower right corner of the publishing page. Click to enter the scheduled publishing interface. In the interface, you can choose the type of work you want to publish, including short videos, long videos, and live broadcasts. Next, you need to set a time for your work to be published. TikTok provides
 How to set up scheduled publishing on Weibo_Tutorial on how to set up scheduled publishing on Weibo
Mar 29, 2024 pm 03:51 PM
How to set up scheduled publishing on Weibo_Tutorial on how to set up scheduled publishing on Weibo
Mar 29, 2024 pm 03:51 PM
1. Open the Weibo client, click the three little dots on the editing page, and then click Scheduled Post. 2. After clicking on scheduled posting, there will be a time option on the right side of the publishing time. Set the time, edit the article, and click on the yellow words in the lower right corner to schedule posting. 3. The mobile version of Weibo does not currently support scheduled publishing. This function can only be used on the PC client!
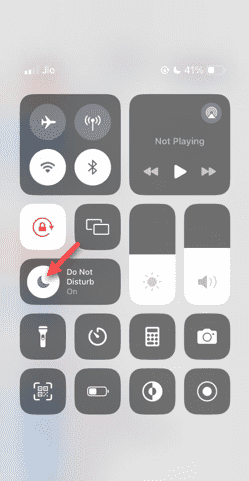 Do Not Disturb Mode Not Working in iPhone: Fix
Apr 24, 2024 pm 04:50 PM
Do Not Disturb Mode Not Working in iPhone: Fix
Apr 24, 2024 pm 04:50 PM
Even answering calls in Do Not Disturb mode can be a very annoying experience. As the name suggests, Do Not Disturb mode turns off all incoming call notifications and alerts from emails, messages, etc. You can follow these solution sets to fix it. Fix 1 – Enable Focus Mode Enable focus mode on your phone. Step 1 – Swipe down from the top to access Control Center. Step 2 – Next, enable “Focus Mode” on your phone. Focus Mode enables Do Not Disturb mode on your phone. It won't cause any incoming call alerts to appear on your phone. Fix 2 – Change Focus Mode Settings If there are some issues in the focus mode settings, you should fix them. Step 1 – Open your iPhone settings window. Step 2 – Next, turn on the Focus mode settings
 How to set the watermark in the middle on Weibo_How to set the watermark in the middle on Weibo
Mar 29, 2024 pm 03:31 PM
How to set the watermark in the middle on Weibo_How to set the watermark in the middle on Weibo
Mar 29, 2024 pm 03:31 PM
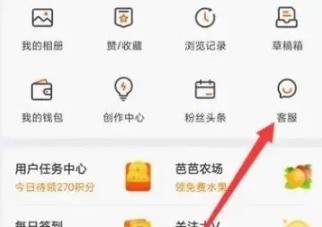
1. First enter Weibo, then click on me in the lower right corner and select [Customer Service]. 2. Then enter [Watermark] in the search box and select [Set Weibo Image Watermark]. 3. Then click [Link] in the interface. 4. Then click [Image Watermark Settings] in the newly opened window. 5. Finally, check [Picture Center] and click [Save].
 Where to set Douyin recommendations and selections
Mar 27, 2024 pm 05:06 PM
Where to set Douyin recommendations and selections
Mar 27, 2024 pm 05:06 PM
Where are the recommendations and selections on Douyin? In Douyin short videos, there are two categories: selection and recommendation. Most users don’t know how to set up recommendations and selections. Next is the Douyin tutorial that the editor brings to users. Audio recommendations and selected setting method tutorials, interested users come and take a look! Douyin usage tutorial Where to set up Douyin recommendations and selections 1. First open the Douyin short video APP and enter the main page, click on the [Me] area in the lower right corner and select [three horizontal lines] in the upper right corner; 2. Then on the right The function bar will expand, slide the page to select [Settings] at the bottom; 3. Then on the settings function page, find the [Personal Information Management] service; 4. Finally jump to the personal information management page, slide [Personalized Content Recommendations] 】The buttons on the back can be set.
 Join a new Xianxia adventure! 'Zhu Xian 2' 'Wuwei Test' pre-download is now available
Apr 22, 2024 pm 12:50 PM
Join a new Xianxia adventure! 'Zhu Xian 2' 'Wuwei Test' pre-download is now available
Apr 22, 2024 pm 12:50 PM
The "Inaction Test" of the new fantasy fairy MMORPG "Zhu Xian 2" will be launched on April 23. What kind of new fairy adventure story will happen in Zhu Xian Continent thousands of years after the original work? The Six Realm Immortal World, a full-time immortal academy, a free immortal life, and all kinds of fun in the immortal world are waiting for the immortal friends to explore in person! The "Wuwei Test" pre-download is now open. Fairy friends can go to the official website to download. You cannot log in to the game server before the server is launched. The activation code can be used after the pre-download and installation is completed. "Zhu Xian 2" "Inaction Test" opening hours: April 23 10:00 - May 6 23:59 The new fairy adventure chapter of the orthodox sequel to Zhu Xian "Zhu Xian 2" is based on the "Zhu Xian" novel as a blueprint. Based on the world view of the original work, the game background is set
 How to set the countdown to grab tickets in Damai
Apr 01, 2024 pm 07:01 PM
How to set the countdown to grab tickets in Damai
Apr 01, 2024 pm 07:01 PM
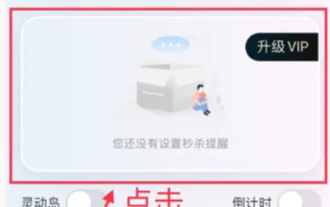
When buying tickets on Damai.com, in order to ensure that the ticket purchase time can be accurately grasped, users can set a floating clock to grab tickets. The detailed setting method is below, let us learn together. How to bind the floating clock to Damai 1. Click to open the floating clock app on your phone to enter the interface, and click on the location where the flash sale check is set, as shown in the figure below: 2. After coming to the page of adding new records, click on Damai.com Copy the ticket purchase link page copied in. 3. Next, set the flash sale time and notification time below, turn on the switch button behind [Save to Calendar], and click [Save] below. 4. Click to turn on [Countdown], as shown in the figure below: 5. When the reminder time comes, click the [Start Picture-in-Picture] button below. 6. When the ticket purchase time comes
 How to set Douyin playback to automatically close? Why does the playback process automatically exit?
Apr 01, 2024 pm 12:06 PM
How to set Douyin playback to automatically close? Why does the playback process automatically exit?
Apr 01, 2024 pm 12:06 PM
Douyin is one of the most popular short video platforms today. While enjoying the fun of short videos, users also hope to have better control over their time. Recently, some users reported that Douyin would automatically close during playback, which troubled them very much. 1. How to set the Douyin playback to automatically turn off? 1. Check the Douyin version. Please make sure that the Douyin version you are using is the latest. Douyin will be updated regularly to fix known issues. If your version of TikTok is too old, it may automatically close. You can check and update TikTok in the App Store. 2. Check the mobile phone system version. The automatic shutdown of Douyin playback may also be related to the mobile phone system version. Please make sure your mobile phone system version is the latest. If the mobile phone system version is too old, it may cause Douyin to run unstable. you can
