The upload class uses the Net.UpdateFile class in the ORG class library package. The latest version of the upload class includes the following functions (some functions need to be combined with other class libraries in the ThinkPHP system):
1. Basic upload function
2. Support batch upload
3. Support generating image thumbnails
4. Custom parameter upload
5. Upload detection (including size, suffix and type)
6. Support upload type, attachment size, upload path definition
7. Support hash or date subdirectory saving of uploaded files
8. Upload images Security detection
9. Support naming rules for uploaded files
10. Support Hash verification of uploaded files
No special processing is required to use the upload function in ThinkPHP . For example, here is a form submission with attachment upload:
Note Enctype="multipart/form-data" must be added to the Form tag of the form before the file can be uploaded. Because the form is submitted to the upload operation method of the current module, we can add the following upload method in the module class:
The code is as follows
Copy code
Public function upload(){
代码如下
复制代码
import(“ORG.Net.UploadFile”); $upload = new UploadFile(); // 实例化上传类
import("ORG.Net.UploadFile" );$upload = new UploadFile(); // Instantiate the upload class$upload->maxSize = 3145728; // Set the attachment upload size$upload->allowExts = array(' jpg', 'gif', 'png', 'jpeg'); // Set attachment upload type$upload->savePath = './Public/Uploads/'; // Set attachment upload directory if(!$upload->upload()) { //Upload error prompt error message$this->error($upload->getErrorMsg());}else{ //Upload successful Get uploaded file information$info = $upload->getUploadFileInfo();}// Save form data including attachment data$User = M(“User”); // Example Convert User object $User->create(); // Create data object $User->photo = $info[0]["savename"]; // Save uploaded photos as needed Assembly$User->add(); // Write user data to the database$this->success("Data saved successfully! ”);}
First, instantiate the upload class
The code is as follows
Copy code
import(“ORG.Net .UploadFile”);$upload = new UploadFile(); // Instantiate the upload class
After instantiating the upload class, you can set some upload attributes (parameters). The supported attributes are:
maxSize: The maximum file size for file upload (in bytes) Unit) Default is -1, no size limit
savePath: File saving path, if left blank, the path defined by the UPLOAD_PATH constant will be taken
saveRule: Save rule for uploaded files, must be a without any The function name of the parameter, for example, can be time, uniqid com_create_guid, etc., but it must be able to ensure that the generated file name is unique. The default is uniqid
hashType: Hash verification method for uploaded files, the default is md5_file
autoCheck: whether to automatically detect attachments, the default is automatic detection
uploadReplace: whether a file with the same name is overwritten
allowExts: file suffix allowed to be uploaded (leave blank to not limit), Use array settings, the default is an empty array
allowTypes: File types allowed to be uploaded (leave blank to not limit), use array settings, the default is an empty array
thumb: Whether image files need to be uploaded Perform thumbnail processing, the default is false
thumbMaxWidth: The maximum width of thumbnails, multiples are separated by commas
thumbMaxHeight: The maximum height of thumbnails, multiples are separated by commas
thumbPrefix: The file prefix of the thumbnail, the default is thumb_ (If you set multiple thumbnail sizes, please set multiple prefixes here)
thumbSuffix: The file suffix of the thumbnail, the default is empty (If you set multiple thumbnail sizes, please set multiple suffixes here)
thumbPath: The saving path of the thumbnail. If left blank, take the file upload directory itself
thumbFile: Specify the file name of the thumbnail
thumbRemoveOrigin: whether to delete the original image after generating the thumbnail
autoSub: whether to use a subdirectory to save the uploaded file
subType: subdirectory creation method, The default is hash, which can be set to hash or date
dateFormat: Specify the date format when the subdirectory mode is date
hashLevel: The level at which the subdirectory is saved, the default is one level
The above attributes can be set directly, for example:
The function of generating thumbnails requires the support of the Image class.
After setting the upload parameters, you can call the upload method of the UploadFile class to upload the attachment. If it fails, return false and use the getErrorMsg method to obtain the error message; if the upload is successful, you can obtain it by calling the getUploadFileInfo method. List of successfully uploaded attachment information. Therefore, the return value of the getUploadFileInfo method is an array, each element of which is the uploaded attachment information. Each attachment information is an array that records the following information, including:
key: the name of the form for uploading the attachment
savepath: the save path of the uploaded file
name: The original name of the uploaded file
savename: the saved name of the uploaded file
size: the size of the uploaded file
type: the MIME type of the uploaded file
extension : The suffix type of the uploaded file
hash: The hash verification string of the uploaded file
After the file is successfully uploaded, you can use these attachment information to perform other data access operations, such as saving Either to the current data table or to a separate attachment data table.
If you need to upload multiple files, you only need to modify the form and add the
XML/HTML code
代码如下
复制代码
Change to
XML/HTML code
The code is as follows
代码如下
复制代码
或者
PHP代码
Copy code
The file upload class of both methods of multi-attachment upload system can be automatically recognized. http://www.bkjia.com/PHPjc/444697.html
www.bkjia.com
true
http: //www.bkjia.com/PHPjc/444697.htmlTechArticleThe upload class uses the Net.UpdateFile class in the ORG class library package. The latest version of the upload class includes the following functions ( Some functions need to be combined with other class libraries of the ThinkPHP system): 1. Basic upload function 2...
Statement of this Website
The content of this article is voluntarily contributed by netizens, and the copyright belongs to the original author. This site does not assume corresponding legal responsibility. If you find any content suspected of plagiarism or infringement, please contact admin@php.cn
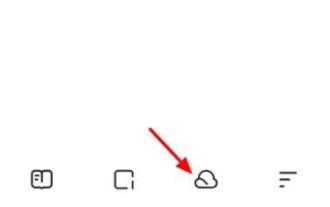
Quark Netdisk and Baidu Netdisk are very convenient storage tools. Many users are asking whether these two softwares are interoperable? How to share Quark Netdisk to Baidu Netdisk? Let this site introduce to users in detail how to save Quark network disk files to Baidu network disk. How to save files from Quark Network Disk to Baidu Network Disk Method 1. If you want to know how to transfer files from Quark Network Disk to Baidu Network Disk, first download the files that need to be saved on Quark Network Disk, and then open the Baidu Network Disk client. , select the folder where the compressed file is to be saved, and double-click to open the folder. 2. After opening the folder, click "Upload" in the upper left corner of the window. 3. Find the compressed file that needs to be uploaded on your computer and click to select it.
CrystalDiskMark is a small HDD benchmark tool for hard drives that quickly measures sequential and random read/write speeds. Next, let the editor introduce CrystalDiskMark to you and how to use crystaldiskmark~ 1. Introduction to CrystalDiskMark CrystalDiskMark is a widely used disk performance testing tool used to evaluate the read and write speed and performance of mechanical hard drives and solid-state drives (SSD). Random I/O performance. It is a free Windows application and provides a user-friendly interface and various test modes to evaluate different aspects of hard drive performance and is widely used in hardware reviews
When deleting or decompressing a folder on your computer, sometimes a prompt dialog box "Error 0x80004005: Unspecified Error" will pop up. How should you solve this situation? There are actually many reasons why the error code 0x80004005 is prompted, but most of them are caused by viruses. We can re-register the dll to solve the problem. Below, the editor will explain to you the experience of handling the 0x80004005 error code. Some users are prompted with error code 0X80004005 when using their computers. The 0x80004005 error is mainly caused by the computer not correctly registering certain dynamic link library files, or by a firewall that does not allow HTTPS connections between the computer and the Internet. So how about
foobar2000 is a software that can listen to music resources at any time. It brings you all kinds of music with lossless sound quality. The enhanced version of the music player allows you to get a more comprehensive and comfortable music experience. Its design concept is to play the advanced audio on the computer The device is transplanted to mobile phones to provide a more convenient and efficient music playback experience. The interface design is simple, clear and easy to use. It adopts a minimalist design style without too many decorations and cumbersome operations to get started quickly. It also supports a variety of skins and Theme, personalize settings according to your own preferences, and create an exclusive music player that supports the playback of multiple audio formats. It also supports the audio gain function to adjust the volume according to your own hearing conditions to avoid hearing damage caused by excessive volume. Next, let me help you
Quark Netdisk and Baidu Netdisk are currently the most commonly used Netdisk software for storing files. If you want to save the files in Quark Netdisk to Baidu Netdisk, how do you do it? In this issue, the editor has compiled the tutorial steps for transferring files from Quark Network Disk computer to Baidu Network Disk. Let’s take a look at how to operate it. How to save Quark network disk files to Baidu network disk? To transfer files from Quark Network Disk to Baidu Network Disk, you first need to download the required files from Quark Network Disk, then select the target folder in the Baidu Network Disk client and open it. Then, drag and drop the files downloaded from Quark Cloud Disk into the folder opened by the Baidu Cloud Disk client, or use the upload function to add the files to Baidu Cloud Disk. Make sure to check whether the file was successfully transferred in Baidu Cloud Disk after the upload is completed. That's it
1. First, we enter NetEase Cloud Music, and then click on the software homepage interface to enter the song playback interface. 2. Then in the song playback interface, find the sharing function button in the upper right corner, as shown in the red box in the figure below, click to select the sharing channel; in the sharing channel, click the "Share to" option at the bottom, and then select the first "WeChat Moments" allows you to share content to WeChat Moments.
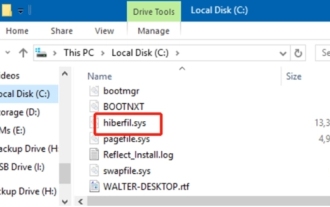
Recently, many netizens have asked the editor, what is the file hiberfil.sys? Can hiberfil.sys take up a lot of C drive space and be deleted? The editor can tell you that the hiberfil.sys file can be deleted. Let’s take a look at the details below. hiberfil.sys is a hidden file in the Windows system and also a system hibernation file. It is usually stored in the root directory of the C drive, and its size is equivalent to the size of the system's installed memory. This file is used when the computer is hibernated and contains the memory data of the current system so that it can be quickly restored to the previous state during recovery. Since its size is equal to the memory capacity, it may take up a larger amount of hard drive space. hiber
NetEase Mailbox, as an email address widely used by Chinese netizens, has always won the trust of users with its stable and efficient services. NetEase Mailbox Master is an email software specially created for mobile phone users. It greatly simplifies the process of sending and receiving emails and makes our email processing more convenient. So how to use NetEase Mailbox Master, and what specific functions it has. Below, the editor of this site will give you a detailed introduction, hoping to help you! First, you can search and download the NetEase Mailbox Master app in the mobile app store. Search for "NetEase Mailbox Master" in App Store or Baidu Mobile Assistant, and then follow the prompts to install it. After the download and installation is completed, we open the NetEase email account and log in. The login interface is as shown below