

Three Steps to DIY a Counter (Part 2)_PHP Tutorial

In the middle article, I introduced you how to place the counter on OSO on your own mirror site. In this article, I will introduce you to the idea of how to build your own free counter system. You have to write the program yourself.
Many websites All provide free counter services. I had a dream a long time ago to build my own free counter system, and now OSO provides the database, all this will become a reality.
Most websites only provide free counters to members. We can also do this so that there are some subjects on our website. When they register, an ID can be automatically generated. Our counter system relies entirely on this ID!
When a user applies for a counter, the first step is to check the username and password. After successful login, the user's ID is retrieved from the database. After the user applies, the system automatically creates two files, countid.php and showid.php. Simple The process can be as follows:
$filea="count".$id."php";
$fileb="show".$id."php";
$fpa=fopen("count/$ filea",w);
$fpb=fopen("show/$fileb",w)
Then write the file, the content is similar to the one in the medium, just change the num, simple process It can be as follows:
fputs($fpa,$count,strlen($count));
fputs($fpb,$show,strlen($show));
$count=countid.php Content;
Contents in $show=showid.php;
This generates two files, countid.php and showid.php. At the same time, let the database insert num=id. Finally, return a piece of code to let The user knows how to use this counter and everything is done!
But I think the user can set the initial value when applying for the counter. When inserting num into the database, use replace instead of insert. In this way, if the user forgets the code, he can reapply for one at any time and set the initial value, and the counter will replace the original value. The records are overwritten, so there is no need for users to remember the code or provide code returns, which is too troublesome!
How about it? Everything is very easy. I hope you can successfully create your own counter system through these three articles. I wish you success!

Hot AI Tools

Undresser.AI Undress
AI-powered app for creating realistic nude photos

AI Clothes Remover
Online AI tool for removing clothes from photos.

Undress AI Tool
Undress images for free

Clothoff.io
AI clothes remover

AI Hentai Generator
Generate AI Hentai for free.

Hot Article
Hot Tools

Notepad++7.3.1
Easy-to-use and free code editor

SublimeText3 Chinese version
Chinese version, very easy to use

Zend Studio 13.0.1
Powerful PHP integrated development environment

Dreamweaver CS6
Visual web development tools

SublimeText3 Mac version
God-level code editing software (SublimeText3)
Hot Topics
 1371
1371
 52
52

 ao3 mirror official website entrance
Feb 24, 2024 am 11:34 AM
ao3 mirror official website entrance
Feb 24, 2024 am 11:34 AM
ao3 mirror is a platform for creating fan fiction, but most friends don’t know where the official website of ao3 mirror is. Click on the https://ao3.cubeart.club/ link to enter the ao3 mirror website. The next step is The editor brings users an introduction to the latest official website entrance of ao3 mirror 2024. Interested users come and take a look! ao3 mirror official website entrance: https://ao3.cubeart.club/ 1. Download address 1. AO3: Click to download》》 2. AO3 latest version: Click to download》》 2. Enter the website method 1. Copy the website to View it in the browser and click [LogIn] in the upper right corner of the page to enter; 2. Account
 How to turn off AirPlay on Mac
Apr 16, 2023 am 09:49 AM
How to turn off AirPlay on Mac
Apr 16, 2023 am 09:49 AM
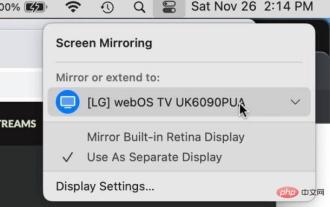
Turn off AirPlay on Mac via Control Center You can quickly turn off AirPlay in Mac OS Ventura 13 or later by doing the following: On a Mac with AirPlay enabled, go to Control Center in the upper right corner by clicking the two switch appearance icon and select " "Screen Mirroring" From the menu that appears, select the screen your Mac is AirPlay mirroring to. This will disconnect AirPlay and turn it off. You can also turn on ScreenMirroring and AirPlay this way, which you probably already know by now if you enabled it in the first place. . Disconnect AirPla on Mac via system settings
 Easily mirror your Acer laptop screen to TV with these steps
Apr 13, 2023 pm 07:10 PM
Easily mirror your Acer laptop screen to TV with these steps
Apr 13, 2023 pm 07:10 PM
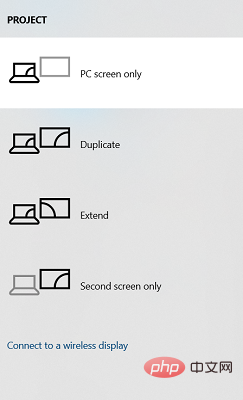
Screen mirroring is the best option when you want to view or display content from a small screen to a large screen (for example, from a laptop to a TV). While you may have heard of the option to mirror your smartphone screen to your TV or laptop, you can also mirror your laptop screen to your TV. This will allow you to view the content on a larger screen. The process of mirroring your laptop screen to your TV can be done in a variety of ways, including wired and wireless. It's up to you which option you want to continue using. On the one hand, the wired approach gives you a reliable mirroring experience with low latency. However, the wireless method eliminates the need to find a compatible cable for mirroring and can be done between two supported devices. The only downside is that you'll experience some lag and sometimes low-resolution mirroring
 How to set up the keyboard boot function on a GIGABYTE motherboard (enable keyboard boot mode on GIGABYTE motherboard)
Dec 31, 2023 pm 05:15 PM
How to set up the keyboard boot function on a GIGABYTE motherboard (enable keyboard boot mode on GIGABYTE motherboard)
Dec 31, 2023 pm 05:15 PM
How to set up keyboard startup on Gigabyte's motherboard. First, if it needs to support keyboard startup, it must be a PS2 keyboard! ! The setting steps are as follows: Step 1: Press Del or F2 to enter the BIOS after booting, and go to the Advanced (Advanced) mode of the BIOS. Ordinary motherboards enter the EZ (Easy) mode of the motherboard by default. You need to press F7 to switch to the Advanced mode. ROG series motherboards enter the BIOS by default. Advanced mode (we use Simplified Chinese to demonstrate) Step 2: Select to - [Advanced] - [Advanced Power Management (APM)] Step 3: Find the option [Wake up by PS2 keyboard] Step 4: This option The default is Disabled. After pulling down, you can see three different setting options, namely press [space bar] to turn on the computer, press group
 CentOS7 various version image download addresses and version descriptions (including Everything version)
Feb 29, 2024 am 09:20 AM
CentOS7 various version image download addresses and version descriptions (including Everything version)
Feb 29, 2024 am 09:20 AM
When loading CentOS-7.0-1406, there are many optional versions. For ordinary users, they don’t know which one to choose. Here is a brief introduction: (1) CentOS-xxxx-LiveCD.ios and CentOS-xxxx- What is the difference between bin-DVD.iso? The former only has 700M, and the latter has 3.8G. The difference is not only in size, but the more essential difference is that CentOS-xxxx-LiveCD.ios can only be loaded into the memory and run, and cannot be installed. Only CentOS-xxx-bin-DVD1.iso can be installed on the hard disk. (2) CentOS-xxx-bin-DVD1.iso, Ce
 The first choice for CS players: recommended computer configuration
Jan 02, 2024 pm 04:26 PM
The first choice for CS players: recommended computer configuration
Jan 02, 2024 pm 04:26 PM
1. Processor When choosing a computer configuration, the processor is one of the most important components. For playing games like CS, the performance of the processor directly affects the smoothness and response speed of the game. It is recommended to choose Intel Core i5 or i7 series processors because they have powerful multi-core processing capabilities and high frequencies, and can easily cope with the high requirements of CS. 2. Graphics card Graphics card is one of the important factors in game performance. For shooting games such as CS, the performance of the graphics card directly affects the clarity and smoothness of the game screen. It is recommended to choose NVIDIA GeForce GTX series or AMD Radeon RX series graphics cards. They have excellent graphics processing capabilities and high frame rate output, and can provide a better gaming experience. 3. Memory power
 Update | Hacker explains how to install Epic Games Store and Fortnite on iPad outside the EU
Aug 18, 2024 am 06:34 AM
Update | Hacker explains how to install Epic Games Store and Fortnite on iPad outside the EU
Aug 18, 2024 am 06:34 AM
Update: Saunders Tech has uploaded a tutorial to his YouTube channel (video embedded below) explaining how to install Fortnite and the Epic Games Store on an iPad outside the EU. However, not only does the process require specific beta versions of iO
 Digital audio output interface on the motherboard-SPDIF OUT
Jan 14, 2024 pm 04:42 PM
Digital audio output interface on the motherboard-SPDIF OUT
Jan 14, 2024 pm 04:42 PM
SPDIFOUT connection line sequence on the motherboard. Recently, I encountered a problem regarding the wiring sequence of the wires. I checked online. Some information says that 1, 2, and 4 correspond to out, +5V, and ground; while other information says that 1, 2, and 4 correspond to out, ground, and +5V. The best way is to check your motherboard manual. If you can't find the manual, you can use a multimeter to measure it. Find the ground first, then you can determine the order of the rest of the wiring. How to connect motherboard VDG wiring When connecting the VDG wiring of the motherboard, you need to plug one end of the VGA cable into the VGA interface of the monitor and the other end into the VGA interface of the computer's graphics card. Please be careful not to plug it into the motherboard's VGA port. Once connected, you can
