
 Backend Development
Python Tutorial
Python crawler programming framework Scrapy introductory learning tutorial
Backend Development
Python Tutorial
Python crawler programming framework Scrapy introductory learning tutorial
Python crawler programming framework Scrapy introductory learning tutorial

1. Introduction to Scrapy
Scrapy is an application framework written to crawl website data and extract structured data. It can be used in a series of programs including data mining, information processing or storing historical data.
It was originally designed for page scraping (more specifically, web scraping), but can also be used to obtain data returned by APIs (such as Amazon Associates Web Services) or general web crawlers. Scrapy is widely used and can be used for data mining, monitoring and automated testing
Scrapy uses the Twisted asynchronous network library to handle network communication. The overall structure is roughly as follows
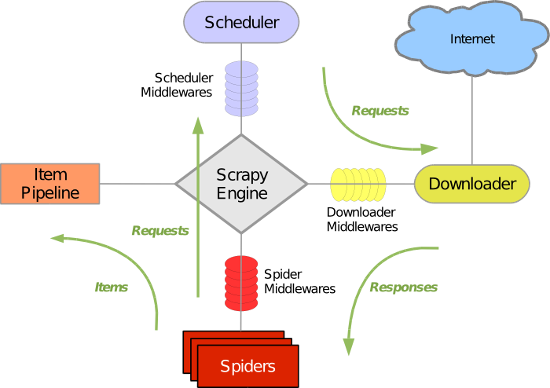
Scrapy mainly includes the following components:
(1) Engine (Scrapy): used to handle data flow processing of the entire system and trigger transactions (core framework)
(2) Scheduler (Scheduler): Used to accept requests from the engine, push them into the queue, and return when the engine requests again. It can be imagined as a URL (the URL or link of the web page that is captured ), which determines the next URL to be crawled and removes duplicate URLs
(3) Downloader: used to download web content and return the web content to the spider (Scrapy downloader is built on twisted, an efficient asynchronous model)
(4) Spiders: Crawlers are mainly used to extract the information they need from specific web pages, which are so-called entities (Items). Users can also extract links from it and let Scrapy continue to crawl the next page
Project Pipeline: Responsible for processing entities extracted from web pages by crawlers. The main function is to persist entities, verify the validity of entities, and remove unnecessary information. When the page is parsed by the crawler, it will be sent to the project pipeline and the data will be processed through several specific sequences.
(5) Downloader Middlewares: A framework located between the Scrapy engine and the downloader. It mainly handles requests and responses between the Scrapy engine and the downloader.
(6) Spider Middlewares: A framework between the Scrapy engine and the crawler. Its main job is to process the spider's response input and request output.
(7) Scheduler Middewares: The middleware between the Scrapy engine and the scheduler, sending requests and responses from the Scrapy engine to the scheduler.
The Scrapy operation process is roughly as follows:
First, the engine takes out a link (URL) from the scheduler for subsequent crawling
The engine encapsulates the URL into a request (Request) and passes it to the downloader. The downloader downloads the resource and encapsulates it into a response package (Response)
Then, the crawler parses Response
If the entity (Item) is parsed, it is handed over to the entity pipeline for further processing.
If the parsed result is a link (URL), the URL will be handed over to the Scheduler to wait for crawling
2. Install Scrapy
Use the following command:
sudo pip install virtualenv #安装虚拟环境工具
virtualenv ENV #创建一个虚拟环境目录
source ./ENV/bin/active #激活虚拟环境
pip install Scrapy
#验证是否安装成功
pip list
#输出如下
cffi (0.8.6)
cryptography (0.6.1)
cssselect (0.9.1)
lxml (3.4.1)
pip (1.5.6)
pycparser (2.10)
pyOpenSSL (0.14)
queuelib (1.2.2)
Scrapy (0.24.4)
setuptools (3.6)
six (1.8.0)
Twisted (14.0.2)
w3lib (1.10.0)
wsgiref (0.1.2)
zope.interface (4.1.1)
For more virtual environment operations, please check my blog post
3. Scrapy Tutorial
Before scraping, you need to create a new Scrapy project. Enter a directory where you want to save the code, and then execute:
$ scrapy startproject tutorial
This command will create a new directory tutorial in the current directory, with the following structure:
.
├── scrapy.cfg
└── tutorial
 ├── __init__.py
 ├── items.py
 ├── pipelines.py
 ├── settings.py
 └── spiders
  └── __init__.py
These files are mainly:
(1) scrapy.cfg: project configuration file
(2) tutorial/: project python module, you will add code here later
(3) tutorial/items.py: project items file
(4) tutorial/pipelines.py: project pipeline file
(5) tutorial/settings.py: project configuration file
(6) tutorial/spiders: directory where spiders are placed
3.1. Define Item
Items is a container that will be loaded with scraped data. It works like a dictionary in python, but it provides more protection, such as padding undefined fields to prevent spelling errors
Declare an Item by creating a scrapy.Item class and defining a class attribute of type scrapy.Field.
We control the site data obtained from dmoz.org by modeling the required items. For example, if we want to obtain the site name, URL and site description, we define the fields of these three attributes. Edit the items.py file in the tutorial directory
from scrapy.item import Item, Field


class DmozItem(Item):
 # define the fields for your item here like:
 name = Field()
 description = Field()
 url = Field()
3.2. Writing Spider
Spider is a user-written class used to crawl information from a domain (or domain group), defining a preliminary list of URLs for downloading, how to follow the links, and how to parse the content of these web pages for Extract items.
To create a Spider, inherit the scrapy.Spider base class and identify three main, mandatory properties:
name:爬虫的识别名,它必须是唯一的,在不同的爬虫中你必须定义不同的名字.
start_urls:包含了Spider在启动时进行爬取的url列表。因此,第一个被获取到的页面将是其中之一。后续的URL则从初始的URL获取到的数据中提取。我们可以利用正则表达式定义和过滤需要进行跟进的链接。
parse():是spider的一个方法。被调用时,每个初始URL完成下载后生成的 Response 对象将会作为唯一的参数传递给该函数。该方法负责解析返回的数据(response data),提取数据(生成item)以及生成需要进一步处理的URL的 Request 对象。
这个方法负责解析返回的数据、匹配抓取的数据(解析为 item )并跟踪更多的 URL。
在 /tutorial/tutorial/spiders 目录下创建 dmoz_spider.py
import scrapy

class DmozSpider(scrapy.Spider):
 name = "dmoz"
 allowed_domains = ["dmoz.org"]
 start_urls = [
  "http://www.dmoz.org/Computers/Programming/Languages/Python/Books/",
  "http://www.dmoz.org/Computers/Programming/Languages/Python/Resources/"
 ]

 def parse(self, response):
  filename = response.url.split("/")[-2]
  with open(filename, 'wb') as f:
   f.write(response.body)
3.3. 爬取
当前项目结构
├── scrapy.cfg
└── tutorial
 ├── __init__.py
 ├── items.py
 ├── pipelines.py
 ├── settings.py
 └── spiders
  ├── __init__.py
  └── dmoz_spider.py
到项目根目录, 然后运行命令:
$ scrapy crawl dmoz
2014-12-15 09:30:59+0800 [scrapy] INFO: Scrapy 0.24.4 started (bot: tutorial)
2014-12-15 09:30:59+0800 [scrapy] INFO: Optional features available: ssl, http11
2014-12-15 09:30:59+0800 [scrapy] INFO: Overridden settings: {'NEWSPIDER_MODULE': 'tutorial.spiders', 'SPIDER_MODULES': ['tutorial.spiders'], 'BOT_NAME': 'tutorial'}
2014-12-15 09:30:59+0800 [scrapy] INFO: Enabled extensions: LogStats, TelnetConsole, CloseSpider, WebService, CoreStats, SpiderState
2014-12-15 09:30:59+0800 [scrapy] INFO: Enabled downloader middlewares: HttpAuthMiddleware, DownloadTimeoutMiddleware, UserAgentMiddleware, RetryMiddleware, DefaultHeadersMiddleware, MetaRefreshMiddleware, HttpCompressionMiddleware, RedirectMiddleware, CookiesMiddleware, ChunkedTransferMiddleware, DownloaderStats
2014-12-15 09:30:59+0800 [scrapy] INFO: Enabled spider middlewares: HttpErrorMiddleware, OffsiteMiddleware, RefererMiddleware, UrlLengthMiddleware, DepthMiddleware
2014-12-15 09:30:59+0800 [scrapy] INFO: Enabled item pipelines:
2014-12-15 09:30:59+0800 [dmoz] INFO: Spider opened
2014-12-15 09:30:59+0800 [dmoz] INFO: Crawled 0 pages (at 0 pages/min), scraped 0 items (at 0 items/min)
2014-12-15 09:30:59+0800 [scrapy] DEBUG: Telnet console listening on 127.0.0.1:6023
2014-12-15 09:30:59+0800 [scrapy] DEBUG: Web service listening on 127.0.0.1:6080
2014-12-15 09:31:00+0800 [dmoz] DEBUG: Crawled (200) <GET http://www.dmoz.org/Computers/Programming/Languages/Python/Resources/> (referer: None)
2014-12-15 09:31:00+0800 [dmoz] DEBUG: Crawled (200) <GET http://www.dmoz.org/Computers/Programming/Languages/Python/Books/> (referer: None)
2014-12-15 09:31:00+0800 [dmoz] INFO: Closing spider (finished)
2014-12-15 09:31:00+0800 [dmoz] INFO: Dumping Scrapy stats:
 {'downloader/request_bytes': 516,
  'downloader/request_count': 2,
  'downloader/request_method_count/GET': 2,
  'downloader/response_bytes': 16338,
  'downloader/response_count': 2,
  'downloader/response_status_count/200': 2,
  'finish_reason': 'finished',
  'finish_time': datetime.datetime(2014, 12, 15, 1, 31, 0, 666214),
  'log_count/DEBUG': 4,
  'log_count/INFO': 7,
  'response_received_count': 2,
  'scheduler/dequeued': 2,
  'scheduler/dequeued/memory': 2,
  'scheduler/enqueued': 2,
  'scheduler/enqueued/memory': 2,
  'start_time': datetime.datetime(2014, 12, 15, 1, 30, 59, 533207)}
2014-12-15 09:31:00+0800 [dmoz] INFO: Spider closed (finished)
3.4. 提取Items
3.4.1. 介绍Selector
从网页中提取数据有很多方法。Scrapy使用了一种基于 XPath 或者 CSS 表达式机制: Scrapy Selectors
出XPath表达式的例子及对应的含义:
- /html/head/title: 选择HTML文档中 标签内的
元素</li> <li>/html/head/title/text(): 选择 <title> 元素内的文本</li> <li>//td: 选择所有的 <td> 元素</li> <li>//div[@class="mine"]: 选择所有具有class="mine" 属性的 div 元素</li> </ul> <p>等多强大的功能使用可以查看XPath tutorial</p> <p>为了方便使用 XPaths,Scrapy 提供 Selector 类, 有四种方法 :</p> <ul> <li>xpath():返回selectors列表, 每一个selector表示一个xpath参数表达式选择的节点.</li> <li>css() : 返回selectors列表, 每一个selector表示CSS参数表达式选择的节点</li> <li>extract():返回一个unicode字符串,该字符串为XPath选择器返回的数据</li> <li>re(): 返回unicode字符串列表,字符串作为参数由正则表达式提取出来</li> </ul> <p><strong>3.4.2. 取出数据<br /> </strong></p> <ul> <li>首先使用谷歌浏览器开发者工具, 查看网站源码, 来看自己需要取出的数据形式(这种方法比较麻烦), 更简单的方法是直接对感兴趣的东西右键审查元素, 可以直接查看网站源码</li> </ul> <p>在查看网站源码后, 网站信息在第二个<ul>内</p> <div class="jb51code"> <div class="code" style="position:relative; padding:0px; margin:0px;"><pre class='brush:php;toolbar:false;'> <ul class="directory-url" style="margin-left:0;"> <li><a href="http://www.pearsonhighered.com/educator/academic/product/0,,0130260363,00%2Ben-USS_01DBC.html" class="listinglink">Core Python Programming</a> - By Wesley J. Chun; Prentice Hall PTR, 2001, ISBN 0130260363. For experienced developers to improve extant skills; professional level examples. Starts by introducing syntax, objects, error handling, functions, classes, built-ins. [Prentice Hall] <div class="flag"><a href="/public/flag?cat=Computers%2FProgramming%2FLanguages%2FPython%2FBooks&url=http%3A%2F%2Fwww.pearsonhighered.com%2Feducator%2Facademic%2Fproduct%2F0%2C%2C0130260363%2C00%252Ben-USS_01DBC.html"><img src="/static/imghw/default1.png" data-src="/img/flag.png" class="lazy" alt="Python crawler programming framework Scrapy introductory learning tutorial" title="report an issue with this listing"></a></div> </li> ...省略部分... </ul> </pre><div class="contentsignin">Copy after login</div></div> </p> <p>那么就可以通过一下方式进行提取数据</p> <div class="jb51code"> <div class="code" style="position:relative; padding:0px; margin:0px;"><pre class='brush:php;toolbar:false;'> #通过如下命令选择每个在网站中的 <li> 元素: sel.xpath('//ul/li') #网站描述: sel.xpath('//ul/li/text()').extract() #网站标题: sel.xpath('//ul/li/a/text()').extract() #网站链接: sel.xpath('//ul/li/a/@href').extract() </pre><div class="contentsignin">Copy after login</div></div> </p> <p>如前所述,每个 xpath() 调用返回一个 selectors 列表,所以我们可以结合 xpath() 去挖掘更深的节点。我们将会用到这些特性,所以:</p> <div class="jb51code"> <div class="code" style="position:relative; padding:0px; margin:0px;"><pre class='brush:php;toolbar:false;'> for sel in response.xpath('//ul/li') title = sel.xpath('a/text()').extract() link = sel.xpath('a/@href').extract() desc = sel.xpath('text()').extract() print title, link, desc </pre><div class="contentsignin">Copy after login</div></div> </p> <p>在已有的爬虫文件中修改代码</p> <div class="jb51code"> <div class="code" style="position:relative; padding:0px; margin:0px;"><pre class='brush:php;toolbar:false;'> import scrapy class DmozSpider(scrapy.Spider): name = "dmoz" allowed_domains = ["dmoz.org"] start_urls = [ "http://www.dmoz.org/Computers/Programming/Languages/Python/Books/", "http://www.dmoz.org/Computers/Programming/Languages/Python/Resources/" ] def parse(self, response): for sel in response.xpath('//ul/li'): title = sel.xpath('a/text()').extract() link = sel.xpath('a/@href').extract() desc = sel.xpath('text()').extract() print title, link, desc </pre><div class="contentsignin">Copy after login</div></div> </p> <p><strong>3.4.3. 使用item<br /> </strong>Item对象是自定义的python字典,可以使用标准的字典语法来获取到其每个字段的值(字段即是我们之前用Field赋值的属性)</p> <div class="jb51code"> <div class="code" style="position:relative; padding:0px; margin:0px;"><pre class='brush:php;toolbar:false;'> >>> item = DmozItem() >>> item['title'] = 'Example title' >>> item['title'] 'Example title' </pre><div class="contentsignin">Copy after login</div></div> </p> <p>一般来说,Spider将会将爬取到的数据以 Item 对象返回, 最后修改爬虫类,使用 Item 来保存数据,代码如下</p> <div class="jb51code"> <div class="code" style="position:relative; padding:0px; margin:0px;"><pre class='brush:php;toolbar:false;'> from scrapy.spider import Spider from scrapy.selector import Selector from tutorial.items import DmozItem class DmozSpider(Spider): name = "dmoz" allowed_domains = ["dmoz.org"] start_urls = [ "http://www.dmoz.org/Computers/Programming/Languages/Python/Books/", "http://www.dmoz.org/Computers/Programming/Languages/Python/Resources/", ] def parse(self, response): sel = Selector(response) sites = sel.xpath('//ul[@class="directory-url"]/li') items = [] for site in sites: item = DmozItem() item['name'] = site.xpath('a/text()').extract() item['url'] = site.xpath('a/@href').extract() item['description'] = site.xpath('text()').re('-\s[^\n]*\\r') items.append(item) return items </pre><div class="contentsignin">Copy after login</div></div> </p> <p><strong>3.5. 使用Item Pipeline<br /> </strong>当Item在Spider中被收集之后,它将会被传递到Item Pipeline,一些组件会按照一定的顺序执行对Item的处理。<br /> 每个item pipeline组件(有时称之为ItemPipeline)是实现了简单方法的Python类。他们接收到Item并通过它执行一些行为,同时也决定此Item是否继续通过pipeline,或是被丢弃而不再进行处理。<br /> 以下是item pipeline的一些典型应用:</p> <ul> <li>清理HTML数据</li> <li>验证爬取的数据(检查item包含某些字段)</li> <li>查重(并丢弃)</li> <li>将爬取结果保存,如保存到数据库、XML、JSON等文件中</li> </ul> <p>编写你自己的item pipeline很简单,每个item pipeline组件是一个独立的Python类,同时必须实现以下方法:</p> <p>(1)process_item(item, spider) #每个item pipeline组件都需要调用该方法,这个方法必须返回一个 Item (或任何继承类)对象,或是抛出 DropItem异常,被丢弃的item将不会被之后的pipeline组件所处理。</p> <p>#参数:</p> <p>item: 由 parse 方法返回的 Item 对象(Item对象)</p> <p>spider: 抓取到这个 Item 对象对应的爬虫对象(Spider对象)</p> <p>(2)open_spider(spider) #当spider被开启时,这个方法被调用。</p> <p>#参数:</p> <p>spider : (Spider object) – 被开启的spider</p> <p>(3)close_spider(spider) #当spider被关闭时,这个方法被调用,可以再爬虫关闭后进行相应的数据处理。</p> <p>#参数:</p> <p>spider : (Spider object) – 被关闭的spider</p> <p>为JSON文件编写一个items</p> <div class="jb51code"> <div class="code" style="position:relative; padding:0px; margin:0px;"><pre class='brush:php;toolbar:false;'> from scrapy.exceptions import DropItem class TutorialPipeline(object): # put all words in lowercase words_to_filter = ['politics', 'religion'] def process_item(self, item, spider): for word in self.words_to_filter: if word in unicode(item['description']).lower(): raise DropItem("Contains forbidden word: %s" % word) else: return item </pre><div class="contentsignin">Copy after login</div></div> </p> <p>在 settings.py 中设置ITEM_PIPELINES激活item pipeline,其默认为[]</p> <div class="jb51code"> <div class="code" style="position:relative; padding:0px; margin:0px;"><pre class='brush:php;toolbar:false;'> ITEM_PIPELINES = {'tutorial.pipelines.FilterWordsPipeline': 1} </pre><div class="contentsignin">Copy after login</div></div> </p> <p><strong>3.6. 存储数据<br /> </strong>使用下面的命令存储为json文件格式</p> <p>scrapy crawl dmoz -o items.json</p> <p><strong>4.示例<br /> 4.1最简单的spider(默认的Spider)<br /> </strong>用实例属性start_urls中的URL构造Request对象<br /> 框架负责执行request<br /> 将request返回的response对象传递给parse方法做分析</p> <p>简化后的源码:</p> <div class="jb51code"> <div class="code" style="position:relative; padding:0px; margin:0px;"><pre class='brush:php;toolbar:false;'> class Spider(object_ref): """Base class for scrapy spiders. All spiders must inherit from this class. """ name = None def __init__(self, name=None, **kwargs): if name is not None: self.name = name elif not getattr(self, 'name', None): raise ValueError("%s must have a name" % type(self).__name__) self.__dict__.update(kwargs) if not hasattr(self, 'start_urls'): self.start_urls = [] def start_requests(self): for url in self.start_urls: yield self.make_requests_from_url(url) def make_requests_from_url(self, url): return Request(url, dont_filter=True) def parse(self, response): raise NotImplementedError BaseSpider = create_deprecated_class('BaseSpider', Spider) </pre><div class="contentsignin">Copy after login</div></div> </p> <p>一个回调函数返回多个request的例子</p> <div class="jb51code"> <div class="code" style="position:relative; padding:0px; margin:0px;"><pre class='brush:php;toolbar:false;'> import scrapyfrom myproject.items import MyItemclass MySpider(scrapy.Spider): name = 'example.com' allowed_domains = ['example.com'] start_urls = [ 'http://www.example.com/1.html', 'http://www.example.com/2.html', 'http://www.example.com/3.html', ] def parse(self, response): sel = scrapy.Selector(response) for h3 in response.xpath('//h3').extract(): yield MyItem(title=h3) for url in response.xpath('//a/@href').extract(): yield scrapy.Request(url, callback=self.parse) </pre><div class="contentsignin">Copy after login</div></div> </p> <p>构造一个Request对象只需两个参数: URL和回调函数</p> <p><strong>4.2CrawlSpider<br /> </strong>通常我们需要在spider中决定:哪些网页上的链接需要跟进, 哪些网页到此为止,无需跟进里面的链接。CrawlSpider为我们提供了有用的抽象——Rule,使这类爬取任务变得简单。你只需在rule中告诉scrapy,哪些是需要跟进的。<br /> 回忆一下我们爬行mininova网站的spider.</p> <div class="jb51code"> <div class="code" style="position:relative; padding:0px; margin:0px;"><pre class='brush:php;toolbar:false;'> class MininovaSpider(CrawlSpider): name = 'mininova' allowed_domains = ['mininova.org'] start_urls = ['http://www.mininova.org/yesterday'] rules = [Rule(LinkExtractor(allow=['/tor/\d+']), 'parse_torrent')] def parse_torrent(self, response): torrent = TorrentItem() torrent['url'] = response.url torrent['name'] = response.xpath("//h1/text()").extract() torrent['description'] = response.xpath("//div[@id='description']").extract() torrent['size'] = response.xpath("//div[@id='specifications']/p[2]/text()[2]").extract() return torrent </pre><div class="contentsignin">Copy after login</div></div> </p> <p>上面代码中 rules的含义是:匹配/tor/\d+的URL返回的内容,交给parse_torrent处理,并且不再跟进response上的URL。<br /> 官方文档中也有个例子:</p> <div class="jb51code"> <div class="code" style="position:relative; padding:0px; margin:0px;"><pre class='brush:php;toolbar:false;'> rules = ( # 提取匹配 'category.php' (但不匹配 'subsection.php') 的链接并跟进链接(没有callback意味着follow默认为True) Rule(LinkExtractor(allow=('category\.php', ), deny=('subsection\.php', ))), # 提取匹配 'item.php' 的链接并使用spider的parse_item方法进行分析 Rule(LinkExtractor(allow=('item\.php', )), callback='parse_item'), ) </pre><div class="contentsignin">Copy after login</div></div> <p>除了Spider和CrawlSpider外,还有XMLFeedSpider, CSVFeedSpider, SitemapSpider</p> <p></p> </div> </div> </div> <div class="wzconShengming_sp"> <div class="bzsmdiv_sp">Statement of this Website</div> <div>The content of this article is voluntarily contributed by netizens, and the copyright belongs to the original author. This site does not assume corresponding legal responsibility. If you find any content suspected of plagiarism or infringement, please contact admin@php.cn</div> </div> </div> <ins class="adsbygoogle" style="display:block" data-ad-format="autorelaxed" data-ad-client="ca-pub-5902227090019525" data-ad-slot="2507867629"></ins> <script> (adsbygoogle = window.adsbygoogle || []).push({}); </script> <div class="AI_ToolDetails_main4sR"> <ins class="adsbygoogle" style="display:block" data-ad-client="ca-pub-5902227090019525" data-ad-slot="3653428331" data-ad-format="auto" data-full-width-responsive="true"></ins> <script> (adsbygoogle = window.adsbygoogle || []).push({}); </script> <!-- <div class="phpgenera_Details_mainR4"> <div class="phpmain1_4R_readrank"> <div class="phpmain1_4R_readrank_top"> <img onerror="this.onerror=''; this.src='/static/imghw/default1.png'" onerror="this.onerror=''; this.src='/static/imghw/default1.png'" src="/static/imghw/hotarticle2.png" alt="" /> <h2>Hot Article</h2> </div> <div class="phpgenera_Details_mainR4_bottom"> <div class="phpgenera_Details_mainR4_bottoms"> <a href="https://www.php.cn/faq/1796785841.html" title="Assassin's Creed Shadows: Seashell Riddle Solution" class="phpgenera_Details_mainR4_bottom_title">Assassin's Creed Shadows: Seashell Riddle Solution</a> <div class="phpgenera_Details_mainR4_bottoms_info"> <span>3 weeks ago</span> <span>By DDD</span> </div> </div> <div class="phpgenera_Details_mainR4_bottoms"> <a href="https://www.php.cn/faq/1796789525.html" title="What's New in Windows 11 KB5054979 & How to Fix Update Issues" class="phpgenera_Details_mainR4_bottom_title">What's New in Windows 11 KB5054979 & How to Fix Update Issues</a> <div class="phpgenera_Details_mainR4_bottoms_info"> <span>2 weeks ago</span> <span>By DDD</span> </div> </div> <div class="phpgenera_Details_mainR4_bottoms"> <a href="https://www.php.cn/faq/1796785857.html" title="Where to find the Crane Control Keycard in Atomfall" class="phpgenera_Details_mainR4_bottom_title">Where to find the Crane Control Keycard in Atomfall</a> <div class="phpgenera_Details_mainR4_bottoms_info"> <span>3 weeks ago</span> <span>By DDD</span> </div> </div> <div class="phpgenera_Details_mainR4_bottoms"> <a href="https://www.php.cn/faq/1796781206.html" title="Saving in R.E.P.O. Explained (And Save Files)" class="phpgenera_Details_mainR4_bottom_title">Saving in R.E.P.O. Explained (And Save Files)</a> <div class="phpgenera_Details_mainR4_bottoms_info"> <span>1 months ago</span> <span>By 尊渡假赌尊渡假赌尊渡假赌</span> </div> </div> <div class="phpgenera_Details_mainR4_bottoms"> <a href="https://www.php.cn/faq/1796783009.html" title="Assassin's Creed Shadows - How To Find The Blacksmith And Unlock Weapon And Armour Customisation" class="phpgenera_Details_mainR4_bottom_title">Assassin's Creed Shadows - How To Find The Blacksmith And Unlock Weapon And Armour Customisation</a> <div class="phpgenera_Details_mainR4_bottoms_info"> <span>4 weeks ago</span> <span>By DDD</span> </div> </div> </div> <div class="phpgenera_Details_mainR3_more"> <a href="https://www.php.cn/article.html">Show More</a> </div> </div> </div> --> <div class="phpgenera_Details_mainR3"> <div class="phpmain1_4R_readrank"> <div class="phpmain1_4R_readrank_top"> <img onerror="this.onerror=''; this.src='/static/imghw/default1.png'" onerror="this.onerror=''; this.src='/static/imghw/default1.png'" src="/static/imghw/hottools2.png" alt="" /> <h2>Hot AI Tools</h2> </div> <div class="phpgenera_Details_mainR3_bottom"> <div class="phpmain_tab2_mids_top"> <a href="https://www.php.cn/ai/undresserai-undress" title="Undresser.AI Undress" class="phpmain_tab2_mids_top_img"> <img onerror="this.onerror=''; this.src='/static/imghw/default1.png'" onerror="this.onerror=''; this.src='/static/imghw/default1.png'" class="lazy" data-src="https://img.php.cn/upload/ai_manual/001/246/273/173411540686492.jpg?x-oss-process=image/resize,m_fill,h_50,w_50" src="/static/imghw/default1.png" alt="Undresser.AI Undress" /> </a> <div class="phpmain_tab2_mids_info"> <a href="https://www.php.cn/ai/undresserai-undress" title="Undresser.AI Undress" class="phpmain_tab2_mids_title"> <h3>Undresser.AI Undress</h3> </a> <p>AI-powered app for creating realistic nude photos</p> </div> </div> <div class="phpmain_tab2_mids_top"> <a href="https://www.php.cn/ai/ai-clothes-remover" title="AI Clothes Remover" class="phpmain_tab2_mids_top_img"> <img onerror="this.onerror=''; this.src='/static/imghw/default1.png'" onerror="this.onerror=''; this.src='/static/imghw/default1.png'" class="lazy" data-src="https://img.php.cn/upload/ai_manual/001/246/273/173411552797167.jpg?x-oss-process=image/resize,m_fill,h_50,w_50" src="/static/imghw/default1.png" alt="AI Clothes Remover" /> </a> <div class="phpmain_tab2_mids_info"> <a href="https://www.php.cn/ai/ai-clothes-remover" title="AI Clothes Remover" class="phpmain_tab2_mids_title"> <h3>AI Clothes Remover</h3> </a> <p>Online AI tool for removing clothes from photos.</p> </div> </div> <div class="phpmain_tab2_mids_top"> <a href="https://www.php.cn/ai/undress-ai-tool" title="Undress AI Tool" class="phpmain_tab2_mids_top_img"> <img onerror="this.onerror=''; this.src='/static/imghw/default1.png'" onerror="this.onerror=''; this.src='/static/imghw/default1.png'" class="lazy" data-src="https://img.php.cn/upload/ai_manual/001/246/273/173410641626608.jpg?x-oss-process=image/resize,m_fill,h_50,w_50" src="/static/imghw/default1.png" alt="Undress AI Tool" /> </a> <div class="phpmain_tab2_mids_info"> <a href="https://www.php.cn/ai/undress-ai-tool" title="Undress AI Tool" class="phpmain_tab2_mids_title"> <h3>Undress AI Tool</h3> </a> <p>Undress images for free</p> </div> </div> <div class="phpmain_tab2_mids_top"> <a href="https://www.php.cn/ai/clothoffio" title="Clothoff.io" class="phpmain_tab2_mids_top_img"> <img onerror="this.onerror=''; this.src='/static/imghw/default1.png'" onerror="this.onerror=''; this.src='/static/imghw/default1.png'" class="lazy" data-src="https://img.php.cn/upload/ai_manual/001/246/273/173411529149311.jpg?x-oss-process=image/resize,m_fill,h_50,w_50" src="/static/imghw/default1.png" alt="Clothoff.io" /> </a> <div class="phpmain_tab2_mids_info"> <a href="https://www.php.cn/ai/clothoffio" title="Clothoff.io" class="phpmain_tab2_mids_title"> <h3>Clothoff.io</h3> </a> <p>AI clothes remover</p> </div> </div> <div class="phpmain_tab2_mids_top"> <a href="https://www.php.cn/ai/video-swap" title="Video Face Swap" class="phpmain_tab2_mids_top_img"> <img onerror="this.onerror=''; this.src='/static/imghw/default1.png'" onerror="this.onerror=''; this.src='/static/imghw/default1.png'" class="lazy" data-src="https://img.php.cn/upload/ai_manual/001/246/273/173414504068133.jpg?x-oss-process=image/resize,m_fill,h_50,w_50" src="/static/imghw/default1.png" alt="Video Face Swap" /> </a> <div class="phpmain_tab2_mids_info"> <a href="https://www.php.cn/ai/video-swap" title="Video Face Swap" class="phpmain_tab2_mids_title"> <h3>Video Face Swap</h3> </a> <p>Swap faces in any video effortlessly with our completely free AI face swap tool!</p> </div> </div> </div> <div class="phpgenera_Details_mainR3_more"> <a href="https://www.php.cn/ai">Show More</a> </div> </div> </div> <script src="https://sw.php.cn/hezuo/cac1399ab368127f9b113b14eb3316d0.js" type="text/javascript"></script> <div class="phpgenera_Details_mainR4"> <div class="phpmain1_4R_readrank"> <div class="phpmain1_4R_readrank_top"> <img onerror="this.onerror=''; this.src='/static/imghw/default1.png'" onerror="this.onerror=''; this.src='/static/imghw/default1.png'" src="/static/imghw/hotarticle2.png" alt="" /> <h2>Hot Article</h2> </div> <div class="phpgenera_Details_mainR4_bottom"> <div class="phpgenera_Details_mainR4_bottoms"> <a href="https://www.php.cn/faq/1796785841.html" title="Assassin's Creed Shadows: Seashell Riddle Solution" class="phpgenera_Details_mainR4_bottom_title">Assassin's Creed Shadows: Seashell Riddle Solution</a> <div class="phpgenera_Details_mainR4_bottoms_info"> <span>3 weeks ago</span> <span>By DDD</span> </div> </div> <div class="phpgenera_Details_mainR4_bottoms"> <a href="https://www.php.cn/faq/1796789525.html" title="What's New in Windows 11 KB5054979 & How to Fix Update Issues" class="phpgenera_Details_mainR4_bottom_title">What's New in Windows 11 KB5054979 & How to Fix Update Issues</a> <div class="phpgenera_Details_mainR4_bottoms_info"> <span>2 weeks ago</span> <span>By DDD</span> </div> </div> <div class="phpgenera_Details_mainR4_bottoms"> <a href="https://www.php.cn/faq/1796785857.html" title="Where to find the Crane Control Keycard in Atomfall" class="phpgenera_Details_mainR4_bottom_title">Where to find the Crane Control Keycard in Atomfall</a> <div class="phpgenera_Details_mainR4_bottoms_info"> <span>3 weeks ago</span> <span>By DDD</span> </div> </div> <div class="phpgenera_Details_mainR4_bottoms"> <a href="https://www.php.cn/faq/1796781206.html" title="Saving in R.E.P.O. Explained (And Save Files)" class="phpgenera_Details_mainR4_bottom_title">Saving in R.E.P.O. Explained (And Save Files)</a> <div class="phpgenera_Details_mainR4_bottoms_info"> <span>1 months ago</span> <span>By 尊渡假赌尊渡假赌尊渡假赌</span> </div> </div> <div class="phpgenera_Details_mainR4_bottoms"> <a href="https://www.php.cn/faq/1796783009.html" title="Assassin's Creed Shadows - How To Find The Blacksmith And Unlock Weapon And Armour Customisation" class="phpgenera_Details_mainR4_bottom_title">Assassin's Creed Shadows - How To Find The Blacksmith And Unlock Weapon And Armour Customisation</a> <div class="phpgenera_Details_mainR4_bottoms_info"> <span>4 weeks ago</span> <span>By DDD</span> </div> </div> </div> <div class="phpgenera_Details_mainR3_more"> <a href="https://www.php.cn/article.html">Show More</a> </div> </div> </div> <div class="phpgenera_Details_mainR3"> <div class="phpmain1_4R_readrank"> <div class="phpmain1_4R_readrank_top"> <img onerror="this.onerror=''; this.src='/static/imghw/default1.png'" onerror="this.onerror=''; this.src='/static/imghw/default1.png'" src="/static/imghw/hottools2.png" alt="" /> <h2>Hot Tools</h2> </div> <div class="phpgenera_Details_mainR3_bottom"> <div class="phpmain_tab2_mids_top"> <a href="https://www.php.cn/toolset/development-tools/92" title="Notepad++7.3.1" class="phpmain_tab2_mids_top_img"> <img onerror="this.onerror=''; this.src='/static/imghw/default1.png'" onerror="this.onerror=''; this.src='/static/imghw/default1.png'" class="lazy" data-src="https://img.php.cn/upload/manual/000/000/001/58ab96f0f39f7357.jpg?x-oss-process=image/resize,m_fill,h_50,w_72" src="/static/imghw/default1.png" alt="Notepad++7.3.1" /> </a> <div class="phpmain_tab2_mids_info"> <a href="https://www.php.cn/toolset/development-tools/92" title="Notepad++7.3.1" class="phpmain_tab2_mids_title"> <h3>Notepad++7.3.1</h3> </a> <p>Easy-to-use and free code editor</p> </div> </div> <div class="phpmain_tab2_mids_top"> <a href="https://www.php.cn/toolset/development-tools/93" title="SublimeText3 Chinese version" class="phpmain_tab2_mids_top_img"> <img onerror="this.onerror=''; this.src='/static/imghw/default1.png'" onerror="this.onerror=''; this.src='/static/imghw/default1.png'" class="lazy" data-src="https://img.php.cn/upload/manual/000/000/001/58ab97a3baad9677.jpg?x-oss-process=image/resize,m_fill,h_50,w_72" src="/static/imghw/default1.png" alt="SublimeText3 Chinese version" /> </a> <div class="phpmain_tab2_mids_info"> <a href="https://www.php.cn/toolset/development-tools/93" title="SublimeText3 Chinese version" class="phpmain_tab2_mids_title"> <h3>SublimeText3 Chinese version</h3> </a> <p>Chinese version, very easy to use</p> </div> </div> <div class="phpmain_tab2_mids_top"> <a href="https://www.php.cn/toolset/development-tools/121" title="Zend Studio 13.0.1" class="phpmain_tab2_mids_top_img"> <img onerror="this.onerror=''; this.src='/static/imghw/default1.png'" onerror="this.onerror=''; this.src='/static/imghw/default1.png'" class="lazy" data-src="https://img.php.cn/upload/manual/000/000/001/58ab97ecd1ab2670.jpg?x-oss-process=image/resize,m_fill,h_50,w_72" src="/static/imghw/default1.png" alt="Zend Studio 13.0.1" /> </a> <div class="phpmain_tab2_mids_info"> <a href="https://www.php.cn/toolset/development-tools/121" title="Zend Studio 13.0.1" class="phpmain_tab2_mids_title"> <h3>Zend Studio 13.0.1</h3> </a> <p>Powerful PHP integrated development environment</p> </div> </div> <div class="phpmain_tab2_mids_top"> <a href="https://www.php.cn/toolset/development-tools/469" title="Dreamweaver CS6" class="phpmain_tab2_mids_top_img"> <img onerror="this.onerror=''; this.src='/static/imghw/default1.png'" onerror="this.onerror=''; this.src='/static/imghw/default1.png'" class="lazy" data-src="https://img.php.cn/upload/manual/000/000/001/58d0e0fc74683535.jpg?x-oss-process=image/resize,m_fill,h_50,w_72" src="/static/imghw/default1.png" alt="Dreamweaver CS6" /> </a> <div class="phpmain_tab2_mids_info"> <a href="https://www.php.cn/toolset/development-tools/469" title="Dreamweaver CS6" class="phpmain_tab2_mids_title"> <h3>Dreamweaver CS6</h3> </a> <p>Visual web development tools</p> </div> </div> <div class="phpmain_tab2_mids_top"> <a href="https://www.php.cn/toolset/development-tools/500" title="SublimeText3 Mac version" class="phpmain_tab2_mids_top_img"> <img onerror="this.onerror=''; this.src='/static/imghw/default1.png'" onerror="this.onerror=''; this.src='/static/imghw/default1.png'" class="lazy" data-src="https://img.php.cn/upload/manual/000/000/001/58d34035e2757995.png?x-oss-process=image/resize,m_fill,h_50,w_72" src="/static/imghw/default1.png" alt="SublimeText3 Mac version" /> </a> <div class="phpmain_tab2_mids_info"> <a href="https://www.php.cn/toolset/development-tools/500" title="SublimeText3 Mac version" class="phpmain_tab2_mids_title"> <h3>SublimeText3 Mac version</h3> </a> <p>God-level code editing software (SublimeText3)</p> </div> </div> </div> <div class="phpgenera_Details_mainR3_more"> <a href="https://www.php.cn/ai">Show More</a> </div> </div> </div> <div class="phpgenera_Details_mainR4"> <div class="phpmain1_4R_readrank"> <div class="phpmain1_4R_readrank_top"> <img onerror="this.onerror=''; this.src='/static/imghw/default1.png'" onerror="this.onerror=''; this.src='/static/imghw/default1.png'" src="/static/imghw/hotarticle2.png" alt="" /> <h2>Hot Topics</h2> </div> <div class="phpgenera_Details_mainR4_bottom"> <div class="phpgenera_Details_mainR4_bottoms"> <a href="https://www.php.cn/faq/gmailyxdlrkzn" title="Where is the login entrance for gmail email?" class="phpgenera_Details_mainR4_bottom_title">Where is the login entrance for gmail email?</a> <div class="phpgenera_Details_mainR4_bottoms_info"> <div class="phpgenera_Details_mainR4_bottoms_infos"> <img src="/static/imghw/eyess.png" alt="" /> <span>7572</span> </div> <div class="phpgenera_Details_mainR4_bottoms_infos"> <img src="/static/imghw/tiezi.png" alt="" /> <span>15</span> </div> </div> </div> <div class="phpgenera_Details_mainR4_bottoms"> <a href="https://www.php.cn/faq/cakephp-tutor" title="CakePHP Tutorial" class="phpgenera_Details_mainR4_bottom_title">CakePHP Tutorial</a> <div class="phpgenera_Details_mainR4_bottoms_info"> <div class="phpgenera_Details_mainR4_bottoms_infos"> <img src="/static/imghw/eyess.png" alt="" /> <span>1386</span> </div> <div class="phpgenera_Details_mainR4_bottoms_infos"> <img src="/static/imghw/tiezi.png" alt="" /> <span>52</span> </div> </div> </div> <div class="phpgenera_Details_mainR4_bottoms"> <a href="https://www.php.cn/faq/steamdzhmcssmgs" title="What is the format of the account name of steam" class="phpgenera_Details_mainR4_bottom_title">What is the format of the account name of steam</a> <div class="phpgenera_Details_mainR4_bottoms_info"> <div class="phpgenera_Details_mainR4_bottoms_infos"> <img src="/static/imghw/eyess.png" alt="" /> <span>87</span> </div> <div class="phpgenera_Details_mainR4_bottoms_infos"> <img src="/static/imghw/tiezi.png" alt="" /> <span>11</span> </div> </div> </div> <div class="phpgenera_Details_mainR4_bottoms"> <a href="https://www.php.cn/faq/winactivationkeyper" title="win11 activation key permanent" class="phpgenera_Details_mainR4_bottom_title">win11 activation key permanent</a> <div class="phpgenera_Details_mainR4_bottoms_info"> <div class="phpgenera_Details_mainR4_bottoms_infos"> <img src="/static/imghw/eyess.png" alt="" /> <span>62</span> </div> <div class="phpgenera_Details_mainR4_bottoms_infos"> <img src="/static/imghw/tiezi.png" alt="" /> <span>19</span> </div> </div> </div> <div class="phpgenera_Details_mainR4_bottoms"> <a href="https://www.php.cn/faq/newyorktimesdailybrief" title="nyt connections hints and answers" class="phpgenera_Details_mainR4_bottom_title">nyt connections hints and answers</a> <div class="phpgenera_Details_mainR4_bottoms_info"> <div class="phpgenera_Details_mainR4_bottoms_infos"> <img src="/static/imghw/eyess.png" alt="" /> <span>28</span> </div> <div class="phpgenera_Details_mainR4_bottoms_infos"> <img src="/static/imghw/tiezi.png" alt="" /> <span>110</span> </div> </div> </div> </div> <div class="phpgenera_Details_mainR3_more"> <a href="https://www.php.cn/faq/zt">Show More</a> </div> </div> </div> </div> </div> <div class="Article_Details_main2"> <div class="phpgenera_Details_mainL4"> <div class="phpmain1_2_top"> <a href="javascript:void(0);" class="phpmain1_2_top_title">Related knowledge<img src="/static/imghw/index2_title2.png" alt="" /></a> </div> <div class="phpgenera_Details_mainL4_info"> <div class="phphistorical_Version2_mids"> <a href="https://www.php.cn/faq/1796796694.html" title="How to run programs in terminal vscode" class="phphistorical_Version2_mids_img"> <img onerror="this.onerror=''; this.src='/static/imghw/default1.png'" src="/static/imghw/default1.png" class="lazy" data-src="https://img.php.cn/upload/article/202501/02/2025010222204446248.jpg?x-oss-process=image/resize,m_fill,h_207,w_330" alt="How to run programs in terminal vscode" /> </a> <a href="https://www.php.cn/faq/1796796694.html" title="How to run programs in terminal vscode" class="phphistorical_Version2_mids_title">How to run programs in terminal vscode</a> <span class="Articlelist_txts_time">Apr 15, 2025 pm 06:42 PM</span> <p class="Articlelist_txts_p">In VS Code, you can run the program in the terminal through the following steps: Prepare the code and open the integrated terminal to ensure that the code directory is consistent with the terminal working directory. Select the run command according to the programming language (such as Python's python your_file_name.py) to check whether it runs successfully and resolve errors. Use the debugger to improve debugging efficiency.</p> </div> <div class="phphistorical_Version2_mids"> <a href="https://www.php.cn/faq/1796796735.html" title="Can visual studio code be used in python" class="phphistorical_Version2_mids_img"> <img onerror="this.onerror=''; this.src='/static/imghw/default1.png'" src="/static/imghw/default1.png" class="lazy" data-src="https://img.php.cn/upload/article/202412/27/2024122713580165301.jpg?x-oss-process=image/resize,m_fill,h_207,w_330" alt="Can visual studio code be used in python" /> </a> <a href="https://www.php.cn/faq/1796796735.html" title="Can visual studio code be used in python" class="phphistorical_Version2_mids_title">Can visual studio code be used in python</a> <span class="Articlelist_txts_time">Apr 15, 2025 pm 08:18 PM</span> <p class="Articlelist_txts_p">VS Code can be used to write Python and provides many features that make it an ideal tool for developing Python applications. It allows users to: install Python extensions to get functions such as code completion, syntax highlighting, and debugging. Use the debugger to track code step by step, find and fix errors. Integrate Git for version control. Use code formatting tools to maintain code consistency. Use the Linting tool to spot potential problems ahead of time.</p> </div> <div class="phphistorical_Version2_mids"> <a href="https://www.php.cn/faq/1796796719.html" title="Is the vscode extension malicious?" class="phphistorical_Version2_mids_img"> <img onerror="this.onerror=''; this.src='/static/imghw/default1.png'" src="/static/imghw/default1.png" class="lazy" data-src="https://img.php.cn/upload/article/202412/27/2024122714102618732.jpg?x-oss-process=image/resize,m_fill,h_207,w_330" alt="Is the vscode extension malicious?" /> </a> <a href="https://www.php.cn/faq/1796796719.html" title="Is the vscode extension malicious?" class="phphistorical_Version2_mids_title">Is the vscode extension malicious?</a> <span class="Articlelist_txts_time">Apr 15, 2025 pm 07:57 PM</span> <p class="Articlelist_txts_p">VS Code extensions pose malicious risks, such as hiding malicious code, exploiting vulnerabilities, and masturbating as legitimate extensions. Methods to identify malicious extensions include: checking publishers, reading comments, checking code, and installing with caution. Security measures also include: security awareness, good habits, regular updates and antivirus software.</p> </div> <div class="phphistorical_Version2_mids"> <a href="https://www.php.cn/faq/1796796708.html" title="Can vs code run in Windows 8" class="phphistorical_Version2_mids_img"> <img onerror="this.onerror=''; this.src='/static/imghw/default1.png'" src="/static/imghw/default1.png" class="lazy" data-src="https://img.php.cn/upload/article/202412/31/2024123119425980275.jpg?x-oss-process=image/resize,m_fill,h_207,w_330" alt="Can vs code run in Windows 8" /> </a> <a href="https://www.php.cn/faq/1796796708.html" title="Can vs code run in Windows 8" class="phphistorical_Version2_mids_title">Can vs code run in Windows 8</a> <span class="Articlelist_txts_time">Apr 15, 2025 pm 07:24 PM</span> <p class="Articlelist_txts_p">VS Code can run on Windows 8, but the experience may not be great. First make sure the system has been updated to the latest patch, then download the VS Code installation package that matches the system architecture and install it as prompted. After installation, be aware that some extensions may be incompatible with Windows 8 and need to look for alternative extensions or use newer Windows systems in a virtual machine. Install the necessary extensions to check whether they work properly. Although VS Code is feasible on Windows 8, it is recommended to upgrade to a newer Windows system for a better development experience and security.</p> </div> <div class="phphistorical_Version2_mids"> <a href="https://www.php.cn/faq/1796796860.html" title="Python: Automation, Scripting, and Task Management" class="phphistorical_Version2_mids_img"> <img onerror="this.onerror=''; this.src='/static/imghw/default1.png'" src="/static/imghw/default1.png" class="lazy" data-src="https://img.php.cn/upload/article/001/253/068/174473369180376.jpg?x-oss-process=image/resize,m_fill,h_207,w_330" alt="Python: Automation, Scripting, and Task Management" /> </a> <a href="https://www.php.cn/faq/1796796860.html" title="Python: Automation, Scripting, and Task Management" class="phphistorical_Version2_mids_title">Python: Automation, Scripting, and Task Management</a> <span class="Articlelist_txts_time">Apr 16, 2025 am 12:14 AM</span> <p class="Articlelist_txts_p">Python excels in automation, scripting, and task management. 1) Automation: File backup is realized through standard libraries such as os and shutil. 2) Script writing: Use the psutil library to monitor system resources. 3) Task management: Use the schedule library to schedule tasks. Python's ease of use and rich library support makes it the preferred tool in these areas.</p> </div> <div class="phphistorical_Version2_mids"> <a href="https://www.php.cn/faq/1796796695.html" title="What is vscode What is vscode for?" class="phphistorical_Version2_mids_img"> <img onerror="this.onerror=''; this.src='/static/imghw/default1.png'" src="/static/imghw/default1.png" class="lazy" data-src="https://img.php.cn/upload/article/202501/02/2025010222184785346.jpg?x-oss-process=image/resize,m_fill,h_207,w_330" alt="What is vscode What is vscode for?" /> </a> <a href="https://www.php.cn/faq/1796796695.html" title="What is vscode What is vscode for?" class="phphistorical_Version2_mids_title">What is vscode What is vscode for?</a> <span class="Articlelist_txts_time">Apr 15, 2025 pm 06:45 PM</span> <p class="Articlelist_txts_p">VS Code is the full name Visual Studio Code, which is a free and open source cross-platform code editor and development environment developed by Microsoft. It supports a wide range of programming languages and provides syntax highlighting, code automatic completion, code snippets and smart prompts to improve development efficiency. Through a rich extension ecosystem, users can add extensions to specific needs and languages, such as debuggers, code formatting tools, and Git integrations. VS Code also includes an intuitive debugger that helps quickly find and resolve bugs in your code.</p> </div> <div class="phphistorical_Version2_mids"> <a href="https://www.php.cn/faq/1796796720.html" title="Can visual studio code run python" class="phphistorical_Version2_mids_img"> <img onerror="this.onerror=''; this.src='/static/imghw/default1.png'" src="/static/imghw/default1.png" class="lazy" data-src="https://img.php.cn/upload/article/202412/27/2024122714100888560.jpg?x-oss-process=image/resize,m_fill,h_207,w_330" alt="Can visual studio code run python" /> </a> <a href="https://www.php.cn/faq/1796796720.html" title="Can visual studio code run python" class="phphistorical_Version2_mids_title">Can visual studio code run python</a> <span class="Articlelist_txts_time">Apr 15, 2025 pm 08:00 PM</span> <p class="Articlelist_txts_p">VS Code not only can run Python, but also provides powerful functions, including: automatically identifying Python files after installing Python extensions, providing functions such as code completion, syntax highlighting, and debugging. Relying on the installed Python environment, extensions act as bridge connection editing and Python environment. The debugging functions include setting breakpoints, step-by-step debugging, viewing variable values, and improving debugging efficiency. The integrated terminal supports running complex commands such as unit testing and package management. Supports extended configuration and enhances features such as code formatting, analysis and version control.</p> </div> <div class="phphistorical_Version2_mids"> <a href="https://www.php.cn/faq/1796796853.html" title="Python vs. JavaScript: The Learning Curve and Ease of Use" class="phphistorical_Version2_mids_img"> <img onerror="this.onerror=''; this.src='/static/imghw/default1.png'" src="/static/imghw/default1.png" class="lazy" data-src="https://img.php.cn/upload/article/001/253/068/174473354083140.jpg?x-oss-process=image/resize,m_fill,h_207,w_330" alt="Python vs. JavaScript: The Learning Curve and Ease of Use" /> </a> <a href="https://www.php.cn/faq/1796796853.html" title="Python vs. JavaScript: The Learning Curve and Ease of Use" class="phphistorical_Version2_mids_title">Python vs. JavaScript: The Learning Curve and Ease of Use</a> <span class="Articlelist_txts_time">Apr 16, 2025 am 12:12 AM</span> <p class="Articlelist_txts_p">Python is more suitable for beginners, with a smooth learning curve and concise syntax; JavaScript is suitable for front-end development, with a steep learning curve and flexible syntax. 1. Python syntax is intuitive and suitable for data science and back-end development. 2. JavaScript is flexible and widely used in front-end and server-side programming.</p> </div> </div> <a href="https://www.php.cn/be/" class="phpgenera_Details_mainL4_botton"> <span>See all articles</span> <img src="/static/imghw/down_right.png" alt="" /> </a> </div> </div> </div> </main> <footer> <div class="footer"> <div class="footertop"> <img src="/static/imghw/logo.png" alt=""> <p>Public welfare online PHP training,Help PHP learners grow quickly!</p> </div> <div class="footermid"> <a href="https://www.php.cn/about/us.html">About us</a> <a href="https://www.php.cn/about/disclaimer.html">Disclaimer</a> <a href="https://www.php.cn/update/article_0_1.html">Sitemap</a> </div> <div class="footerbottom"> <p> © php.cn All rights reserved </p> </div> </div> </footer> <input type="hidden" id="verifycode" value="/captcha.html"> <script>layui.use(['element', 'carousel'], function () {var element = layui.element;$ = layui.jquery;var carousel = layui.carousel;carousel.render({elem: '#test1', width: '100%', height: '330px', arrow: 'always'});$.getScript('/static/js/jquery.lazyload.min.js', function () {$("img").lazyload({placeholder: "/static/images/load.jpg", effect: "fadeIn", threshold: 200, skip_invisible: false});});});</script> <script src="/static/js/common_new.js"></script> <script type="text/javascript" src="/static/js/jquery.cookie.js?1745066917"></script> <script src="https://vdse.bdstatic.com//search-video.v1.min.js"></script> <link rel='stylesheet' id='_main-css' href='/static/css/viewer.min.css?2' type='text/css' media='all' /> <script type='text/javascript' src='/static/js/viewer.min.js?1'></script> <script type='text/javascript' src='/static/js/jquery-viewer.min.js'></script> <script type="text/javascript" src="/static/js/global.min.js?5.5.53"></script> <script> var _paq = window._paq = window._paq || []; /* tracker methods like "setCustomDimension" should be called before "trackPageView" */ _paq.push(['trackPageView']); _paq.push(['enableLinkTracking']); (function () { var u = "https://tongji.php.cn/"; _paq.push(['setTrackerUrl', u + 'matomo.php']); _paq.push(['setSiteId', '9']); var d = document, g = d.createElement('script'), s = d.getElementsByTagName('script')[0]; g.async = true; g.src = u + 'matomo.js'; s.parentNode.insertBefore(g, s); })(); </script> <script> // top layui.use(function () { var util = layui.util; util.fixbar({ on: { mouseenter: function (type) { layer.tips(type, this, { tips: 4, fixed: true, }); }, mouseleave: function (type) { layer.closeAll("tips"); }, }, }); }); document.addEventListener("DOMContentLoaded", (event) => { // 定义一个函数来处理滚动链接的点击事件 function setupScrollLink(scrollLinkId, targetElementId) { const scrollLink = document.getElementById(scrollLinkId); const targetElement = document.getElementById(targetElementId); if (scrollLink && targetElement) { scrollLink.addEventListener("click", (e) => { e.preventDefault(); // 阻止默认链接行为 targetElement.scrollIntoView({ behavior: "smooth" }); // 平滑滚动到目标元素 }); } else { console.warn( `Either scroll link with ID '${scrollLinkId}' or target element with ID '${targetElementId}' not found.` ); } } // 使用该函数设置多个滚动链接 setupScrollLink("Article_Details_main1L2s_1", "article_main_title1"); setupScrollLink("Article_Details_main1L2s_2", "article_main_title2"); setupScrollLink("Article_Details_main1L2s_3", "article_main_title3"); setupScrollLink("Article_Details_main1L2s_4", "article_main_title4"); setupScrollLink("Article_Details_main1L2s_5", "article_main_title5"); setupScrollLink("Article_Details_main1L2s_6", "article_main_title6"); // 可以继续添加更多的滚动链接设置 }); window.addEventListener("scroll", function () { var fixedElement = document.getElementById("Article_Details_main1Lmain"); var scrollTop = window.scrollY || document.documentElement.scrollTop; // 兼容不同浏览器 var clientHeight = window.innerHeight || document.documentElement.clientHeight; // 视口高度 var scrollHeight = document.documentElement.scrollHeight; // 页面总高度 // 计算距离底部的距离 var distanceToBottom = scrollHeight - scrollTop - clientHeight; // 当距离底部小于或等于300px时,取消固定定位 if (distanceToBottom <= 980) { fixedElement.classList.remove("Article_Details_main1Lmain"); fixedElement.classList.add("Article_Details_main1Lmain_relative"); } else { // 否则,保持固定定位 fixedElement.classList.remove("Article_Details_main1Lmain_relative"); fixedElement.classList.add("Article_Details_main1Lmain"); } }); </script> </body> </html>