Uploadify是JQuery的一个上传插件,实现的效果非常不错,带进度显示。不过官方提供的实例时php版本的,本文将详细介绍Uploadify在Aspnet中的使用,您也可以点击下面的链接进行演示或下载。
首先按下面的步骤来实现一个简单的上传功能。
1 创建Web项目,命名为JQueryUploadDemo,从官网上下载最新的版本解压后添加到项目中。
2 在项目中添加UploadHandler.ashx文件用来处理文件的上传。
3 在项目中添加UploadFile文件夹,用来存放上传的文件。
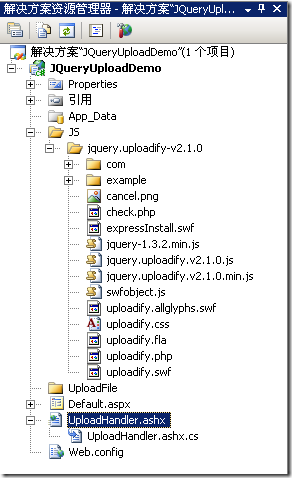
进行完上面三步后项目的基本结构如下图:

4 Default.aspx的html页的代码修改如下:
<html xmlns="http://www.w3.org/1999/xhtml">
<head runat="server">
 <title>Uploadify</title>
 <link href="JS/jquery.uploadify-v2.1.0/example/css/default.css"
  rel="stylesheet" type="text/css" />
 <link href="JS/jquery.uploadify-v2.1.0/uploadify.css"
  rel="stylesheet" type="text/css" />

 <script type="text/javascript"
  src="JS/jquery.uploadify-v2.1.0/jquery-1.3.2.min.js"></script>

 <script type="text/javascript"
  src="JS/jquery.uploadify-v2.1.0/swfobject.js"></script>

 <script type="text/javascript"
 src="JS/jquery.uploadify-v2.1.0/jquery.uploadify.v2.1.0.min.js"></script>

 <script type="text/javascript">
  $(document).ready(function()
  {
   $("#uploadify").uploadify({
    'uploader': 'JS/jquery.uploadify-v2.1.0/uploadify.swf',
    'script': 'UploadHandler.ashx',
    'cancelImg': 'JS/jquery.uploadify-v2.1.0/cancel.png',
    'folder': 'UploadFile',
    'queueID': 'fileQueue',
    'auto': false,
    'multi': true
   });
  });
 </script>

</head>
<body>
 <div id="fileQueue"></div>
 <input type="file" name="uploadify" id="uploadify" />
 <p>
  <a href="javascript:$('#uploadify').uploadifyUpload()">上传</a>|
  <a href="javascript:$('#uploadify').uploadifyClearQueue()">取消上传</a>
 </p>
</body>
</html>
5 UploadHandler类的ProcessRequest方法代码如下:
public void ProcessRequest(HttpContext context)
{
 context.Response.ContentType = "text/plain";
 context.Response.Charset = "utf-8";

 HttpPostedFile file = context.Request.Files["Filedata"];
 string uploadPath =
  HttpContext.Current.Server.MapPath(@context.Request["folder"])+"\\";

 if (file != null)
 {
  if (!Directory.Exists(uploadPath))
  {
   Directory.CreateDirectory(uploadPath);
  }
  file.SaveAs(uploadPath + file.FileName);
  //下面这句代码缺少的话,上传成功后上传队列的显示不会自动消失
  context.Response.Write("1");
 }
 else
 {
  context.Response.Write("0");
 }
}
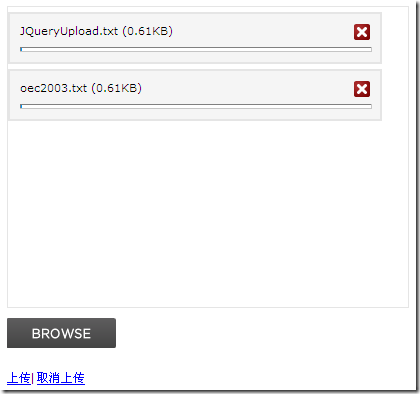
6 运行后效果如下图:

7 选择了两个文件后,点击上传,就可以看到UploadFile文件夹中会增加这两个文件。
上面简单地实现了一个上传的功能,依靠函数uploadify实现,uploadify函数的参数为json格式,可以对json对象的key值的修改来进行自定义的设置,如multi设置为true或false来控制是否可以进行多文件上传,下面就来介绍下这些key值的意思:
uploader : uploadify.swf 文件的相对路径,该swf文件是一个带有文字BROWSE的按钮,点击后淡出打开文件对话框,默认值:uploadify.swf。
script : 后台处理程序的相对路径 。默认值:uploadify.php
checkScript :用来判断上传选择的文件在服务器是否存在的后台处理程序的相对路径
fileDataName :设置一个名字,在服务器处理程序中根据该名字来取上传文件的数据。默认为Filedata
method : 提交方式Post 或Get 默认为Post
scriptAccess :flash脚本文件的访问模式,如果在本地测试设置为always,默认值:sameDomain
folder : 上传文件存放的目录 。
queueID : 文件队列的ID,该ID与存放文件队列的div的ID一致。
queueSizeLimit : 当允许多文件生成时,设置选择文件的个数,默认值:999 。
multi : 设置为true时可以上传多个文件。
auto : 设置为true当选择文件后就直接上传了,为false需要点击上传按钮才上传 。
fileDesc : 这个属性值必须设置fileExt属性后才有效,用来设置选择文件对话框中的提示文本,如设置fileDesc为“请选择rar doc pdf文件”,打开文件选择框效果如下图:

fileExt : 设置可以选择的文件的类型,格式如:'*.doc;*.pdf;*.rar' 。
sizeLimit : 上传文件的大小限制 。
simUploadLimit : 允许同时上传的个数 默认值:1 。
buttonText : 浏览按钮的文本,默认值:BROWSE 。
buttonImg : 浏览按钮的图片的路径 。
hideButton : 设置为true则隐藏浏览按钮的图片 。
rollover : 值为true和false,设置为true时当鼠标移到浏览按钮上时有反转效果。
width : 设置浏览按钮的宽度 ,默认值:110。
height : 设置浏览按钮的高度 ,默认值:30。
wmode : 设置该项为transparent 可以使浏览按钮的flash背景文件透明,并且flash文件会被置为页面的最高层。 默认值:opaque 。
cancelImg :选择文件到文件队列中后的每一个文件上的关闭按钮图标,如下图:

上面介绍的key值的value都为字符串或是布尔类型,比较简单,接下来要介绍的key值的value为一个函数,可以在选择文件、出错或其他一些操作的时候返回一些信息给用户。
onInit : 做一些初始化的工作。
onSelect :选择文件时触发,该函数有三个参数
event:事件对象。
queueID:文件的唯一标识,由6为随机字符组成。
fileObj:选择的文件对象,有name、size、creationDate、modificationDate、type 5个属性。
代码如下:
$(document).ready(function()
{
  $("#uploadify").uploadify({
    'uploader': 'JS/jquery.uploadify-v2.1.0/uploadify.swf',
    'script': 'UploadHandler.ashx',
    'cancelImg': 'JS/jquery.uploadify-v2.1.0/cancel.png',
    'folder': 'UploadFile',
    'queueID': 'fileQueue',
    'auto': false,
    'multi': true,
    'onInit':function(){alert("1");},
    'onSelect': function(e, queueId, fileObj)
    {
      alert("唯一标识:" + queueId + "\r\n" +
         "文件名:" + fileObj.name + "\r\n" +
         "文件大小:" + fileObj.size + "\r\n" +
         "创建时间:" + fileObj.creationDate + "\r\n" +
         "最后修改时间:" + fileObj.modificationDate + "\r\n" +
         "文件类型:" + fileObj.type
      );

    }
  });
});
The message that pops up after selecting a file is as follows:

onSelectOnce: Triggered when a file is selected when uploading a single file or multiple files. This function has two parameters event, data, and the data object has the following attributes:
onCancel: Triggered when the close button of a file in the file queue is clicked or when canceling the upload is clicked. This function has four parameters: event, queueId, fileObj, and data. The first three parameters are the same as the three parameters in onSelect. The data object has two attributes, fileCount and allBytesTotal.
onClearQueue: Triggered when the function fileUploadClearQueue is called. There are two parameters, event and data, which are the same as the two corresponding parameters in onCancel.
onQueueFull: Triggered when queueSizeLimit is set and the number of selected files exceeds the value of queueSizeLimit. This function has two parameters event and queueSizeLimit.
onError: Triggered when an error occurs during upload. This function has four parameters: event, queueId, fileObj, and errorObj. The first three parameters are the same as above. The errorObj object has two attributes: type and info.
onOpen: Triggered when clicking upload. If auto is set to true, it will be triggered when a file is selected. If there are multiple files uploaded, the entire file queue will be traversed. This function has three parameters: event, queueId, and fileObj. The explanation of the parameters is the same as above.
onProgress: Triggered when clicking upload. If auto is set to true, it will be triggered when a file is selected. If there are multiple files uploaded, it will traverse the entire file queue and trigger after onOpen. This function has four parameters: event, queueId, fileObj, and data. The explanation of the first three parameters is the same as above. The data object has four attributes: percentage, bytesLoaded, allBytesLoaded, speed:
onComplete: Fired after the file upload is completed. This function has four parameters event, queueId, fileObj, response, and five parameters. The first three parameters are the same as above. response is the value returned by the background handler, which is 1 or 0 in the above example. data has two attributes fileCount and speed
Note: The fileObj object is somewhat different from the one mentioned above. The fileObj object of onComplete has a filePath attribute that can retrieve the path of the uploaded file.
onAllComplete: Triggered after all files in the file queue are uploaded. This function has two parameters, event and data. Data has four attributes, namely:
Introduction to related functions
In the above example, two functions, uploadifyUpload and uploadifyClearQueue, have been used. In addition, there are several functions:
uploadifySettings:可以动态修改上面介绍的那些key值,如下面代码
$('#uploadify').uploadifySettings('folder','JS');
如果上传按钮的事件写成下面这样,文件将会上传到uploadifySettings定义的目录中
<a href="javascript:$('#uploadify').uploadifySettings('folder','JS');
$('#uploadify').uploadifyUpload()">上传</a>
uploadifyCancel:该函数接受一个queueID作为参数,可以取消文件队列中指定queueID的文件。
$('#uploadify').uploadifyCancel(id);
终于写完了,对JQuery这个上传插件也基本了解了,希望对大家有所帮助,不对之处还望大家指正。


