
 Web Front-end
JS Tutorial
bootstrap-treeview custom double-click event implementation method_javascript skills
Web Front-end
JS Tutorial
bootstrap-treeview custom double-click event implementation method_javascript skills
bootstrap-treeview custom double-click event implementation method_javascript skills

bootstrap-treeview is a very cool jQuery multi-level list tree plug-in based on bootstrap. This jQuery plug-in is based on Twitter Bootstrap and displays some inheritance tree structures, such as view trees, list trees, etc., in a simple and elegant way. But I don’t know why this plug-in doesn’t have its own double-click event.
After many tests, neither the method $('#tree').dblclick( function () {}) nor the method $('#tree').on('dblclick', function(){}) works! Puzzled. Finally, I came to the rescue and the problem was solved, but it didn't seem very elegant, but in the end I was able to hand over the work.
This solution uses the two events "nodeSelected" and "nodeUnselected" that come with bootstrap-treeview. If you double-click on a treeview node, the selected event and unselected event will be triggered. You can calculate the time interval between these two times. Simulates the effect of a double-click event. The interval between each click of the left mouse button in a double-click event is 300 milliseconds for manual operation.
The specific code is as follows:
<!DOCTYPE html>
<html>

  <head>
    <meta charset="utf-8" />
    <title></title>
    <link href="css/bootstrap.css" rel="stylesheet" />
  </head>

  <body>
    <div id="tree" style="width: 400px;height: 1000px;margin-left: auto;margin-right: auto;"></div>
    <div id="testDate"></div>
    <script src="js/jquery.js"></script>
    <script src="js/bootstrap-treeview.js"></script>
    <script type="text/javascript">
      //获取树形结构列表数据
      function getTree() {
        var tree = [{
          text: "Parent 1",
          nodes: [{
            text: "Child 1",
            nodes: [{
              text: "Grandchild 1"
            }, {
              text: "Grandchild 2"
            }]
          }, {
            text: "Child 2"
          }]
        }, {
          text: "Parent 2"
        }, {
          text: "Parent 3"
        }, {
          text: "Parent 4"
        }, {
          text: "Parent 5"
        }];
        return tree;
      }

      //初始化树形结构列表
      $('#tree').treeview({
        data: getTree()
      });

      //最后一次触发节点Id
      var lastSelectedNodeId = null;
      //最后一次触发时间
      var lastSelectTime = null;

      //自定义业务方法
      function customBusiness(data){
        alert("双击获得节点名字: "+data.text);
      }

      function clickNode(event, data) {
        if (lastSelectedNodeId && lastSelectTime) {
          var time = new Date().getTime();
          var t = time - lastSelectTime;
          if (lastSelectedNodeId == data.nodeId && t < 300) {
            customBusiness(data);
          }
        }
        lastSelectedNodeId = data.nodeId;
        lastSelectTime = new Date().getTime();
      }

      //自定义双击事件
      function customDblClickFun(){
        //节点选中时触发
        $('#tree').on('nodeSelected', function(event, data) {
          clickNode(event, data)
        });
        //节点取消选中时触发
        $('#tree').on('nodeUnselected', function(event, data) {
          clickNode(event, data)
        });
      }
      $('#tree').dblclick( function () { alert("Hello World!"); });
      $(document).ready(function() {
        //customDblClickFun();
      });
    </script>
  </body>

</html>
Coarse filtering explanation:
The most important global variables: lastSelectedNodeId, lastSelectedNodeId
The main method: clickNode()
The above method is mainly used to determine whether the target of the selected event and the unchecked event operation is the same and whether the time interval is small enough. Customers who meet these two conditions just want to trigger a double-click event. You can customize business logic in the function customBusiness.
The above is the detailed content of this article, I hope it will be helpful to everyone’s study.

Hot AI Tools

Undresser.AI Undress
AI-powered app for creating realistic nude photos

AI Clothes Remover
Online AI tool for removing clothes from photos.

Undress AI Tool
Undress images for free

Clothoff.io
AI clothes remover

AI Hentai Generator
Generate AI Hentai for free.

Hot Article
Hot Tools

Notepad++7.3.1
Easy-to-use and free code editor

SublimeText3 Chinese version
Chinese version, very easy to use

Zend Studio 13.0.1
Powerful PHP integrated development environment

Dreamweaver CS6
Visual web development tools

SublimeText3 Mac version
God-level code editing software (SublimeText3)
Hot Topics


 How to quickly set up a custom avatar in Netflix
Feb 19, 2024 pm 06:33 PM
How to quickly set up a custom avatar in Netflix
Feb 19, 2024 pm 06:33 PM
An avatar on Netflix is a visual representation of your streaming identity. Users can go beyond the default avatar to express their personality. Continue reading this article to learn how to set a custom profile picture in the Netflix app. How to quickly set a custom avatar in Netflix In Netflix, there is no built-in feature to set a profile picture. However, you can do this by installing the Netflix extension on your browser. First, install a custom profile picture for the Netflix extension on your browser. You can buy it in the Chrome store. After installing the extension, open Netflix on your browser and log into your account. Navigate to your profile in the upper right corner and click
 How to introduce bootstrap into Eclipse
Apr 05, 2024 am 02:30 AM
How to introduce bootstrap into Eclipse
Apr 05, 2024 am 02:30 AM
Introduce Bootstrap in Eclipse in five steps: Download the Bootstrap file and unzip it. Import the Bootstrap folder into the project. Add Bootstrap dependency. Load Bootstrap CSS and JS in HTML files. Start using Bootstrap to enhance your user interface.
 How to introduce idea into bootstrap
Apr 05, 2024 am 02:33 AM
How to introduce idea into bootstrap
Apr 05, 2024 am 02:33 AM
Steps to introduce Bootstrap in IntelliJ IDEA: Create a new project and select "Web Application". Add "Bootstrap" Maven dependency. Create an HTML file and add Bootstrap references. Replace with the actual path to the Bootstrap CSS file. Run the HTML file to use Bootstrap styles. Tip: Use a CDN to import Bootstrap or customize HTML file templates.
 How to read the bootstrap mediation effect test results in stata
Apr 05, 2024 am 01:48 AM
How to read the bootstrap mediation effect test results in stata
Apr 05, 2024 am 01:48 AM
Interpretation steps of Bootstrap mediation effect test in Stata: Check the sign of the coefficient: Determine the positive or negative direction of the mediation effect. Test p value: less than 0.05 indicates that the mediating effect is significant. Check the confidence interval: not containing zero indicates that the mediation effect is significant. Comparing the median p-value: less than 0.05 further supports the significance of the mediation effect.
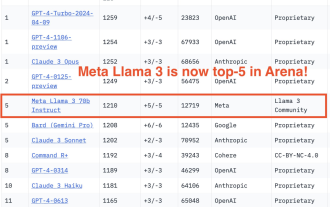 750,000 rounds of one-on-one battle between large models, GPT-4 won the championship, and Llama 3 ranked fifth
Apr 23, 2024 pm 03:28 PM
750,000 rounds of one-on-one battle between large models, GPT-4 won the championship, and Llama 3 ranked fifth
Apr 23, 2024 pm 03:28 PM
Regarding Llama3, new test results have been released - the large model evaluation community LMSYS released a large model ranking list. Llama3 ranked fifth, and tied for first place with GPT-4 in the English category. The picture is different from other benchmarks. This list is based on one-on-one battles between models, and the evaluators from all over the network make their own propositions and scores. In the end, Llama3 ranked fifth on the list, followed by three different versions of GPT-4 and Claude3 Super Cup Opus. In the English single list, Llama3 overtook Claude and tied with GPT-4. Regarding this result, Meta’s chief scientist LeCun was very happy and forwarded the tweet and
 How to customize shortcut key settings in Eclipse
Jan 28, 2024 am 10:01 AM
How to customize shortcut key settings in Eclipse
Jan 28, 2024 am 10:01 AM
How to customize shortcut key settings in Eclipse? As a developer, mastering shortcut keys is one of the keys to improving efficiency when coding in Eclipse. As a powerful integrated development environment, Eclipse not only provides many default shortcut keys, but also allows users to customize them according to their own preferences. This article will introduce how to customize shortcut key settings in Eclipse and give specific code examples. Open Eclipse First, open Eclipse and enter
 How to read the results of bootstrap mediation test
Apr 05, 2024 am 03:30 AM
How to read the results of bootstrap mediation test
Apr 05, 2024 am 03:30 AM
The Bootstrap mediation test evaluates the mediation effect by resampling the data multiple times: Indirect effect confidence interval: indicates the estimated range of the mediation effect. If the interval does not contain zero, the effect is significant. p-value: Evaluates the probability that the confidence interval does not contain zero, with values less than 0.05 indicating significant. Sample size: The number of data samples used for analysis. Bootstrap subsampling times: the number of repeated samplings (500-2000 times). If the confidence interval does not contain zero and the p-value is less than 0.05, the mediation effect is significant, indicating that the mediating variable explains the relationship between the independent and dependent variables.
 The operation process of edius custom screen layout
Mar 27, 2024 pm 06:50 PM
The operation process of edius custom screen layout
Mar 27, 2024 pm 06:50 PM
1. The picture below is the default screen layout of edius. The default EDIUS window layout is a horizontal layout. Therefore, in a single-monitor environment, many windows overlap and the preview window is in single-window mode. 2. You can enable [Dual Window Mode] through the [View] menu bar to make the preview window display the playback window and recording window at the same time. 3. You can restore the default screen layout through [View menu bar>Window Layout>General]. In addition, you can also customize the layout that suits you and save it as a commonly used screen layout: drag the window to a layout that suits you, then click [View > Window Layout > Save Current Layout > New], and in the pop-up [Save Current Layout] Layout] enter the layout name in the small window and click OK
