
 Web Front-end
JS Tutorial
careful! The pitfalls of file merging and compression using AngularJS combined with RequireJS_javascript skills
Web Front-end
JS Tutorial
careful! The pitfalls of file merging and compression using AngularJS combined with RequireJS_javascript skills
careful! The pitfalls of file merging and compression using AngularJS combined with RequireJS_javascript skills

The AngularJS framework was used in the project and RequireJS was used for asynchronous module loading (AMD). When doing file merging and compression, I encountered some pitfalls. Some of them were solved, but I didn’t understand the reasons.
Those pits
1. The paths in build.js must be consistent with those in main.js.
This build.js is the configuration file used by r.js, and main.js is the main file of RequireJS. When merging and compressing, paths also need to be written in the build.js file, and they are still the same as main.js. I am very surprised why the paths of require.config in main cannot be recognized, so as to save the need to copy the paths when merging ( I tried that there are no paths in build.js and it cannot be merged). (-_-!!!)
2. Some dependent libraries need to write the entire relative path before merging.
In the project, I use a third-party library called layer (the library is written with requireJS define). When I was only doing development at the beginning, after configuring the path in paths, I only need to use the abbreviation (define) to use this library. dependent time). But when doing the merge, it was prompted that the file did not exist (because the abbreviation was directly used to spell the file address). In desperation, I could only modify the usage of this library. All those who used this library wrote the entire relative path. At this time, I developed There is nothing wrong with merging.
3. It can be run after merging, but not after compression.
This is the most serious problem, the most serious problem, the most serious problem. After the files are merged and compressed, AngularJS runs abnormally when using the files, and always reports module initialization failure, Failed to instantiate module common due to: Error: [$injector:unpr] Unknown provider: e , as shown below.

A very critical point is that it can be used without compression. Once compressed (default compression is used), an error will be reported when used. So I think something must be "crushed". Some articles on the Internet say that you need to write AngularJS cntroller, directive, etc. as follows, and the services used are defined in strings.
commonModule.controller( "broswerCtrl" ,["$scope" ,"$sce" , function ($scope,$sce){
But my entire application is defined this way, and there is no chance of injecting errors into it. In the end, I had no choice but to configure mangle: false without confusing variable names. After doing this, the merged and compressed files can be used correctly! ! !
PS: To put it simply, merging and compression can be done, but variable names cannot be confused (it always feels weird). I feel that the problem has no solution for the time being.
4. The second layer of requirements cannot be merged when merging them.
For example, if you load the module like this in main.js, you will find that the second layer of require has not been merged during merging.
require([ "COMMON"], function(){
  require([ "angular", "LOGIN" ], function(angular){
   //....
  });
});
At this time, you need to add findNestedDependencies: true to build.js, and then the second layer will be merged.
Merge preparation
1. Install nodejs
File merging and compression is based on nodejs, so install nodejs first.
2. Download r.js
r.js cooperates with requirejs module writing method to merge and compress files.
Simple configuration
It is best to write a build.js for the configuration file, as follows:
({
  baseUrl:"../",
  paths: {
   //...
  },
  shim: {
   //...
  },
  optimize: "uglify2",
  uglify2: {
  mangle: false //false 不混淆变量名
  },
  findNestedDependencies: true,
  name: "js/main",
  out: "../js/main-built.js"
})Here are a few key attributes:
baseUrl: All modules (usually js) exist relative to this path.
optimize: How to optimize script files. There are five value methods below.
- uglify: (Default) Compressed with UglifyJS.
- uglify2: Compressed with UglifyJS2 (2.1.2).
- closure: Use Google's Closure Compiler simple optimization mode to compress files, only valid when the optimization tool uses Java.
- closure.keepLines: Same as the closure parameter, except that newlines are retained.
- none: No compression.
findNestedDependencies: Find the dependencies of require or define calls in require().
PS: There are many more configuration attributes, so I won’t go into details. When the files are configured, execute the command to merge and compress
node r.js -o build.js
Summary
The merge and compression of RequireJS modules is relatively simple, but when it comes to AngularJS, there are some problems with compression, and no better way has been found so far.
The above is the detailed content of this article, I hope it will be helpful to everyone’s study.

Hot AI Tools

Undresser.AI Undress
AI-powered app for creating realistic nude photos

AI Clothes Remover
Online AI tool for removing clothes from photos.

Undress AI Tool
Undress images for free

Clothoff.io
AI clothes remover

AI Hentai Generator
Generate AI Hentai for free.

Hot Article
Hot Tools

Notepad++7.3.1
Easy-to-use and free code editor

SublimeText3 Chinese version
Chinese version, very easy to use

Zend Studio 13.0.1
Powerful PHP integrated development environment

Dreamweaver CS6
Visual web development tools

SublimeText3 Mac version
God-level code editing software (SublimeText3)
Hot Topics
 1376
1376
 52
52

 How to merge two arrays in C language?
Sep 10, 2023 am 09:05 AM
How to merge two arrays in C language?
Sep 10, 2023 am 09:05 AM
Taking two arrays as input, try to merge or concatenate the two arrays and store the result in the third array. The logic of merging two arrays is as follows-J=0,k=0for(i=0;i<o;i++){//mergingtwoarrays if(a[j]<=b[k]){ c[i] =a[j]; j++; }else{ &nbs
 How to enable or disable memory compression on Windows 11
Sep 19, 2023 pm 11:33 PM
How to enable or disable memory compression on Windows 11
Sep 19, 2023 pm 11:33 PM
With memory compression on Windows 11, your device will choke even with a limited amount of RAM. In this article, we will show you how to enable or disable memory compression on Windows 11. What is memory compression? Memory compression is a feature that compresses data before writing it to RAM, thus providing more storage space on it. Of course, more data stored in physical memory translates into faster system operation and better overall performance. This feature is enabled by default in Windows 11, but if it's somehow not active, you can disable or re-enable it. How to enable memory compression in Windows 11? Click the search bar, type powershell, and click
 How to use HTML, CSS and jQuery to implement advanced functions of image merging and display
Oct 27, 2023 pm 04:36 PM
How to use HTML, CSS and jQuery to implement advanced functions of image merging and display
Oct 27, 2023 pm 04:36 PM
Overview of advanced functions of how to use HTML, CSS and jQuery to implement image merge display: In web design, image display is an important link, and image merge display is one of the common techniques to improve page loading speed and enhance user experience. This article will introduce how to use HTML, CSS and jQuery to implement advanced functions of image merging and display, and provide specific code examples. 1. HTML layout: First, we need to create a container in HTML to display the merged images. You can use di
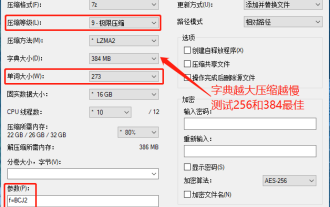 7-zip maximum compression rate setting, how to compress 7zip to the minimum
Jun 18, 2024 pm 06:12 PM
7-zip maximum compression rate setting, how to compress 7zip to the minimum
Jun 18, 2024 pm 06:12 PM
I found that the compressed package downloaded from a download website will be larger than the original compressed package after decompression. The difference is tens of Kb for a small one and several dozen Mb for a large one. If it is uploaded to a cloud disk or paid space, it does not matter if the file is small. , if there are many files, the storage cost will be greatly increased. I studied it specifically and can learn from it if necessary. Compression level: 9-Extreme compression Dictionary size: 256 or 384, the more compressed the dictionary, the slower it is. The compression rate difference is larger before 256MB, and there is no difference in compression rate after 384MB. Word size: maximum 273 Parameters: f=BCJ2, test and add parameter compression rate will be higher
 Get started quickly: JSON array merging and splitting techniques in Java.
Sep 06, 2023 am 10:21 AM
Get started quickly: JSON array merging and splitting techniques in Java.
Sep 06, 2023 am 10:21 AM
Get started quickly: JSON array merging and splitting techniques in Java In modern software development, data format and transmission have become increasingly important. Among them, JSON (JavaScriptObjectNotation) is a commonly used data format, especially suitable for front-end and back-end interaction and data storage. In Java development, we often need to deal with JSON objects and JSON arrays. This article explains how to merge and split JSON arrays in Java, along with tips and examples for implementing these operations.
 How to merge two CSV files by specific columns using Pandas in Python?
Sep 08, 2023 pm 02:01 PM
How to merge two CSV files by specific columns using Pandas in Python?
Sep 08, 2023 pm 02:01 PM
CSV (Comma Separated Values) files are widely used to store and exchange data in a simple format. In many data processing tasks, there is a need to merge two or more CSV files based on specific columns. Fortunately, this can be easily achieved using the Pandas library in Python. In this article, we will learn how to merge two CSV files by specific columns using Pandas in Python. What is the Pandas library? Pandas is an open source library for information control and inspection in Python. It provides tools for working with structured data (such as tabular, time series, and multidimensional data) and high-performance data structures. Pandas is widely used in finance, data science, machine learning, and other fields that require data manipulation.
 How to use Nginx for compression and decompression of HTTP requests
Aug 02, 2023 am 10:09 AM
How to use Nginx for compression and decompression of HTTP requests
Aug 02, 2023 am 10:09 AM
How to use Nginx to compress and decompress HTTP requests Nginx is a high-performance web server and reverse proxy server that is powerful and flexible. When processing HTTP requests, you can use the gzip and gunzip modules provided by Nginx to compress and decompress the requests to reduce the amount of data transmission and improve the request response speed. This article will introduce the specific steps of how to use Nginx to compress and decompress HTTP requests, and provide corresponding code examples. Configure gzip module
 Tips to reduce win10 screen recording file size
Jan 04, 2024 pm 12:05 PM
Tips to reduce win10 screen recording file size
Jan 04, 2024 pm 12:05 PM
Many friends need to record screens for office work or transfer files, but sometimes the problem of files that are too large causes a lot of trouble. The following is a solution to the problem of files that are too large, let’s take a look. What to do if the win10 screen recording file is too large: 1. Download the software Format Factory to compress the file. Download address >> 2. Enter the main page and click the "Video-MP4" option. 3. Click "Add File" on the conversion format page and select the MP4 file to be compressed. 4. Click "Output Configuration" on the page to compress the file according to the output quality. 5. Select "Low Quality and Size" from the drop-down configuration list and click "OK". 6. Click "OK" to complete the import of video files. 7. Click "Start" to start the conversion. 8. After completion, you can
