
 Web Front-end
JS Tutorial
Detailed explanation of method examples for setting and obtaining cookies in javascript_javascript skills
Web Front-end
JS Tutorial
Detailed explanation of method examples for setting and obtaining cookies in javascript_javascript skills
Detailed explanation of method examples for setting and obtaining cookies in javascript_javascript skills

The example in this article describes how to set and obtain cookies in javascript. Share it with everyone for your reference, the details are as follows:
1. Set cookies
1 2 3 4 5 6 7 8 9 10 11 12 13 14 15 |
|
2. Get cookies
1 2 3 4 5 6 7 8 9 10 11 12 13 14 15 16 17 18 19 20 21 22 23 24 |
|
Example:
1 2 3 4 5 6 7 8 9 10 11 12 13 14 15 16 17 18 19 20 21 22 23 24 25 26 27 28 29 30 31 32 33 34 35 36 37 38 39 40 41 42 43 44 45 46 47 48 49 50 51 52 53 54 55 56 57 58 59 60 61 62 63 64 65 66 67 68 69 70 71 72 73 74 75 76 77 78 79 80 81 82 83 84 85 86 87 88 89 90 91 92 93 94 95 96 97 98 99 100 101 102 103 104 105 106 107 108 109 110 111 112 113 114 115 116 117 118 |
|
Note:
Since Google Chrome only supports online-cookies for security reasons, it has no effect when tested locally. You need to upload it to the server to try.
For more information about JavaScript operating cookies, please view the special topics on this site: " Summary of knowledge related to JavaScript operating cookies " and " Summary of jQuery's cookie operating skills "
I hope this article will be helpful to everyone in JavaScript programming.

Hot AI Tools

Undresser.AI Undress
AI-powered app for creating realistic nude photos

AI Clothes Remover
Online AI tool for removing clothes from photos.

Undress AI Tool
Undress images for free

Clothoff.io
AI clothes remover

AI Hentai Generator
Generate AI Hentai for free.
Hot Article
Hot Tools

Notepad++7.3.1
Easy-to-use and free code editor

SublimeText3 Chinese version
Chinese version, very easy to use

Zend Studio 13.0.1
Powerful PHP integrated development environment

Dreamweaver CS6
Visual web development tools

SublimeText3 Mac version
God-level code editing software (SublimeText3)
Hot Topics
 1377
1377
 52
52

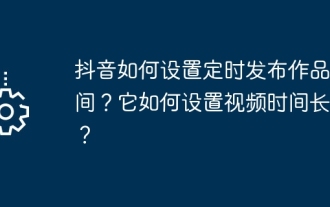 How to set the scheduled time for publishing works on Douyin? How does it set the video duration?
Mar 27, 2024 pm 06:11 PM
How to set the scheduled time for publishing works on Douyin? How does it set the video duration?
Mar 27, 2024 pm 06:11 PM
Publishing works on Douyin can attract more attention and likes, but sometimes it may be difficult for us to publish works in real time. In this case, we can use Douyin's scheduled release function. Douyin’s scheduled release function allows users to automatically publish works at a scheduled time, which can better plan the release plan and increase the exposure and influence of the work. 1. How to set the scheduled time for publishing works on Douyin? To set a scheduled release time, first go to Douyin's personal homepage, find the "+" button in the upper right corner, and click to enter the release page. There is a clock icon in the lower right corner of the publishing page. Click to enter the scheduled publishing interface. In the interface, you can choose the type of work you want to publish, including short videos, long videos, and live broadcasts. Next, you need to set a time for your work to be published. TikTok provides
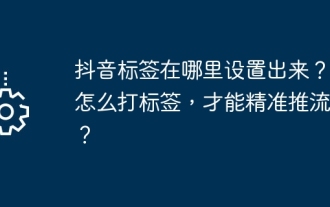 Where is the Douyin tag set? How can it be tagged so that it can be pushed accurately?
Mar 27, 2024 am 11:01 AM
Where is the Douyin tag set? How can it be tagged so that it can be pushed accurately?
Mar 27, 2024 am 11:01 AM
As one of the most popular short video platforms in the world, Douyin allows everyone to become a creator and share every moment of life. For Douyin users, tags are a very important function. It can help users better classify and retrieve content, and also allows the platform to push appropriate content to users more accurately. So, where are the Douyin tags set? This article will explain in detail how to set up and use tags on Douyin. 1. Where is the Douyin tag set? Using tags on Douyin can help users better classify and label their works, making it easier for other users to find and follow them. The method to set the label is as follows: 1. Open the Douyin APP and log in to your account. 2. Click the "+" sign at the bottom of the screen and select the "Publish" button. 3.
 Where to get Google security code
Mar 30, 2024 am 11:11 AM
Where to get Google security code
Mar 30, 2024 am 11:11 AM
Google Authenticator is a tool used to protect the security of user accounts, and its key is important information used to generate dynamic verification codes. If you forget the key of Google Authenticator and can only verify it through the security code, then the editor of this website will bring you a detailed introduction on where to get the Google security code. I hope it can help you. If you want to know more Users please continue reading below! First open the phone settings and enter the settings page. Scroll down the page and find Google. Go to the Google page and click on Google Account. Enter the account page and click View under the verification code. Enter your password or use your fingerprint to verify your identity. Obtain a Google security code and use the security code to verify your Google identity.
 How to set up scheduled publishing on Weibo_Tutorial on how to set up scheduled publishing on Weibo
Mar 29, 2024 pm 03:51 PM
How to set up scheduled publishing on Weibo_Tutorial on how to set up scheduled publishing on Weibo
Mar 29, 2024 pm 03:51 PM
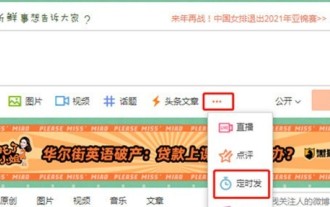
1. Open the Weibo client, click the three little dots on the editing page, and then click Scheduled Post. 2. After clicking on scheduled posting, there will be a time option on the right side of the publishing time. Set the time, edit the article, and click on the yellow words in the lower right corner to schedule posting. 3. The mobile version of Weibo does not currently support scheduled publishing. This function can only be used on the PC client!
 Do Not Disturb Mode Not Working in iPhone: Fix
Apr 24, 2024 pm 04:50 PM
Do Not Disturb Mode Not Working in iPhone: Fix
Apr 24, 2024 pm 04:50 PM
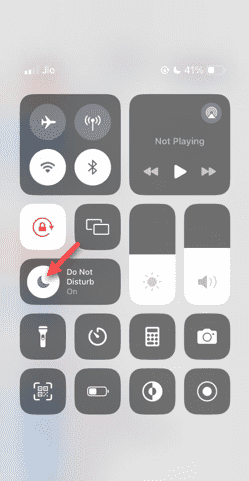
Even answering calls in Do Not Disturb mode can be a very annoying experience. As the name suggests, Do Not Disturb mode turns off all incoming call notifications and alerts from emails, messages, etc. You can follow these solution sets to fix it. Fix 1 – Enable Focus Mode Enable focus mode on your phone. Step 1 – Swipe down from the top to access Control Center. Step 2 – Next, enable “Focus Mode” on your phone. Focus Mode enables Do Not Disturb mode on your phone. It won't cause any incoming call alerts to appear on your phone. Fix 2 – Change Focus Mode Settings If there are some issues in the focus mode settings, you should fix them. Step 1 – Open your iPhone settings window. Step 2 – Next, turn on the Focus mode settings
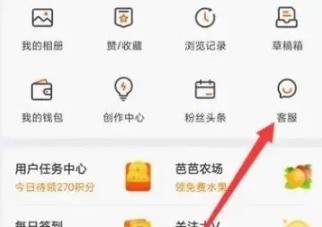 How to set the watermark in the middle on Weibo_How to set the watermark in the middle on Weibo
Mar 29, 2024 pm 03:31 PM
How to set the watermark in the middle on Weibo_How to set the watermark in the middle on Weibo
Mar 29, 2024 pm 03:31 PM
1. First enter Weibo, then click on me in the lower right corner and select [Customer Service]. 2. Then enter [Watermark] in the search box and select [Set Weibo Image Watermark]. 3. Then click [Link] in the interface. 4. Then click [Image Watermark Settings] in the newly opened window. 5. Finally, check [Picture Center] and click [Save].
 Where to set Douyin recommendations and selections
Mar 27, 2024 pm 05:06 PM
Where to set Douyin recommendations and selections
Mar 27, 2024 pm 05:06 PM
Where are the recommendations and selections on Douyin? In Douyin short videos, there are two categories: selection and recommendation. Most users don’t know how to set up recommendations and selections. Next is the Douyin tutorial that the editor brings to users. Audio recommendations and selected setting method tutorials, interested users come and take a look! Douyin usage tutorial Where to set up Douyin recommendations and selections 1. First open the Douyin short video APP and enter the main page, click on the [Me] area in the lower right corner and select [three horizontal lines] in the upper right corner; 2. Then on the right The function bar will expand, slide the page to select [Settings] at the bottom; 3. Then on the settings function page, find the [Personal Information Management] service; 4. Finally jump to the personal information management page, slide [Personalized Content Recommendations] 】The buttons on the back can be set.
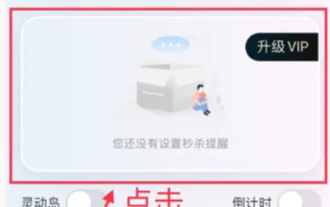 How to set the countdown to grab tickets in Damai
Apr 01, 2024 pm 07:01 PM
How to set the countdown to grab tickets in Damai
Apr 01, 2024 pm 07:01 PM
When buying tickets on Damai.com, in order to ensure that the ticket purchase time can be accurately grasped, users can set a floating clock to grab tickets. The detailed setting method is below, let us learn together. How to bind the floating clock to Damai 1. Click to open the floating clock app on your phone to enter the interface, and click on the location where the flash sale check is set, as shown in the figure below: 2. After coming to the page of adding new records, click on Damai.com Copy the ticket purchase link page copied in. 3. Next, set the flash sale time and notification time below, turn on the switch button behind [Save to Calendar], and click [Save] below. 4. Click to turn on [Countdown], as shown in the figure below: 5. When the reminder time comes, click the [Start Picture-in-Picture] button below. 6. When the ticket purchase time comes
