
 Backend Development
Python Tutorial
Detailed explanation of the usage of logging built-in logging module in Python
Backend Development
Python Tutorial
Detailed explanation of the usage of logging built-in logging module in Python
Detailed explanation of the usage of logging built-in logging module in Python

Introduction to logging module
Python's logging module provides a general logging system, which can be conveniently used by third-party modules or applications. This module provides different log levels and can record logs in different ways, such as files, HTTP GET/POST, SMTP, Socket, etc. You can even implement specific logging methods yourself.
The mechanism of the logging module and log4j is the same, but the specific implementation details are different. The module provides logger, handler, filter, and formatter.
- logger: Provides a log interface for application code to use. The most commonly used operations of logger fall into two categories: configuration and sending log messages. You can obtain the logger object through logging.getLogger(name). If the name is not specified, the root object is returned. Calling the getLogger method with the same name multiple times returns the same logger object.
- Handler: Send log records to appropriate destinations, such as files, sockets, etc. A logger object can add 0 to multiple handlers through the addHandler method, and each handler can define different log levels to achieve hierarchical filtering and display of logs.
- filter: Provides an elegant way to determine whether a log record is sent to the handler.
- formatter: Specify the specific format of log output. The constructor of formatter requires two parameters: the format string of the message and the date string, both of which are optional.
Similar to log4j, calls to logger, handler and log messages can have specific log levels (Level), only when the level of the log message is greater than the level of the logger and handler.
logging usage analysis
1. Initialize logger = logging.getLogger("endlesscode"), it is best to add the module name to be logged after the getLogger() method. The %(name)s in the subsequent log format corresponds to the module name here
2. Set the level logger.setLevel(logging.DEBUG). There are several levels in Logging: NOTSET < DEBUG < INFO < WARNING < ERROR < CRITICAL. The log will record logs above the set level
3. Handler, commonly used are StreamHandler and FileHandler. Under Windows, you can simply understand that one is console and file log, one is printed on the CMD window, and the other is recorded on a file
4. Formatter defines the order, structure and content of the final log information. I like to use the format '[%(asctime)s] [%(levelname)s] %(message)s', '%Y-%m' -%d %H:%M:%S',
%(name)s Logger’s name
%(levelname)s log level in text form
%(message)s Messages output by the user
%(asctime)s The current time as a string. The default format is "2003-07-08 16:49:45,896". What comes after the comma is milliseconds
%(levelno)s log level in numeric form
%(pathname)s The full path name of the module that calls the log output function, may not have
%(filename)s is the file name of the module that calls the log output function
%(module)s The name of the module that calls the log output function
%(funcName)s is the function name for calling the log output function
%(lineno)d is the line of code where the statement that calls the log output function is located
%(created)f current time, represented by UNIX standard floating point number representing time
%(relativeCreated)d When outputting log information, the number of milliseconds since the Logger was created
%(thread)d thread ID. Probably not
%(threadName)s thread name. Probably not
%(process)d process ID. Probably not
5. Record Use object.debug(message) to record logs
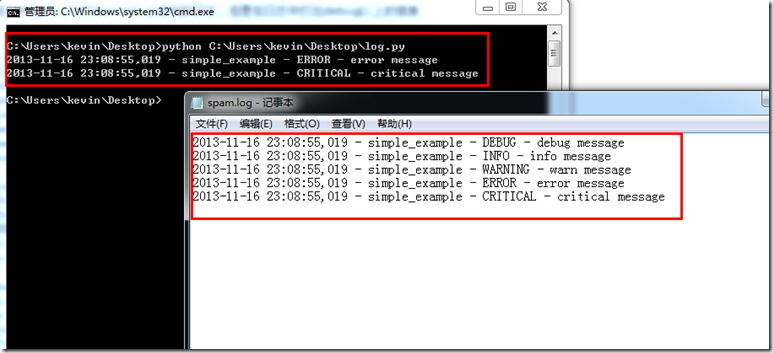
Let’s write an example below. In the CMD window, only error and above level logs are printed, but debug and above level information are printed in the log
import logging
logger = logging.getLogger("simple_example")
logger.setLevel(logging.DEBUG)
# 建立一个filehandler来把日志记录在文件里,级别为debug以上
fh = logging.FileHandler("spam.log")
fh.setLevel(logging.DEBUG)
# 建立一个streamhandler来把日志打在CMD窗口上,级别为error以上
ch = logging.StreamHandler()
ch.setLevel(logging.ERROR)
# 设置日志格式
formatter = logging.Formatter("%(asctime)s - %(name)s - %(levelname)s - %(message)s")
ch.setFormatter(formatter)
fh.setFormatter(formatter)
#将相应的handler添加在logger对象中
logger.addHandler(ch)
logger.addHandler(fh)
# 开始打日志
logger.debug("debug message")
logger.info("info message")
logger.warn("warn message")
logger.error("error message")
logger.critical("critical message")
Run it and you will see that only two logs are recorded in the CMD window and five logs are recorded in spam.log
When a project is relatively large and Log is used in different files, you can consider encapsulating it into a class for use
#! /usr/bin/env python
#coding=gbk
import logging,os

class Logger:
 def __init__(self, path,clevel = logging.DEBUG,Flevel = logging.DEBUG):
  self.logger = logging.getLogger(path)
  self.logger.setLevel(logging.DEBUG)
  fmt = logging.Formatter('[%(asctime)s] [%(levelname)s] %(message)s', '%Y-%m-%d %H:%M:%S')
  #设置CMD日志
  sh = logging.StreamHandler()
  sh.setFormatter(fmt)
  sh.setLevel(clevel)
  #设置文件日志
  fh = logging.FileHandler(path)
  fh.setFormatter(fmt)
  fh.setLevel(Flevel)
  self.logger.addHandler(sh)
  self.logger.addHandler(fh)

 def debug(self,message):
  self.logger.debug(message)

 def info(self,message):
  self.logger.info(message)

 def war(self,message):
  self.logger.warn(message)

 def error(self,message):
  self.logger.error(message)

 def cri(self,message):
  self.logger.critical(message)

if __name__ =='__main__':
 logyyx = Logger('yyx.log',logging.ERROR,logging.DEBUG)
 logyyx.debug('一个debug信息')
 logyyx.info('一个info信息')
 logyyx.war('一个warning信息')
 logyyx.error('一个error信息')
 logyyx.cri('一个致命critical信息')
In this way, you only need to instantiate an object every time you use it
logobj = Logger(‘filename',clevel,Flevel)
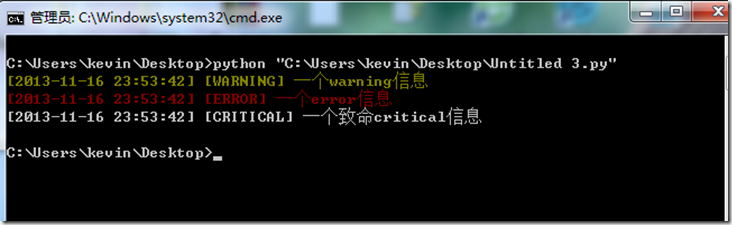
If you want to mark error logs in red and warning logs in yellow in the CMD window, you can use the ctypes module
#! /usr/bin/env python
#coding=gbk
import logging,os
import ctypes

FOREGROUND_WHITE = 0x0007
FOREGROUND_BLUE = 0x01 # text color contains blue.
FOREGROUND_GREEN= 0x02 # text color contains green.
FOREGROUND_RED = 0x04 # text color contains red.
FOREGROUND_YELLOW = FOREGROUND_RED | FOREGROUND_GREEN

STD_OUTPUT_HANDLE= -11
std_out_handle = ctypes.windll.kernel32.GetStdHandle(STD_OUTPUT_HANDLE)
def set_color(color, handle=std_out_handle):
 bool = ctypes.windll.kernel32.SetConsoleTextAttribute(handle, color)
 return bool

class Logger:
 def __init__(self, path,clevel = logging.DEBUG,Flevel = logging.DEBUG):
  self.logger = logging.getLogger(path)
  self.logger.setLevel(logging.DEBUG)
  fmt = logging.Formatter('[%(asctime)s] [%(levelname)s] %(message)s', '%Y-%m-%d %H:%M:%S')
  #设置CMD日志
  sh = logging.StreamHandler()
  sh.setFormatter(fmt)
  sh.setLevel(clevel)
  #设置文件日志
  fh = logging.FileHandler(path)
  fh.setFormatter(fmt)
  fh.setLevel(Flevel)
  self.logger.addHandler(sh)
  self.logger.addHandler(fh)

 def debug(self,message):
  self.logger.debug(message)

 def info(self,message):
  self.logger.info(message)

 def war(self,message,color=FOREGROUND_YELLOW):
  set_color(color)
  self.logger.warn(message)
  set_color(FOREGROUND_WHITE)

 def error(self,message,color=FOREGROUND_RED):
  set_color(color)
  self.logger.error(message)
  set_color(FOREGROUND_WHITE)

 def cri(self,message):
  self.logger.critical(message)

if __name__ =='__main__':
 logyyx = Logger('yyx.log',logging.WARNING,logging.DEBUG)
 logyyx.debug('一个debug信息')
 logyyx.info('一个info信息')
 logyyx.war('一个warning信息')
 logyyx.error('一个error信息')
 logyyx.cri('一个致命critical信息')
Use logging with multiple modules
The logging module guarantees that within the same python interpreter, calling logging.getLogger('log_name') multiple times will return the same logger instance, even in the case of multiple modules. Therefore, the typical way to use logging in a multi-module scenario is to configure logging in the main module. This configuration will affect multiple sub-modules, and then directly obtain the Logger object through getLogger in other modules.
Profile:
[loggers]
keys=root,main

[handlers]
keys=consoleHandler,fileHandler

[formatters]
keys=fmt

[logger_root]
level=DEBUG
handlers=consoleHandler

[logger_main]
level=DEBUG
qualname=main
handlers=fileHandler

[handler_consoleHandler]
class=StreamHandler
level=DEBUG
formatter=fmt
args=(sys.stdout,)

[handler_fileHandler]
class=logging.handlers.RotatingFileHandler
level=DEBUG
formatter=fmt
args=('tst.log','a',20000,5,)

[formatter_fmt]
format=%(asctime)s - %(name)s - %(levelname)s - %(message)s
datefmt=
Main module main.py:
import logging
import logging.config

logging.config.fileConfig('logging.conf')
root_logger = logging.getLogger('root')
root_logger.debug('test root logger...')

logger = logging.getLogger('main')
logger.info('test main logger')
logger.info('start import module \'mod\'...')
import mod

logger.debug('let\'s test mod.testLogger()')
mod.testLogger()

root_logger.info('finish test...')
Submodule mod.py:
import logging
import submod

logger = logging.getLogger('main.mod')
logger.info('logger of mod say something...')

def testLogger():
  logger.debug('this is mod.testLogger...')
  submod.tst()
Sub-submodule submod.py:
import logging

logger = logging.getLogger('main.mod.submod')
logger.info('logger of submod say something...')

def tst():
  logger.info('this is submod.tst()...')
然后运行python main.py,控制台输出:
2012-03-09 18:22:22,793 - root - DEBUG - test root logger...
2012-03-09 18:22:22,793 - main - INFO - test main logger
2012-03-09 18:22:22,809 - main - INFO - start import module 'mod'...
2012-03-09 18:22:22,809 - main.mod.submod - INFO - logger of submod say something...
2012-03-09 18:22:22,809 - main.mod - INFO - logger say something...
2012-03-09 18:22:22,809 - main - DEBUG - let's test mod.testLogger()
2012-03-09 18:22:22,825 - main.mod - DEBUG - this is mod.testLogger...
2012-03-09 18:22:22,825 - main.mod.submod - INFO - this is submod.tst()...
2012-03-09 18:22:22,841 - root - INFO - finish test...
可以看出,和预想的一样,然后在看一下tst.log,logger配置中的输出的目的地:
2012-03-09 18:22:22,793 - main - INFO - test main logger
2012-03-09 18:22:22,809 - main - INFO - start import module 'mod'...
2012-03-09 18:22:22,809 - main.mod.submod - INFO - logger of submod say something...
2012-03-09 18:22:22,809 - main.mod - INFO - logger say something...
2012-03-09 18:22:22,809 - main - DEBUG - let's test mod.testLogger()
2012-03-09 18:22:22,825 - main.mod - DEBUG - this is mod.testLogger...
2012-03-09 18:22:22,825 - main.mod.submod - INFO - this is submod.tst()...
tst.log中没有root logger输出的信息,因为logging.conf中配置了只有main logger及其子logger使用RotatingFileHandler,而root logger是输出到标准输出。

Hot AI Tools

Undresser.AI Undress
AI-powered app for creating realistic nude photos

AI Clothes Remover
Online AI tool for removing clothes from photos.

Undress AI Tool
Undress images for free

Clothoff.io
AI clothes remover

AI Hentai Generator
Generate AI Hentai for free.

Hot Article
Hot Tools

Notepad++7.3.1
Easy-to-use and free code editor

SublimeText3 Chinese version
Chinese version, very easy to use

Zend Studio 13.0.1
Powerful PHP integrated development environment

Dreamweaver CS6
Visual web development tools

SublimeText3 Mac version
God-level code editing software (SublimeText3)
Hot Topics
 1378
1378
 52
52

 How to use Debian Apache logs to improve website performance
Apr 12, 2025 pm 11:36 PM
How to use Debian Apache logs to improve website performance
Apr 12, 2025 pm 11:36 PM
This article will explain how to improve website performance by analyzing Apache logs under the Debian system. 1. Log Analysis Basics Apache log records the detailed information of all HTTP requests, including IP address, timestamp, request URL, HTTP method and response code. In Debian systems, these logs are usually located in the /var/log/apache2/access.log and /var/log/apache2/error.log directories. Understanding the log structure is the first step in effective analysis. 2. Log analysis tool You can use a variety of tools to analyze Apache logs: Command line tools: grep, awk, sed and other command line tools.
 Python: Games, GUIs, and More
Apr 13, 2025 am 12:14 AM
Python: Games, GUIs, and More
Apr 13, 2025 am 12:14 AM
Python excels in gaming and GUI development. 1) Game development uses Pygame, providing drawing, audio and other functions, which are suitable for creating 2D games. 2) GUI development can choose Tkinter or PyQt. Tkinter is simple and easy to use, PyQt has rich functions and is suitable for professional development.
 PHP and Python: Comparing Two Popular Programming Languages
Apr 14, 2025 am 12:13 AM
PHP and Python: Comparing Two Popular Programming Languages
Apr 14, 2025 am 12:13 AM
PHP and Python each have their own advantages, and choose according to project requirements. 1.PHP is suitable for web development, especially for rapid development and maintenance of websites. 2. Python is suitable for data science, machine learning and artificial intelligence, with concise syntax and suitable for beginners.
 How debian readdir integrates with other tools
Apr 13, 2025 am 09:42 AM
How debian readdir integrates with other tools
Apr 13, 2025 am 09:42 AM
The readdir function in the Debian system is a system call used to read directory contents and is often used in C programming. This article will explain how to integrate readdir with other tools to enhance its functionality. Method 1: Combining C language program and pipeline First, write a C program to call the readdir function and output the result: #include#include#include#includeintmain(intargc,char*argv[]){DIR*dir;structdirent*entry;if(argc!=2){
 The role of Debian Sniffer in DDoS attack detection
Apr 12, 2025 pm 10:42 PM
The role of Debian Sniffer in DDoS attack detection
Apr 12, 2025 pm 10:42 PM
This article discusses the DDoS attack detection method. Although no direct application case of "DebianSniffer" was found, the following methods can be used for DDoS attack detection: Effective DDoS attack detection technology: Detection based on traffic analysis: identifying DDoS attacks by monitoring abnormal patterns of network traffic, such as sudden traffic growth, surge in connections on specific ports, etc. This can be achieved using a variety of tools, including but not limited to professional network monitoring systems and custom scripts. For example, Python scripts combined with pyshark and colorama libraries can monitor network traffic in real time and issue alerts. Detection based on statistical analysis: By analyzing statistical characteristics of network traffic, such as data
 Python and Time: Making the Most of Your Study Time
Apr 14, 2025 am 12:02 AM
Python and Time: Making the Most of Your Study Time
Apr 14, 2025 am 12:02 AM
To maximize the efficiency of learning Python in a limited time, you can use Python's datetime, time, and schedule modules. 1. The datetime module is used to record and plan learning time. 2. The time module helps to set study and rest time. 3. The schedule module automatically arranges weekly learning tasks.
 Nginx SSL Certificate Update Debian Tutorial
Apr 13, 2025 am 07:21 AM
Nginx SSL Certificate Update Debian Tutorial
Apr 13, 2025 am 07:21 AM
This article will guide you on how to update your NginxSSL certificate on your Debian system. Step 1: Install Certbot First, make sure your system has certbot and python3-certbot-nginx packages installed. If not installed, please execute the following command: sudoapt-getupdatesudoapt-getinstallcertbotpython3-certbot-nginx Step 2: Obtain and configure the certificate Use the certbot command to obtain the Let'sEncrypt certificate and configure Nginx: sudocertbot--nginx Follow the prompts to select
 How to configure HTTPS server in Debian OpenSSL
Apr 13, 2025 am 11:03 AM
How to configure HTTPS server in Debian OpenSSL
Apr 13, 2025 am 11:03 AM
Configuring an HTTPS server on a Debian system involves several steps, including installing the necessary software, generating an SSL certificate, and configuring a web server (such as Apache or Nginx) to use an SSL certificate. Here is a basic guide, assuming you are using an ApacheWeb server. 1. Install the necessary software First, make sure your system is up to date and install Apache and OpenSSL: sudoaptupdatesudoaptupgradesudoaptinsta
