
 Backend Development
PHP Tutorial
How to get user IP on Nginx, the second layer of two-tier server
Backend Development
PHP Tutorial
How to get user IP on Nginx, the second layer of two-tier server
How to get user IP on Nginx, the second layer of two-tier server

How to get user IP on Nginx, the second layer of the two-tier server
1. I encountered a problem when configuring nginx server before. Previously, the server used a function to limit the maximum concurrent connections of the client, and the implementation of this function relied on
$remote-addr
such configuration in the server. achieved. But after adding a front-end layer (load, CDN, firewall, security service) server, the client IP obtained becomes the IP of the front-end server, not the real user IP address.
2. Faced with such a problem, I re-read the introduction of nginx official website several times and found another particularly important variable
$proxy_add_x_forwarded_for
This variable is the value of the X-forwarded-for field in the client access request. If the request does not contain this field, the automatic use of this variable will be equivalent to the remote-addr variable. This allows us to obtain the field of the client's real IP address that is usually saved by the front-end server in the HTTP request, usually what we call the X_FORWARDED_FOR field, and then through this method, we can implement a variety of functions.
Three. Let me give you a simple demonstration below. There are many deficiencies, please correct me.
First we set up the Nginx environment. Here we use the latest version 1.7.9 of the 1.7 series as an example. (For version issues, please see FAQ 1)
Download and WGET required address http://nginx.org/ download/nginx-1.7.9.tar.gz
1. Download Nginx
[lugt@localhostmysql]$ wget http://nginx.org/download/nginx-1.7.9.tar.gz
2. Unzip
[lugt@localhostmysql]$ tar zxvf nginx-1.7.9.tar.gz
3. Compile directly (you need to consider whether you need the support of plug-ins such as openssl)
[lugt@localhost mysql]$cd nginx-1.7. 9
[lugt@localhost nginx-1.7.9]$ ./configure
[lugt@localhost nginx-1.7.9]$ make
[lugt@localhost nginx-1.7.9]$ su
[lugt@ localhostnginx-1.7.9]$ make install
4. Then modify the nginx.conf configuration file
[lugt@localhost nginx-1.7.9]$ su
[lugt@localhost nginx-1.7.9]$cd /usr/local/nginx
[lugt@localhostnginx]$ vi conf/nginx.conf
Then find this in nginx.conf, add it to set up load balancing, imitate CDN
upstream dnsnginx1 {
        server[*.*.*.*/yourhostname]:8080 weight=10000; #填IP、域名
}
server {
        listen       80;
        server_name
#access_log  logs/host.access.log  main
        location /{
           proxy_pass          http://dnsnginx1;
            proxy_set_header    Host             $host;
            proxy_set_header    X-Real-IP        $remote_addr;
            proxy_set_header    X-Forwarded-For  $proxy_add_x_forwarded_for;
            proxy_set_header    HTTP_X_FORWARDED_FOR $remote_addr;
            proxy_redirect      default;
}
}and set up a virtual server at 8080 Port,
limit_conn_zone $proxy_add_x_forwarded_for zone=addr:10m;  # 并发设置 空间10M
server {
        listen       8080;
        server_name  [*.*.*.*/yourhostname]:8080 weight=10000; #填IP、域名
        limit_conn addr 1; #限制客户端最大并发连接数为 1
            location / {
            root   html;
            index  index.html index.htm;
        }
}saved. Then test the configuration file syntax
[lugt@localhostnginx]$ ./sbin/nginx –t
Start the server
[lugt@localhostnginx]$ ./sbin/nginx
IV. Use the ab tool to see the effect.
[lugt@localhost nginx]$ ab –c 10 –n 100 –v 4 http://127.0.0.1/ | grep HTTP/1.1
The meaning of this line: access the address through the AB testing tool, the number of concurrent connections is 30, total test 300 times, display HTTP return header information
Using the ab tool, it can be measured that no matter how many connections are sent at the same time, the only one that successfully returns 200 in the end is the maximum number of concurrent connections that previously limited nginx, so it can be proved that the IP restriction function has been Ready to use. For reference data, see FAQ2
FAQ 1 Version issue
If the Nginx version currently in use has not reached version 1.7.1, it is likely that nginx does not support this function.
At this time, you need to use a piece of code to sandwich the limit_conn_handler function. Get the value of x_forwarded_for from request.
Taking version 1.6.1 as an example, the code is added as follows. src/http/modules/ngx_http_limit_conn.c Line 184
hash =ngx_crc32_short(key.data, key.len);
If(“” == &ctx->key){
<span style="white-space:pre">	</span>If(NULL!= r->main->headers_in->x_forwarded_for->elts){
           key.data= *(char*)r->main->headers_in->x_forwarded_for->elts;
         key.len = 4;
hash =ngx_crc32_short(key.data, key.len);
<span style="white-space:pre"> </span>} } 100-v 4 http://127.0.0.1/ | grep HTTP/1.1
HTTP/1.1503 Service Temporarily UnavailableHTTP/1.1503 Service Temporarily Unavailable
HTTP/1.1 503 Service Temporarily Unavailable
HTTP/1.1503 Service Temporarily Unavailable
HTTP/1.1503 Service Temporarily Unavailable
HTTP/1.1503 Service Temporarily Unavailable
HTTP/1.1503 Service Temporarily Unavailable
HTTP/1.1503 Service Temporarily Unavailable
HTTP/1.1 200 OK
HTTP/ 1.1503 Service Temporarily Unavailable
HTTP/1.1503 Service Temporarily Unavailable
HTTP/1.1503 Service Temporarily Unavailable
HTTP/1.1503 Service Temporarily Unavailable
HTTP/1.1503 Service Temporarily Unavailable
HTTP/1.1503 Service Temporarily Unavailable
HTTP/1.1503 Service Temporarily Unavailable
HTTP/1.1503 Service Temporarily Unavailable
HTTP/1.1503 Service Temporarily Unavailable
HTTP/1.1 200 OK
<… repeated 往下均为重复8次HTTP/503 与1次HTTP/200 交替出现>
English Version
How to retrievethe true ip of the client user if there are two layers of servers
Days before, wehave been faced such a difficulty which is we can’t use the variable $remote_addr for gathering the clients’ip address. This problem surfaces when we used a proxy server between the trueserver and client, which is actually a cdn. And that makes our functions oflimiting the maximum connections a client can make to a server at a time. Thissituation can also found if the load balance or any anti-spam service are inuse. So that’s why we can’t use remote_addr variable further.
After I did someresearch on the documentation and the code , I found out that this problem canbe solved by replacing the
$remote_addr
variable with the
$proxy_add_x_forwarded_for
And now I shall makean easy example to practically use this method.
First of all,build up a Nginx server.
Here, I will usethe 1.7.9 version (latest to the written time) for instance, therefore, thereexist some differences between older versions than 1.7.1 (see FAQ 1)
1. Download A Nginx Copy:
[lugt@localhostmysql]$ wget http://nginx.org/download/nginx-1.7.9.tar.gz
2. Decompress the file
[lugt@localhostmysql]$ tar zxvf nginx-1.7.9.tar.gz
3. Compile The Code
[lugt@localhostmysql]$ cd nginx-1.7.9
[lugt@localhostnginx-1.7.9]$ ./configure
[lugt@localhostnginx-1.7.9]$ make
[lugt@localhostnginx-1.7.9]$ su
[lugt@localhostnginx-1.7.9]$ make install
4. And edit the config file nginx.conf
[lugt@localhost nginx-1.7.9]$ su
[lugt@localhostnginx-1.7.9]$ cd /usr/local/nginx
[lugt@localhostnginx]$ vi conf/nginx.conf
There add suchdirectives to the server1 for emulate for an CDN server
upstream dnsnginx1 {
        server[*.*.*.*/yourhostname]:8080 weight=1000; #fill in your ip/hostname
}
server {
        listen       80;
        server_name  [hostname]   #fill your ip/ hostname here
#access_log  logs/host.access.log  main
        location /{
           proxy_pass          http://dnsnginx1;
            proxy_set_header    Host             $host;
            proxy_set_header    X-Real-IP        $remote_addr;
            proxy_set_header    X-Forwarded-For  $proxy_add_x_forwarded_for;
            proxy_set_header    HTTP_X_FORWARDED_FOR $remote_addr;
            proxy_redirect      default;
}
}
After the end ofone server directive, and in the http directive, add so to function the sever2
limit_conn_zone $proxy_add_x_forwarded_for zone=addr:10m;  # sample setting
server {
        listen       8080;
        server_name  [*.*.*.*/hostname]:8080 weight=10000; #fill in ip/hostname here
        limit_conn addr 1; # Enablethe limitation of connection per ip at a time to 1.

            location / {
            root   html;
            index  index.html index.htm;
        }
}And then you cansave , test the config file and run nginx
Test your configfile:
[lugt@localhostnginx]$ ./sbin/nginx –t
Start the nginx server
[lugt@localhostnginx]$ ./sbin/nginx
Now, the serverhas been set and you can run a test at instance.
/* This CommandMeans to run a tool to connect to server as 10conn/once and 10 conns in total*/
[lugt@localhost~]$ ab -c 10 -n 100 -v 4 http://127.0.0.1/ | grep HTTP/1.1
FAQ 1
There is actuallysome little malfunctions when using elder versions than 1.7.1 (Probably the newversion has it for a new feature).So to use this directive in earlier versions,some code need to be added.
As a Example inthe version 1.6.1
In filesrc/http/modules/ngx_http_limit_conn.c Line around 184
hash =ngx_crc32_short(key.data, key.len);
If("" == &ctx->key){
    If(NULL!= r->main->headers_in->x_forwarded_for->elts){
           key.data= *(char*)r->main->headers_in->x_forwarded_for->elts;
         key.len = 4;
hash =ngx_crc32_short(key.data, key.len);
}}<span style="font-family: Arial, Helvetica, sans-serif;"> </span>
FAQ 2 TestingResults
[lugt@localhost~]$ ab -c 10 -n 100 -v 4 http://127.0.0.1/ | grep HTTP/1.1
HTTP/1.1503 Service Temporarily Unavailable
HTTP/1.1503 Service Temporarily Unavailable
HTTP/1.1503 Service Temporarily Unavailable
HTTP/1.1503 Service Temporarily Unavailable
HTTP/1.1503 Service Temporarily Unavailable
HTTP/1.1503 Service Temporarily Unavailable
HTTP/1.1503 Service Temporarily Unavailable
HTTP/1.1503 Service Temporarily Unavailable
HTTP/1.1503 Service Temporarily Unavailable
HTTP/1.1 200 OK
HTTP/1.1503 Service Temporarily Unavailable
HTTP/1.1503 Service Temporarily Unavailable
HTTP/1.1503 Service Temporarily Unavailable
HTTP/1.1503 Service Temporarily Unavailable
HTTP/1.1503 Service Temporarily Unavailable
HTTP/1.1503 Service Temporarily Unavailable
HTTP /1.1503 Service Temporarily Unavailable
HTTP/1.1503 Service Temporarily Unavailable
HTTP/1.1503 Service Temporarily Unavailable
HTTP/1.1 200 OK
<… repeated as 8times of HTTP/503 and 1 time of HTTP/200 and so on&g t ;
The above introduces how to obtain the user IP on the second layer Nginx of the two-layer server, including the relevant content. I hope it will be helpful to friends who are interested in PHP tutorials.

Hot AI Tools

Undresser.AI Undress
AI-powered app for creating realistic nude photos

AI Clothes Remover
Online AI tool for removing clothes from photos.

Undress AI Tool
Undress images for free

Clothoff.io
AI clothes remover

AI Hentai Generator
Generate AI Hentai for free.

Hot Article
Hot Tools

Notepad++7.3.1
Easy-to-use and free code editor

SublimeText3 Chinese version
Chinese version, very easy to use

Zend Studio 13.0.1
Powerful PHP integrated development environment

Dreamweaver CS6
Visual web development tools

SublimeText3 Mac version
God-level code editing software (SublimeText3)
Hot Topics


 Solution: Your organization requires you to change your PIN
Oct 04, 2023 pm 05:45 PM
Solution: Your organization requires you to change your PIN
Oct 04, 2023 pm 05:45 PM
The message "Your organization has asked you to change your PIN" will appear on the login screen. This happens when the PIN expiration limit is reached on a computer using organization-based account settings, where they have control over personal devices. However, if you set up Windows using a personal account, the error message should ideally not appear. Although this is not always the case. Most users who encounter errors report using their personal accounts. Why does my organization ask me to change my PIN on Windows 11? It's possible that your account is associated with an organization, and your primary approach should be to verify this. Contacting your domain administrator can help! Additionally, misconfigured local policy settings or incorrect registry keys can cause errors. Right now
 How to adjust window border settings on Windows 11: Change color and size
Sep 22, 2023 am 11:37 AM
How to adjust window border settings on Windows 11: Change color and size
Sep 22, 2023 am 11:37 AM
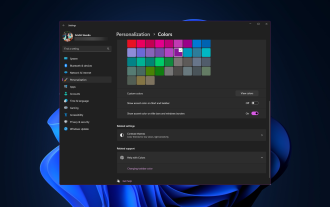
Windows 11 brings fresh and elegant design to the forefront; the modern interface allows you to personalize and change the finest details, such as window borders. In this guide, we'll discuss step-by-step instructions to help you create an environment that reflects your style in the Windows operating system. How to change window border settings? Press + to open the Settings app. WindowsI go to Personalization and click Color Settings. Color Change Window Borders Settings Window 11" Width="643" Height="500" > Find the Show accent color on title bar and window borders option, and toggle the switch next to it. To display accent colors on the Start menu and taskbar To display the theme color on the Start menu and taskbar, turn on Show theme on the Start menu and taskbar
 How to change title bar color on Windows 11?
Sep 14, 2023 pm 03:33 PM
How to change title bar color on Windows 11?
Sep 14, 2023 pm 03:33 PM
By default, the title bar color on Windows 11 depends on the dark/light theme you choose. However, you can change it to any color you want. In this guide, we'll discuss step-by-step instructions for three ways to change it and personalize your desktop experience to make it visually appealing. Is it possible to change the title bar color of active and inactive windows? Yes, you can change the title bar color of active windows using the Settings app, or you can change the title bar color of inactive windows using Registry Editor. To learn these steps, go to the next section. How to change title bar color in Windows 11? 1. Using the Settings app press + to open the settings window. WindowsI go to "Personalization" and then
 OOBELANGUAGE Error Problems in Windows 11/10 Repair
Jul 16, 2023 pm 03:29 PM
OOBELANGUAGE Error Problems in Windows 11/10 Repair
Jul 16, 2023 pm 03:29 PM
Do you see "A problem occurred" along with the "OOBELANGUAGE" statement on the Windows Installer page? The installation of Windows sometimes stops due to such errors. OOBE means out-of-the-box experience. As the error message indicates, this is an issue related to OOBE language selection. There is nothing to worry about, you can solve this problem with nifty registry editing from the OOBE screen itself. Quick Fix – 1. Click the “Retry” button at the bottom of the OOBE app. This will continue the process without further hiccups. 2. Use the power button to force shut down the system. After the system restarts, OOBE should continue. 3. Disconnect the system from the Internet. Complete all aspects of OOBE in offline mode
 How to enable or disable taskbar thumbnail previews on Windows 11
Sep 15, 2023 pm 03:57 PM
How to enable or disable taskbar thumbnail previews on Windows 11
Sep 15, 2023 pm 03:57 PM
Taskbar thumbnails can be fun, but they can also be distracting or annoying. Considering how often you hover over this area, you may have inadvertently closed important windows a few times. Another disadvantage is that it uses more system resources, so if you've been looking for a way to be more resource efficient, we'll show you how to disable it. However, if your hardware specs can handle it and you like the preview, you can enable it. How to enable taskbar thumbnail preview in Windows 11? 1. Using the Settings app tap the key and click Settings. Windows click System and select About. Click Advanced system settings. Navigate to the Advanced tab and select Settings under Performance. Select "Visual Effects"
 Display scaling guide on Windows 11
Sep 19, 2023 pm 06:45 PM
Display scaling guide on Windows 11
Sep 19, 2023 pm 06:45 PM
We all have different preferences when it comes to display scaling on Windows 11. Some people like big icons, some like small icons. However, we all agree that having the right scaling is important. Poor font scaling or over-scaling of images can be a real productivity killer when working, so you need to know how to customize it to get the most out of your system's capabilities. Advantages of Custom Zoom: This is a useful feature for people who have difficulty reading text on the screen. It helps you see more on the screen at one time. You can create custom extension profiles that apply only to certain monitors and applications. Can help improve the performance of low-end hardware. It gives you more control over what's on your screen. How to use Windows 11
 10 Ways to Adjust Brightness on Windows 11
Dec 18, 2023 pm 02:21 PM
10 Ways to Adjust Brightness on Windows 11
Dec 18, 2023 pm 02:21 PM
Screen brightness is an integral part of using modern computing devices, especially when you look at the screen for long periods of time. It helps you reduce eye strain, improve legibility, and view content easily and efficiently. However, depending on your settings, it can sometimes be difficult to manage brightness, especially on Windows 11 with the new UI changes. If you're having trouble adjusting brightness, here are all the ways to manage brightness on Windows 11. How to Change Brightness on Windows 11 [10 Ways Explained] Single monitor users can use the following methods to adjust brightness on Windows 11. This includes desktop systems using a single monitor as well as laptops. let's start. Method 1: Use the Action Center The Action Center is accessible
 How to turn off private browsing authentication for iPhone in Safari?
Nov 29, 2023 pm 11:21 PM
How to turn off private browsing authentication for iPhone in Safari?
Nov 29, 2023 pm 11:21 PM
In iOS 17, Apple introduced several new privacy and security features to its mobile operating system, one of which is the ability to require two-step authentication for private browsing tabs in Safari. Here's how it works and how to turn it off. On an iPhone or iPad running iOS 17 or iPadOS 17, Apple's browser now requires Face ID/Touch ID authentication or a passcode if you have any Private Browsing tab open in Safari and then exit the session or app to access them again. In other words, if someone gets their hands on your iPhone or iPad while it's unlocked, they still won't be able to view your privacy without knowing your passcode
