

Laravel 5 documentation reading summary

Laravel 5Project structure analysis and Chinese document reading summary
HTTProuting
Middleware
Controller
HTTPRequest
http Service Providers
Service Container
Contracts
Facades
Request lifecycle
Application structure
Certification
Cache
Collection
Artisan Console
Extension Framework*
Laravel Elixir*
Encryption
Errors and Logs
Events File System / Cloud Storage Hash Auxiliary methods Localization* Mail* Expansion Pack Development* Pagination* Queue* Session BladeTemplate Unit Test* Data verification Structure Generator Migration and Data Population
HTTP routing Basic routing Define routes for different Http Method, such as: Route::get('/', function(){ Route: : post('foo/bar', function(){ Route::match(['get', 'post'], '/', function(){ # Multiple methods Route::any('foo', function(){ # All methods use the url method to generate url: $url = url('foo'); CSRFprotection Laravel will automatically place a random token in each user’s session. The VerifyCsrfToken middleware pairs the request saved in the session with the input token to verify the token. In addition to looking for the CSRF token as the "POST" parameter, the middleware also checks the X-XSRF-TOKEN request header. Insert CSRF Token into the form:
in Blade template engine using :
added to the X-XSRF-TOKEN request header : csrf_token()}}" /> $.ajaxSetup ({ headers: { } ... # In this way, all ajax requests will carry this header information: $.ajax({ }) method cheat
Route parameters
Route::get('user/
{id} ', function($id){ #
Basic parametersRoute::get('user/{name?}', function($name = null){ #
Optional parametersRoute::get('user/{name?}', function(
$name = 'John'){ # Parameters with default values You can define the global mode of parameters. Define the mode in the
bootmethod of RouteServiceProvider
: $router-&g t;pattern('id ', '[0-9]+');
will be applied to all routes using this specific parameter:
Route::get('user/{id}', function($id)
if (
$route->input('id')== 1){ #
External to the route Get parametersYou can also get parameters through dependency injection:
use IlluminateHttp
Request;
Route::get('user/{ id}', function(Request $request, $id){
if ($request->route('id')){
Route naming
Route::get('user/profile', [
'as' => 'profile', function(){
#
Specify the route name for the controller action
Route::get('user/profile', [ 'as' => 'profile', 'uses' => 'UserController@showProfile' ]); # Use named routes for redirection $url = route('profile'); $redirect = redirect ()-> route('profile'); # Returns the name of the current route request $name = Route:: currentRouteName();
Route Group Treat shared properties as an array as Route::groupFirst parameter: # Shared middleware Route::group(['middleware' => ['foo', 'bar']], function() { Route::get('/', function() { Route::get('user/profile', function() { // Has Foo And Bar Middleware }); }); # In the above example, foo and bar are the middleware key names. The mapping relationship between the key name and class name of the customized middleware needs to be added in Kernel.php. # Shared namespace 'namespace' => 'Admin'], function() => 'User'], function () { // Controllers Within The "AppHttpControllersAdminUser" Namespace }) ; Subdomain routing Route::group(['domain' => ' .myapp.com'], function() { Route::get('user/{id}', function($account, $id) { ); }); Route::group([ => 'admin'], function() { Route::get('users', function() { // Matches The "/admin/users }); });
# is defined in the routing prefix Parameters Route::group(['prefix' => 'accounts/{account_id} { Route ::get('detail', function($account_id) Route model binding model Binding provides a convenient way to inject model entities into routes User ID, you can choose to inject User class entities that match the given ID . Define model binding in the RouteServiceProvider::boot method: public function boot(Router $router){ parent::boot($router ; {user} Parameter route: Route::get('profile/{user} AppUser $user){ ) / / }); profile/1 will inject the ID for the 1 entityUser . If the entity does not exist, throw 404. You can pass a closure as the third parameter to define the behavior when it is not found. throws 404 error Two methods: abort (404); # Essentially throws a SymfonyComponentHttpKernelExceptionHttpException with a specific status code. Or: manually throw HttpException
middleware New middleware php artisan make:middleware OldMiddleware # Create a new middlewareThe main function of the middleware is implemented in the handle() class OldMiddleware { public function handle($request, Closure $next){ if (xxx){ return redirect('xx'); 🎙 } Analyzing its structure, we can find that it is basically the execution Make a judgment, and then redirect or continue forward. Global middleware If you want the middleware to be executed by all HTTP requests, just add the middleware class to app/Http/ Kernel.php $middleware property list. Assign middleware to routing After creating the new middleware, go to app/Http/Kernel.php Add middle in $routeMiddleware The mapping relationship between the file key name and the class name, and then you can use this key name in routing to assign routes: Route::get('admin/profile', ['middleware' => 'auth', function(){
Terminable middleware Terminable middleware needs to inherit from TerminableMiddleware and implement terminate() Method. Its purpose is to execute after the HTTP response has been sent to the client. Terminable middleware needs to be added to the global middleware list of app/Http/Kernel.php .
Controller Basic Controller All controllers should extend the base controller class use AppHttpControllers Controller; class UserController extends Controller { # Inherits Controller public function showProfile($id ) # Action { AppHttpControllersController is defined as follows: namespace BorogadiHttpControllers; use IlluminateFoundationBusDispatchesJobs; use as BaseController;use IlluminateFoundationValidationValidatesRequests; abstract class Controller extends BaseController { use DispatchesJobs, ValidatesRequests; }It can be seen that it is ultimately inherited from the IlluminateRoutingController class. # Named controller route Route::get('foo', ['uses' => 'FooController@method', 'as ' => 'name']); # URL pointing to the controller $url = action('AppHttpControllersFooController@ method'); URL::setRootControllerNamespace $url = action('FooController@
Two ways, one is to specify in the controller route: 'middleware'
'uses' => 'UserController@showProfile' ]); The other is Specify directly in the controller constructor: class UserController extends Controller { public function __construct(){ (' auth'); $this->middleware Implicit controller Implicit controller implementation defines a single route to handle each behavior in the controller: Route ::controller('users', 'UserController'); Define the implementation of the controller class: class UserController extends BaseController { public function getIndex (){ # Response to user public function postProfile(){ # Response to post way user/profile
Public function anyLogin(){ # Response to all methods of user/login It is possible to support multi-word controller behavior by using "-": public function getAdminProfile() {} # Response to users/admin-profile , not user/adminprofile. Pay attention to the camel case naming method used in the action name
RESTfulResource controller is actually a specific application of implicit controller.
Route cache If only controller routing is used in the application, route caching can be used to improve performance. php artisan route:cache The cache route file will be used instead of the app/Http/routes.php file HTTP request Get the request in two ways, one is through the Request facade: use Request; $name = Request::input('name'); or via dependency injection: use type hints on the class in the constructor or method in the controller. The currently requested instance will be automatically injected by the service container: use IlluminateHttpRequest; use IlluminateRoutingController; class UserController extends Controller { public function store(Request$request){ $name ; request, $id Get input data $name = Request::input('name') ; # Get specific input data $name = Request::input('name', 'Sally'); # Get specific input data, if not, get the default value if (Request::has('name')){ # Confirm whether there is input data $input = Request::all # Get all input data$input = Request::only # Get some input data $input = Request::except # Get partial input data exclusion method$input = Request::input('products.0.name'); # Get data in array form old input data Request::flash(); # Save the current input data into session中 Request:: flashOnly('username', 'email'); # Save some data into session Request:: ('password'); # Save some data as session, elimination method withInput(); # Redirect and cache the current input data to session return redirect('form')->withInput(Request::except('password')); # Redirect and cache part of the current input data to session $username = Request::old('username'); # Get the one-time Session {{ old(' username') }} # Showing old input data in bladetemplate Cookies L cookie created by aravel Encrypt and add authentication mark. $value = Request::cookie('name'); # Get the Cookievalue #In response Add Cookies $response = new IlluminateHttpResponse('Hello World'); $response->withCookie (cookie('name', 'value' , $minutes)); $response->withCookie(cookie()->forever('name', 'value')); # Add Permanent Cookie # Add Cookie in queue mode, that is, set Cookie before actually sending the response Cookie::queue ('name', 'value'); return response('Hello World'); $file = Request: ; :file('photo')->isValid()) # Confirm whether the uploaded file is valid
Request::file('photo')->move($destinationPath); # Move Uploaded file Request::file('photo')->move($destinationPath, $fileName); # Move the uploaded file and rename it Other request information $uri = Request::path(); # Get request if (Request::ajax()) # Determine whether a request uses AJAX if (Request::isMethod('post'))
if (Request::is('admin/*')) # Confirm whether the request path meets the specific format $url = Request::url(); # URL HTTP response Basic response Route ::get('/', function(){ # return string return 'Hello World';
# Return to complete Responses return Responses object:
use IlluminateHttpResponse; return (new Response($content, $status)) - ->header('Content-Type', $value); or use auxiliary Method: return response($content, $status)->header('Content-Type', $value);
# Return to view return response()-> return response($content)-> withCookie( cookie('name', 'value')); Redirect return redirect('user/login'); # Use redirect method return redirect ('user/login')-> ;with('message', 'Login Failed'); # Redirect and save the current data to Sessionreturn redirect()->back () ; # Redirect to previous locationreturn redirect()-> route('login'); # Redirect to specific route # Redirect to a specific route with parameters return redirect()->route('profile', [1]); # The URI profile/{id} return redirect()->route('profile', ['user' => 1]); # routed URI is: profile/{user} # Redirect based on controller actionreturn redirect()->action ('AppHttpControllersHomeController@index'); return redirect()->action('AppHttpControllersUserController@profile', ['user' => 1]); # With parameters Other responses # returnjson
return response()-> ;json(['name' => 'Abigail', 'state' => 'CA']); >json([' name' => 'Abigail', 'state' => 'CA']) - ->setCallback($request->input('callback')); # File download
return response()->download($pathToFile, $name, $headers); Response Macro # Define the response macro, usually defined in the Provider method Response::macro ('caps', function($value) ($response){ # PHPBy default, anonymous functions cannot call the context variables of the code block in which they are located, but need to use the use keyword. use will copy a copy of the variable into the closure, and also supports reference forms, such as use ( &$rmb ) return $response->make(strtoupper( $value)); # Call the response macroreturn response()- >caps(' foo'); ViewBasic view # View definition File path and file name: resources/views/greeting.php
# View call Route::get('/', function() { return view( 'greeting' 'name' => 'James']); The parameter passed to the view is an array of key-value pairs}); Subfolder view call Definition location: resources/views/
return view(' admin.profile ', $data); # Other ways to pass data to the view $view = view('greeting')-> ( 'name', 'Victoria'); # Traditional method $view = view('greeting')->withName('Victoria'); # Magic Method $view = view('greetings', $data); # Directly pass the array $data is an array of key-value pairs # Share data to all views Customize a Provider boot method of AppServiceProvider view( )->share('data', [1, 2, 3]); or: View::share('data', [1, 2 , 3]);
# Confirm whether the view exists if (view()->exists ('emails .customer')) # Generate a view from a file path return view()->file ($pathToFile, $data); View componentView component is a closure or class method that is called before the view is rendered.
#
use View; use IlluminateSupportServiceProvider; View:: ('profile', 'AppHttpViewComposersProfileComposer'); #指 Use a class to specify the view component View :: composer ('dashboard', function ($ view) { # Use closure to specify the view component ... Use classes to specify view components, The method named compose of the specified class will be called before the view is rendered. As in the above example, the class is defined as: use IlluminateContractsViewView; use IlluminateUsersRepository as UserRepository; class ProfileComposer { protected $users; public function __construct(UserRepository $users){ # service container will automatically parse the required parameters Public function compose(View $view){ # The compose method is passed an instance of View, where parameters can be passed to View $ view->with('count', $this->users->count()); } } #
View::composer('*', function($view){ # is equivalent to defining it for all views #
View::composer(['profile', 'dashboard'], 'AppHttpViewComposersMyViewComposer'); #
View::composers([ 'AppHttpViewComposersAdminComposer' => ['admin.index', 'admin.profile'], 'AppHttpViewComposersUserComposer ' => 'user', 'AppHttpViewComposersProductComposer' => 'product' ]); Service Providers
Each custom Provider must inherit from ServiceProvider and be registered in the Providers array in config/app.php. The custom Provider must define the register() method, which is used to define the behavior during registration. In addition, there are two optional methods and an optional attribute: the boot() method will not be called until all Provider have been loaded, and the provides()method Used in conjunction with the $defer optional attribute to provide the buffering function. The idea of providing services through service providers: implement a class that completes the actual work, define a Provider, and use it in the method of Provider Methods to register the actual work class with the system container and obtain the actual work class instance. Then register this Provider in the application configuration. In this way, the register() method of all Provider will be called when the application is initialized to indirectly register the way to obtain the actual working class instance. # Provider use RiakConnection; use IlluminateSupportServiceProvider ) # Register a class in the container and obtain its instance Method Return new Connection($app['config' ]['riak']); ; Service Container Basic usage in Inside the , the service container can be accessed through . There are two main ways to register dependencies: callback interface method and binding instance interface. # The way of closure callback$this->app->bind('FooBar', function($app){ Return new FooBar($app['SomethingElse']); });
# Registered as a singleton, subsequent calls will return the same instance $this->app->singleton('FooBar', function($app){ return new FooBar($app['SomethingElse']); }); # Bind to an existing instance $fooBar = new FooBar(new SomethingElse); $this ->app->instance('FooBar', $fooBar); There are two ways to resolve the instance from the container: # Use the make() method to parse $fooBar = $this->app['FooBar']; # Because the container implements the ArrayAccess interface, you can use the array access form After defining the registration and parsing information, you can directly use it in the constructor of the class Specify the required dependencies via type-hint , and the container will automatically inject all the required dependencies. use IlluminateRoutingController; AppUsersRepository as UserRepository;class UserController extends Controller { protected $users; public function __construct( UserRepository $users){ $users; } public function show($id){ } Binding interface interface { Public function push($event, array $data); } class implements EventPusher { ... } Because the PusherEventPusher class implements EventPusher Interface, so you can directly register this interface and bind it to a class that implements this interface: $this->app-> ('AppContractsEventPusher', 'AppServicesPusherEventPusher '); When a class requires the EventPusher interface, it will tell the container that it should inject PusherEventPusher. $this->app->when needs('AppContractsEventPusher') tPusher'); tag $this->app->bind('SpeedReport', function(){ }); $this->app->bind ('MemoryReport', function (){ }); reports'); Tag the class registered in the previous two steps as 'reports' Parse them properly:
$this->app->bind('ReportAggregator', function($app){ ) return new ReportAggregator($app->tagged ('reports'));
}); Container events The container will trigger an event when parsing each object. You can use the resolving method to listen for this event (the parsed object will be passed into the closure method): $this->app->resolving(function($object, $app){ # Called when the container resolves any type of dependency
... });$this->app- >resolving(function(FooBar $fooBar, $app){ # 'FooBar' ... });
main component implementations , you can see it under the Contracts
directory The directory structure is the same as inIlluminate.
Contractsis the interface definition,
Illuminateis the specific implementation. Each concrete implemented class in Illuminate
extends its corresponding interface inContracts. This separation of interface and implementation can make dependency injection low-coupling. /laravel/framework/src
/Illuminate
/Auth
/Broadcasting
/Bus
...
/Contracts
/Auth
/Broadcasting
/Bus
...
FacadesBasic usage
Facades provide a static interface to classes that can be accessed in the application's
service container. (An application of "decoration mode" in design pattern mainly uses class_alias
to create category names, and also uses__callStatic() to provide a static proxy, which is ultimately simulated using a mock object
PHPobject and call the object's method)
Laravel's facades and any custom facades you create, will inherit the base class Facade and only need to implement one method: getFacadeAccessor() .
Such as CacheThis facade is called: $value = Cache::get( 'key');
Look at the implementation of the class:
class Cache extends Facade {
protected static function getFacadeAccessor() { return 'cache'; } # This The function of the method is to return the name of the service container binding
}
When the user executes any static method on the Cache's facade, Laravel Will resolve the bound cache from the service container and execute the requested method (in this example, get)
on that object All facades exist in the global namespace. When used in a nested namespace, you need to import the facade class into the namespace:
use Cache; # ImportCache facade
class PhotosController extends Controller {
public function index(){
$ photos = Cache::get('photos');
}
}

Hot AI Tools

Undresser.AI Undress
AI-powered app for creating realistic nude photos

AI Clothes Remover
Online AI tool for removing clothes from photos.

Undress AI Tool
Undress images for free

Clothoff.io
AI clothes remover

Video Face Swap
Swap faces in any video effortlessly with our completely free AI face swap tool!

Hot Article
Hot Tools

Notepad++7.3.1
Easy-to-use and free code editor

SublimeText3 Chinese version
Chinese version, very easy to use

Zend Studio 13.0.1
Powerful PHP integrated development environment

Dreamweaver CS6
Visual web development tools

SublimeText3 Mac version
God-level code editing software (SublimeText3)
Hot Topics
 1386
1386
 52
52

 Solution: Your organization requires you to change your PIN
Oct 04, 2023 pm 05:45 PM
Solution: Your organization requires you to change your PIN
Oct 04, 2023 pm 05:45 PM
The message "Your organization has asked you to change your PIN" will appear on the login screen. This happens when the PIN expiration limit is reached on a computer using organization-based account settings, where they have control over personal devices. However, if you set up Windows using a personal account, the error message should ideally not appear. Although this is not always the case. Most users who encounter errors report using their personal accounts. Why does my organization ask me to change my PIN on Windows 11? It's possible that your account is associated with an organization, and your primary approach should be to verify this. Contacting your domain administrator can help! Additionally, misconfigured local policy settings or incorrect registry keys can cause errors. Right now
 How to adjust window border settings on Windows 11: Change color and size
Sep 22, 2023 am 11:37 AM
How to adjust window border settings on Windows 11: Change color and size
Sep 22, 2023 am 11:37 AM
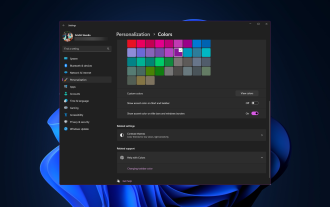
Windows 11 brings fresh and elegant design to the forefront; the modern interface allows you to personalize and change the finest details, such as window borders. In this guide, we'll discuss step-by-step instructions to help you create an environment that reflects your style in the Windows operating system. How to change window border settings? Press + to open the Settings app. WindowsI go to Personalization and click Color Settings. Color Change Window Borders Settings Window 11" Width="643" Height="500" > Find the Show accent color on title bar and window borders option, and toggle the switch next to it. To display accent colors on the Start menu and taskbar To display the theme color on the Start menu and taskbar, turn on Show theme on the Start menu and taskbar
 How to change title bar color on Windows 11?
Sep 14, 2023 pm 03:33 PM
How to change title bar color on Windows 11?
Sep 14, 2023 pm 03:33 PM
By default, the title bar color on Windows 11 depends on the dark/light theme you choose. However, you can change it to any color you want. In this guide, we'll discuss step-by-step instructions for three ways to change it and personalize your desktop experience to make it visually appealing. Is it possible to change the title bar color of active and inactive windows? Yes, you can change the title bar color of active windows using the Settings app, or you can change the title bar color of inactive windows using Registry Editor. To learn these steps, go to the next section. How to change title bar color in Windows 11? 1. Using the Settings app press + to open the settings window. WindowsI go to "Personalization" and then
 OOBELANGUAGE Error Problems in Windows 11/10 Repair
Jul 16, 2023 pm 03:29 PM
OOBELANGUAGE Error Problems in Windows 11/10 Repair
Jul 16, 2023 pm 03:29 PM
Do you see "A problem occurred" along with the "OOBELANGUAGE" statement on the Windows Installer page? The installation of Windows sometimes stops due to such errors. OOBE means out-of-the-box experience. As the error message indicates, this is an issue related to OOBE language selection. There is nothing to worry about, you can solve this problem with nifty registry editing from the OOBE screen itself. Quick Fix – 1. Click the “Retry” button at the bottom of the OOBE app. This will continue the process without further hiccups. 2. Use the power button to force shut down the system. After the system restarts, OOBE should continue. 3. Disconnect the system from the Internet. Complete all aspects of OOBE in offline mode
 How to enable or disable taskbar thumbnail previews on Windows 11
Sep 15, 2023 pm 03:57 PM
How to enable or disable taskbar thumbnail previews on Windows 11
Sep 15, 2023 pm 03:57 PM
Taskbar thumbnails can be fun, but they can also be distracting or annoying. Considering how often you hover over this area, you may have inadvertently closed important windows a few times. Another disadvantage is that it uses more system resources, so if you've been looking for a way to be more resource efficient, we'll show you how to disable it. However, if your hardware specs can handle it and you like the preview, you can enable it. How to enable taskbar thumbnail preview in Windows 11? 1. Using the Settings app tap the key and click Settings. Windows click System and select About. Click Advanced system settings. Navigate to the Advanced tab and select Settings under Performance. Select "Visual Effects"
 Display scaling guide on Windows 11
Sep 19, 2023 pm 06:45 PM
Display scaling guide on Windows 11
Sep 19, 2023 pm 06:45 PM
We all have different preferences when it comes to display scaling on Windows 11. Some people like big icons, some like small icons. However, we all agree that having the right scaling is important. Poor font scaling or over-scaling of images can be a real productivity killer when working, so you need to know how to customize it to get the most out of your system's capabilities. Advantages of Custom Zoom: This is a useful feature for people who have difficulty reading text on the screen. It helps you see more on the screen at one time. You can create custom extension profiles that apply only to certain monitors and applications. Can help improve the performance of low-end hardware. It gives you more control over what's on your screen. How to use Windows 11
 What are the differences between Huawei GT3 Pro and GT4?
Dec 29, 2023 pm 02:27 PM
What are the differences between Huawei GT3 Pro and GT4?
Dec 29, 2023 pm 02:27 PM
Many users will choose the Huawei brand when choosing smart watches. Among them, Huawei GT3pro and GT4 are very popular choices. Many users are curious about the difference between Huawei GT3pro and GT4. Let’s introduce the two to you. . What are the differences between Huawei GT3pro and GT4? 1. Appearance GT4: 46mm and 41mm, the material is glass mirror + stainless steel body + high-resolution fiber back shell. GT3pro: 46.6mm and 42.9mm, the material is sapphire glass + titanium body/ceramic body + ceramic back shell 2. Healthy GT4: Using the latest Huawei Truseen5.5+ algorithm, the results will be more accurate. GT3pro: Added ECG electrocardiogram and blood vessel and safety
 10 Ways to Adjust Brightness on Windows 11
Dec 18, 2023 pm 02:21 PM
10 Ways to Adjust Brightness on Windows 11
Dec 18, 2023 pm 02:21 PM
Screen brightness is an integral part of using modern computing devices, especially when you look at the screen for long periods of time. It helps you reduce eye strain, improve legibility, and view content easily and efficiently. However, depending on your settings, it can sometimes be difficult to manage brightness, especially on Windows 11 with the new UI changes. If you're having trouble adjusting brightness, here are all the ways to manage brightness on Windows 11. How to Change Brightness on Windows 11 [10 Ways Explained] Single monitor users can use the following methods to adjust brightness on Windows 11. This includes desktop systems using a single monitor as well as laptops. let's start. Method 1: Use the Action Center The Action Center is accessible
